Imagine finishing your video shoot and noticing unwanted objects in the frame; the quickest fix is to blur video using top video editing tools. Blur effects in videos mean adding a soft, out-of-focus impact to parts of a video (faces, text/logo, license plates, or other private information). But what tools do you need, and how do you go about the video blurring process?
This step-by-step guide will teach you how to make your video blurry using one of the best video editing software. Continue reading.
In this article
Part 1: When Blurring Videos
Videos can unintentionally reveal personal details like home addresses, license plates, or faces of actors. Again, certain platforms use facial recognition software that recognizes users in videos. So, even if you're not tagged, algorithms might still match your face with existing data, compromising your anonymity. This is where the need to add blur to video comes in and below are reasons why blurring videos is important.
- Helps in privacy protection: Adding blur to videos is essential if you have to post videos online or on social media platforms where privacy concerns are prevalent.
- Removes distractions: This is true since blurring backgrounds or unwanted objects can help viewers focus on the main subject.
- Create a cinematic effect and adds a professional touch to the content: Filmmakers use it to set the mood, build suspense, or direct attention to a specific element.
- Adds layers of mystery or excitement: The video blur effect, when applied to travel, gaming, and unboxing videos, helps increase viewer engagement.
Part 2: What You Need to Make Video Blurry
To add blur in videos, you need video editing software that supports various blurring effects and allows you to apply these effects with ease. You also need a computer or mobile device that meets the software's requirements, especially for handling high-resolution videos.
For example, a PC used to edit videos should have a good processor, such as an Intel i5 or AMD Ryzen 5, and 4 to 8GB of RAM. For complex projects, consider 16GB of RAM or more and a dedicated graphics card, such as the NVIDIA GTX series. These components boost performance by handling complex video effects.
In terms of video editing software, choose apps like Wondershare Filmora that offers blur effects like Gaussian blur, motion blur, masking effects, and Mosaic blur:
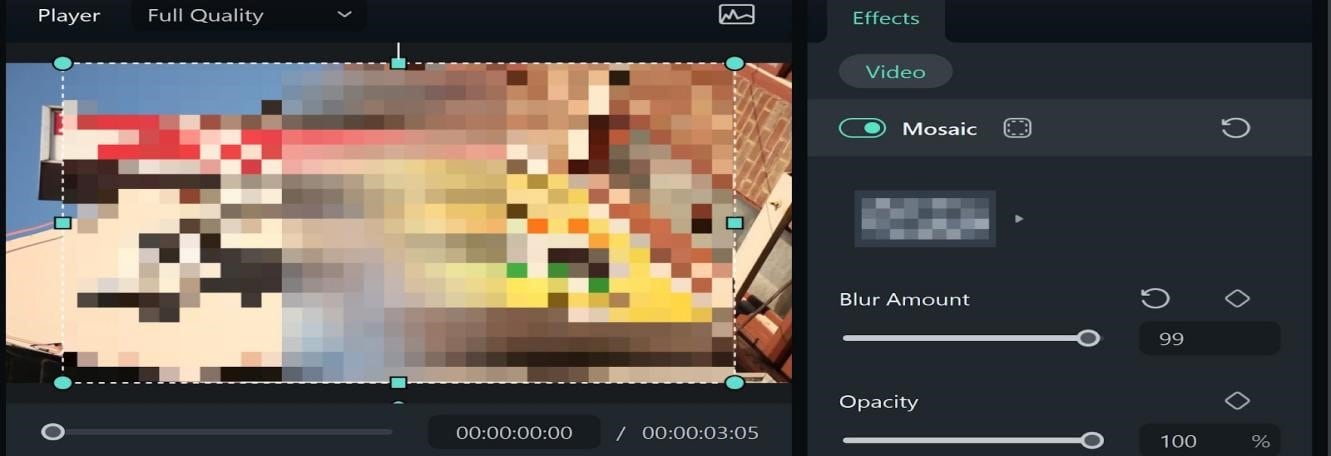
- Gaussian blur: This blur acts as a low-pass filter, smoothing out pixel values and reducing unevenness in any photo. Photographers use Gaussian blur to keep the subject sharp while muting distractions in the background.
- Motion blur: This blur effect turns a dull image into a striking visual by adding an illusion of motion. Blurring moving objects creates streaks or blurs in the direction of their movement, making the image come to life.
- Mask effects: The masking feature lets you hide one object while editing another. It allows you to apply effects, transitions, and more to a single object in a video.
- Mosaic blur effect: Mosaic blur lets you blur a specific area or the entire video. The blurred area stays in place even as the video plays.
Filmora is a a highly-recommended editing software that you can use to add or edit blur in videos, as it offers a range of blur effects that you can apply with a few clicks. This video editing software runs well on most modern computers and mobile devices, ensuring a smooth editing experience even with basic hardware setups. So, if your question right now is: "Why should I use Filmora to blur my videos?" the next section explains why this software is your best bet.
- Automatic face detection effortlessly.
- Customizable blur effect with more flexibility.
- Multiple face blurring at a time.
- Works on Mac, Windows, iOS, and Android.

Part 3: Why Choose Filmora to Blur Videos?
Filmora is ideal for beginners and experienced editors looking to work with diverse media types. It is among the top recommended tools you can use to make videos blurry because of its robust features and easy-to-use interface. These include:
- Boasts over 300 dazzling built-in blur effects, perfect for any video project.
- The standout feature, AI Face Mosaic, automatically tracks and blurs faces in real-time.
- Drag-and-drop interface makes it incredibly easy to apply different blur effects, making it a breeze even for beginners.
- With a motion tracking feature, you can apply blur effects to elements like text, images, or videos that follow the motion.
- Cost-friendly tool for adding blur effects in videos.
AI face mosaic is the latest video blur effect to look out for because it automatically detects and tracks faces in a video, saving you time and effort.
What is Filmora’s New AI Face Mosaic Feature?
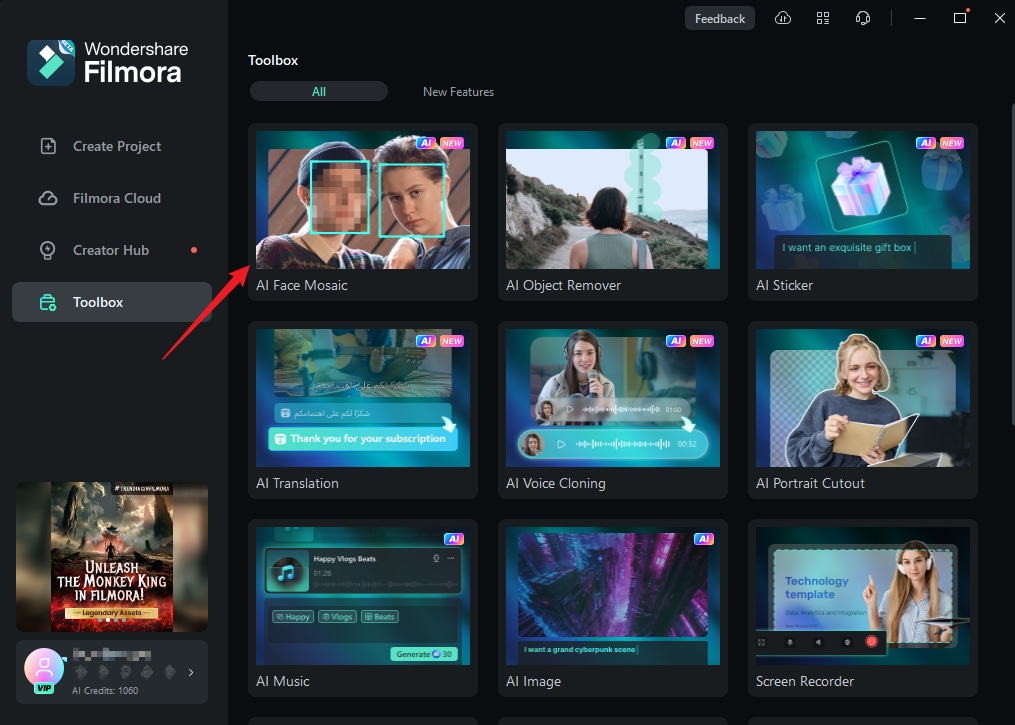
Filmora’s new AI Face Mosaic feature automatically detects and blurs faces in videos, making it easier to protect privacy. This AI-powered feature accurately identifies faces in stationary and moving scenes, ensuring you add blur to video with one click.
The mosaic application technology's real-time tracking and covering capabilities ensure privacy protection regardless of how a face moves within the frame. In situations where explicit consent is unavailable, such as those involving crowds or minors, this is especially helpful in enabling content creators to share their videos while adhering to privacy laws and guidelines.
Part 4: How to Blur Different Objects in Videos with Filmora
You can easily blur videos or specific objects within a video using various blurring features available in Filmora. Traditionally, masks have been a popular method for blurring, but with the introduction of the AI Face Mosaic feature, you can blur videos more efficiently. With the help of AI it can automatically detect faces for blurring, saving you lots of time and efforts. The “Motion Tracking” feature, on the other hand allows you to flexibly apply mosaic blur to moving objects, ensuring smooth and precise tracking throughout the video.
The examples below show a step-by-step guide on how you can blur different objects with Filmora.
Examples showing how to add blur video objects with Filmora
Here are examples of how to easily blur video objects using Filmora's intuitive features.
1. Blur faces
Blurring faces in videos is crucial for protecting privacy, especially when sharing content online or on public platforms. Below is how you can blur faces using the AI face mosaic.
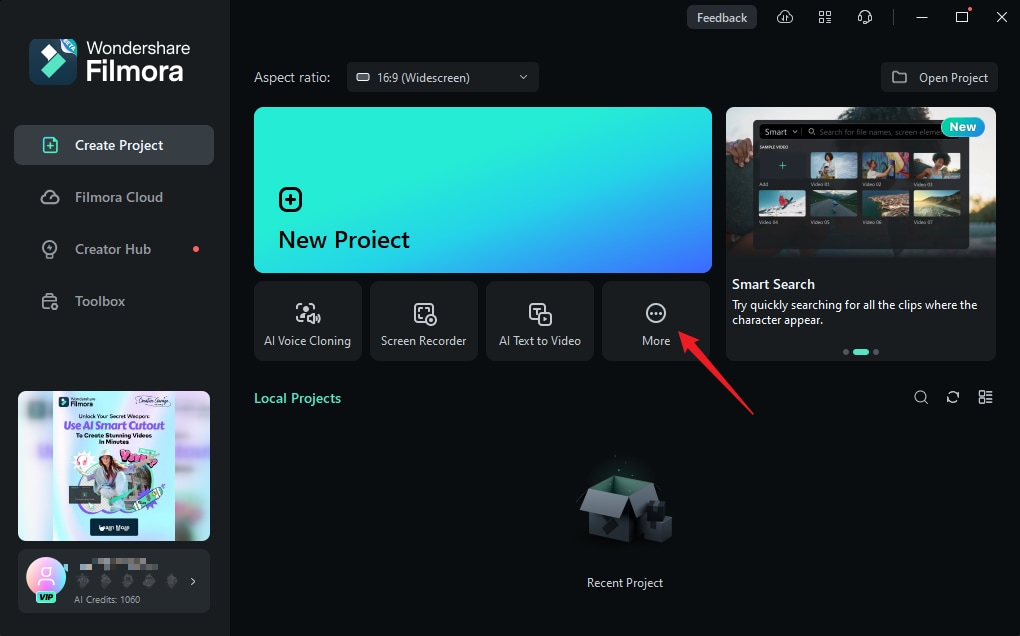
Step 1: Launch your Filmora app and click More to access the toolbox,
Step 2: Select AI Face Mosaic then import your video clip.

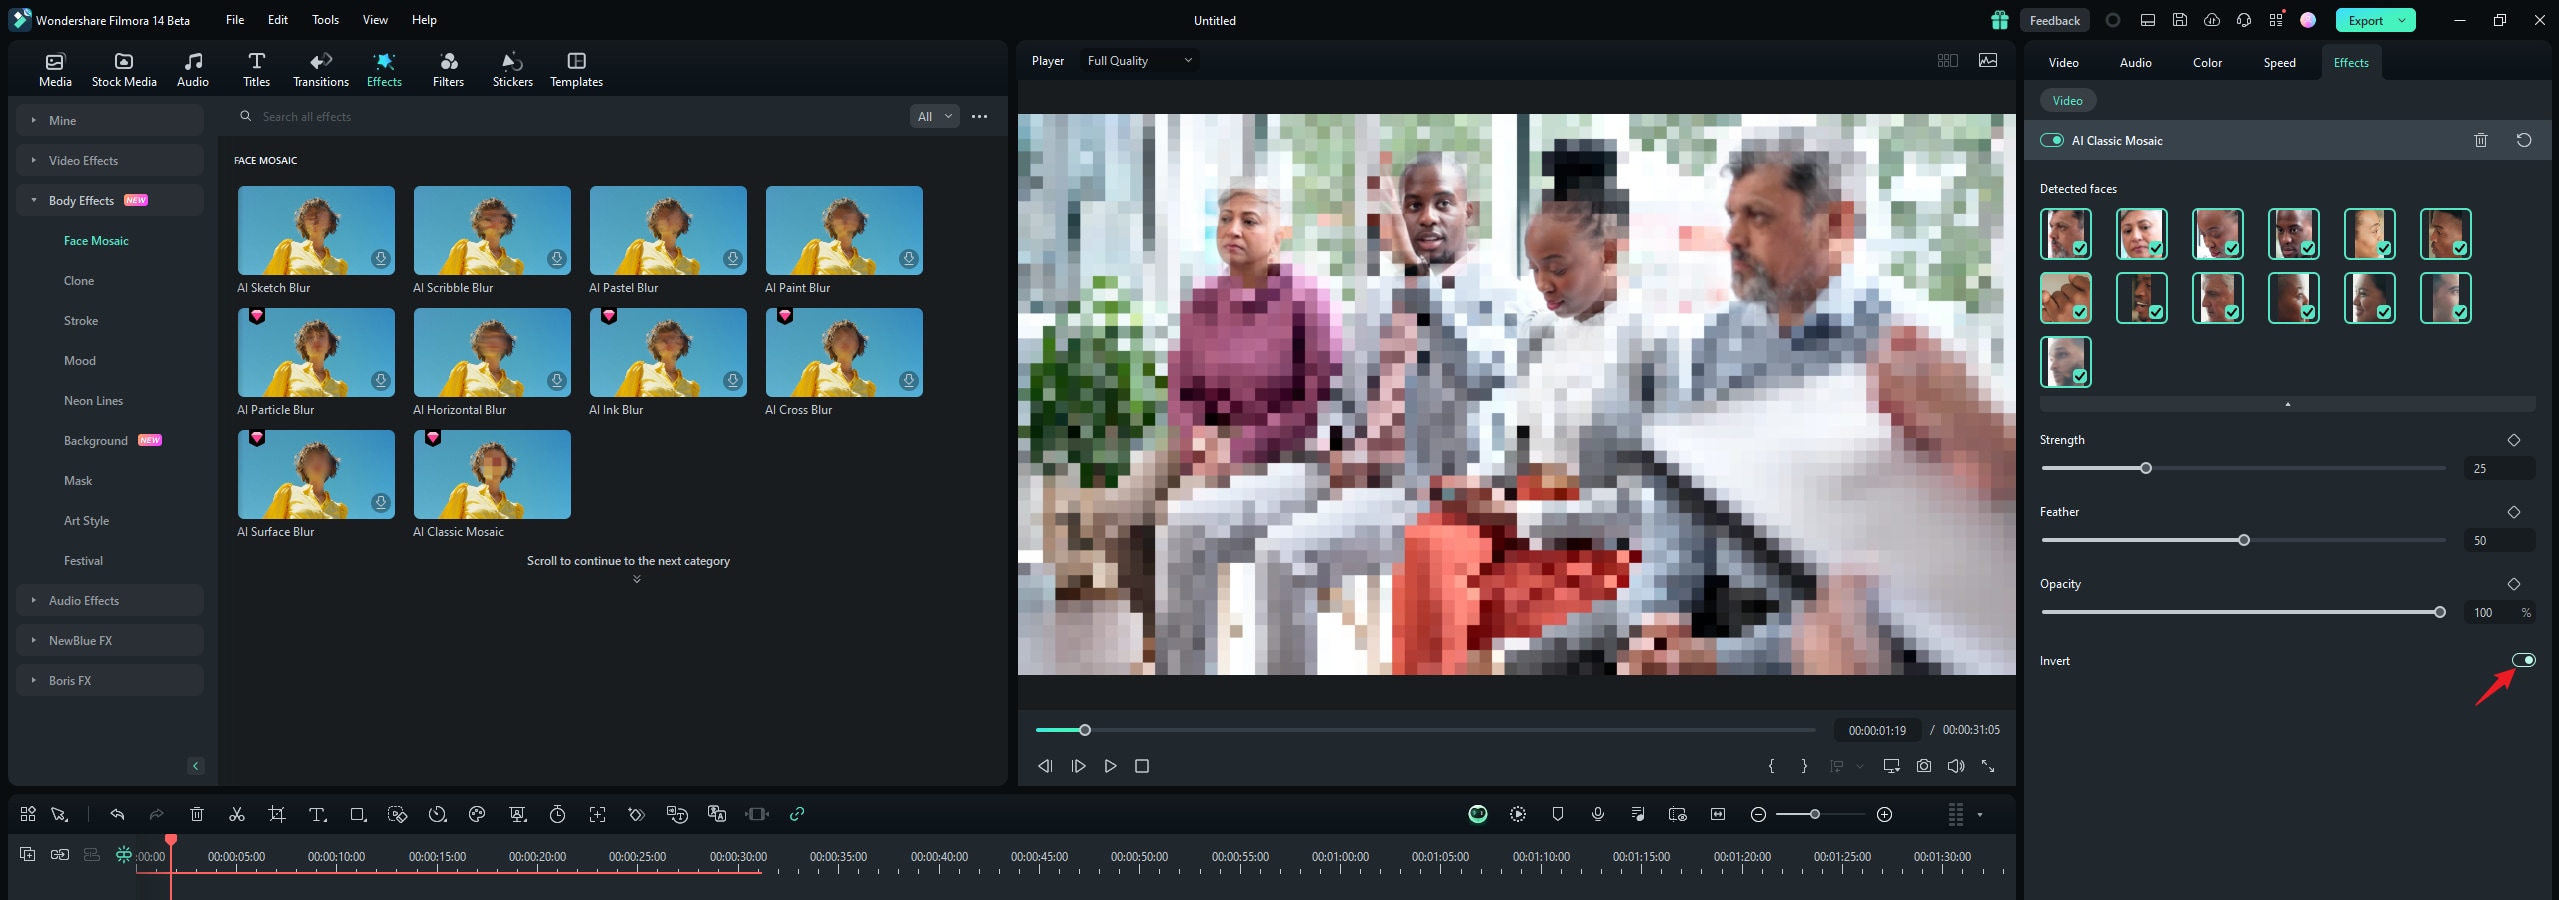
Step 3: Once media is imported, Filmora will then analyze the video and automatically apply the mosaic blur effect to the detected faces.
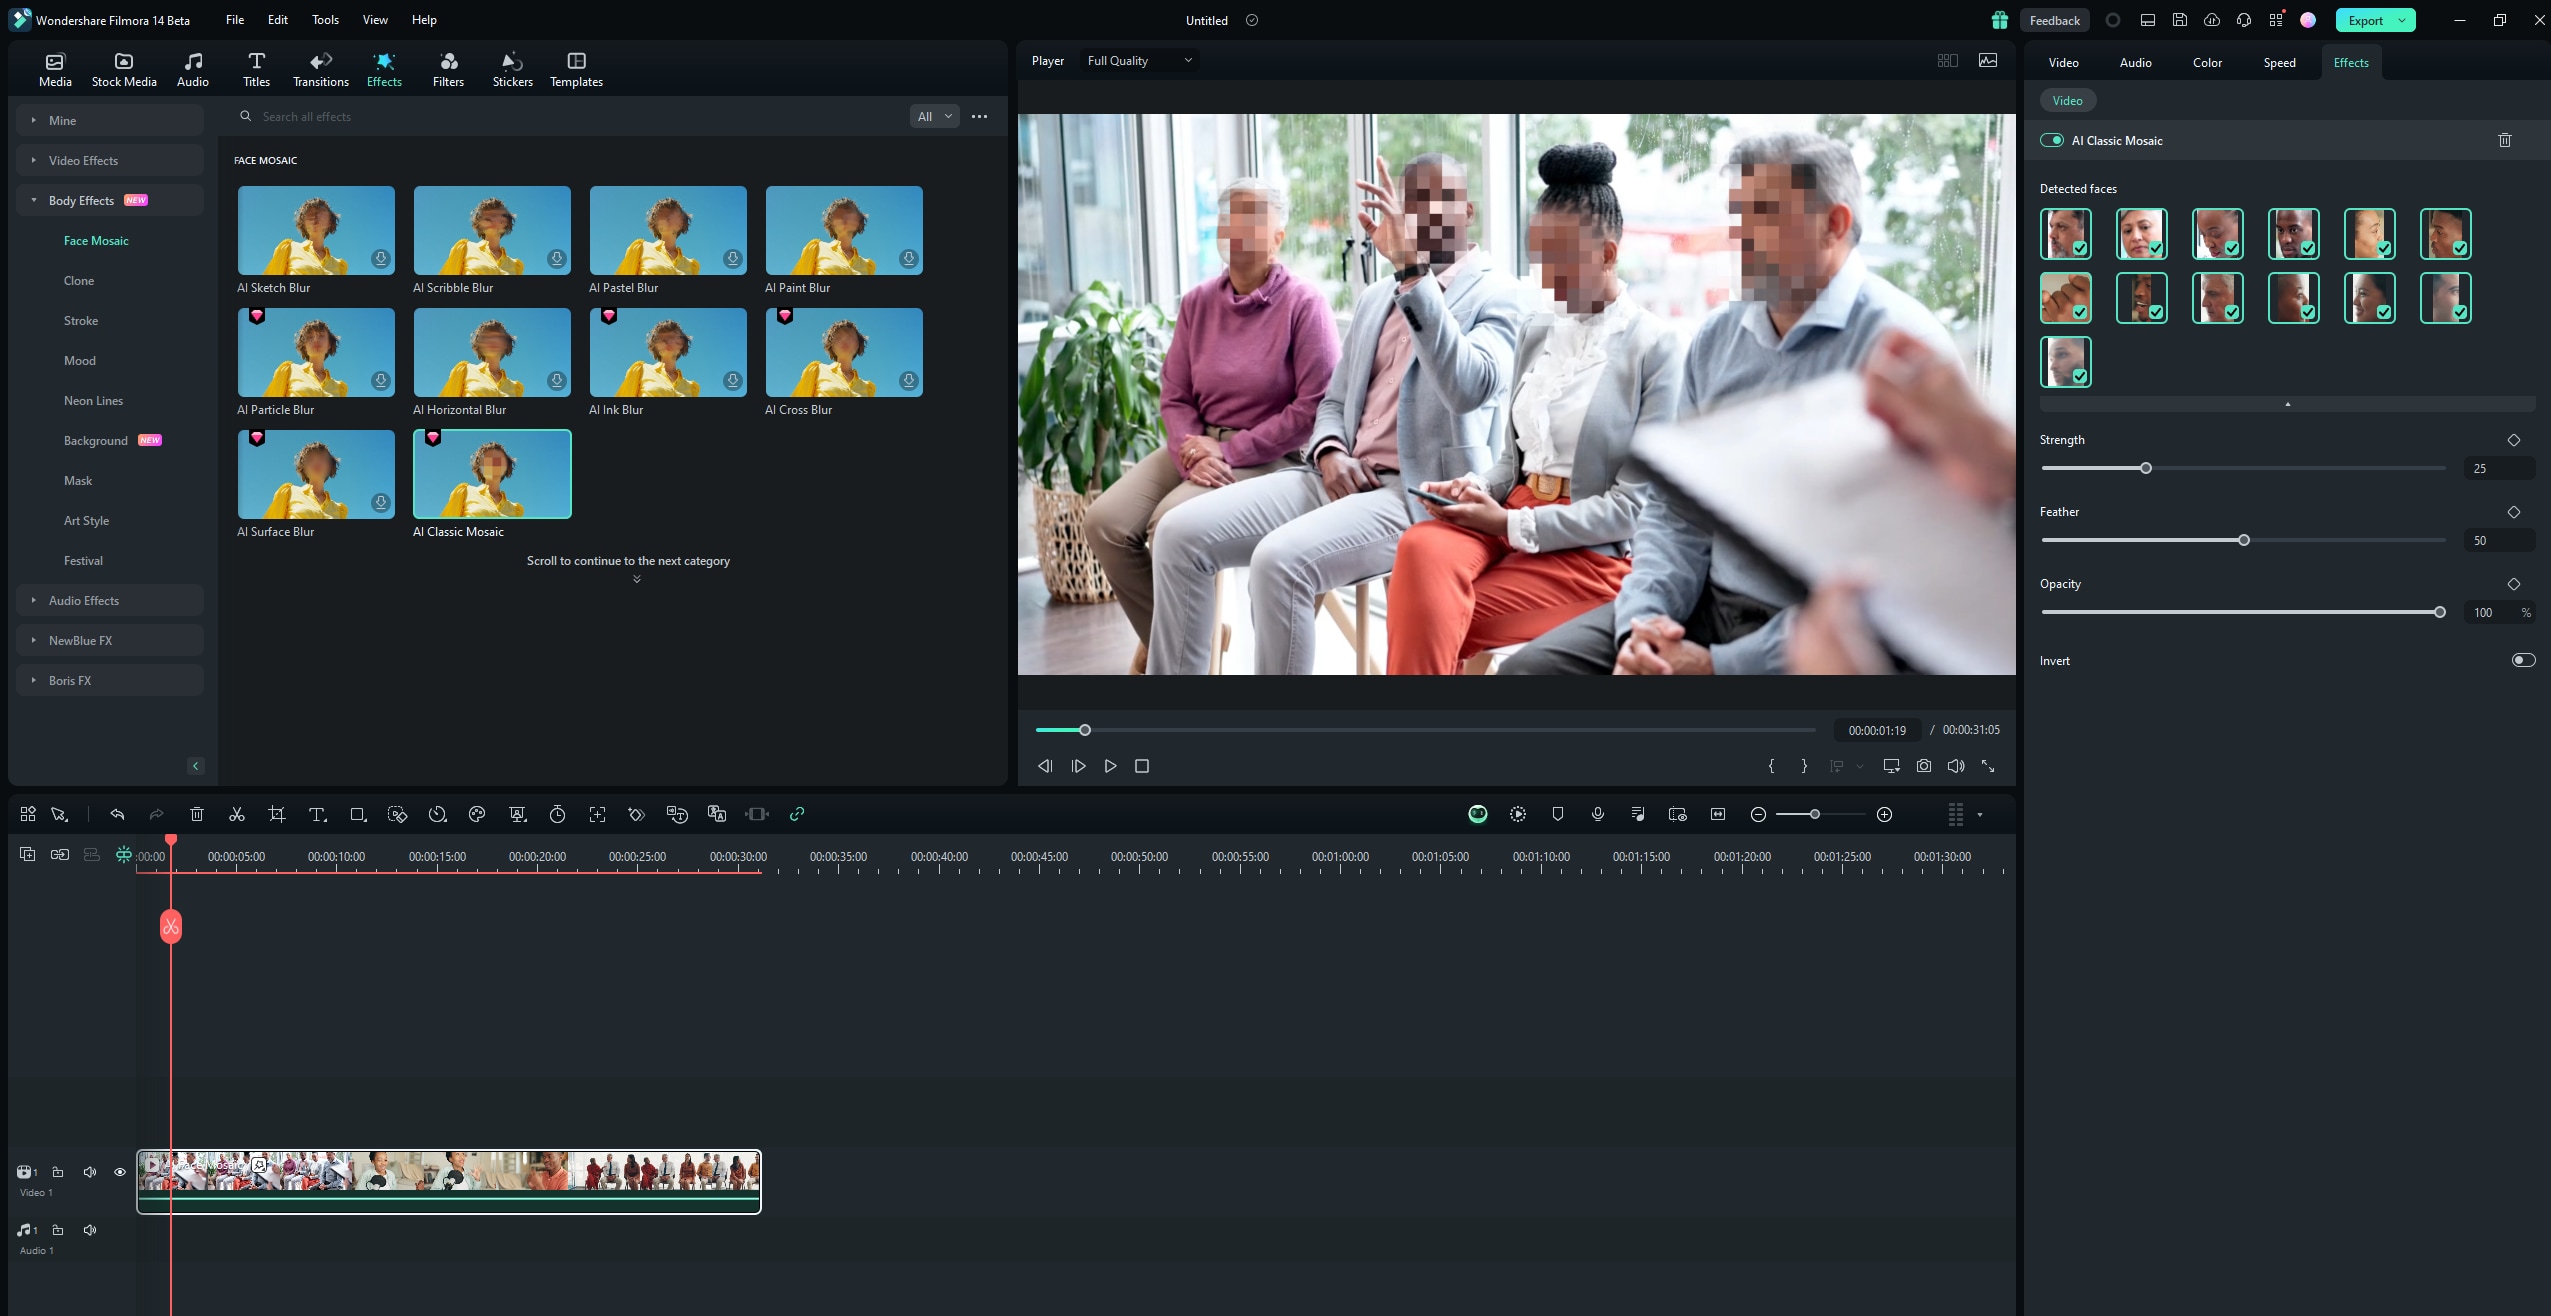
Step 4: Using the same mosaic effect, blur your background instead of the faces by clicking on Invert.
2. Blur Backgrounds
Blurring backgrounds in videos helps focus attention on the main subject while reducing distractions from the surrounding environment.
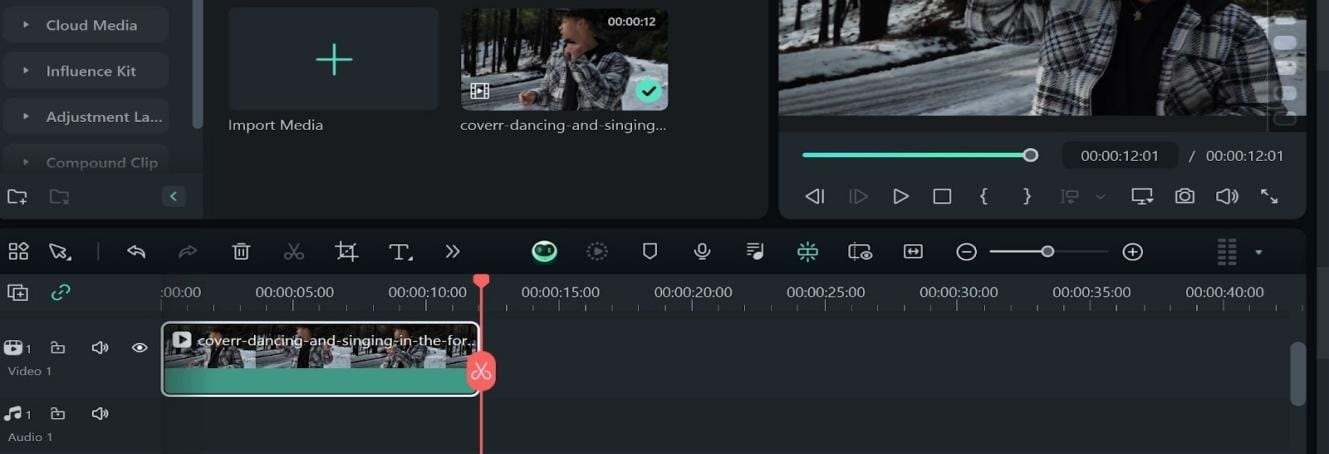
Step 1: Click on the left side to import the video you want to edit. Drag the video to the timeline and enlarge it for easier editing.
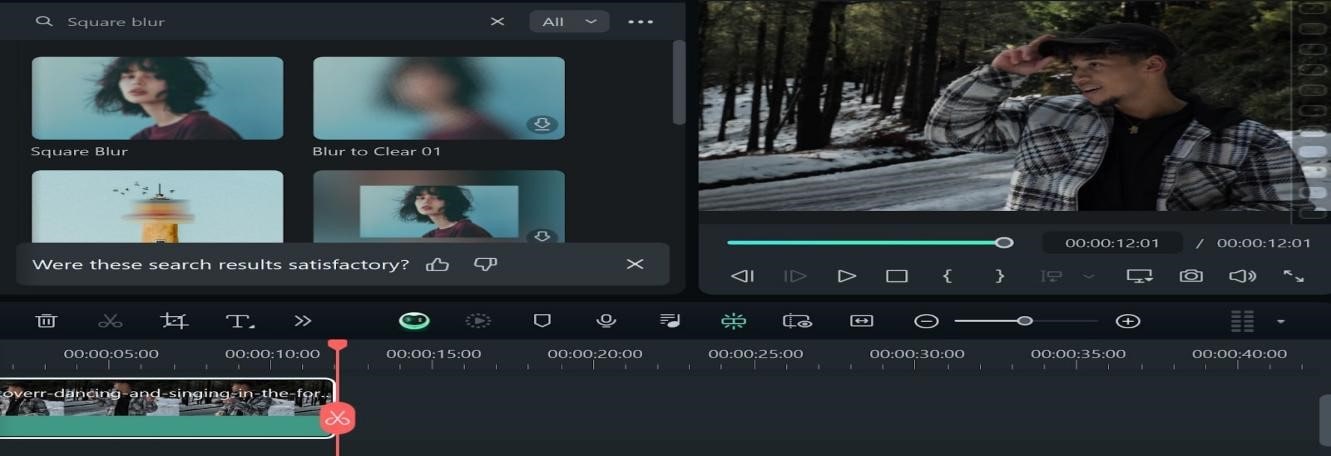
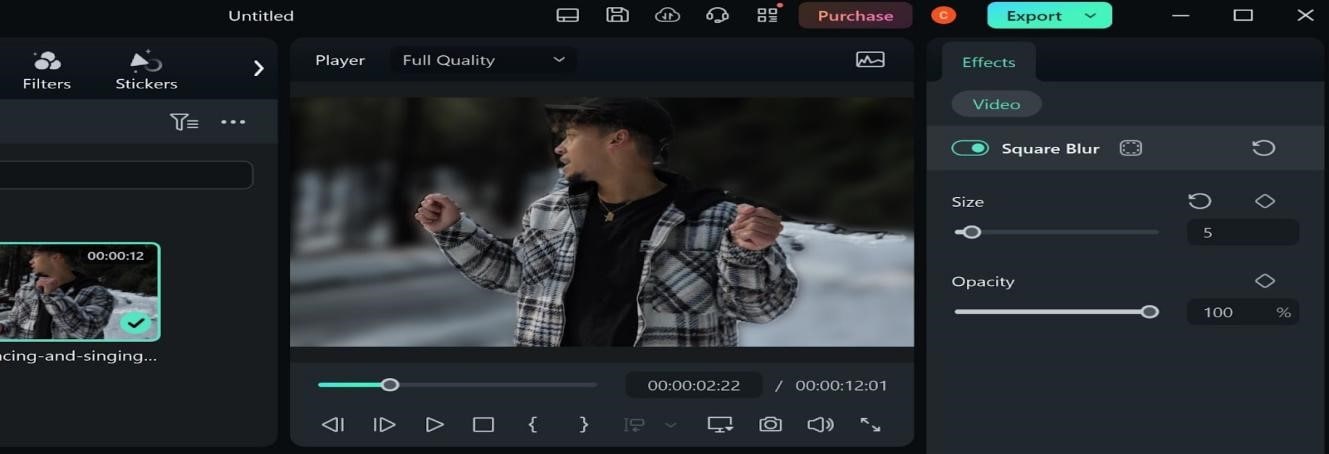
Step 2: Go to Effects, find Square Blur Effects, and add it.
Step 3: Merge the effects with your video, and on the right side, adjust the blur intensity. Now go to the Media tab and add the same video to the timeline again.
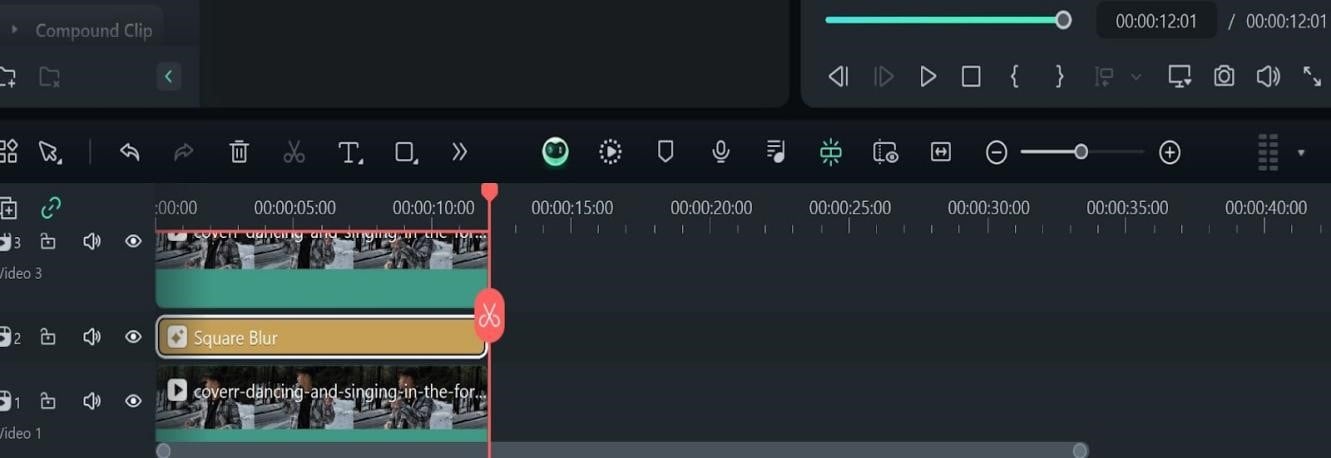
Step 4: Reduce the sound of the video, then find AI Tools on the right side. Select Smart Cutout, click Start, then click on Advanced Mode and adjust the brush size.
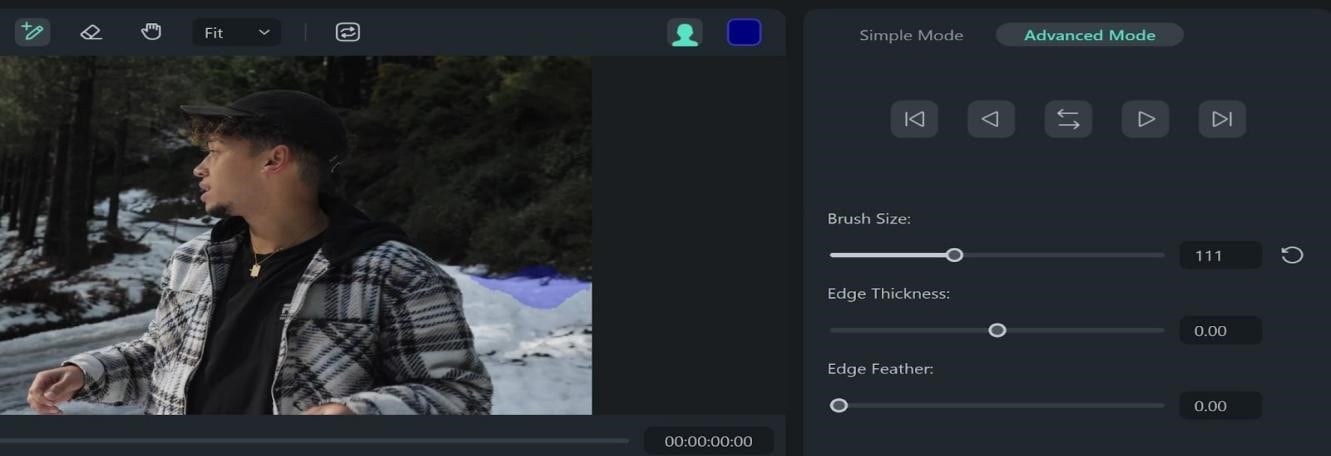
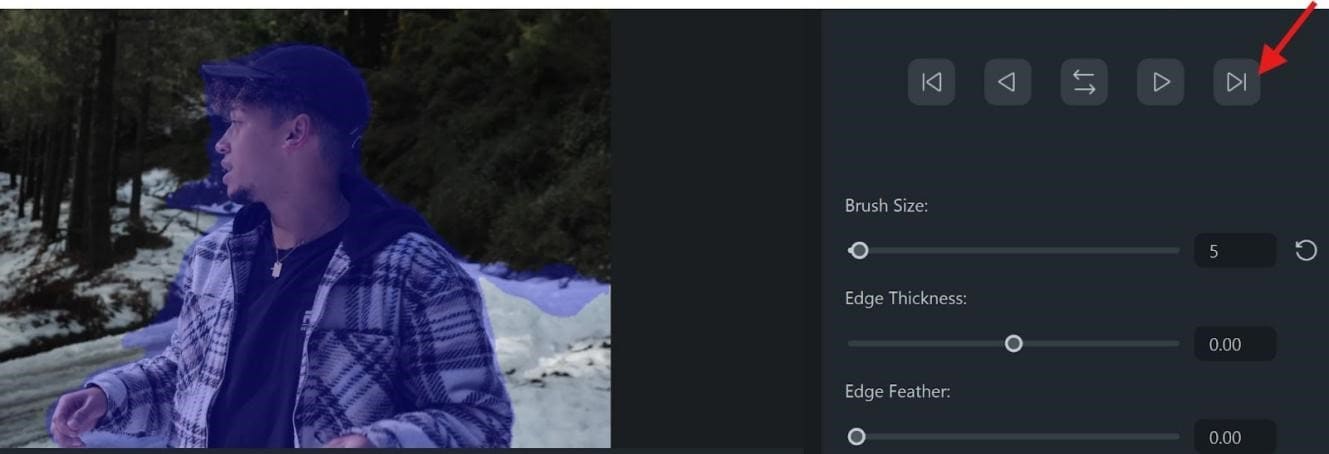
Step 5: Draw a line across the person in the video and click the arrow on the right. Wait for the process to complete and click Save.
Step 6: Click on play to check the blur effect. You can adjust the blur size while opacity is set to 100%. Export the video if you are satisfied with the blur effect in the video.
3. Blur Text/Logos
In videos, blurring text or logos is a helpful way to conceal branding or sensitive information while maintaining viewer focus on the main content. This example shows how to blur text or logos using the mosaic and the motion tracking feature, which is also another way to blur objects in a video.
Step 1: Click the Play button to preview the original video. Go to the AI Tools at the top right and select Motion Tracking. Position the adjustable square over the text or logo you want to blur. Ensuring the play head is at the beginning of the clip. Click Start Motion Tracking.
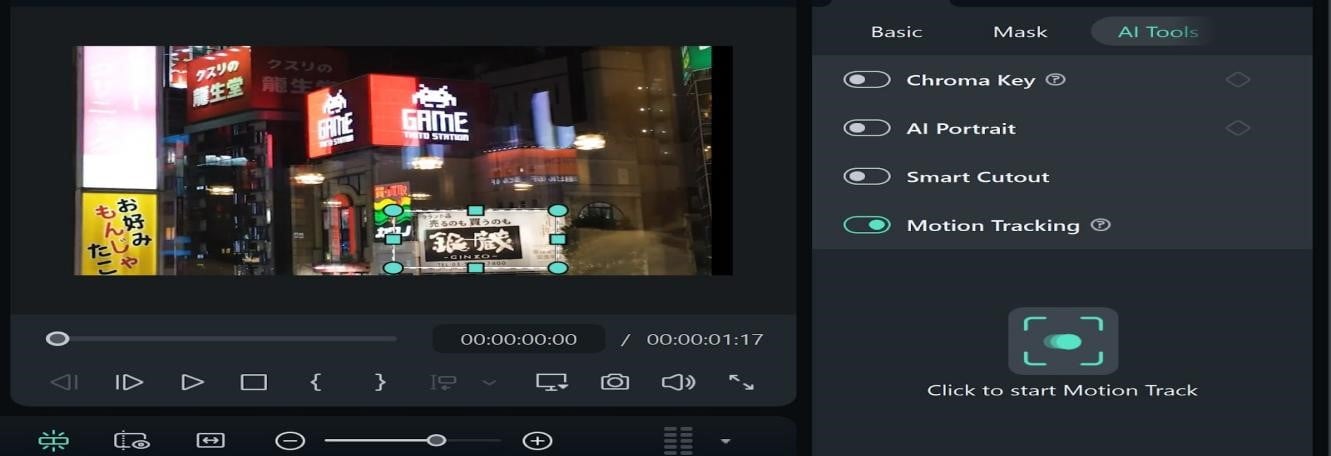
Step 2: After tracking is completed, play the video to verify the text or logo is being tracked. click Link Element and choose Add Mosaic.
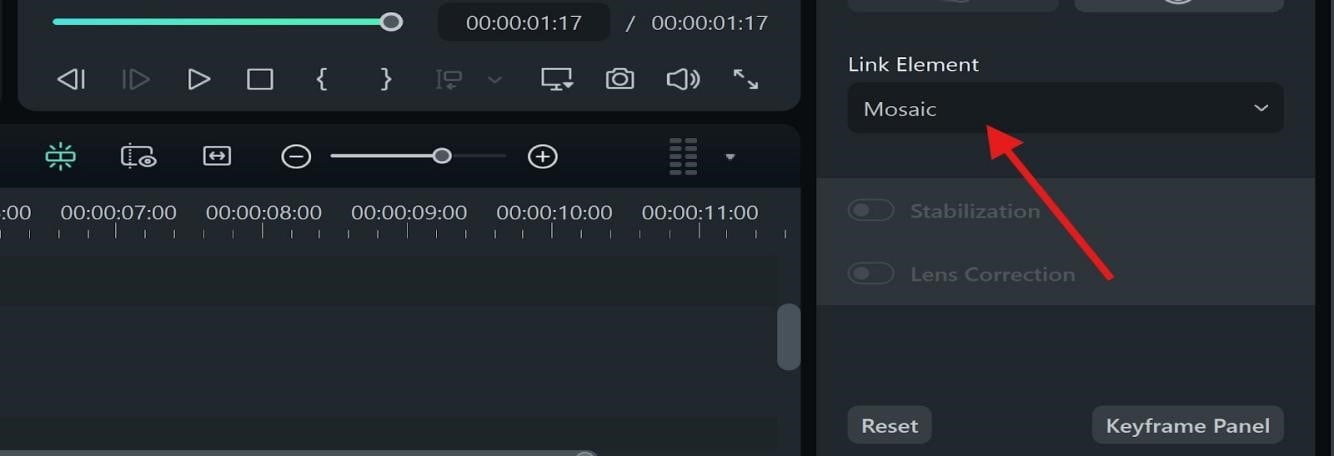
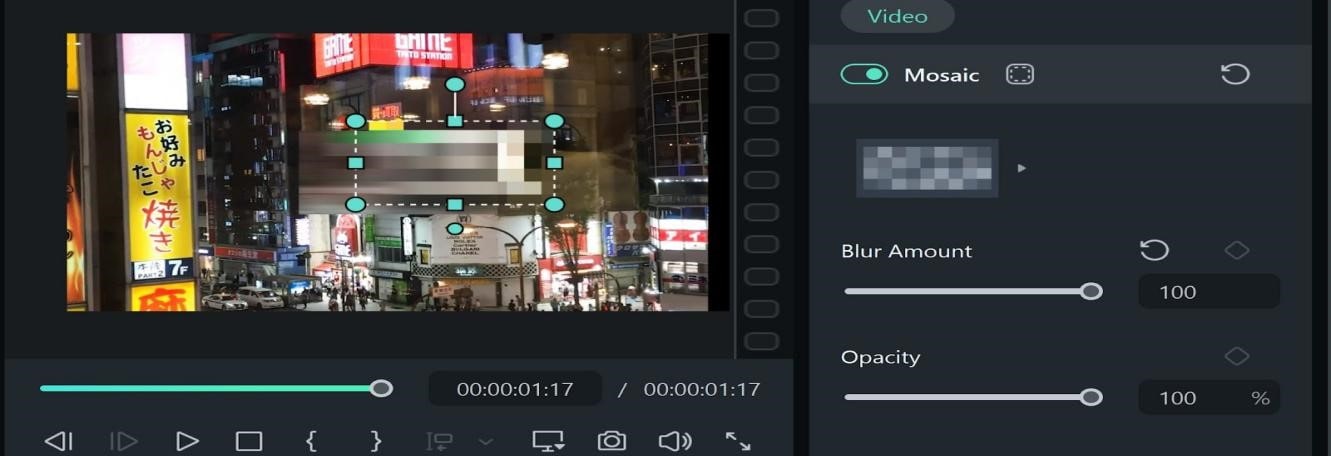
Step 3: Pick a mosaic model and adjust the blur intensity to control the pixelation level. Set the opacity and blur amount to 100 for maximum concealment.
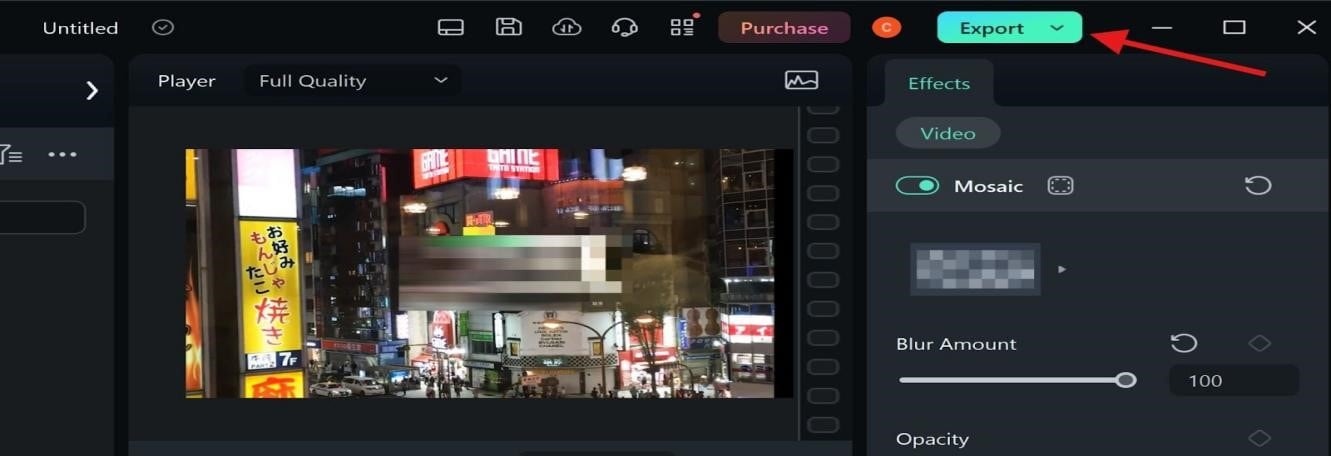
Step 4: Playback the video to ensure the blur effects are applied correctly, then click Export to save the video.
Part 5: Common Challenges You Can Face When Adding the Blur Effect in Videos
While adding a blur effect to your video can increase its quality, highlight important elements, or protect privacy, applying blur to videos can pose some challenges. From tracking moving objects to managing software performance, you might encounter several challenges that can affect the final result.
Knowing these typical obstacles and how to overcome them will help you add blur to videos like a professional. Below are some common challenges you might encounter when blurring videos.
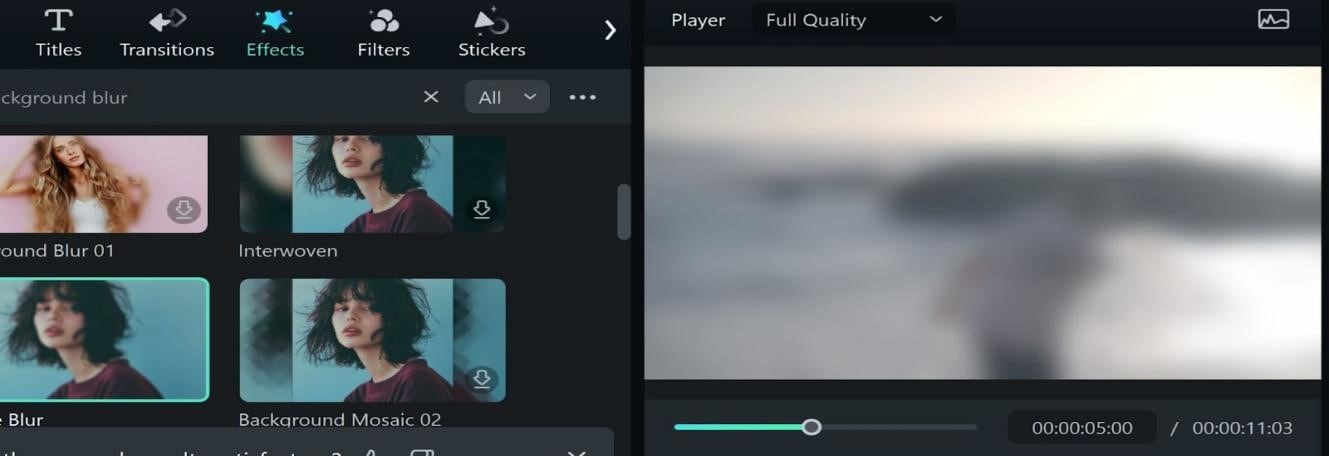
1. Maintaining Focus on the Right Object
2. Blurring Moving Objects
3. Overblurring
4. Export Issues
5. Software Performance
Part 6: Creative Ways to Use the Blur Effect in Your Next Video
Adding video blur effects can do more than just obscure details; it enhances the visual storytelling of your videos. Below are the best ways to incorporate the blur effect into your upcoming video.
- Background blur effects keep subjects sharp - one of the most useful blur effects in video for tutorials, interviews, and vlogs to create professional-looking content.
- Soft blur techniques add dreamy moods - when you add blur to video creatively, it enhances cinematic storytelling, travel videos, or romantic scenes.
- Motion blur effects enhance action sequences - these essential blur effects in video work best for sports and fast-paced content.
- Blur overlay techniques highlight products - a smart way to add blur to video for promotional content and dramatic reveals.
After adding blur in videos, enhance them with additional edits like color grading and sound design. Syncing the blur transitions with music beats can further elevate the viewing experience. These creative uses of blur can transform your video into an engaging, polished piece.
You can add and edit the blurred video on a single screen. Plus, AI-powered features like voice cloning and customizable stickers streamline creative editing.
Conclusion
Blur effects enhance focus and creativity in videos. It helps hide sensitive details, such as faces or license plates while keeping the viewer's focus on the main content. However, using the right tools and techniques will ensure a balance between privacy and video quality.
Video software like Filmora make it easy to add blur effects in videos with precision. The new AI Mosaic feature present in this video editing software automatically blurs unwanted objects and details, ensuring your videos stay professional and polished without sacrificing quality.


