
 100% Security Verified | No Subscription Required | No Malware

Have you ever noticed how some songs on Spotify are louder or softer than others, even when your volume stays the same? That's where you need audio normalization on Spotify. It adjusts the volume of tracks so everything sounds consistent, making your playlists smoother to listen to.
But what exactly is Spotify audio normalization? How does it work? And does it always deliver the best sound? If you're a music lover or a content creator, understanding Spotify mastering levels and Spotify sound normalization can help you get the most out of your audio.
In this article, we'll explain how Spotify normalizes volume, its pros and cons, and why you might need a little extra help.
In this article
How Does Spotify Normalize Volume?
Spotify audio normalization is a way to balance the volume of different tracks so they all play at a consistent level. This means you won't have to turn the volume up or down between songs, making your listening experience smoother and more enjoyable.
How Does Spotify Do It?
Spotify uses a system that measures how loud a track is using LUFS (Loudness Units Relative to Full Scale). It then adjusts the track's volume to match Spotify's target level, which is around -14 LUFS.
Here's what happens:
- If a track is too loud, Spotify lowers the volume.
- If a track is too soft, Spotify boosts it.
Spotify also offers three settings for audio normalization:
- Quiet Mode: Softer volume, great for late-night listening.
- Normal Mode: Default setting for most users, balancing all tracks.
- Loud Mode: Slightly amplifies softer tracks for noisy environments.

Pros of Spotify's Volume Normalization
- Consistent Listening: No more sudden volume changes between songs.
- Easy to Use: It works automatically, so you don't have to tweak anything.
- Custom Settings: You can choose a mode that fits your environment.
- Reduces Fatigue: Smooth volume transitions make long listening sessions more comfortable.
Cons of Spotify's Volume Normalization
- Loss of Detail: Tracks with dynamic volume changes might lose their impact.
- Alters Creative Intent: Artists who use volume for dramatic effects may find their music sounds different.
- Not Always Perfect: The adjustments might not align with listener preferences.
- Hard to Disable: Turning off normalization isn't always straightforward for users.
How to Turn On Audio Normalization on Spotify
Spotify audio normalization is a handy feature that ensures all your songs play at a consistent volume. You can activate this feature on all kinds of devices, whether Android, iOS, or Desktop. Here's how.
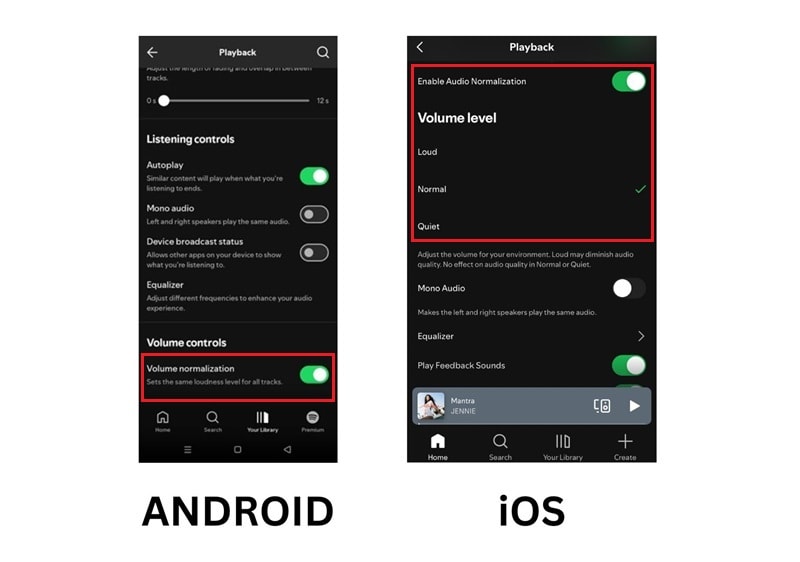
For Android and iOS Users
01of 03Open Spotify Settings
Launch the Spotify app on your Android device. Tap on the gear icon in the top-right corner of the screen.
02of 03Turn on Normalize Volume
Under the Playback section, look for the "Normalize Volume" option. Turn on the switch next to "Normalize Volume".
03of 03Choose a Mode
Tap on the dropdown menu to select Quiet, Normal, or Loud based on your preference.
For Desktop Users
01of 03Open Spotify Settings
Launch the Spotify desktop app on your Windows PC or Mac. Click on your profile picture in the top-right corner and select Settings from the dropdown menu.
02of 03Scroll to Playback and Normalize Volume
Under the Playback section, find "Normalize Volume". Click the toggle to activate the feature.
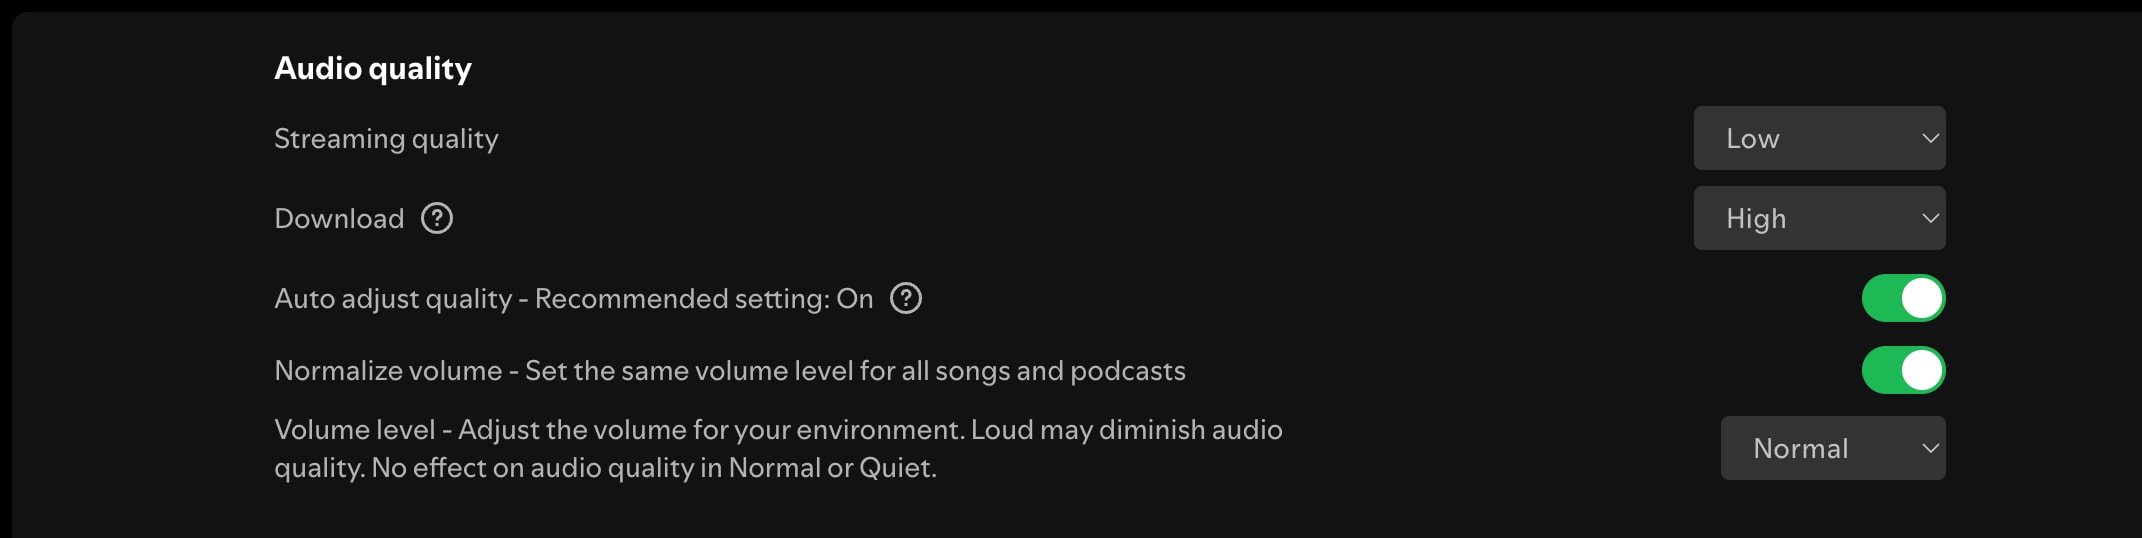
03of 03Adjust the Normalization Mode
Use the dropdown menu to pick your preferred volume mode: Quiet, Normal, or Loud.
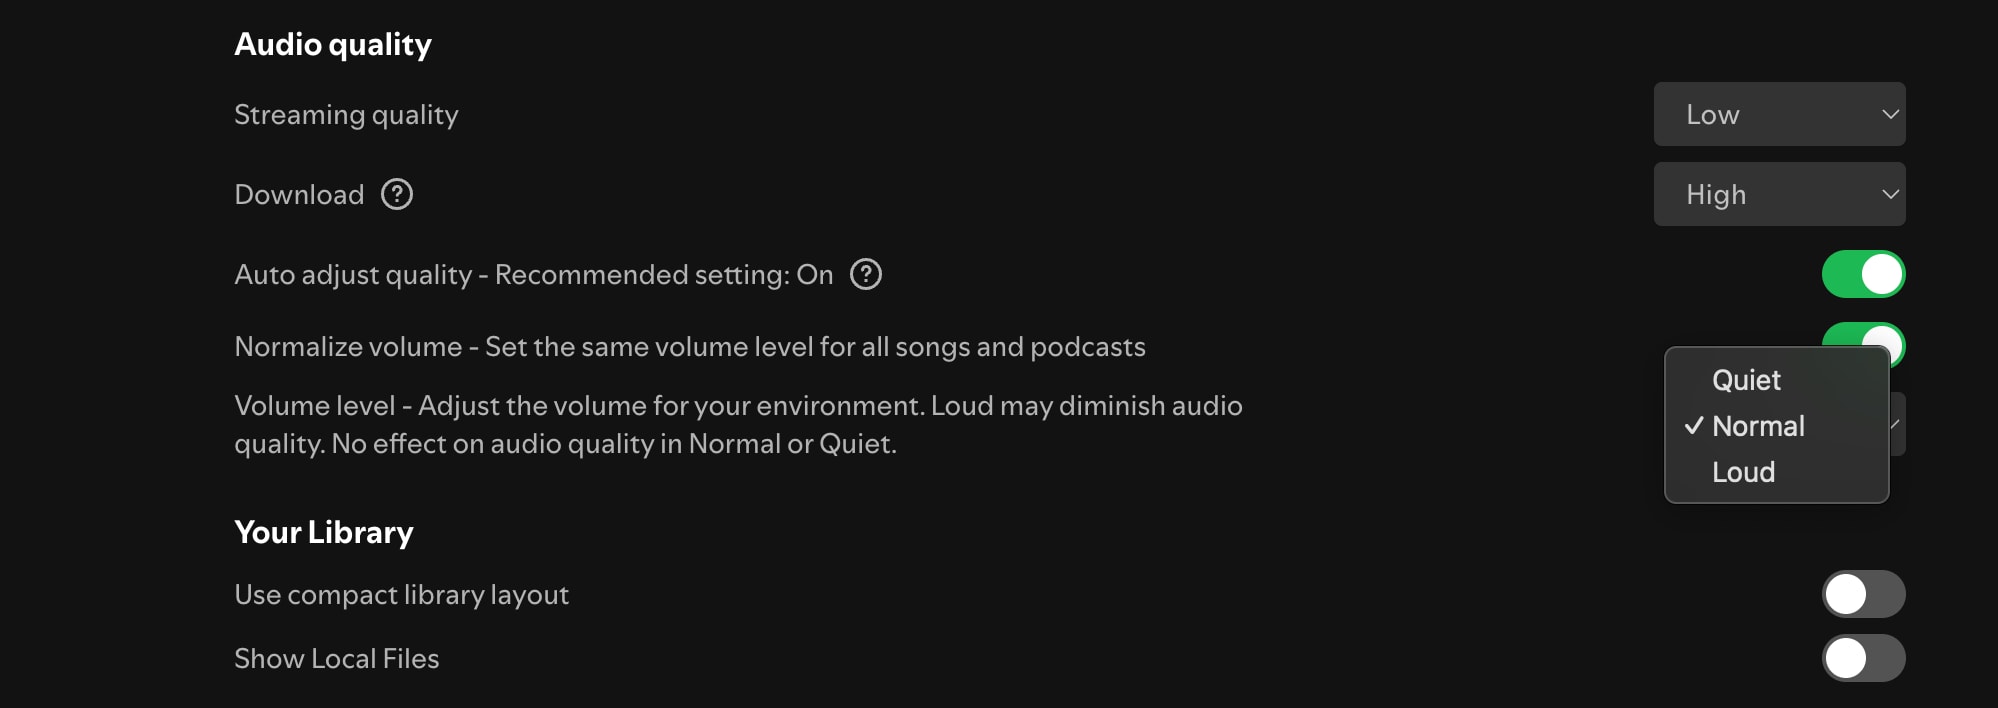
If you ever feel the need to turn off normalization, simply follow the same steps and toggle the feature off. This might be useful if you prefer hearing tracks exactly as they were mastered by the artist.
Audio Normalization Solution for Downloaded Audio
Spotify's audio normalization is a fantastic feature for streamed tracks, ensuring consistent volume across your playlists. However, it doesn't work for downloaded audio or existing files on your device. If you want to normalize the volume of these files, Filmora is the ultimate solution.
Wondershare Filmora is a powerful tool for creators and music lovers who need to normalize downloaded audio and more. While Spotify's volume normalization is limited to streaming, Filmora allows you to adjust audio levels across all types of content, including music, podcasts, and videos.
The Benefits of Filmora's Auto Normalization
- Standardized Loudness Levels: Automatically adjusts audio to the industry-standard level of 23.0 LUFS, ensuring consistent volume. Perfect for creators looking for results beyond Spotify mastering levels.
- Works with All Audio and Video Files: Filmora supports popular formats like MP3, WAV, AAC, and various video formats. Ideal for normalizing downloaded songs, podcasts, or movie soundtracks.
- Advanced Features for Creators: Beyond normalization, you can fine-tune audio with tools for noise reduction, equalization, and effects. This tool also provides AI tools, such as Audio Denoise to remove background noise automatically and Audio Stretching to adjust the length of audio tracks without affecting quality.
How to Use Filmora's Auto Normalization Feature
01of 05Add Your Files to the Timeline
Import the audio or video clips you want to normalize into Filmora and drag them onto the timeline.


02of 05Access the Auto Normalization Option
There are three ways to open the Audio Editing Panel to find the Auto Normalization option:
Method 1: Right-click and Adjust the Audio
Right-click on the clip in the timeline. Then, select Audio > Adjust Audio from the context menu to open the Audio Editing Panel.
Method 2: Use the Tools Tab
Select the clip in the timeline. Go to Tools > Audio > Adjust Audio to access the Audio Editing Panel.
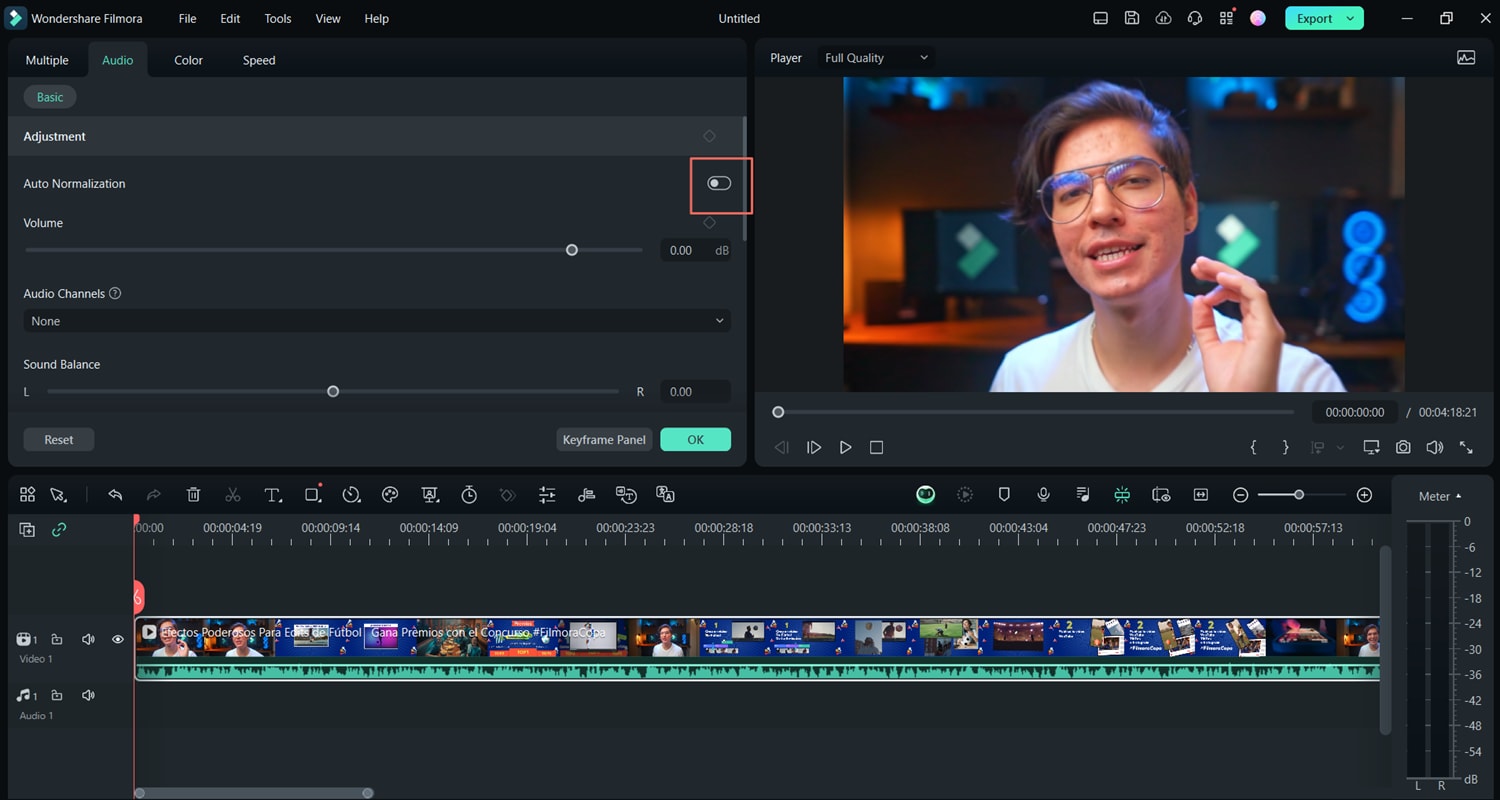
03of 05Enable Auto Normalization
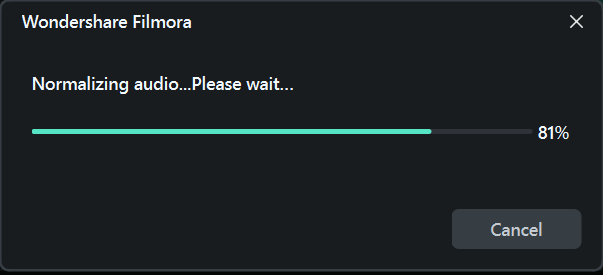
Locate the Auto Normalization option in the Audio Editing Panel. After that, press the button to enable it. Filmora will automatically analyze and adjust the volume of the clip(s) to match the standard loudness level of 23.0 LUFS (±1 LU).
04of 05Review the Results
Play the clip to ensure the volume is balanced and consistent.
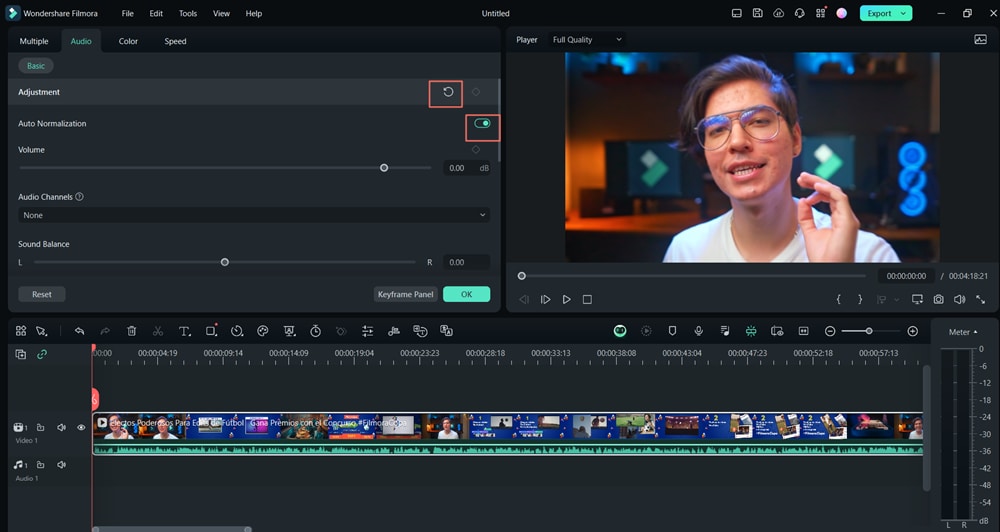
05of 05Reset Auto Normalization (If Needed)
If you're not satisfied with the results, press the Auto Normalization button again to reset the volume to its original state. Or, click the Recheck Icon to reanalyze and adjust the volume.
Comparing Spotify Normalization and Filmora Auto Normalization
Both Spotify's audio normalization and Filmora's Auto Normalization are designed to deliver consistent audio levels, but they cater to different needs. Here's a side-by-side comparison to highlight their strengths and differences:
| Feature | Spotify Audio Normalization | Filmora Auto Normalization |
| Purpose | Optimizes volume for streamed music on the Spotify app. | Normalizes volume for audio and video files, including downloaded content. |
| Content Type | Only works for music streamed on Spotify. | Works for all audio and video formats (e.g., MP3, WAV, AAC, MP4). |
| Application Scope | Limited to playback within Spotify. | Applicable to any project, including podcasts, videos, and offline music. |
| Control Over Results | Minimal control; Spotify sets normalization parameters. | Full control with customizable editing options and AI tools. |
| Loudness Standard | Targets around -14 LUFS for streamed tracks. | Targets 23.0 LUFS (±1 LU) for professional-quality audio. |
| Additional Features | Focused solely on volume leveling. | Includes advanced and AI-powered tools. |
| Reusability | Does not apply to downloaded or offline content. | Normalized audio files can be exported and reused anywhere. |
| Reset or Reanalyze | No option to reset or reanalyze normalization. | Allows users to reset normalization or recheck volume as needed. |
| Intended Audience | Music listeners who want consistent streaming quality. | Creators, editors, and professionals seeking polished audio for projects. |
Filmora gives you more control and flexibility over audio normalization than Spotify. While Spotify audio normalization only works for streamed music in the app, Filmora supports all kinds of audio and video files. This means you can work on projects like podcasts, videos, or custom playlists without limitations.
Unlike Spotify, which uses preset adjustments, Filmora lets you customize your audio to match your exact needs. For example, you can use AI Denoise to remove background noise. Filmora's Auto Normalization adjusts audio to a professional standard of 23.0 LUFS, ensuring smooth and consistent sound across your clips.
The best part? You can save and export your normalized audio files for use on any platform, not just within an app like Spotify. With its advanced tools, easy customization, and versatility, Filmora goes beyond Spotify volume normalization.
Conclusion
Spotify's audio normalization is a convenient feature for consistent streaming playback, but it's limited to the app and doesn't cover downloaded or offline files. For creators and audio enthusiasts seeking more control, Filmora's Auto Normalization is the ultimate solution. It works with a wide range of audio and video files, offering precise adjustments to professional loudness standards.
With additional tools like AI Denoise and Audio Stretching, Filmora ensures your audio projects are polished and ready for any platform. Take your audio editing to the next level—try Filmora today and experience unmatched flexibility and quality.
