When playback issues arise, editors often turn to frame interpolation to enhance the smoothness of their videos. This important feature is available in video editing software like DaVinci Resolve.
Frame interpolation on Davinci Resolve is a technique that generates intermediate frames between existing ones, so it creates the illusion of smoother motion. This can be particularly useful for correcting disjointed footage, slow-motion effects, or improving overall video fluidity.
While it's helpful, those who are new to Davinci Resolve may find it hard to use the frame interpolation effectively. That's why we will walk you through the process, providing clear instructions and tips to help you use this feature to its full potential and achieve smoother, more polished video results.

In this article
Part 1. Types of Videos That Benefit from Frame Interpolation
DaVinci Resolve's frame interpolation feature works by generating intermediate frames between existing ones, so it can make your videos smoother and more fluid. The software analyzes the movement and changes between two frames and then creates new frames that represent the stages between them.
Some types of videos that benefit from frame interpolation are:
- Slow-motion videos: By generating additional frames, frame interpolation helps in reducing the choppiness often seen when slowing down video.
- Choppy or stuttery footage: Smooth out the motion of stuttery footage and make the video appear more seamless.
- High or low-frame-rate videos: For videos shot at high or low frame rates, frame interpolation can help in adjusting the frame rate to match the desired playback speed.
- Sports and action shots: Frame interpolation can make rapid movements appear more fluid and less fragmented.
And while frame interpolation can significantly improve the fluidity of a video, it's important to be aware that it may also introduce artifacts or distortions if not used properly. To ensure optimal results and minimize potential issues, make sure to follow best practices for its use, which we will cover in the following sections.
Part 2. How to Use Frame Interpolation in DaVinci Resolve
Now that you've discovered the advantages of frame interpolation, it's time to learn how to use this feature within DaVinci Resolve. The interface might seem a bit complex if you're just starting out, but we'll explain it as clearly as possible.
Follow the steps below for using Frame Interpolation in DaVinci Resolve:
- Step 1. Upload your video and select clip attributes
To use frame interpolation in DaVinci Resolve, start by uploading your video. Click on File > Import > Media, then drag your video onto a new timeline. Next, switch to the Edit page to proceed.

- Step 2. Use frame interpolation to change the frame rate of your video
Next, open the settings at the button right of the interface. In the next window, locate the "Frame Interpolation" section under the Master Settings. Then, from the Retime process dropdown menu, Choose the option that best fits your needs.
To duplicate frames, select "Nearest." To blend frames together, choose "Frame Blend." And to generate new frames based on the motion in your video, pick "Optical Flow". We will get into details about the differences between them on the next section.

You can also select the motion estimation mode where there will be options like Standard Better, Standard Faster, Enhanced Better, Speed Warp, etc. Each option is designed to handle different types of motion and frame rates, with Speed Warp providing the highest quality for slow-motion footage. Click Save to save the changes.

Part 3. What's the Difference Between Optical Flow and Frame Blending?
When applying frame interpolation in DaVinci Resolve, you'll need to select among Nearest, Optical Flow and Frame Blending option. Nearest is the most processor-efficient but also the least advanced. It works by either dropping frames in fast-motion sequences or duplicating frames in slow-motion sequences.
While it's quick, it might not provide the smoothest results, as it doesn't create new intermediate frames but rather relies on simply adjusting existing ones. Therefore, users usually choose between Optical Flow or Frame Blending. Here's a breakdown of the differences between these two methods:
1. Optical Flow
This technique works by analyzing the motion in your video and generates new frames based on the movement between existing ones. It uses complex algorithms to estimate and create frames that fill in the gaps.
Optical Flow creates smooth, high-quality motion, making it great for slow-motion effects and complex scenes with fast or intricate movements. However, it can sometimes cause artifacts or distortions if the motion is very complex or involves fast-moving objects.
2. Frame Blending
If Optical Flow doesn't work out, Frame Blending is the next best option for smooth, slow-motion effects. This method blends adjacent frames together, creating smoother motion by merging the pixels from nearby frames to produce intermediate frames.
Frame Blending is easier to use than Optical Flow and usually produces fewer artifacts, making it good for natural-looking slow-motion in simpler scenes. It works well for slower motion but might struggle with fast or complex movement, which can result in ghosting or less smooth results.

Optical Flow vs Frame Blending: Summary
The main difference between Optical Flow and Frame Blending is how they handle missing frames. Frame Blending combines two frames using a cross dissolve to fill the gaps. Optical Flow, however, analyzes the video and estimates movement to create new frames for the gaps.
For example, when it comes to dealing with motion blur, frame blending is often better for slow motion. It blends the blur smoothly, so it's less noticeable. Optical Flow can have trouble with blur, leading to distorted images. However, when working with low frame rate footage, frame blending can struggle. It might not make the video as smooth as desired. Optical Flow, on the other hand, creates new frames to make slow motion look smoother.
Part 4. Easier Alternative for Davinci Resolve Frame Interpolation
If you're seeking software with a simpler interface and a cost-effective alternative to DaVinci Resolve for frame interpolation, you might be happy using Wondershare Filmora. It offers a powerful set of features and uses AI to automate the frame interpolation process.
This means you can generate smooth, intermediate frames with minimal manual effort. It's an accessible choice for those who need effective frame interpolation without the complexity of more advanced software.
Key Features:
- AI Frame Interpolation: Automatically generates smooth intermediate frames for better motion quality.
- Keyframing: Allows precise control over animations and effects by setting specific points in time.
- Speed Ramping: Adjusts the speed of your video smoothly for dramatic effects and transitions.
- Motion Tracking: Follows and applies effects to moving objects within your video.
- Compound Clip: Combines multiple clips into a single, editable clip for easier management.
- A variety of video assets, including templates, transitions, music, and high-resolution images to enhance your projects.
Filmora is available for both Windows and MacOS and offers a more budget-friendly option compared to other video editing software with similar advanced features. You can start with a free version, and subscription plans are available from just $9.99/month or $29.99/quarter, providing a cost-effective way to access high-quality interpolation tools.
Here's a detailed guide on how to use the AI Frame Interpolation feature in Filmora:
Step1Install Filmora and import your video
Before you start, make sure you have the latest version of Wondershare Filmora installed. After downloading and installing, double-click to open the program and select "New Project" from the main menu.
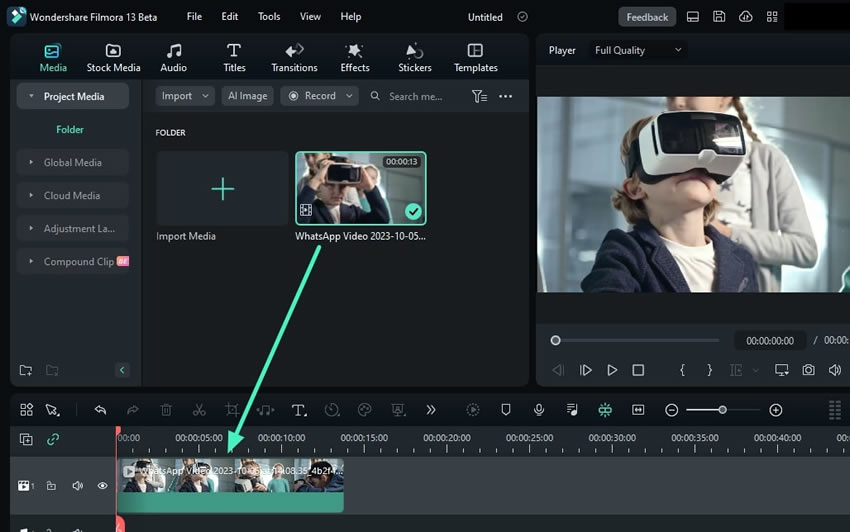
Then, import your video by choosing the Media > Project Media and click the "Import" button. Once your video is uploaded, drag it onto the editing timeline.
Step2Change the video playback speed
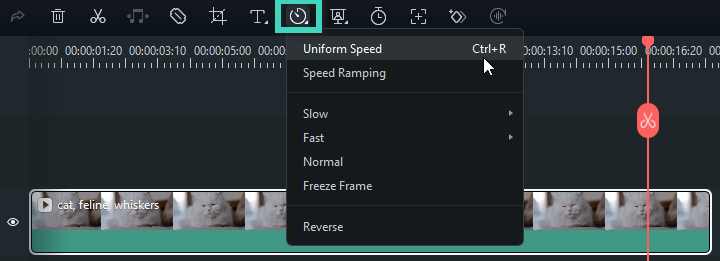
Let's change the video playback speed of your video. You can do so by selecting the Uniform Speed option as seen below.
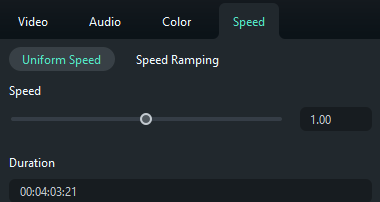
Then, use the Speed slider to the right to increase the speed or to the left to slow it down. For a more precise adjustment, you can also manually enter your desired value in the Duration field.
Step3Choose the AI Frame Interpolation feature
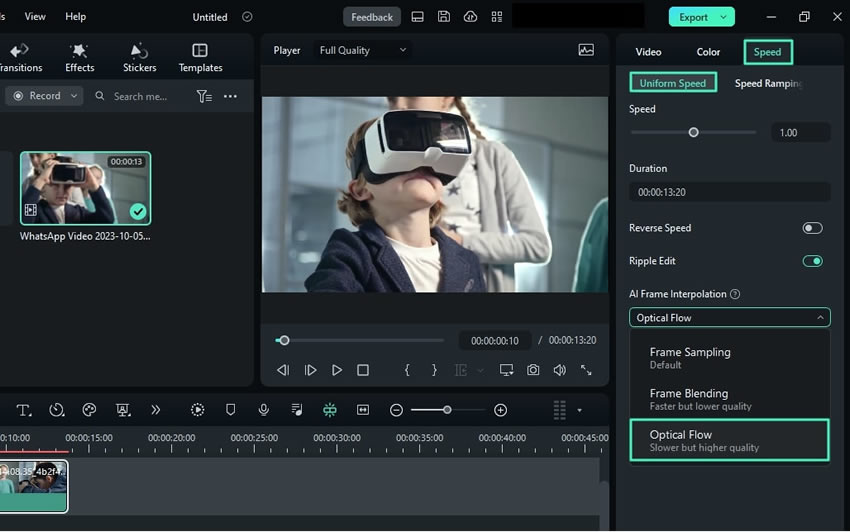
To access the AI Frame Interpolation feature, go to the "Speed" tab on the right settings panel. Select "Uniform Speed" and you find the "AI Frame Interpolation" option.
From there, you can choose between "Frame Blending" and "Optical Flow" based on your video needs. Remember the differences between the two, as explained in the previous section.
Step4Export your video and see the result
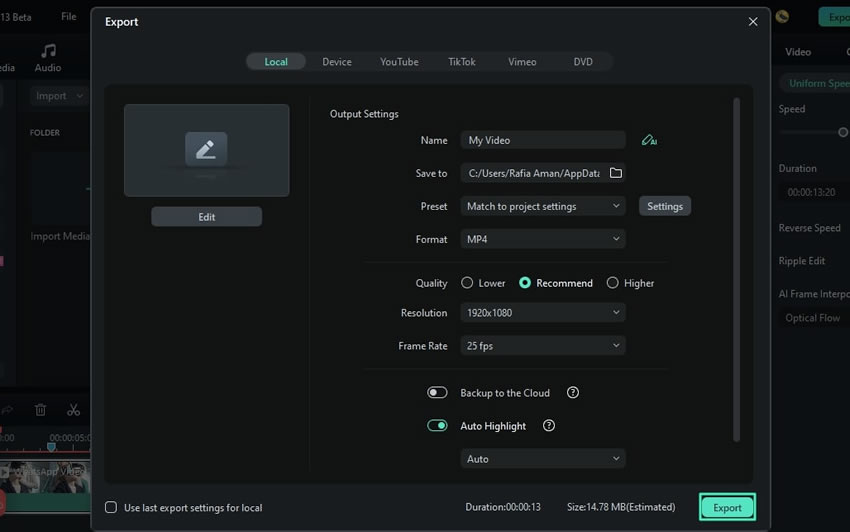
To view the final results, save your video by clicking the "Export" button in the upper right corner of the screen. Name your video and select the save location. Once you're done, click "Export" again and then play the video to see the effects you applied.
Conclusion
Frame interpolation in DaVinci Resolve is a great way to make your videos smoother by adding intermediate frames between existing ones. Throughout the article, we've covered its benefits, how to use and adjust it, and the differences between Optical Flow and Frame Blending. By following the tips and instructions provided, you can make the most of this tool and get smooth, polished results.
For those seeking a more straightforward and cost-effective alternative, Wondershare Filmora is an excellent choice. Its AI-driven frame interpolation automates the process, allowing you to generate smooth intermediate frames with minimal effort. This makes Filmora an accessible and effective solution for high-quality frame interpolation without the complexity of advanced software.


