

 ChatGPT
 Perplexity
 Gemini
 Claude
 Grok
Grok
Planar tracking is one of the useful tracking techniques in After Effects that's effective at following flat surfaces within a video. Using this technique, you can add a digital billboard to a moving bus or place animated text on a screen.
However, if you're new to planar tracking in After Effects, it's easy to make mistakes that can affect the precision of your tracking results. To avoid these pitfalls, a key tool that many video editors and motion artists often rely on is Mocha AE.
Mocha is an award-winning plug-in included with After Effects that is highly regarded for its advanced tracking and masking capabilities. This plugin simplifies the process by providing precise tracking data, even in difficult scenarios, so you can achieve professional-quality results with less effort. Let's get into more detail about how Mocha AE works in planar tracking.
In this article
Part 1 What is Mocha AE?
As we have briefly mentioned, Mocha AE is designed for planar motion tracking, which is ideal for tasks like adding signs to moving vehicles, buildings, or screens. It's renowned for its ability to tackle complex visual effects challenges.
Unlike traditional tracking methods that focus on individual track points, Mocha AE tracks "pixel patterns" across entire surfaces. That's why this approach allows you to handle difficult conditions such as objects moving off-screen, being partially obscured, or footage that's out of focus. By analyzing multiple points on a plane, Mocha AE calculates and interpolates movement across the surface.
Some of Mocha's main features are:
- Planar Tracking: Mocha's Planar Tracker tracks objects based on the movement of flat surfaces like walls or screens. This method provides more detailed and consistent tracking of translation, rotation, and scaling, even when objects move beyond the frame.
- Masking and Rotoscoping: Mocha offers several spline tools that facilitate the quick creation of roto shapes with minimal keyframing. The X-splines and Bezier splines can be connected to tracking layers, streamlining the rotoscoping process and saving time on masking and tracking.
- User-Friendly Interface: Mocha AE features a streamlined interface with an intuitive layout, ensuring a smooth workflow for roto, tracking, and data export to After Effects.
- Seamless Export to After Effects: When exporting data to After Effects, Mocha's tracking and spline data integrate smoothly, converting to After Effects' native formats for easy use.
Compared to other tracking tools, many Adobe users in Adobe Community often recommend tracking with Mocha due to its advanced mathematical algorithms that evaluate the plausibility of tracking results, reducing the likelihood of illogical tracks.
Mocha also offers finer control over tracking regions. It lets users exclude specific objects and make other precise adjustments. This makes Mocha particularly effective for tracking shots that are nearly impossible to track with traditional motion tracking methods.
Part 2 Using Mocha's Planar Tracking in After Effects: A Step-by-Step Guide
Now you must've wondered how to access and use Mocha in After Effects. If you have After Effects CC, whether through a standalone license or Adobe Creative Cloud, the Mocha AE plugin is included for free. It offers Mocha's renowned tracking capabilities as well as X-Spline and Bezier tools.
For additional features, you can also purchase Mocha Pro through BorisFX, starting at $37/month. But usually, using Mocha AE is enough for basic planar tracking within After Effects (no need to integrate with other Adobe products like Premiere Pro).
If you are interested, see a detailed comparison between Mocha AE and Mocha Pro here. Please refrain from using cracked versions of Mocha Pro for After Effects, as they often come with malware risks.
How to Use Mocha's Planar Tracking in After Effects
Step 1: Access Mocha on After Effects.
For this tutorial, we will be following Platform Training video on YouTube. After importing your video to After Effects, access Mocha AE through Animation > Track in Mocha AE or Track in Boris FX Mocha.
Then, click on the Mocha logo and it will direct you to a new workspace where you can start setting up your tracking project.
Step 2: Create and Adjust a Tracking Layer
In Mocha AE, start by creating a new tracking layer. Use the X-Spline or Bezier tool to draw a shape around the area of the video you want to track. Make sure to cover the entire area of interest, including any distinctive features that will help with tracking accuracy. Adjust the shape to fit around the object or feature you're tracking.
Next, click the "Show Surface" button in the Essential panel and adjust the corners to align with the plane you wish to track.
Step 3: Start Your Tracking
Click the "Track Forward" button and wait for Mocha AE to complete the tracking process. After tracking, check the tracking results by selecting "Show Grid" and playing the clip. Make sure the grid aligns perfectly with the plane.
Step 4: Save the Project and Return to After Effects
Once you're satisfied with the tracking, save your work by going to File > Save Project. Close the Mocha AE window to return to the After Effects interface.
Step 5: Create Track Data
In the After Effects interface, click the "Create Track Data" button and select the video layer in the Layer Controls.
Step 6: Add and Position the Object
Next, add the object you want to follow the tracking path. For this example, Plaform Training demonstrates it by placing a logo. Drag the object from the Project Window onto the Layer Player and position it above the video layer.
Step 7: Adjust the Anchor Point
To ensure proper positioning, adjust the object's anchor point to match the Anchor Point of the video layer. Press A on your keyboard to reveal the anchor point settings.
After that, in the Mocha AE effects control panel, select Corner Pin as the export option for the video layer. Also, choose the logo layer in the Layer Export To options. Click the Export button to apply the changes. For a full tutorial, you can watch it here.
Tips for Mocha's Planar Tracking in After Effects
To make the object blend seamlessly with the video, you can add a Hard Light effect by changing the mode to Hard Light and adjusting the opacity as needed. This adjustment will help the object integrate naturally with the background.
And if you encounter some issues with tracking results, make sure that your video meets these criteria:
- High contrast
- Sharp focus
- No motion blur
Part 3 Troubleshooting and Best Practices
Having a problem with Mocha planar tracking is a common experience for many users, but don't worry—most issues can be resolved with a few adjustments. We've gathered some of the troubleshooting tips and best practices from Adobe Community, Reddit, and other sites to help you make the most of Mocha's planar tracking in After Effects.
1. Why is my mocha tracking not working properly?
If your Mocha AE planar tracking isn't working properly, start by ensuring you have the latest version of Mocha with all updates installed, as outdated software can lead to tracking issues. If that's not the case, open Mocha and clear previous cache files by going to File > Clear Cache.
Alternatively, you can deactivate GPU Processing to avoid potential conflicts by accessing Mocha's Preferences > GPU. Or, clear the cache in After Effects by navigating to Edit > Purge > All Memory & Disk Cache. This step will remove any outdated or corrupt cache data that might be affecting performance.
2. Why does my tracked object look distorted or shaky?
Distortion or shakiness in tracked objects can often be attributed to inaccurate tracking data. Review your tracking points and make sure you've correctly placed them on distinct and consistent features of the footage. In cases of shaky footage, you might need to stabilize the footage first before tracking it.
3. What should I do if Mocha crashes or freezes?
Mocha crashing or freezing can be frustrating. Start by ensuring your system meets the minimum requirements for running Mocha and After Effects. Outdated drivers, especially graphics drivers, can also cause crashes, so make sure they're up-to-date.
If Mocha continues to crash, try resetting preferences. You can also check for conflicts with other plugins or software by disabling them temporarily. If these solutions are still not working, reinstalling Mocha and After Effects may resolve the issues.
4. Where's the Best Resource to Learn Mocha After Effects?
The best resource to find the Mocha AE tutorial and learn how to use it in After Effects is Mocha Essentials. For more tracking tips, you can also find them on YouTube or ask away your issues on the Adobe community page.
Part 4. Simplify Mocha Tracking with an Easy-to-Use Editor
This built-in version brings the core functionality of Mocha directly into Filmora’s intuitive video editor. You still get access to:
- Planar Tracking to attach graphics to flat surfaces like walls or screens
- PowerMesh Tracking for realistic warping on faces, fabric, or other flexible objects
- AI-Powered Masking & Roto to isolate subjects quickly with fewer manual keyframes
- Camera and Object Stabilization to smooth shaky footage or follow moving elements
- Pro-Level Lens Correction to fix fisheye and wide-angle lens distortion
After you are done with the tracking, you can continue editing directly in Filmora’s timeline. And if you still find that tracking with Filmora Mocha hard, Filmora also has its own automatic motion tracking and planar tracking feature, which are designed to be even simpler for beginners.
How to Use Filmora Mocha Planar Tracking
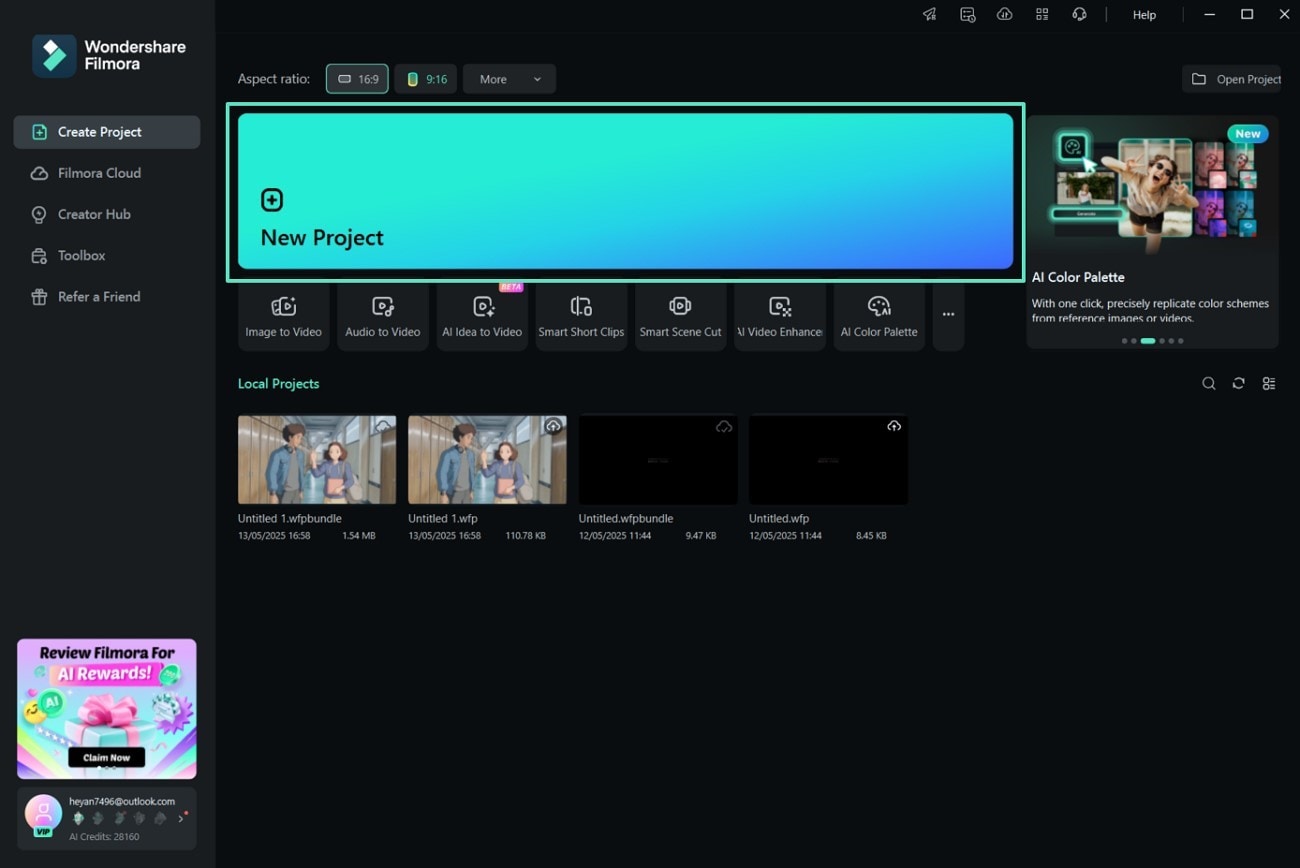
Step 1: Start a New Project in Filmora
Open Filmora on your device and select "New Project" from the main screen. Then, import the video you want to edit and drag it onto the timeline to begin working on it.

 secure download

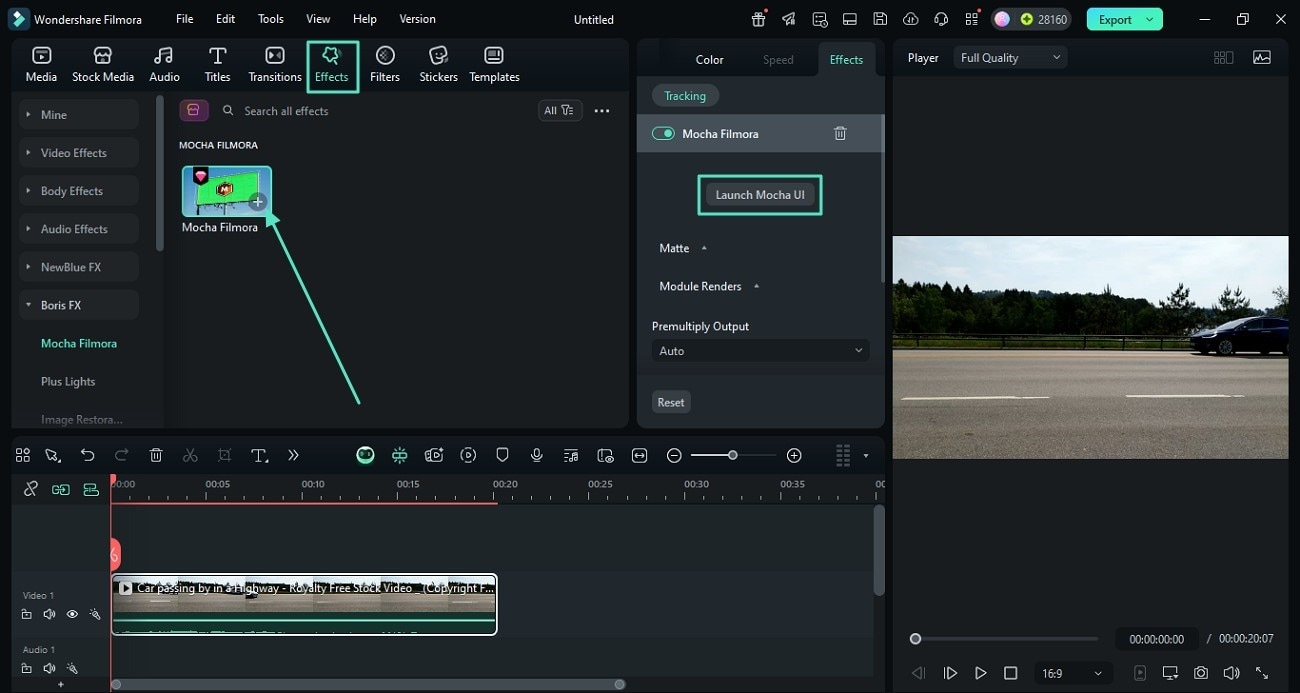
Step 2: Apply Mocha Filmora from the Effects Panel
Go to the "Effects" tab and find "Boris FX" in the sidebar. Look for Mocha Filmora, then click the "+" icon to apply the effect to your video clip.
After that, open the "Video" > "Effects" settings and click on "Launch Mocha UI" to open the Mocha workspace.
Once you're inside the Filmora Mocha workspace, you can begin using planar tracking to follow flat surfaces across frames. The process is similar to what you’d find in Mocha AE. To begin, create an X-Spline layer around the area you want to track.
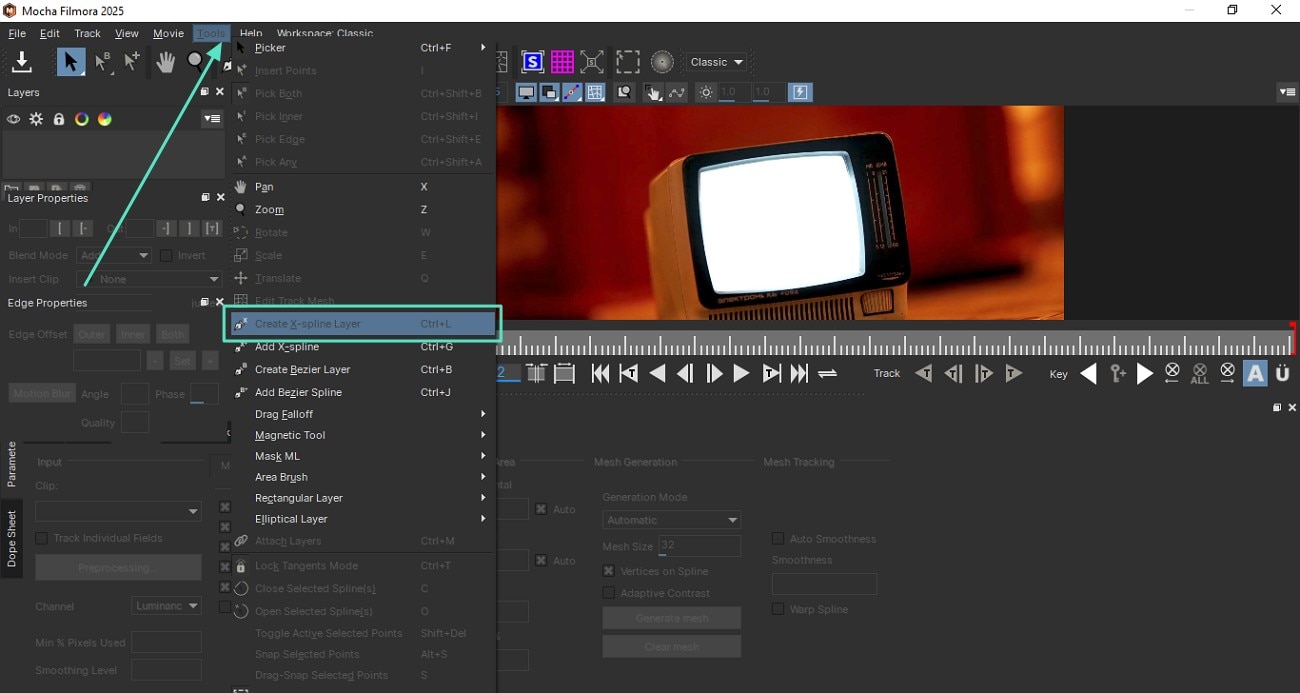
Step 3: Create X-Spline Layer for Tracking
Go to the "Tools" menu and select "Create X-Spline Layer" to draw a new tracking layer within the Mocha interface. Use your cursor to click and drag points around the flat area you want to track in the video. Once you've completed the shape, right-click to confirm the selection.
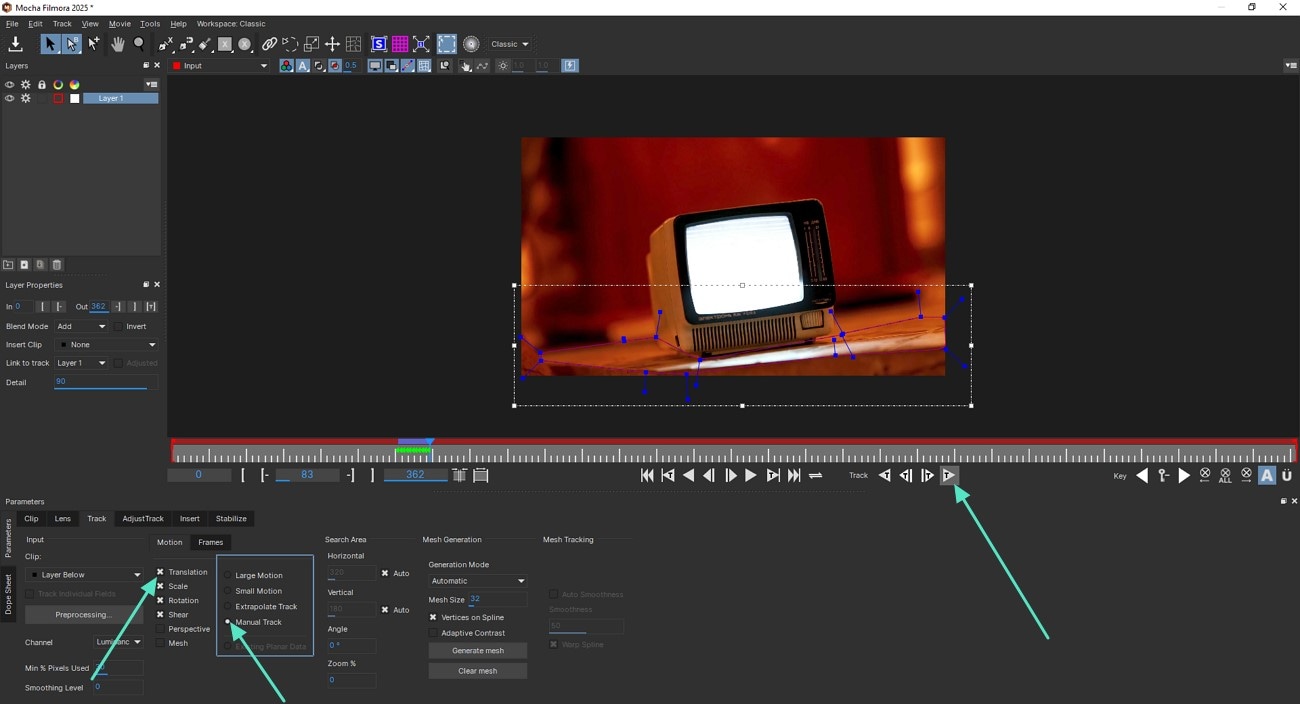
Step 4: Track the Selected Surface
Scroll down to the Track section at the bottom of the workspace. Enable Translation and Manual Track and click Track Forward to begin playback. Mocha will automatically follow the motion of the selected planar surface.
Comparing Filmora and After Effects Planar Tracking
| Filmora | After Effects | |
| Ease of Use | User-friendly with simple, intuitive controls. | Steeper learning curve with a more complex interface. |
| Planar Tracking Method | AI-powered tracking for automatic results. | Using Mocha AE plug-in for easier planar tracking. |
| Performance | Fast and efficient for straightforward tasks. | Can be resource-intensive; offers more control over tracking. |
| Cost | More affordable, with a free plan available. Premium plan starts from $29.99/qtr | Requires subscription starting from $22.99/month (stand-alone app) or $59.99/month (Adobe Creative Cloud) |
| Best for | Beginners and simple projects | Professionals and complex video tracking |
Conclusion
Video editors and motion artists usually use the Mocha plugin to assist them with planar tracking in After Effects. Mocha excels in tracking flat surfaces and handling complex scenarios with ease. Its ability to track pixel patterns across entire surfaces can help you with the process of integrating graphics and effects into moving footage.
While it might seem challenging at first, we hope our guide can help you grasp the basics and build your confidence in using Mocha AE. And if you find After Effects overwhelming, there's also Filmora which offers a more accessible approach to planar tracking.
Both tools provide great solutions for planar tracking, so you can choose the one that best aligns with your needs and skill level to create impressive video effects.
