If you've got some audio you'd love to see as a video, an MP3 to MP4 converter is the tool you need. This tool allows you to convert audio to MP4 or video and give a visual dimension to your sound.
But be warned, not all converters are up to the task. What you really need is a powerful converter that can instantly turn your audio into a matching video. For those who are just starting, we’ll help you find one and guide you on how to convert your audio to video with ease.
In this article
Part 1. Best AI-Powered Tool to Convert Audio to Video (MP4)
You can find MP3 to MP4 free converters online and as software for download on your PC.
And for those who prefer offline tools, you can try an MP3 to MP4 converter that is free to download for PC. But the thing is, they usually just convert short audio files. Or, they only attach a static image or a black screen to your sound like this.

To overcome these limitations, AI-powered audio-to-video converters offer a smarter solution. They intelligently analyze the audio to sync visuals that match your sound and the parameters you set. One of the few standout options is Wondershare Filmora.
Why Use Filmora AI Audio-to-Video
Using AI technology, Filmora features an Audio to Video feature that can convert your audio into an MP4 video. What you need to do is upload your audio, adjust a few settings, and let the AI do the rest. It works with different types of audio and video formats.
Some of the Filmora’s AI Audio to Video features include:
- Auto-Trim Highlights: This feature intelligently selects the most compelling segments of audio conversations and transforms them into engaging video clips.
- Smart Summaries & Voice Cloning: Filmora summarizes your audio content and employs AI to replicate the original voice, producing videos that preserve the original tone and feel.
- Talking Head Videos: Enable the “Character Image” feature and upload a reference image, then Filmora will create a talking-head video synced to your audio.
- Creative Freedom: Filmora provides a suite of AI-powered editing tools, so you can customize your videos to ensure each one is distinct and matches your vision.
Once you've converted your audio, you can easily publish it to platforms like YouTube or various short video apps with just a few clicks.
Part 2. How to Create Video Using MP3 to MP4 Converter
Now that you know which tool to use, it’s time to start converting an MP4 video from your audio. You can download Filmora’s MP3 to MP4 converter on PC and Mac. Make sure you’ve installed the latest version. Then, follow the steps below.
Step 1: Launch Filmora and open Audio to Video tool
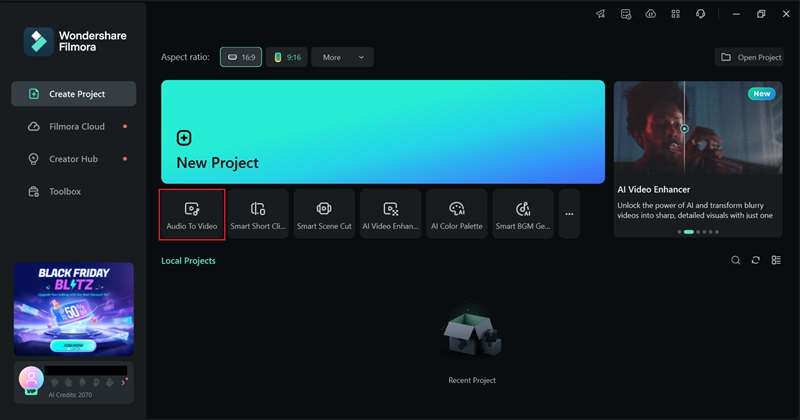
Start by launching Filmora and select the "Audio to Video" option below the New Project button. Or, you can also find the tool on the Toolbox menu.
Step 2. Import audio file
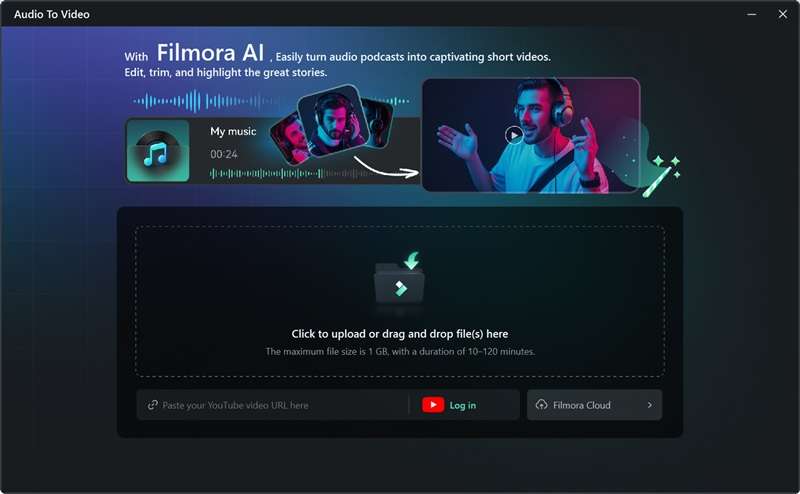
Import your audio file or paste a YouTube URL link (sign-in required). Ensure that the audio file is between 10 and 120 minutes long and doesn’t exceed 1 GB in size.
Step 3. Customize Your Video Settings
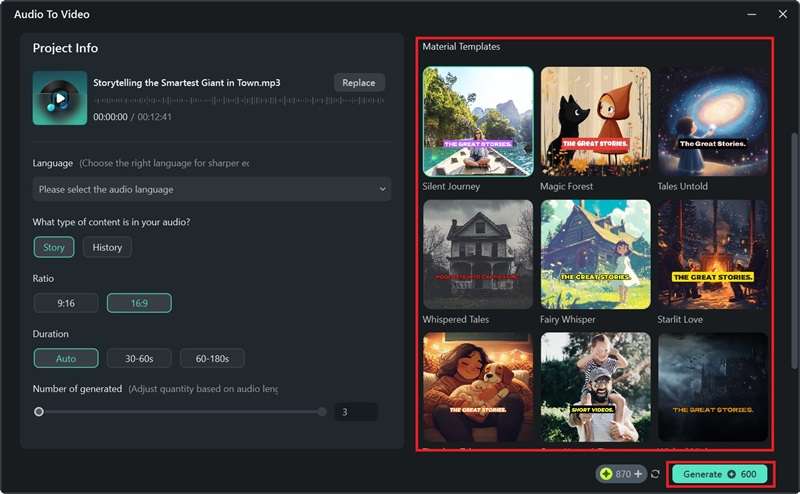
Before converting your audio into an MP4 video, adjust the settings to fit your preferences. Select the language of your audio and the video type you want to create. Then, set the "Ratio" and "Duration" settings, and choose a "Picture Style" or upload a custom image to personalize your video.
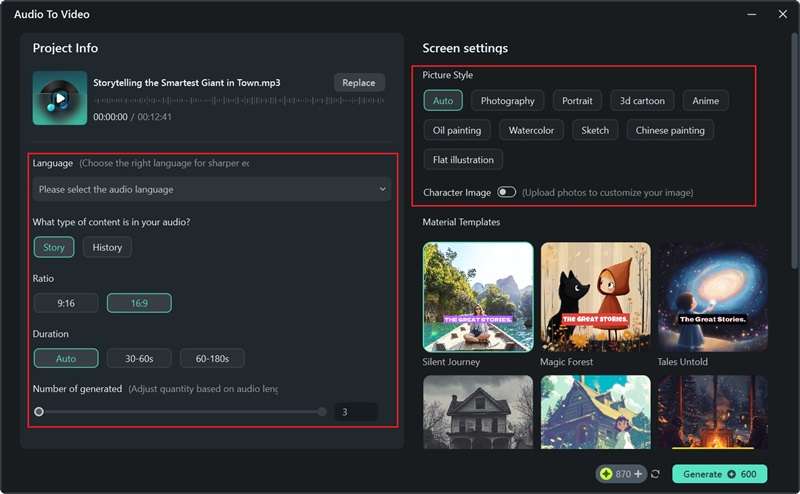
Scroll through the available Filmora templates and select one that aligns with your project's theme. Once satisfied with the settings, click the “Generate” button and allow Filmora a few minutes to create your video.
Step 4. Preview the video result
After the video is generated, you'll see several video results along with their respective scores to help you choose the best one. Click the play button on each clip to preview it. If you're satisfied with your selection, save it to your computer by clicking Export.
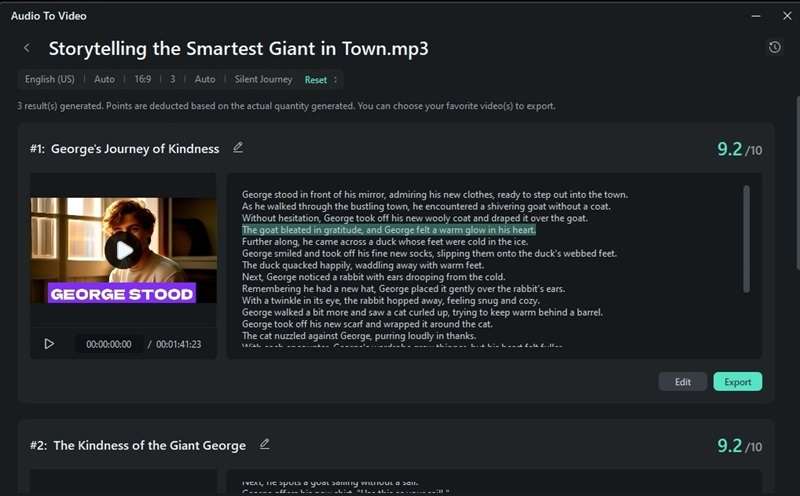
But if you want to edit it further, you can click Edit and continue to the next section.
Part 3. Fine-tuning Your Video with Filmora Editing Tools
Now that you’ve successfully converted audio to video, you can fine-tune it further using Filmora editing tools. After selecting Edit, you will be directed to Filmora’s Audio-to-Video editing interface.
1. Edit and Adjust the Script and Caption
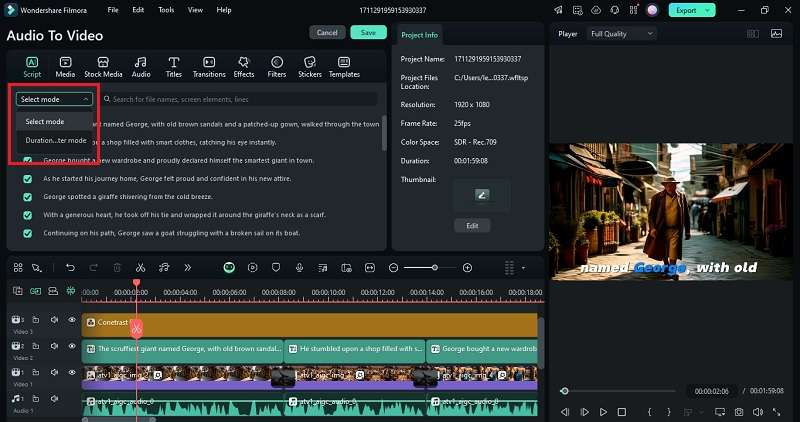
First, you can select either to view the script in the Select mode or Duration Filter mode. Viewing in the Select mode allows you to hide or show specific parts of the script. Meanwhile, the Duration Filter mode helps you organize and filter content based on its timecode.
If you select the script or the text on the preview window, it will open the property panel where you can adjust and change the dynamic caption template. Select the one that you like. Click Apply to All to apply the selected template across all captions in your project.
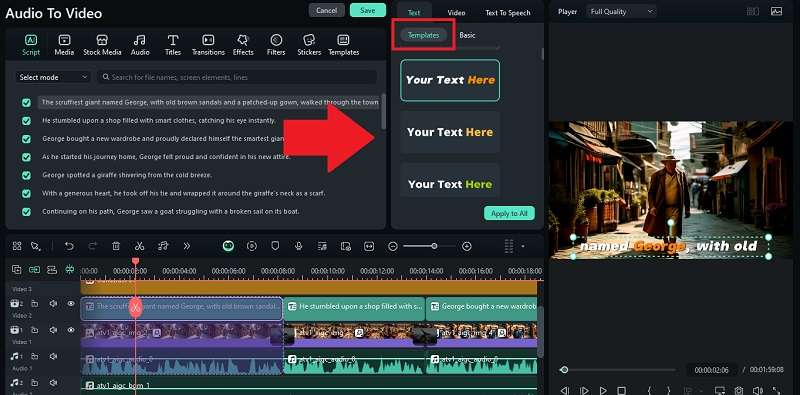
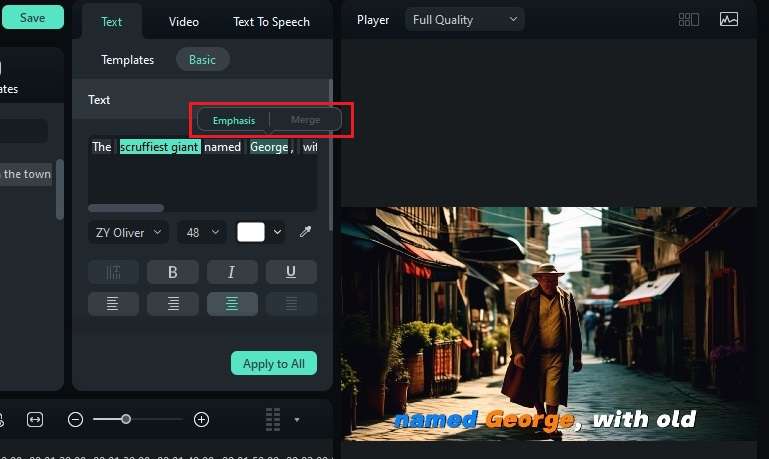
To edit the script, navigate to the Text > Basic tab on the property panel. There, you can also select specific words to emphasize or merge them to create a smoother flow.
2. Change the Voice Narration
If the voice narration doesn’t match the tone and style of your video, you can easily replace it. Head to the Text-to-Speech tab and you’ll see the option to clone your voice or select from the Voice Library tailored to different genders, ages, and styles.
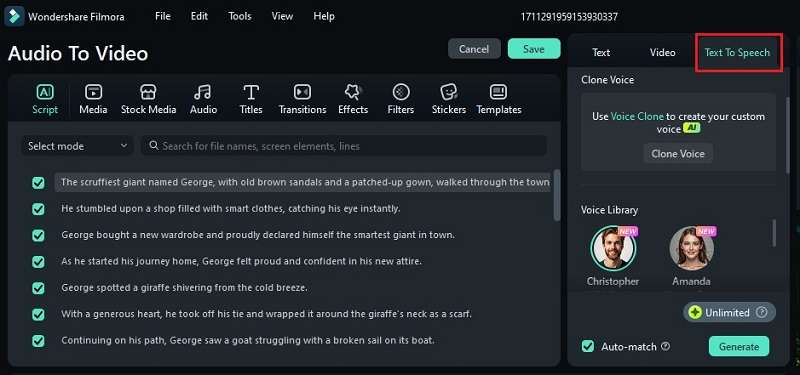
If you choose to use a voice from the Voice Library, you can preview the options, select the one you need, and click Generate to apply it to your project.
3. Modify or Add a Transition Between Clips
When you zoom in on the timeline, you’ll see that the generated video automatically includes transitions to enhance the flow of your content. However, you can still customize or replace them according to your preferences.
To do it, navigate to the Transitions tab. Browse and find one that fits the flow of your video.
Then, drag and drop the transition between clips on the timeline.
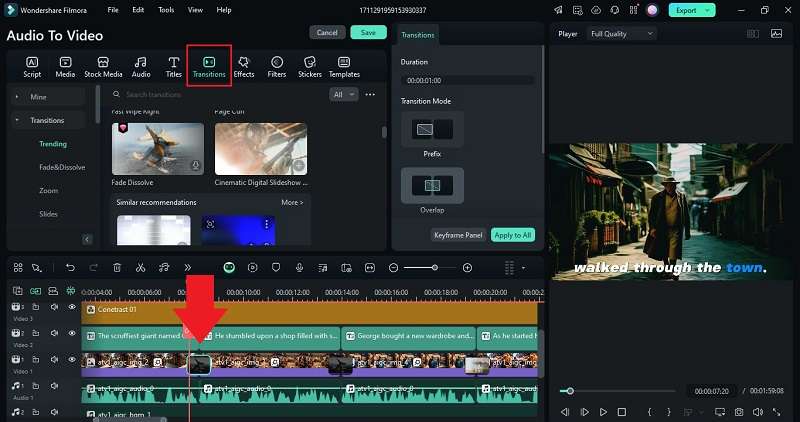
There’s also an option to either put it between the clips (Overlap), before the end of the first clip (Prefix), or at the beginning of the second clip (Postfix).
4. Add Your Own Footage
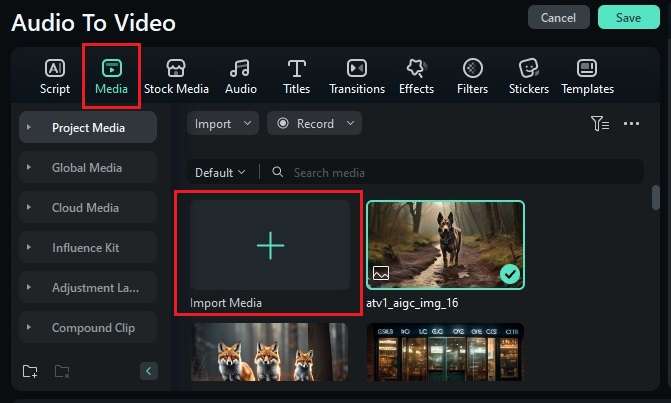
If you want to add your own footage, you can do so by importing your file in the Media tab. Once uploaded, drag the footage to the timeline.
Part 4. Solutions to Common Challenges When Converting Audio to Video
Throughout the MP3-to-MP4 conversion, there might be some challenges you face along the way. Don’t worry, though! We have some handy tips to help you navigate these challenges and keep your project on track.
1. Failed to Generate Video
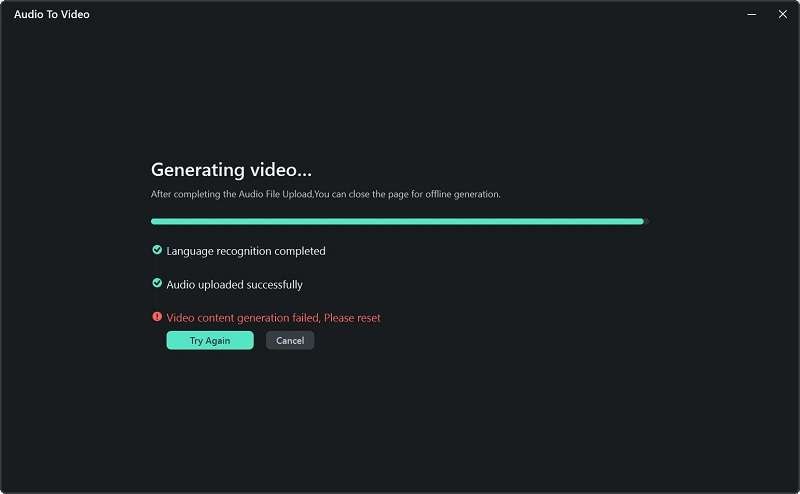
Solution: Double-check that your audio file is in a compatible format and length (between 10-120 minutes). Make sure your device has enough power and storage to handle the task. Then, try generating it again. You can also check your backup folder in Filmora as the software automatically saves project backups in case of interruptions.
2. Poor Audio Quality Affecting Video Output
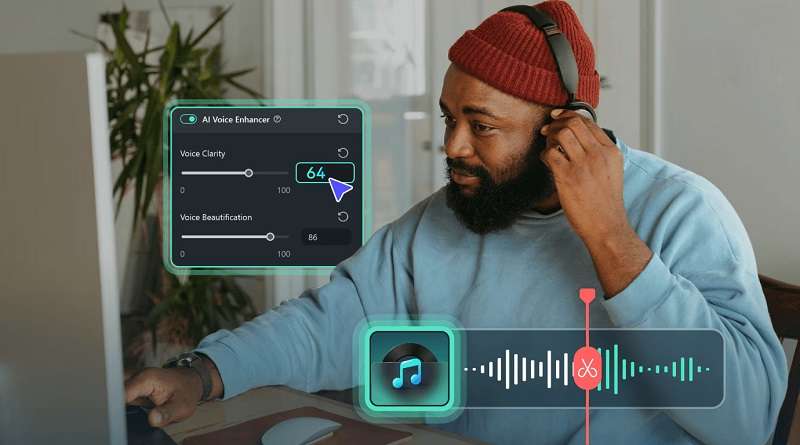
Solution: Before converting your video with Filmora, you can enhance your audio first with Filmora’s audio editing tools. Filmora offers tools like AI Denoise and AI Voice Enhancer that can increase the clarity of your sound.
3. The File Size is Too Large to Upload on Social Media
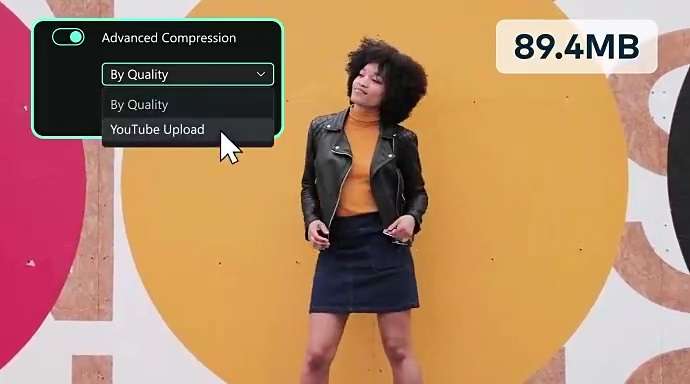
Solution: When exporting, enable the Advanced Compression feature in Filmora to reduce your video size up to 90% without quality loss. There’s also an option to compress your video based on YouTube’s recommended bitrate, which helps to retain the optimal quality of your upload without additional compression steps.
Conclusion
When most free MP3 to MP4 converters fall short of creating a compelling narrative video, you need an AI-powered Audio-to-video tool like the one in Filmora. This powerful tool doesn’t just convert your audio into an MP4 video—it also perfectly visualizes your sound with visuals that match the sound.
Moreover, Filmora's advanced features give you the flexibility to edit your video further. You can add custom elements and fine-tune every detail to create a polished final product.


 100% Security Verified | No Subscription Required | No Malware

