It seems like content creators nowadays are fond of filming themselves while talking about various things. Why so? Simply because the majority of video content online revolves around self-narration, interviews, story-telling, and the like. Well, there is nothing wrong with that. In fact, many viewers are inclined to consume this type of content compared to others. That being the case, the dialogue-enhancer tools have become very popular today. Well, why not? In a click or two, they are capable of improving the speech quality of various audio files. Therefore, content creators are now integrating the use of this tool into their typical production process.
Of course, it is still important that the recording of the audio is done properly. If you have the means, you should use professional equipment in this regard. However, post-production nowadays offers tons of help to enhance voice recordings. Yes. There are lots of dialogue enhancer tools out there that can certainly assist you. You just have to choose the best dialogue enhancer that fits not only your preferences but also your needs. Don’t worry. Lots of related guides online offer valuable insights in this respect. One of them can surely help you make a great choice.
In this article, we will talk about the basics of dialogue enhancement using modern tools. We will also provide a list of the dialogue enhancers that you can try to use. Lastly, we will suggest an ideal alternative in case you’re looking for other potential options. Continue reading below to learn more.
In this article
How to Use Wondershare Filmora as a Dialogue Enhancer?
In a nutshell, we can definitely say that most content creation tools nowadays are well-equipped. They’re continuously adding new features to make sure that their service remains relevant to the evolving needs of everyone. At present, it’s now possible to enhance speech quality within the video-editing application. Yes. Many video editors nowadays have a built-in feature to facilitate this kind of procedure. One of them is Wondershare Filmora. Aside from highly advanced content creation functions, it also provides access to a potent dialogue enhancer. Do you want to try it on your end? If that is so, then read the details below to learn more.

Key Features
Wondershare Filmora is packed with helpful features that can help you with content creation. Check them out from the list below.
- AI voice enhancer: It is equipped with a built-in AI voice enhancer capable of improving speech quality in a snap. Once enabled, this tool automatically removes unnecessary noise from the audio file and polishes everything.
- Basic and professional video editing: It is capable of facilitating various video-editing techniques that you may need in your projects.
- High-quality video templates: It offers various video templates that you can easily customize based on your concepts and ideas.
- Lots of creative resources: It is home to a large library of creative assets that you can insert into your project timeline. Among them are stock images, video clips, audio bits, effects, and filters.
- Artificial intelligence: Aside from AI voice enhancer, it offers other AI tools that you can access and use within the platform. To mention a few, these are AI smart cutout, AI thumbnail creators, AI text-based editing, and many more.
- Flexible export options: It allows you to render and export the outputs in a variety of formats. Among the supported file types are MP4, WMV, AVI, MOV, F4V, MKV, TS, 3GP, MPEG-2, WEBM, GIF, and MP3.
Step-By-Step Guide
Wondershare Filmora is very easy to use and navigate. For sure, you’ll not have a hard time enabling and configuring its dialogue enhancer feature. Do you want to try it now? If so, below is a short tutorial for you. Read the instructions very well and follow the indicated steps accordingly.
Step 1: Download Wondershare Filmora from its official website. Right after, install it on your computer.
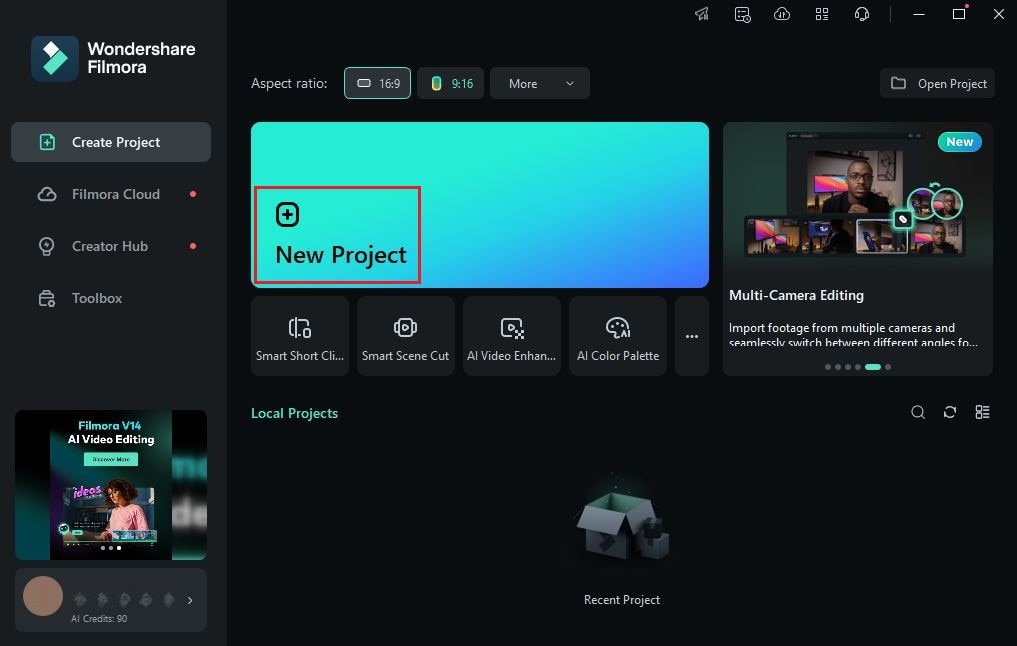
Step 2: Run the newly installed video editing software on your desktop afterward. Once it fully loads up, go to the main dashboard and click New Project to start editing. Alternatively, scroll down to the Local Projects section and open an existing session if there is any.
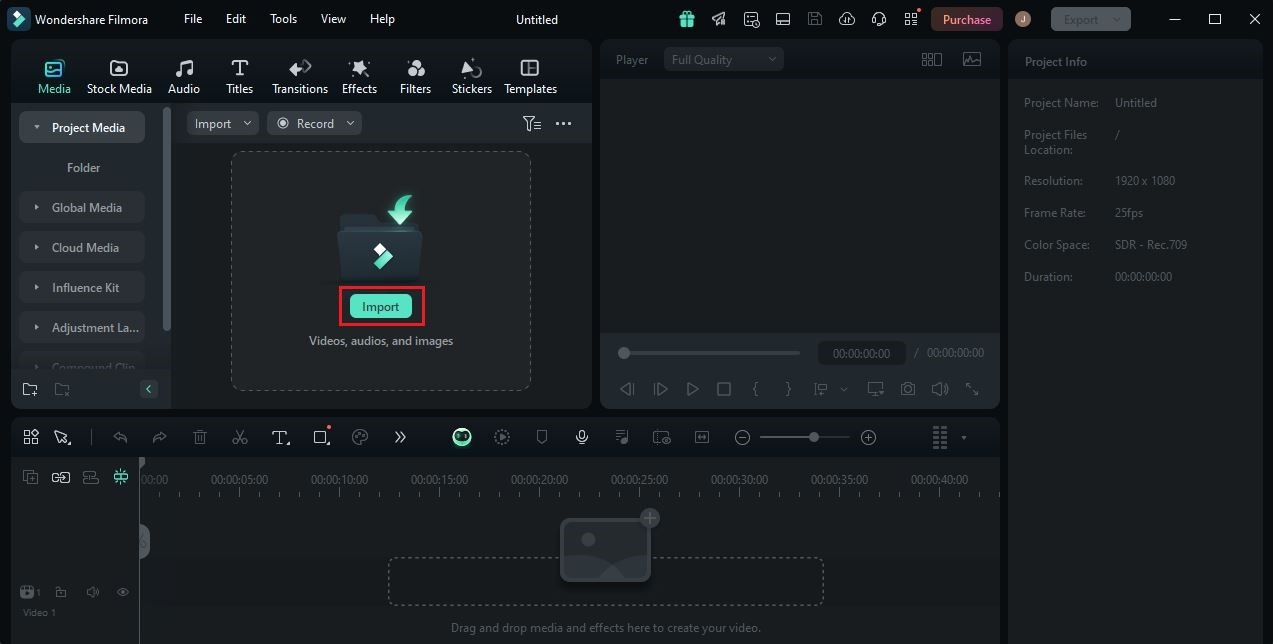
Step 3: After that, head over to the Elements Panel and click Import under the Media tab. Select the files you’re going to use and then upload them to the platform. Once done, grab and drag them one by one to the Editor Timeline. Finalize their arrangement and make all the necessary adjustments.
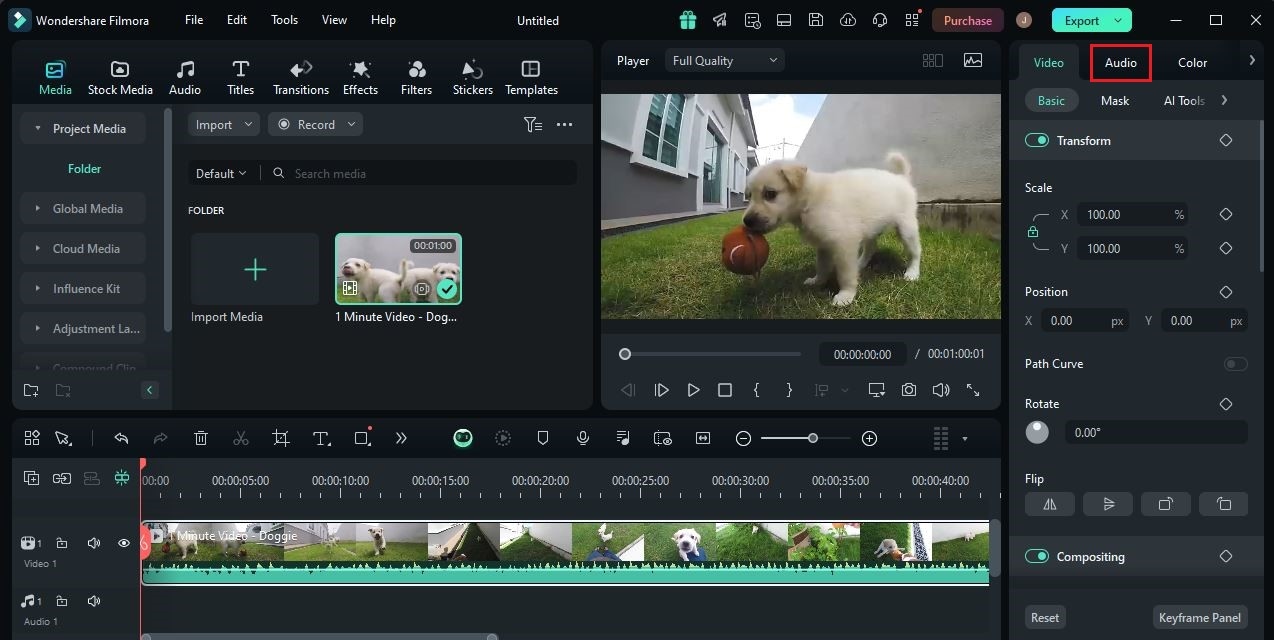
Step 4: At this point, you may now proceed with the voice enhancement. Don’t worry. The AI dialogue enhancer tool of Wondershare Filmora is not that hard to configure. To get started, simply click an audio or video file on the Editor Timeline. A new panel will then open on the right-side corner. From there, click Audio to access the settings.
Step 5: Browse the options under the Basic tab and locate the AI voice enhancer. Switch on the toggle button next to it to activate this feature. Immediately, the tool will analyze the selected asset and improve its speech quality.
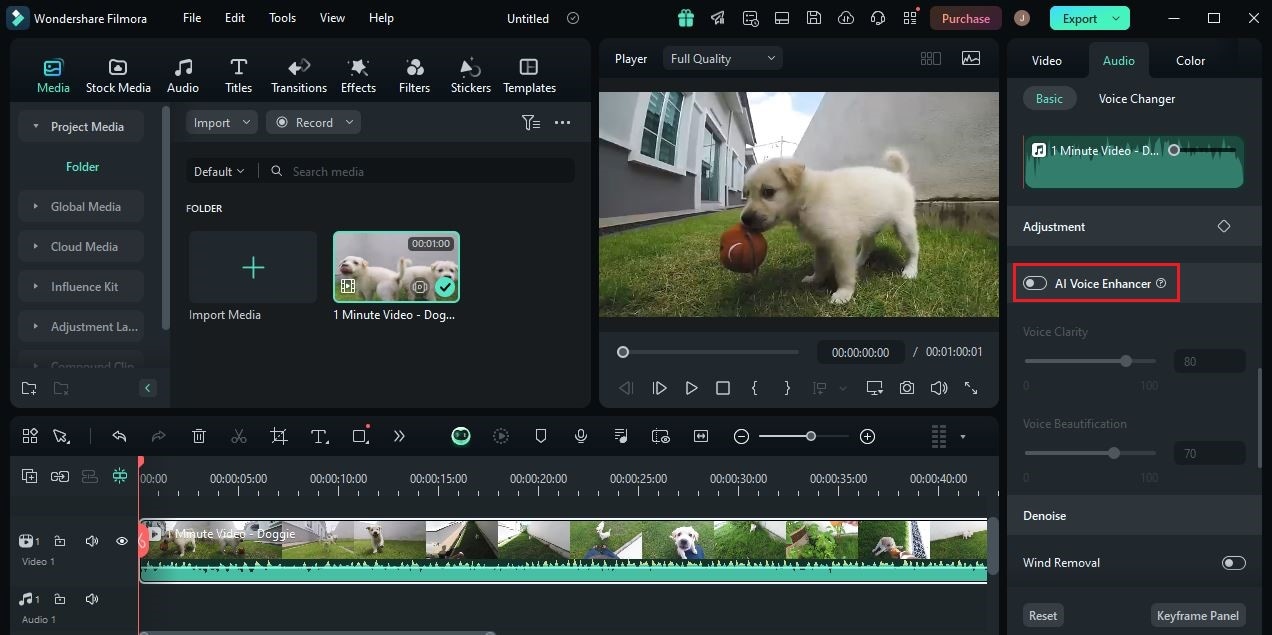
Step 6: For customization, you’re given a couple of options to make certain adjustments. In this regard, scroll down to Voice Clarity and Voice Beautification features. Move the slider from left to right or vice versa until you achieve a desirable result.
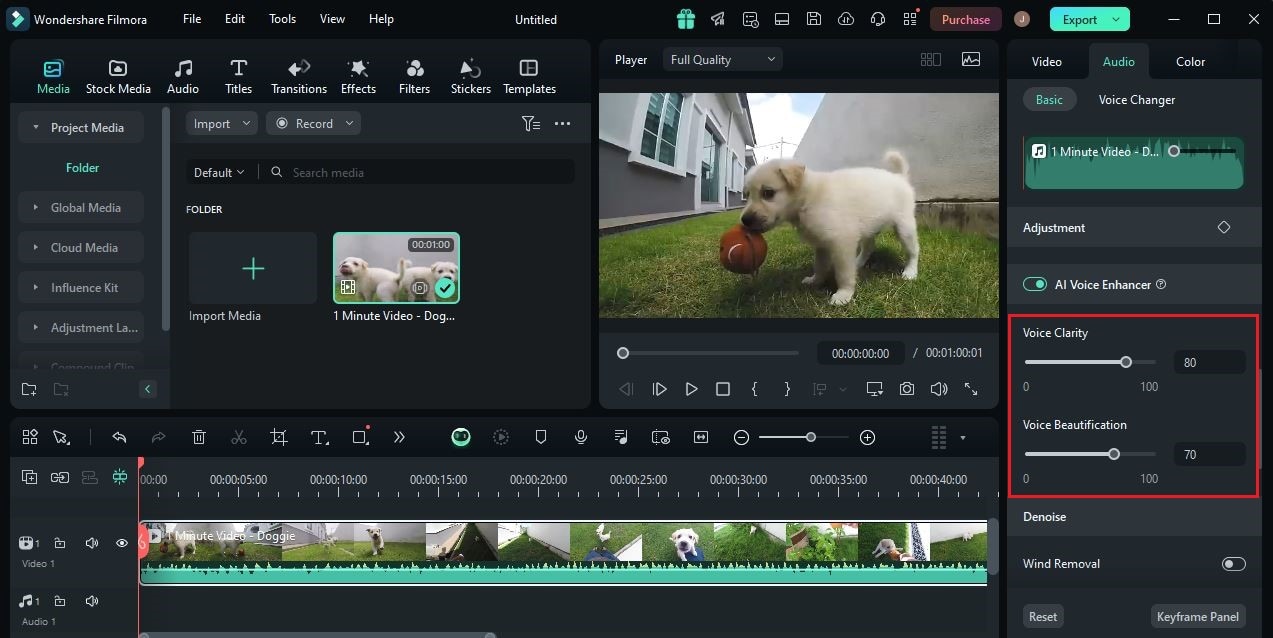
Step 7: Once done, play and review the output. If you’re satisfied with the outcome, click the Export button to render the output and save a copy to your computer. Otherwise, continue calibrating the configurations. Most settings on this platform have a Revert button that you can use to discard previous inputs and start all over again.
Core Elements of Dialogue Enhancement
It’s true to say that the dialogue enhancer tools simplify the post-production procedures of audio files. Well, why not? All it takes is just a few clicks to apply such effects to your files. After uploading the assets, you just need to wait for the output. Yes. It’s just as simple as that. Therefore, it comes as no surprise that Denon dialogue enhancer and other similar tools have become very popular.
However, take note that the outputs of these programs may still vary from one user to another. There are certain factors that may affect the dialogue enhancement and create a different result. That’s why you should familiarize yourself with the basics of dialogue enhancement. Don’t worry. It’s not that complicated to learn. Let’s start with the fundamental elements that make up the dialogue enhancement process. Do you want to know what those are? Check out the list below and keep them in mind whenever you use a dialogue enhancer.
Reducing background noises
When talking about dialogue enhancement, the first thing that comes to mind is background noise reduction. Yes. It’s probably the main element that encompasses this kind of procedure. That being the case, you need to make sure that your preferred dialogue enhancer is equipped with this feature.

Balancing volume levels
One way or another, the dialogues on your audio or video assets must not sound too loud or too soft. They should always be configured at the right levels. In this respect, you don’t need to manually do the calibrations. Just choose an ideal dialogue enhancer and let this tool do the rest of the work for you.
Bringing out the language rhythm
Dialogues have an embedded rhythm. Depending on the emotion it portrays, the lines create a specific cadence as they are spoken. That said, the language rhythm must be felt by the audience as they watch and listen to the material. Don’t worry. A potent dialogue enhancer can help you with that. As the speech quality is improved, the language rhythm appears naturally and becomes evident.

Inserting emotional effect
The message of the dialogue becomes a lot more realistic and effective when delivered with emotions. Thus, the producers always make sure that the voice actors they hire are capable of doing it. As for the editors, the best help they can give is to improve the quality of the recording. You may use a dialogue enhancer and add a few audio effects to unveil the emotions behind the dialogues.
3 Dialogue Enhancer Tools to Try
As previously indicated, improving the speech quality of video and audio content is now a walk in the park. You don’t need any advanced skills or formal training to facilitate this kind of procedure. Basically, you just have to use a dialogue enhancer that suits your preferences and run the materials into it. Yes. It’s just as simple as that. Denon Dialogue Enhancer and Dolby Dialogue Enhancer are among the programs you may take into consideration. But apart from them, there are other potent options you may also explore. Do you want to know what those are? If so, check out the list below.
Accentize

First on the list is Accentize. It’s basically a post-production tool that provides various options to enhance the essential components of audio files. One of its prominent features is DialogueEnhance. As the name suggests, it is the specific function of Accentize that generally acts as a dialogue enhancer. Do you want to try it on your next project? If that is so, then read the details provided below to learn more.
Key Features
- De-Noise Module: It is equipped with a powerful de-noise feature that intelligently detects unwanted noises and removes them from the audio recordings.
- Auto-EQ: It is capable of configuring the audio frequencies without manual inputs from the users.
- Auto-Compressor: It has a special tool that automatically sets the loudness and softness of voice recordings at a balanced level.
- LUFS configuration: It offers an auto-LUFS option to help you ensure that the loudness of the voice recording is properly configured.
Adobe Premiere Pro

We all know that Adobe Premiere Pro is a video editing software. Yes. That is right. This application is used to craft and render various types of video content. But apart from that, you can also enhance the speech quality of your creative assets. How so? Very simple. Just explore its audio settings and activate the dialogue enhancer feature. It’s just as simple as that. Are you planning to include Adobe Premiere Pro in your options? If that is so, then read the details below to learn more about its dialogue enhancer tool.
Key Features
- AI-powered tool: It uses artificial intelligence to analyze the audio and make the necessary improvements. Therefore, you can be sure that the dialogue enhancement process will be a piece of cake.
- Level customization: It allows you to customize the final output of the dialogue enhancer feature. By simply dragging the slider, you can configure its amount to your desired level.
- Noise reduction: It is capable of detecting the dialogue on the audio file and separating it from unwanted noises. This way, the latter is removed accordingly with just the snap of a finger.
VEED.IO

Last but not least is VEED.IO. Like Adobe Premiere Pro, VEED.IO is also a popular video editing tool, except that it is hosted online. Yes. You don’t need to install an app just to use VEED.IO. Simply connect your device to the internet and start surfing. While it is commonly used as a video editor, VEED.IO can also be a great dialogue enhancer. This tool is equipped with a special feature that allows you to improve speech quality within a few minutes. Do you want to know more about this feature? If so, read the details provided below.
Key Features
- Ease of use: It doesn’t take a genius to navigate and use this platform. You will surely get used to its functions in a snap.
- Simplified process: Since this feature is AI-powered, the entire process is simplified. You just basically have to upload the file and wait for the results.
- Wide export options: It allows you to export the final output in either MP3 or MP4 format. Just configure the settings properly before you proceed.
- Auto dialogue enhancement: It automatically removes background noises and improves speech quality once the audio file is uploaded.
Conclusion
Just because the dialogue is well-delivered doesn’t mean post-production is not necessary at all. Of course, it still remains a very important part of the entire creation process. If you skip this step, chances are potential errors and issues will not be amended. Don’t worry. This kind of procedure doesn’t have to be complicated. If you wish to take a convenient approach, the best option for you is to use a dialogue enhancer. There is a lot to choose from in this regard. But for content creators who publish talking video content, you may download Wondershare Filmora. It’s a powerful video editor with a built-in dialogue enhancer feature. Like Vizio Dialogue Enhancer and Dolby Dialogue Enhancer, it can also help you a lot regarding this matter. Explore Wondershare Filmora on your end and make the most of its amazing features.


 100% Security Verified | No Subscription Required | No Malware

