It comes as no surprise that Spotify is one of the most popular applications nowadays. Why so? Simply because listening to music is a huge part of everyone’s daily lives. Most of the time, this audio-streaming app delivers very well. Users don’t usually encounter problems that disrupt their wonderful listening experience. However, problems sometimes occur unexpectedly. Let’s say the sound quality suddenly changes from the usual. Well, Such issues rarely happen, but they can happen due to various factors. But don’t worry. It’s now very easy to improve Spotify sound quality in a breeze.
How to improve audio quality on Spotify? Well, there are lots of techniques you can try in this regard, depending on the nature of the problem. Oftentimes, a simple recalibration resolves the problem once and for all. That’s why you should be familiar with the settings provided by Spotify. Try to understand how the fundamental functions work so that you can easily make adjustments if necessary. Don’t worry. Lots of tutorials are there around to assist you every step of the way. Just choose one that perfectly matches your current situation.
In this article, we will delve into helpful tips on how to improve Spotify audio quality. We will also talk about the benefits of listening to Spotify music with high quality. Continue reading below to learn more.
In this article
How to Improve Background Music Quality Using Wondershare Filmora?
In terms of quality, Spotify music can indeed be considered a great source of background music for video content. You can be sure that the audio files from this platform are well-optimized to sound good for such purposes. If not, you can just make a few reconfigurations to improve Spotify sound quality. While Spotify music is widely available, it is not allowed to download them directly to the local storage of your device. Unless your video-editing software is integrated with Spotify, there is no way you can insert them into your project timeline. But don’t worry. If you want to achieve a Spotify-level quality for your background music, Wondershare Filmora can help you with that. It is equipped with a potent AI voice enhancer that can somehow improve the quality of your background audio. Do you wish to try it on your end? If that is so, then read the details below to learn more.

Key Features
Here are the key features of Wondershare Filmora that can help you create stunning outputs and enhance audio quality.
- AI voice enhancer: It is equipped with a built-in AI voice enhancer that improves the speech quality of the audio assets. If your background music has very poor quality, this tool can somehow help you make the lyrics sound clearer and better.
- Basic and professional video editing: It is packed with tools that you can use to perform various video-editing techniques and apply certain effects.
- Tons of video template selections: It offers numerous video templates that can be easily personalized if you don’t wish to start a project from scratch.
- Huge library of creative resources: It gives you access to a large library of creative assets that you can add to your project. Among them are stock pictures, video clips, audio bits, effects, filters, and many others.
- Artificial intelligence: Its platform supports artificial intelligence very well. Thus, there are other AI-powered tools you can use apart from the AI Voice Enhancer. To name a few, these are AI Thumbnail Creator, AI Smart Cutout, AI Text-Based Editing, and many others.
- Flexible export options: It allows you to render and export the final output in various formats. Among the supported file types are MP4, WMV, AVI, MOV, F4V, MKV, TS, 3GP, MPEG-2, WEBM, GIF, and MP3.
Step-By-Step Guide
The AI Voice Enhancer of Wondershare Filmora is not that hard to use and navigate. The process is generally similar when you improve Spotify sound quality. Do you want to try it on your next project? If so, check out the tutorial below. Read the instructions very well and follow the indicated steps accordingly.
Step 1: Download Wondershare Filmora from its official website. Right after, install it on your computer.
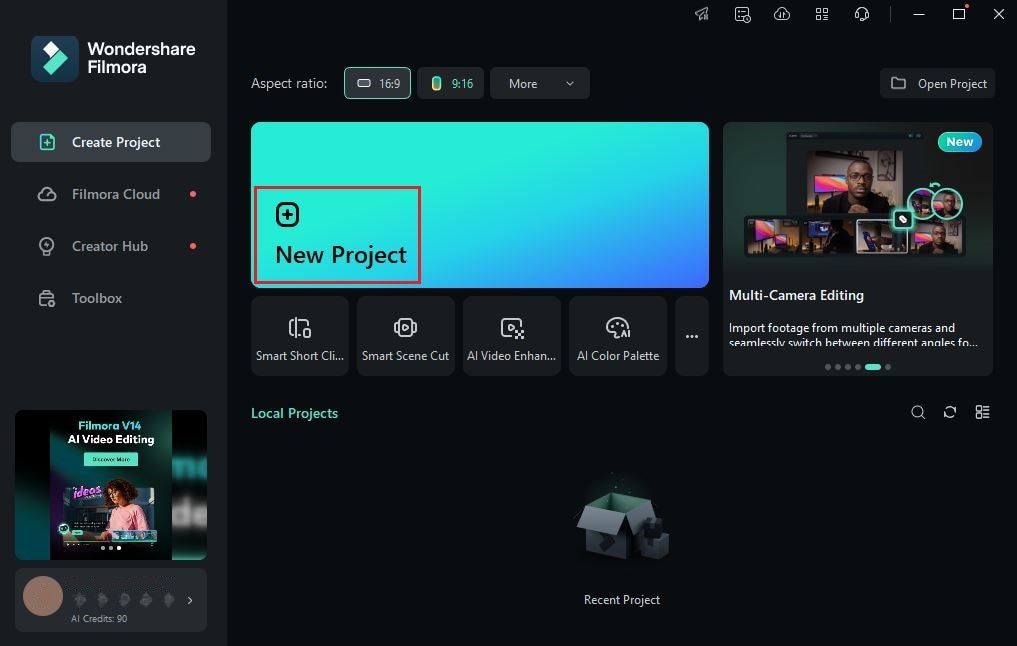
Step 2: Run the newly installed video editing software on your desktop afterward. Once it fully loads up, go to the main dashboard and then click the New Project button to start editing. Alternatively, scroll down to the Local Projects section and open an existing session if there is any.
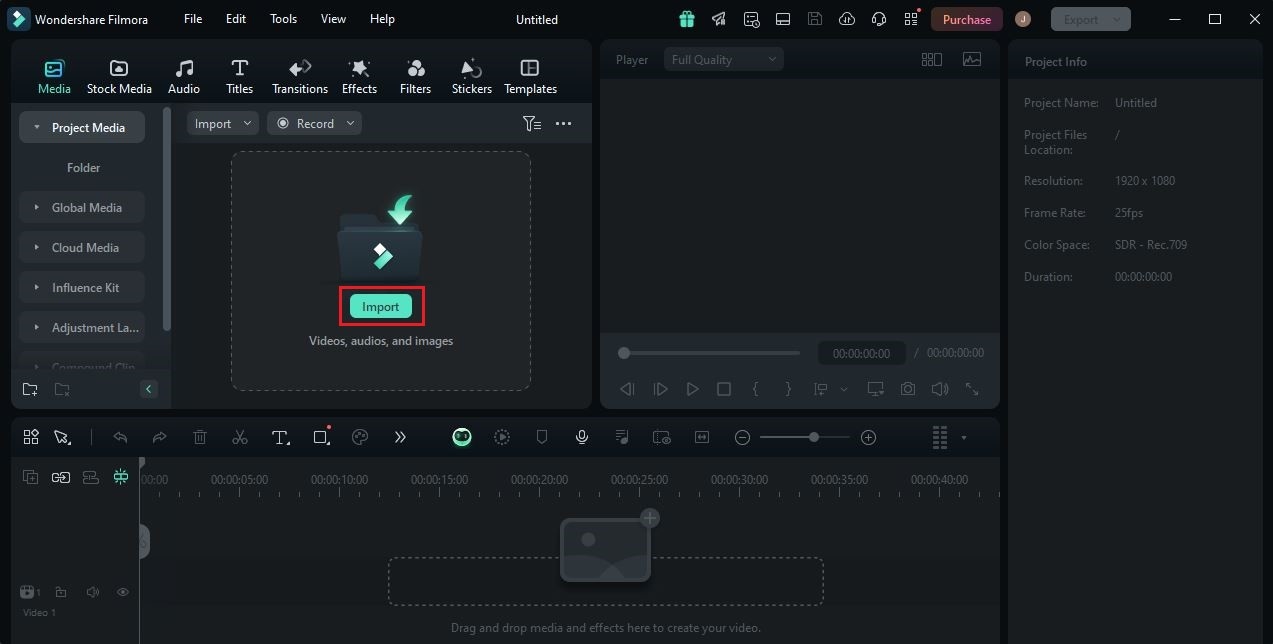
Step 3: After that, head over to the Elements Panel and click Import under the Media tab. Select the files you are going to use and then upload them to the platform. Once done, grab and drag the files one by one to the Editor Timeline. Arrange the assets accordingly and make all the necessary adjustments.
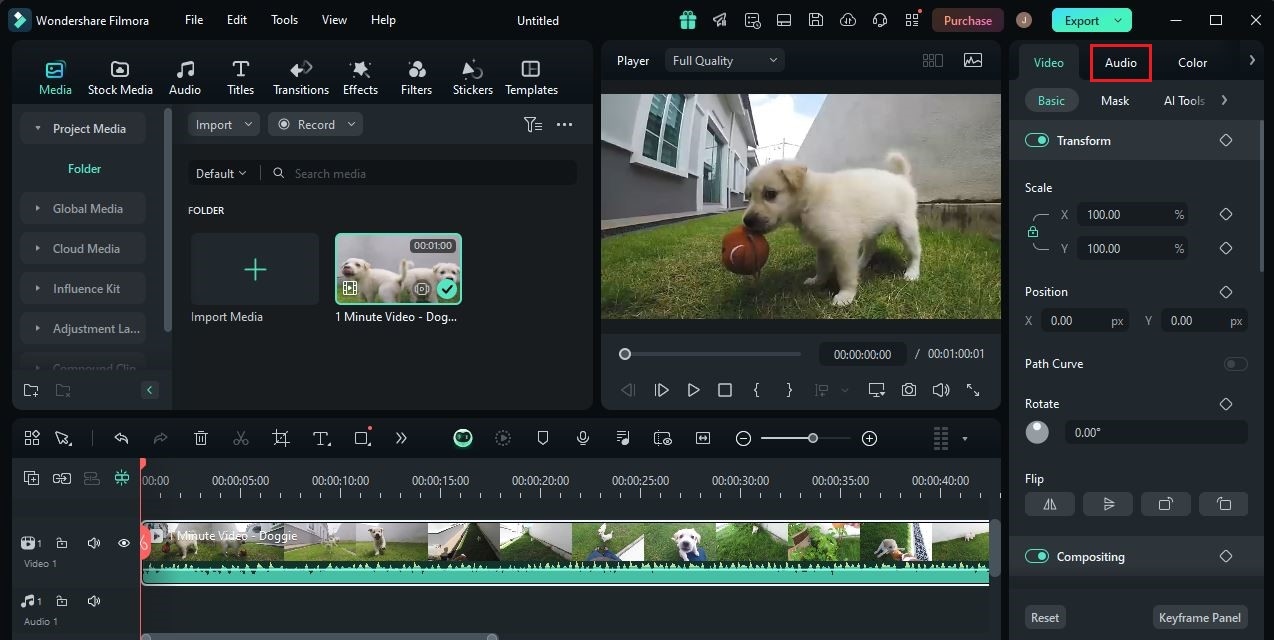
Step 4: At this point, you may now proceed with the voice enhancement. Don’t worry. It’s as easy as shooting fish in a barrel. To get started, simply click an audio or video file on the Editor Timeline. A new panel will then open on the right-side corner of your screen. From there, click Audio.
Step 5: Go over the available options under the Basic tab and then find AI Voice Enhancer. Switch on the toggle next to it to activate this feature and apply the enhancement effect to the selected asset.
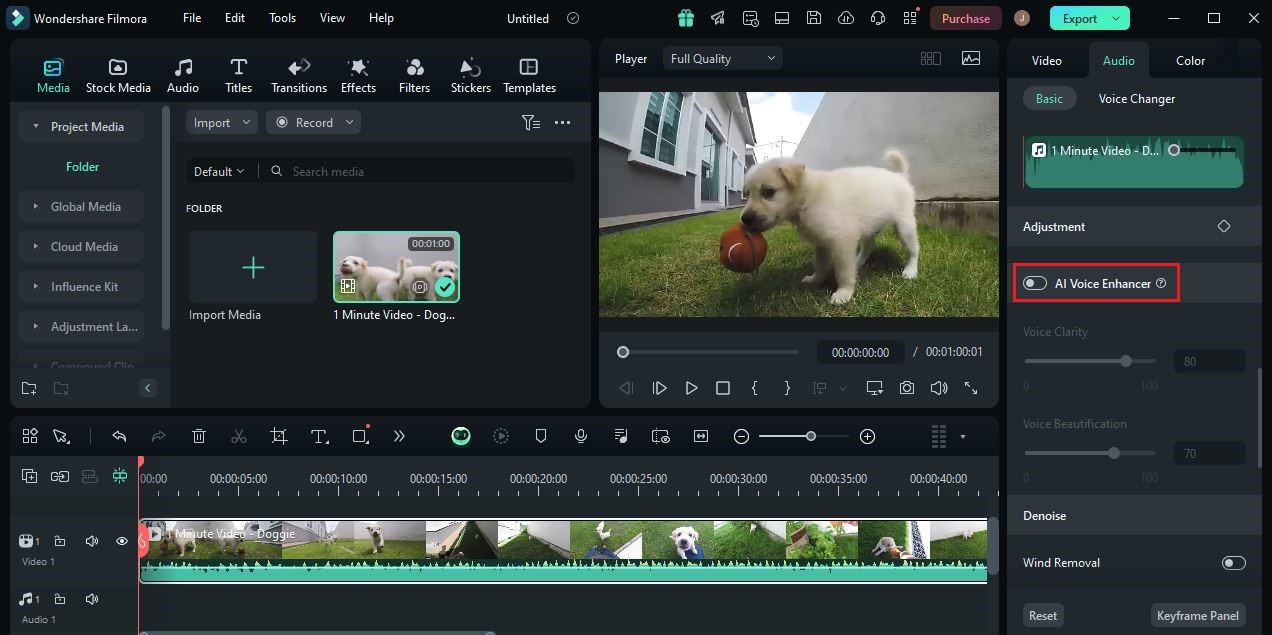
Step 6: As for customization, Wondershare Filmora offers a couple of options that you may configure based on your preferences. Find the Voice Clarity and Voice Beautification options under the Basic tab and then move the slider to your desired level.
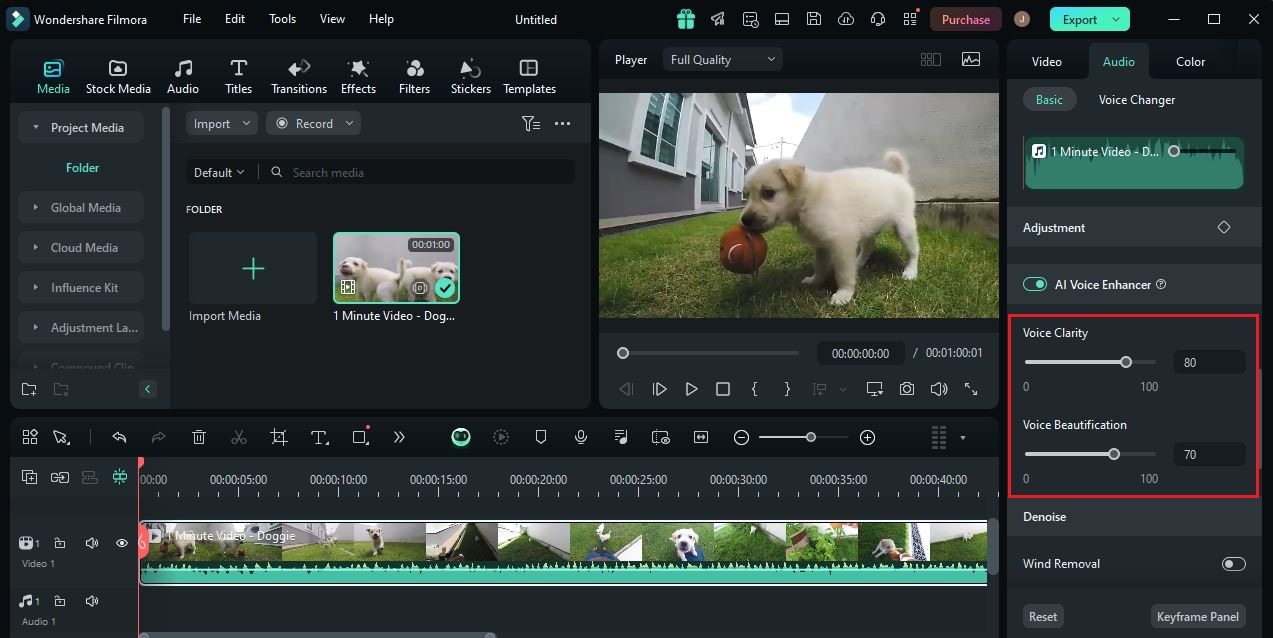
Step 7: Once done, play and review the output. If you’re satisfied with the result, click the Export button above the Preview Panel to finally render the output and save a copy to your device. Otherwise, continue making certain changes until a favorable outcome is achieved. Most of the options on the platform have a corresponding Revert button. You may click on it if you wish to disregard your previous input and start all over again.
How to Manually Improve Spotify Sound Quality?
Unless you’re the artist or producer, you cannot improve the actual quality of the music file. Listeners don’t have access to such calibrations. But don’t worry. There are lots of ways you can try to improve Spotify sound quality on your device. Basically, you just need to make a few reconfigurations on the settings. Do you want to know how and try some of them on your end? If that is so, then check out the list below.
Set the volume level to normal.
Inside Spotify’s settings panel, there is one option that allows you to normalize the sound. Simply go to the Volume Level option and choose Normal. Sure. You have to option to set it to Loud or Quiet. But if you wish to have a more optimized listening experience, Normal is indeed the best choice.

Set the streaming quality to very high.
How to improve sound quality on Spotify? As a listener, the closest you can get in this regard is the Audio Quality option. Simply go to Settings and access the options under Streaming. Make sure that the audio quality for both Wi-Fi and Cellular Streaming is set to Very High. This way, you can be sure that your Spotify music will be played with the highest quality possible.
Reconfigure the Spotify’s default equalization.
In case you’re unaware, Spotify has a built-in Equalizer feature. Through this tool, you’re given the chance to configure the audio frequencies based on your preferences. Don’t worry. It’s indeed a piece of cake. Simply go to Playback Settings and enable Equalizer from there. Make certain changes until you achieve a desirable audio effect.

Use high-quality earphones or speakers.
Sometimes, you don’t actually need to improve Spotify sound quality on your end. Maybe you just have to use other speakers or earphones. If that is the case, then you can leave the original configuration as it is. Instead, find other listening devices that work better on Spotify music.
Why Should You Improve Spotify Sound Quality?
At the very least, it’s not always necessary to improve the Spotify sound quality. Most of the time, the music published on this platform is produced and mastered very well. Regardless, it is still highly recommended to do such modifications. Aside from improved listening experience, there are other benefits you can get if you make this kind of recalibration. Do you want to know what those are? If so, check out the list below.

- Since you can adjust certain configurations, the listening experience feels more personalized. If you want to listen to loud music without hurting your ears, you can reconfigure the equalizer settings accordingly. It’s just as simple as that.
- Some listening devices do not perform that well. If you have one, you can still resolve it without buying a new replacement. How so? Very simple. Explore the settings and use them to improve Spotify sound quality. If you’re able to make the right adjustment, you will surely notice a difference.
- Lastly, playing music from Spotify can become more suitable for professional use. Yes. That is indeed possible if you improve the Spotify sound quality on your device. Let’s say you have a party to host. If you’re going to use Spotify as the music source, then don’t forget to recalibrate its equalizer settings first. Make sure that it produces sound outputs compatible with huge speakers. Take note of the abovementioned tips on how to improve Spotify audio quality. For sure, they can help you a lot in this regard.
🤩 Post You Might Be Interested In:
Conclusion
There is no doubt that Spotify is among the most reliable sources of music nowadays. It offers tons of discographies from various artists and always catches up with the latest single releases. In terms of quality, you can also be sure that Spotify is capable of offering the best in this respect. However, take note that there are effective ways to further improve the Spotify sound quality. Check out the tips and tricks above on how to improve audio quality on Spotify. They can surely assist you every step of the way. As for content creators who wish to use high-quality audio files in their projects, download Wondershare Filmora. It is a potent video editor that comes with a built-in AI voice enhancer feature. Explore this function on the platform and make the most of its benefits.


 100% Security Verified | No Subscription Required | No Malware

