How wonderful to be able to record life’s fleeting moments with your iPhone! Quite amazing, isn't it? But, come on, we all know it—those interfering background sounds can sometimes really spoil the shot.
Suppose you are capturing a beautiful nature trail with nothing but the sounds of birds and animals, but unfortunately, the sound of cars and people chatting interferes, and you fail to capture that ultimate moment. It is quite irritating when your perfectly captured clip is ruined. But don’t worry; everyone has had this experience at some point.
Now, without any further ado, let me take you through the steps on how to remove sound from an iPhone video!
In this article
Part 1: Remove Audio from iPhone Video Using the In-built Photos App!
You might not be aware but the Photos app of your iPhone includes an option for users to take out audio from a video. The iPhone Photos app is a standard application preloaded on iPhone, iPad, and iPod touch devices that can store, sort, and retouch photos and videos. Therefore, this tool is the perfect answer to how to remove audio from video in an iPhone. It is very easy to do it fast and without leaving home—and the best in it, there is no need for any further software or experience on the user's part!

To delete sound from an iPhone video using the Photos app, follow these steps:
Step 1. The first step is to locate the Photos application on the iPhone.
Step 2. Go to the video that you intend to edit and click on it.
Step 3. Choose the "Edit" button located in the upper right corner.

Step 4. On the toolbar at the bottom of the page, tap the “More” icon to expand the options and view more editing tools.
Step 5. Click the yellow Speaker icon in the top left corner.
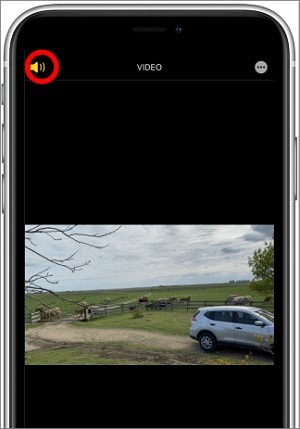
Step 6. After that, you should turn off the sound of the video by tapping the “Done” button at the bottom of the screen.
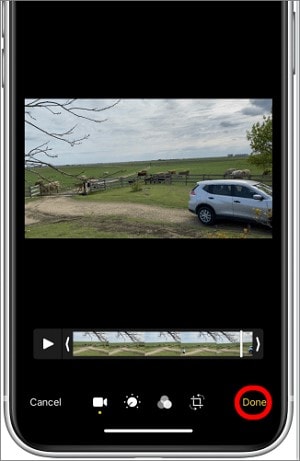
And that's it! You have successfully cut off the audio from your iPhone video through the use of the Photos application! It will now turn into a silent video with no sound or background music.
Part 2: Remove Audio from Video in iPhone using Wondershare Filmora
Well, in case you need a professional level of editing, then we will recommend you use Wondershare Filmora.
This is an easy-to-use video editor for any content creator. It is for beginners, professionals, or anyone who wants to design beautiful and appealing content.
This software is widely utilized the world over. It includes both video editing tools as well as audio manipulation tools. Using Filmora, it becomes very easy to remove sound from iPhone videos.
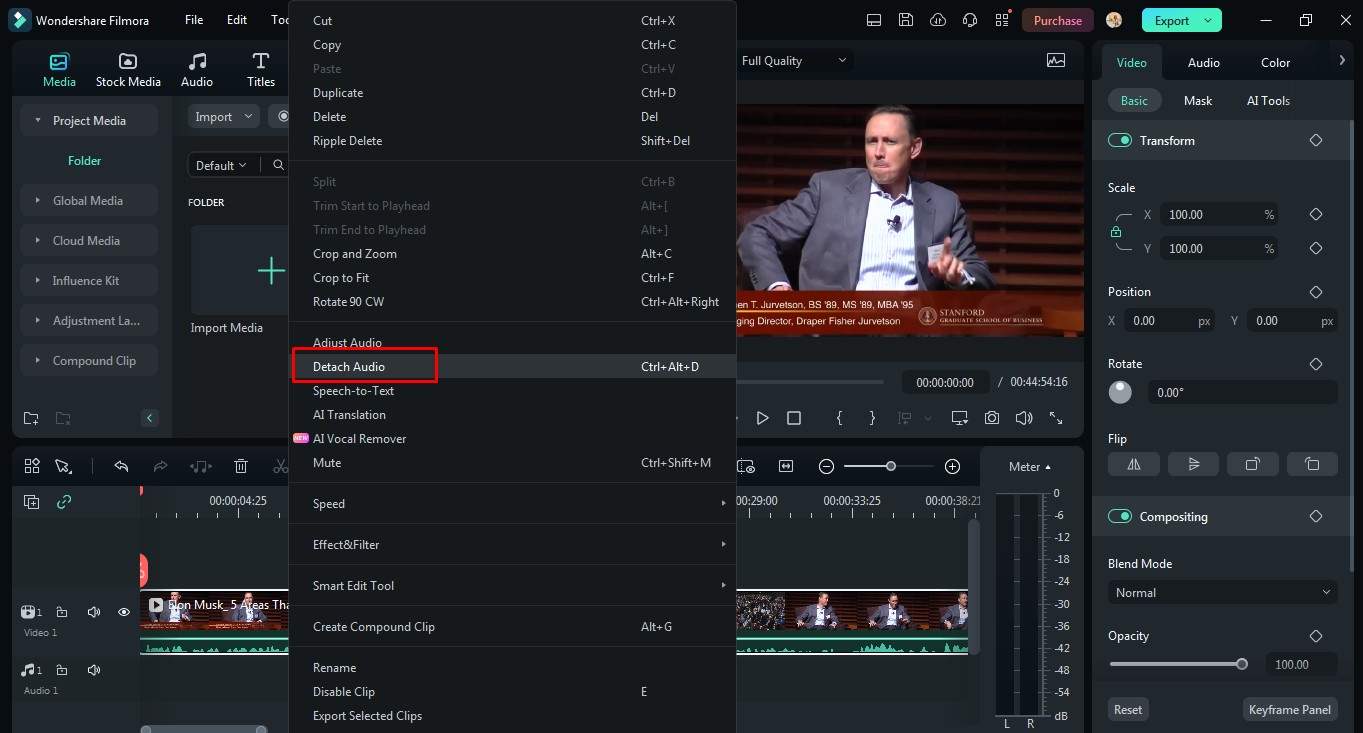
The layout of the software is very basic and intuitive and always informs the user what the next step is. With the help of the ‘Detach Audio’ tool, it is possible to remove audio from video on an iPhone.
Key Features of Wondershare Filmora:
Color grading: Change the video’s lightness, sharpness, and vividness based on the professional appearance you prefer.
Audio ducking: Control the volume of your audio tracks and set it to optimum volume for proper balance and clear sound.
Multi-track editing: Synchronize several audio clips to enable the generation of intricate sound designs.
Wondershare Filmora is compatible with almost all operating systems, whether it’s Windows, iOS, Android, etc.
How to Remove Audio from A Video on iPhone with Wondershare Filmora App
Step 1: To download this application, you can search for the App Store and type Wondershare Filmora. You can also tap on the Install button below to get the app.

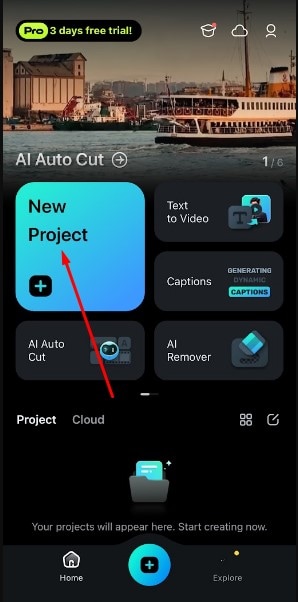
Step 2: Once you launch Filmora, you can touch on the new project button and select the video that you would like to edit and upload from the gallery.
Step 3: After you have uploaded the video, go to the timeline and click on the video clip, then select ‘Extract Audio.’
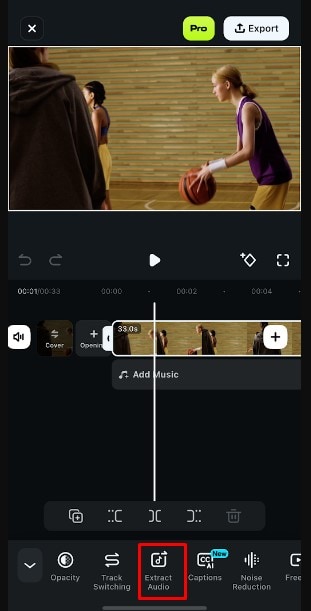
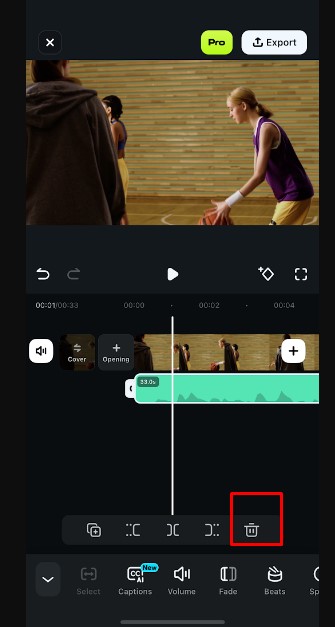
Step 4: You need to select the extracted audio and using editing tools, you can delete the video soundtrack as shown below by clicking on the delete button. By then, your audio will be deducted.
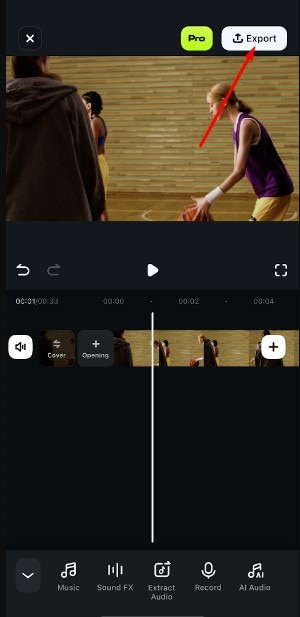
Step 5: Once you’re done with the deletion of the audio and feel content with the overall outcome, the next step is to export the edited video. In the top right corner, click on the ‘Export’ link to see the export setting.
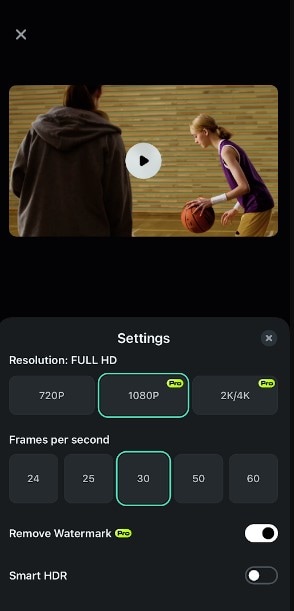
Step 6: Select the desired output resolution and frame rate, then click on Export.
So, these are the steps that you can perform to extract audio from video in Mobile.
How to Remove Audio from Video on An iPhone with Filmora Desktop Version
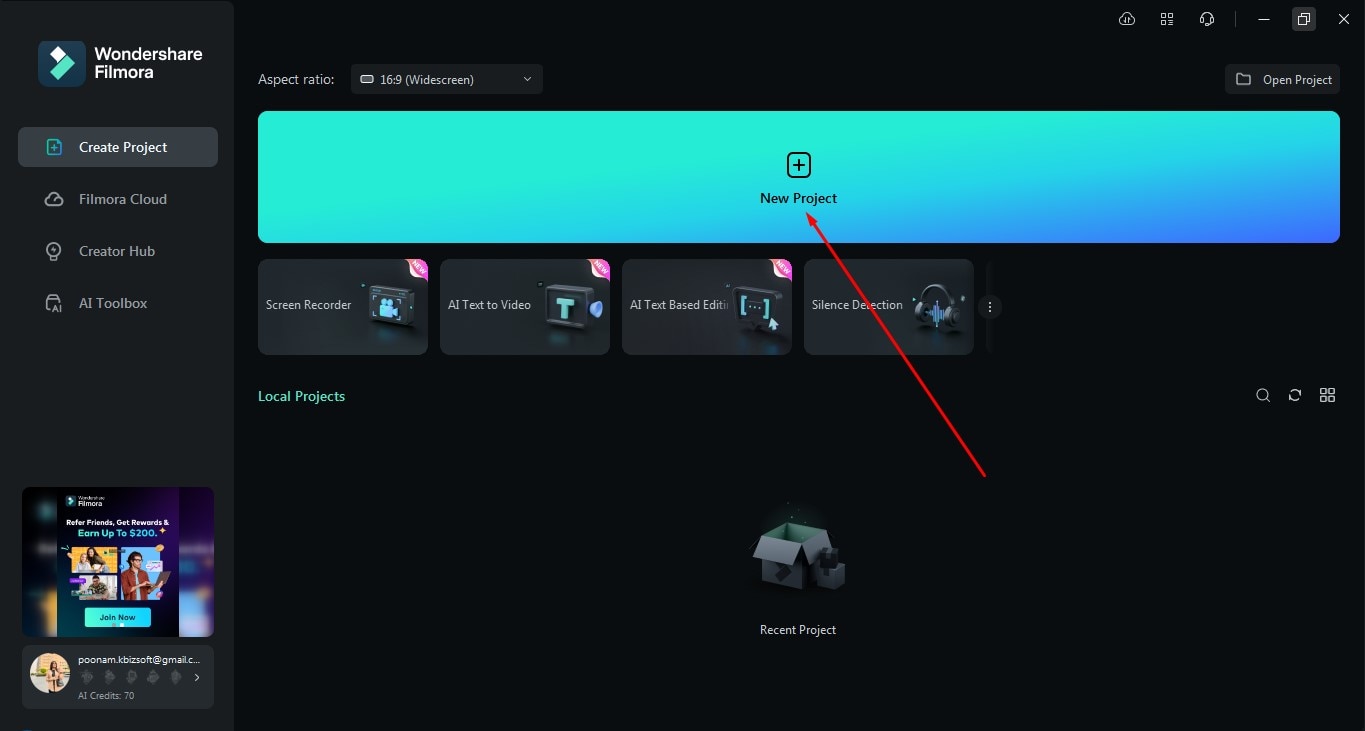
Step 1: First of all, download Wondershare Filmora from its official website, and after launching it, tap “New Project.”
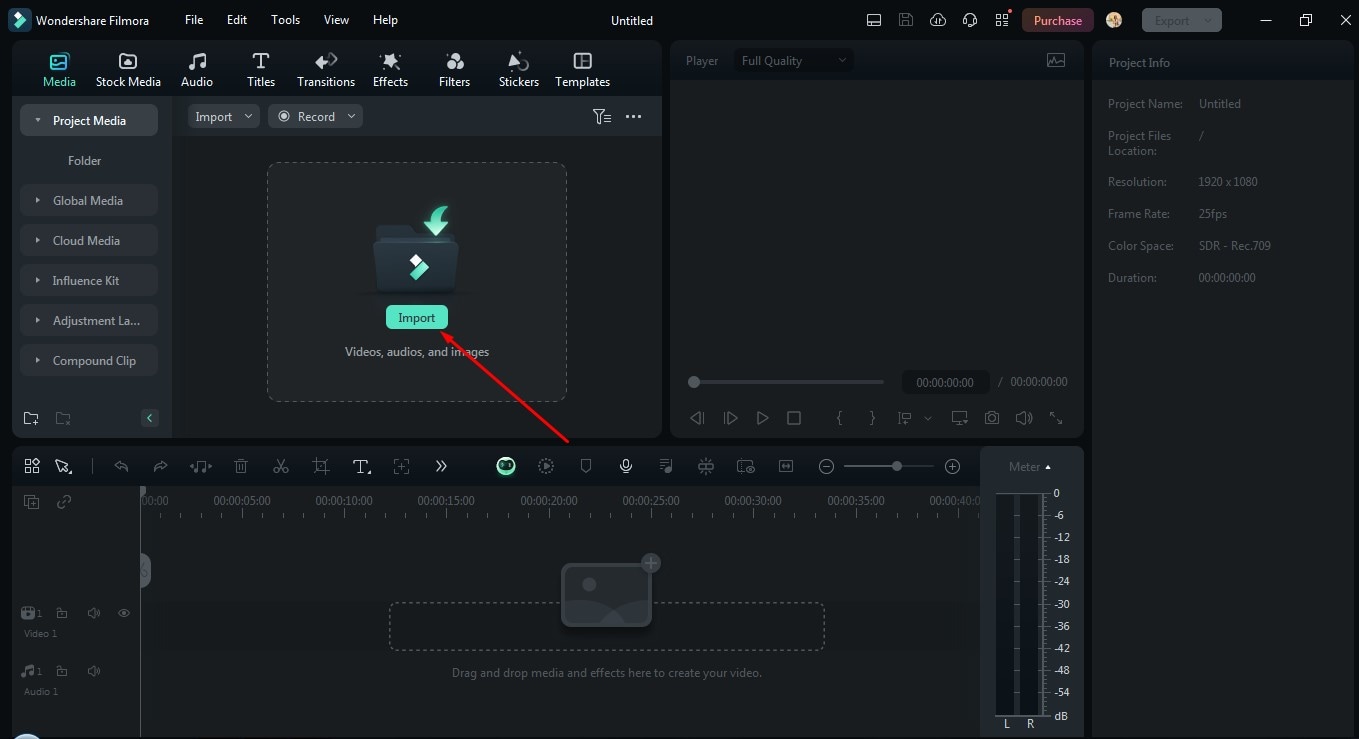
Step 2: Now, import the video from which you want to detach the audio.
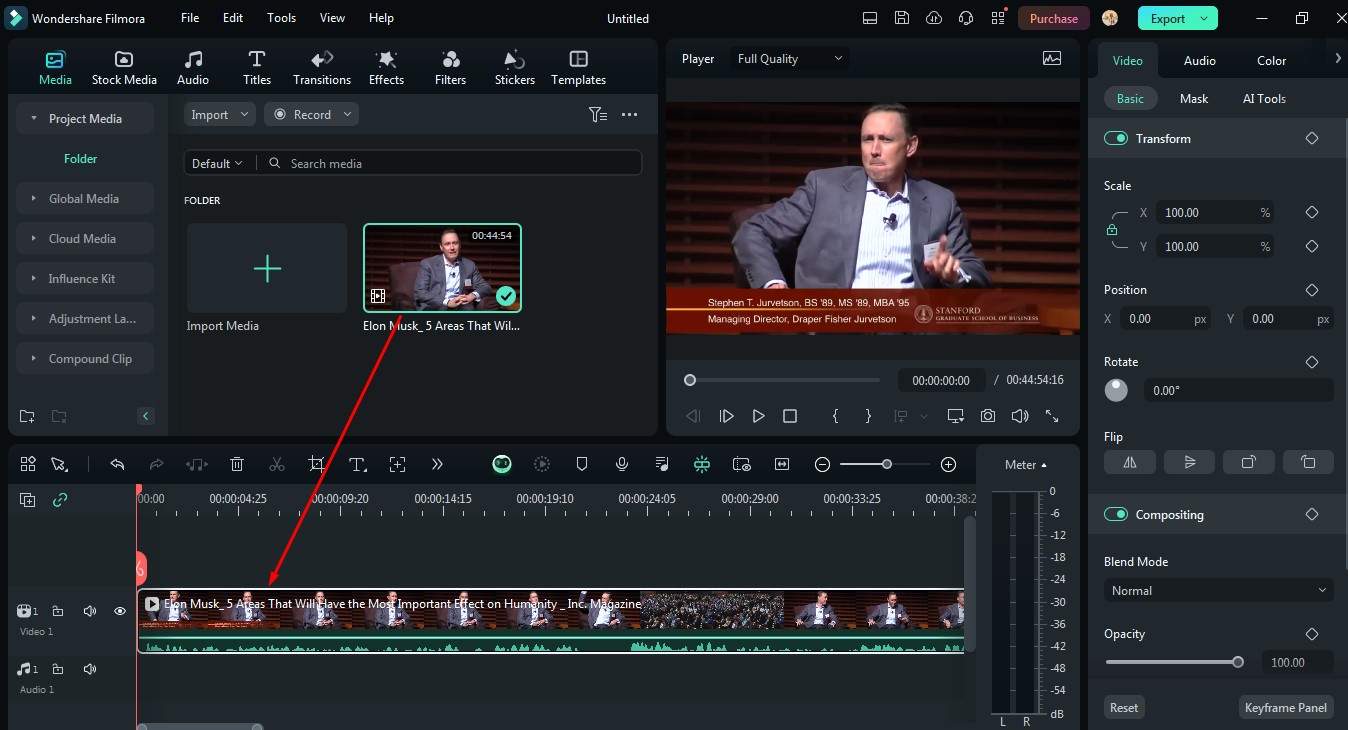
Step 3: After importing the video, drag and drop it to the timeline.
Step 4: Right-click on the video that you had just dragged and dropped to the timeline and you will see various options. Select Detach Audio from those options.
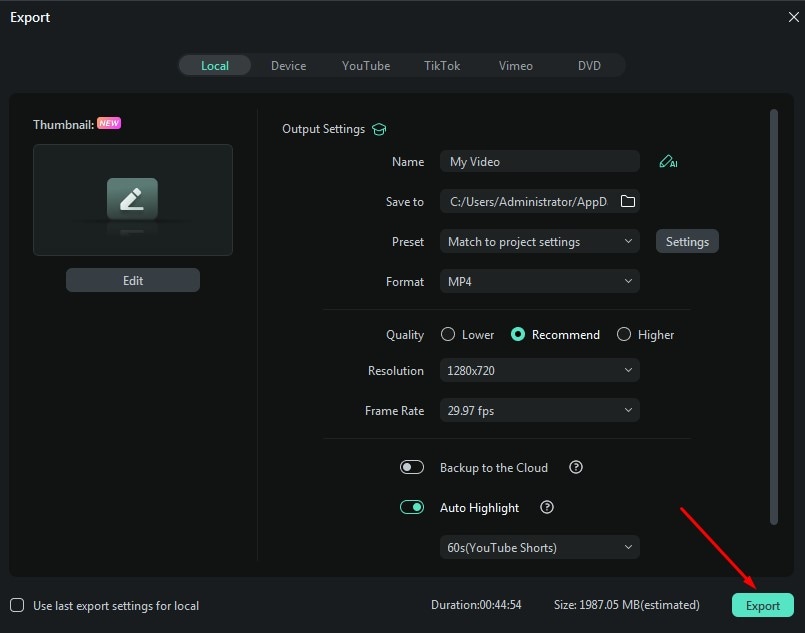
Step 5: It's time to export the video so tap on the Export option in the top right corner and change the resolution and frame rate and then Export.
So, these are the steps to remove audio from video on an iPhone in Windows using Wondershare Filmora. Download this tool today!
Part 3: Why Remove Sound from iPhone Video?
Removing sound from an iPhone video is something that we have to do to improve its quality. Usually, when people record significant events, they do not pay attention to the background sounds.
However, why is it even necessary to remove audio from an iPhone video?
Well, for starters, it helps to:
- Minimize interference and enhance sound quality.
- Enhance the viewing experience significantly.
- Improve the general production quality of your video.
- Enhance how it is possible to incorporate background music and sound effects.
Common scenarios where sound removal is a must include:
- Shooting and recording nature scenes where wind or animal noises dominate over the primary audio.
- Recording case interviews or speeches in which background noise interferes with the talking or speaking.
- Capturing events or performances for live audiences where noise from the audience is disruptive
- Shooting videos that require the removal of soundtracks in the background to be replaced with better music in the music videos.
So, eradicating the noises that are irrelevant to the video will enhance your iPhone video to the extent of making it look professional, thus making the video interesting and enjoyable to practice.
Conclusion
Therefore, in consideration, one can conclude that removing sound in an iPhone video is one of the vital procedures for video quality improvement. The in-built Photos app also offers the removal of audio from the video through a simple process of a few taps. However, the enhanced version of editing can be better handled with Wondershare Filmora since it contains more options and functions. It has a simple and great graphic user interface combined with splendid editing facilities for separating the audio from the video, which can be exported in a high-quality format. Give Wondershare Filmora a try today and get to the next level of your video editing skills.
FAQ
-
Q1: Is there a free trial available for Wondershare Filmora?
Yes, Wondershare Filmora offers a free trial version that allows you to test its features before purchasing the full version. -
Q2: Can I use third-party software to remove sound from an iPhone video?
Yes, you can use third-party software like Wondershare Filmora to remove sound from an iPhone video. -
Q3: Why do I need to remove sound from an iPhone video?
You need to remove sound from an iPhone video to improve its quality, minimize interference, and enhance the overall viewing experience.


