
 TL;DR:
To compress videos in Avidemux without losing quality, set the video output to MPEG-4 AVC (x264) with a Constant Rate Factor (CRF) between 18 and 23, or select Mpeg4 VP9 for WebM browser compatibility.
● Avidemux restricts users to combining video snippets of the exact same frame rate and resolution, presenting a steep learning curve for beginners requiring mixed-format editing.
● Handbrake is the recommended open-source alternative for batch transcoding and granular codec control across Windows, Mac, and Linux, though users should avoid shrinking videos below half of their original file size.
● Wondershare Filmora is best suited for users seeking an automated AI compression workflow (Smart Render), bypassing manual codec adjustments while supporting modern 4K formats like HEVC (H.265) and AV1.
Ask AI for a summary
 ChatGPT
 Perplexity
 Gemini
 Claude
 Grok
Compressing videos is essential for faster uploads and saving storage space. While many tools reduce size at the cost of clarity, Avidemux offers a powerful way to resize videos without losing quality. In this 2025 updated guide, we'll show you the exact settings for Avidemux, including its latest WebM support, and explore superior alternatives like Wondershare Filmora.
Steps for compressing videos using Avidemux
Avidemux is a professional-grade, open-source video editor designed for simple cutting, filtering, and encoding tasks. It is widely recognized for its ability to handle various file types, including AVI, MP4, and ASF, using a variety of codecs. Its standout feature is the "Copy" mode, which allows for lossless video trimming and basic compression without re-encoding.
Here are some steps that will guide you on how to reduce video size with Avidemux.
- The first step is to launch Avudemux on your PC and load the desired video files into it.
- The next step is to set video stream to MPEG-4 AVC.
- Configure Video Output: Select Mpeg4 AVC (x264). Click "Configure", change "Encoding Mode" to Constant Rate Factor (Single Pass). For the best balance, set the CRF value between 18 and 23.
- WebM Support (New): If you need to compress for web, Avidemux now supports VP9 (WebM). Select 'Video Output' as Mpeg4 VP9 for better browser compatibility.
- Choose the MP4 format. Once you are done with it, save your video file.
Alternative to Avidemux for resizing videos:
There is also a problem associated with Avidemux i.e. it combines snippets only of the same frame rate and resolution. So here are five alternatives to Avidemux that you can use for resizing videos.
1. Wondershare Filmora
Wondershare Filmora is a powerful, all-in-one video editing solution that balances advanced features with an intuitive interface. Unlike traditional compressors, Filmora utilizes AI-driven algorithms to optimize file size while preserving stunning visual clarity. Whether you are working with 4K footage or looking for specific WebM/HEVC export options, Filmora provides a streamlined workflow for both beginners and pros.
 Secure Download
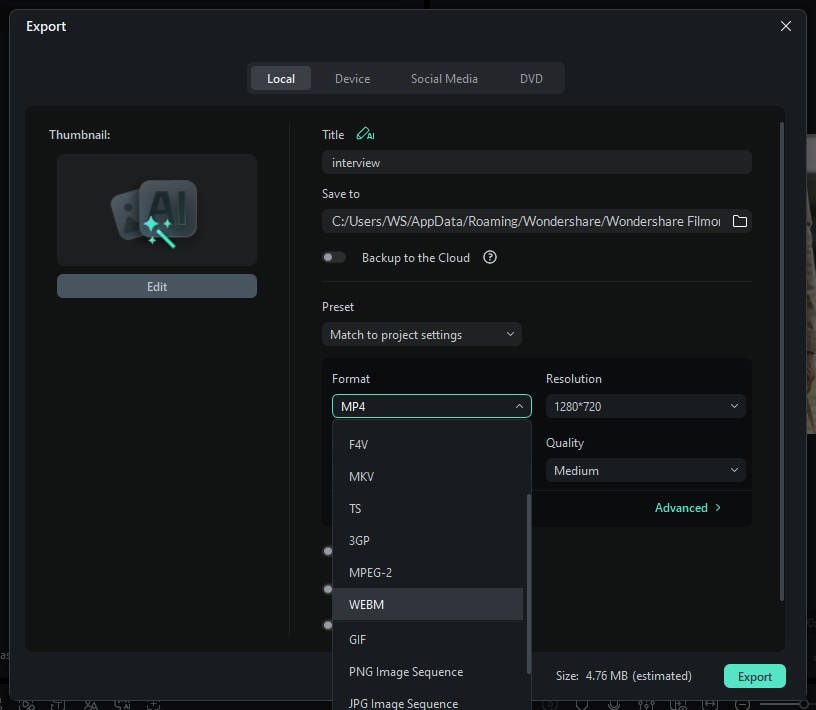
You can resize your video easily with the help of this wonderful software. The steps required for resizing videos are the following:
- Import: Drag your video into Filmora.
- AI Compression: Use the "Export Settings" to adjust resolution and bitrate. Filmora's AI-powered Smart Render ensures the smallest file size with the highest visual fidelity.
- Format Support: Unlike older tools, Filmora fully supports WebM, HEVC (H.265), and AV1 for 4K videos.
2. Handbrake
Handbrake is one of the most popular free, open-source transcoders for converting video from nearly any format to a selection of modern, widely supported codecs. It is highly favored by users who need granular control over bitrate, frame rate, and resolution settings, making it a top contender for heavy-duty video size reduction across Windows, Mac, and Linux.
This open source and free video editor has many amazing features. It supports windows, Mac and Linux. The video can be resized by the following steps.
- The first step begins with downloading the handbrake application according to your operating system.
- Now launch it on your device and look for "Source" button.
- After this, find your desired video, select it and click "Open".
- Tap "Browse" under the "Destination" section for selecting location of new file. It is also necessary to set "MP4 file" format in the output settings.
- Choose "Video" from the section which is grayer in comparison to the rest of the application's interface.
- Click on "Target size (MB)" to type in the required size of the video. It is advisable to do not shrink the video to the size smaller than that half of original file.
- Once you are finished with it, tap "Start" button and your video will begin compressing.
3. VirtualDub
VirtualDub is a legacy video capture and processing utility designed specifically for 32-bit and 64-bit Windows platforms. While it lacks the editing power of modern software, it remains a fast and effective tool for linear video operations and AVI compression. It is best suited for users working with older video formats or looking for a lightweight, no-frills utility.
This video editing software works on AVI movies with Windows operating system. The steps for resizing videos are given below:
- Launch the VirtualDub. After this, go to Video" and choose "Compression".
- On choosing, a menu will be appeared and select "Xvid MPEG-4 Codec".
- Now tap OK and choose "Save as" from the file menu. In this way, your video will be compressed without comprising quality.
Avidemux vs. Handbrake vs. Filmora: Which is Better?
While Avidemux is great for quick cuts, Handbrake excels in batch transcoding. However, for beginners, both have steep learning curves. Wondershare Filmora bridges this gap by providing an AI-driven interface that handles complex compression tasks automatically, making it the best choice for users who want quality without tweaking complex codecs.
Conclusion
Reducing video file size doesn't have to mean sacrificing quality. If you are a technical user looking for open-source control, Avidemux and Handbrake are excellent choices for fine-tuning compression settings. However, if you need a faster, more modern approach with AI assistance and broader format support (like WebM and 4K), Wondershare Filmora is the most efficient alternative.