
Have you ever found yourself wishing to improve your videos but finding it difficult to do so, or have you had them miss that particular something? If you did, well, you are in good company. Sound effects are a very important aspect as far as video production is concerned as they enhance the viewing experience so that the audience becomes more immersed in the video.
For this particular purpose, we will explain to you, indeed show you on your computer, how to use the most effective sound effects for Final Cut Pro and add many others, and especially how Filmora can enhance your videos in favor of their effectiveness. No matter how experienced you may be, every reader in this article will find ready-made sound design solutions that require little effort on the reader's part and allow professional-sounding results.
In this article
Part 1. Why Sound Effects Are Essential in Video Editing
Not only are sound effects a mere added layer of audio, but they are also a necessary feature that is used to bring forth a more complete and engaging video experience. In their absence, even the most beautiful of scenes may still appear dull and unconvincing. Here's why sound effects are so important:
- Enhancing Visuals: Sound effects take whatever is being displayed on the screen and make it more active or dynamic. Picture a punch being delivered without the sound of the impact of a door being banged shut without the sound. Moreover, these sounds enhance the mood of the content and link the audience to the picture.
- Creating Atmosphere: The ambiance in the visuals can also be contributed by sounds like the humming of vehicles in the city, voices of people in a crowd, fire burning, or even the sound of leaves moving. The viewers have to be in the environment; hence, it creates more realism and makes the visuals more likable.
- Building Emotional Impact: Adequate sounds have been seen to change how viewers are most likely to react to what they are watching. If there are disturbing sounds in the background, then it gives more feeling to the progression into the final moments of the film, while a funny scene would bring out its humor better with a specific sound. It can be noted that audio can be used to dictate what a certain video is about through its emotions or otherwise, which allows the desired impact to be achieved.
Adding Sound Effects Final Cut Pro and Wondershare Filmora gives their users the efficiency of integrating the extra features using the advanced editing platforms and, in turn, creating a better film that the audience could enjoy watching.
Part 2. Enhancing Audio with filmora's Sound Effects
Now, if you consider that you have a very steep learning curve as far as Final Cut Pro is concerned, or if you would need simpler software, you could consider using Filmora. Filmora is an easy-to-use video editor that is suitable for beginners and experienced editors. It has many sound effects libraries that come in handy while editing without any technical risk.

Why Filmora is Great for Beginners:
- Perfect for Unkempt Users: Expert editing features and functions minus explosives on the screens, thanks to the neat and simple layout of Filmora.
- Sounds Effects – No Longer Need to Google ‘Sound Effects': That line you needed and did not want to type because, well, there was no coherent way of putting it- the last and final note Filmora video editor comes along with loads of fractioned high pitch sound tabs arranged succinctly over the interface.
Step-by-Step: How to Add Sound Effects in Filmora
Step 1: Run Wondershare Filmora on your PC, and click on the Audio module that is illustrated on the screen above with the remarks audio panel.
Step 2: From where the following types the listed, click Sound Effect.
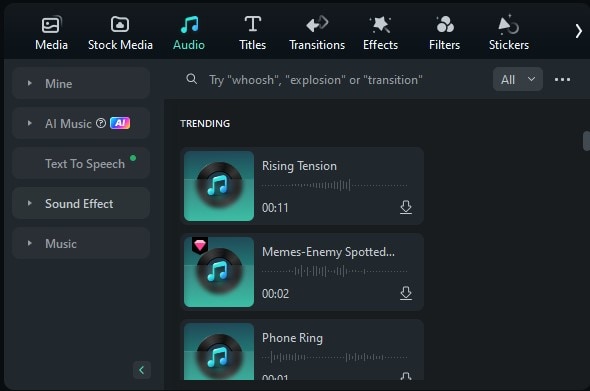
Step 3: A list of various sound effects will be there. Choose appropriate sound effects that you also want to download.
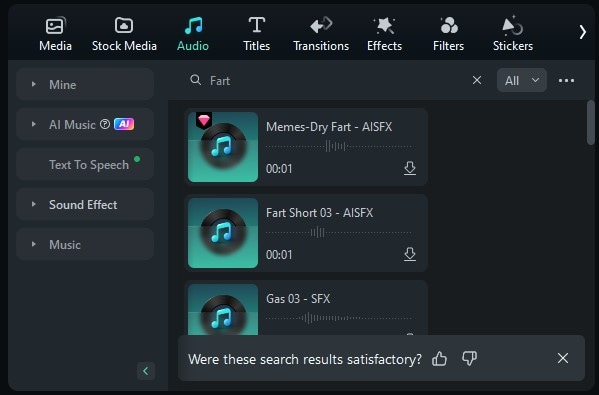
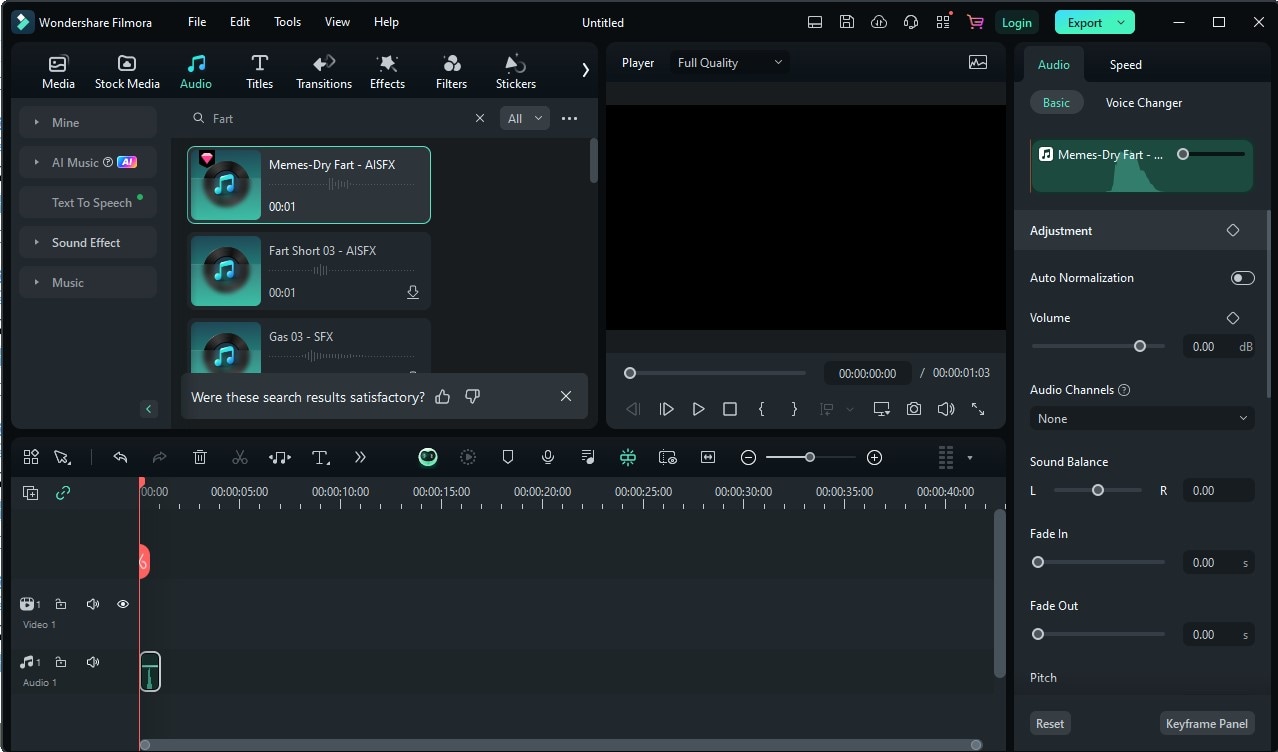
Step 4. You may proceed to add downloaded clips to the timeline and the sound: bord edits by taking them from the edited clip grouping and dropping those into the editor timeline.
Part 3. Top Sound Effects to Use in Final Cut Pro
To begin, here's a list of some of the most effective sound effects to add to your Final Cut Pro projects:
- Ambience & Nature Sounds
- Action & Impact Effects
- Foley Sounds
- Sci-Fi & Fantasy Sounds
- Musical Transitions & Swells
These are important for creating the atmosphere of the given scene. Whether it's a natural setting of mountains and water bodies or an urbanized Space, ambient sounds prove to bring life into the scene.
These are basics that should always be included during moments of madness. These, for instance, include punches, big crashes, explosions, you name them, all require a great audio intensity to their visual intensity.
These are the mundane sounds of a film that do not involve dialogue, the almost unnoticeable sounds occurring in the same plane with the action, the sound of footsteps, doors, or ruffling clothes. As a result, they are frequently disregarded when they should have been moldered into a necessity that aids in cementing your scenes.
Considering a project that will take place in the near future, or perhaps in a fictitious universe? Employ the use of sci-fi sounds like laser guns, spaceship engines, and witchcraft spells to spice up the electric feel inscribed into the visuals.
These are also the dreaded bang-on-the-head effects, usually employed to cover up transitions. Be it a switch between scenes or a build-up; stripe offers changes that make a communicating touch to the waiting audience.
Part 4. How to Add Sound Effects in Final Cut Pro (Step-by-Step Guide)
Including sound effects in your videos facilitates the fulfillment of what you had visualized, whether it is through dramatic scenes or simply adding to the scene. Tips to enhance video motion graphics levels: Final Cut Pro makes this simple with inbuilt features. Follow this how-to guide on including sound effects and music in your project:
Step 1: Access the Photos and Audio Panel
To do this, you need to access the Photos and Audio panel. There are two ways to do that:
Method 1: use the keyboard shortcut, which is pressing the Shift + Command + 1.
Method 2: Go to the button on the top left corner of your screen. Click on the Photos and Audio button or go down to the Window dropdown bar and select Photos and Audio from there.

Here in this panel, you will have a chance to listen to different audio clips such as sound effects, music, and material from other applications like GarageBand.
Step 2: Select the Audio Type
It's now time to choose a sound type once you have the Photos and Audio sidebar open. You will see a list of categories on the left-hand side. Here's how you can do that:
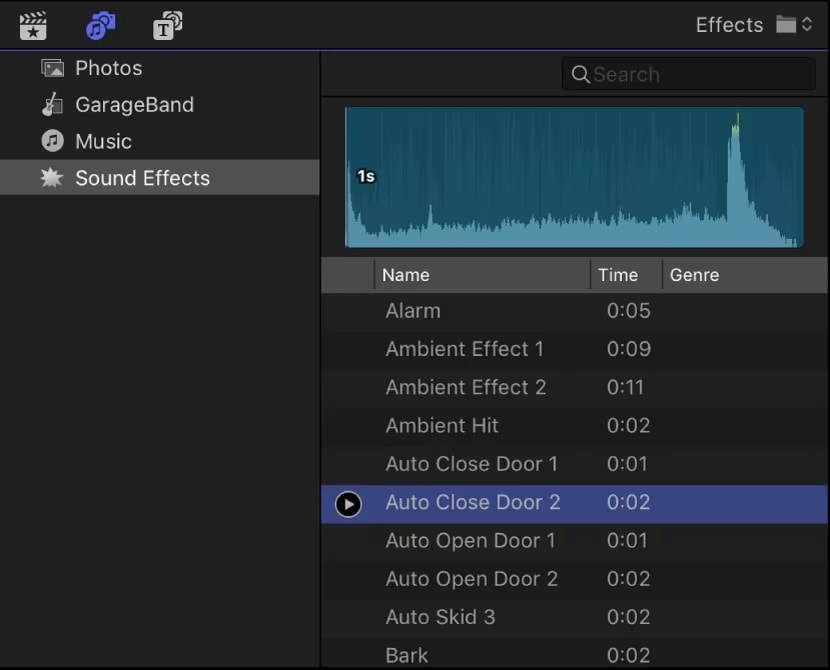
A number of catalogs, for example, Music and Sound Effects, are present. You can also find audio segments according to the programs on your Mac, for example, GarageBand, Music, and Logic Pro. Thus, it is possible to locate the specific sound effects that you would require for your work.
Step 3: Choose the Desired Audio
With your category selected, filter the audio clips in the list by using the pop-up menu in the browser.
Go to Music and select Purchased in order to view the songs that you own. Select the Sound Effects category and go to Final Cut Pro Sound Effects – Impacts & Crashes.
To play any sound you have clicked on in the audio files' list, it is sufficient to click on the file and press Play. In the event that, at once, you have to load a number of sound effects, an additional Action key can be pressed while highlighting each clip.
Step 4: When you have successfully trimmed the Sound effects or music, placement of sound effects or music is done in this case at the timeline:
Drag and drop the selected sound file from the Photos and Audio sidebar into your timeline. Aside from that, if you wish to include a sound related to an event, drag the file to the Libraries sidebar. The Photos and Audio panels will momentarily disappear, and then they will return as soon as the drag action has been completed. Currently, you can watch your clip to test the sound effects and check for a perfect match with the corresponding visuals.
Part 5. Tips for Creating High-Quality Audio in Your Projects
- Layer Sound Effects for Depth
Combining several sound effects is not an issue. For instance, you can add footsteps and environment sounds to render the event accurately.
- Use Silence for Impact
There are times when a few actions can attract more attention than regular actions. For instance, space between sounds will create anticipation or trigger a certain segment in your video.
- Balance Music and Sound Effects
Keep your sound effects subtle so that the background music and dialogues are not lost in the sound effects. In professional work. The careful level of the audio in a mix is “balanced”.
- Experiment with Equalizers and Filters
In both of the programs, Final Cut Pro and Filmora, you can modulate the sound of your audio using equalizers and filters. Make sure to play around with these tools so that you can enhance the sound and adjust to the theme of your video.
Conclusion
The bottom line? It is often possible to benefit from sound effects in the videos. Hence, more effort should be invested in improving the quality of the sound effects. In contrast, Final Cut Pro offers more for skilled users and advanced users, while Filmora audio editing is simple for beginners with the help of a sound library that is already included.
Then why hold back? Get equipped with Wondershare Filmora and convert your videos to audio-visuals today.


 100% Security Verified | No Subscription Required | No Malware


