
- Powerful AI for effortless content creation.
- Offer popular templates and royalty-free creative resources.
- Cross-platform functionality for editing everywhere.
How to Correct Color in Your Videos [Color Correction]

Sep 30, 2026• Proven solutions
 TL;DR:
Wondershare Filmora requires a sequential video editing workflow where you must first fix technical exposure and white balance issues using color correction before applying color grading to establish a specific creative or cinematic style.
● Select the appropriate color tool based on your adjustment needs: use Basic Color for overall exposure, HSL for modifying specific color ranges, RGBY Curves for precise color channel control, Color Wheels for independent shadow and highlight adjustments, and AI Color Palette to match reference footage.
● Apply a Color Mask via a separate grading layer to restrict tonal adjustments to targeted local areas, which functions differently from Filmora's regular video masks that are primarily used for compositing and visual effects.
● You can perform these corrections across different devices, utilizing the desktop application for the complete suite of local mask and tonal controls, or using the Filmora App's Adjust and HSL panels for direct mobile editing on a smartphone.
Ask AI for a summary
 ChatGPT
 Perplexity
 Gemini
 Claude
 Grok
Grok
Video color correction fixes issues such as inaccurate white balance, dull colors, poor exposure, or inconsistent tones so your footage looks more natural and balanced. After correction, you can move into color grading to create a specific cinematic style or mood.
Wondershare Filmora combines both workflows in one color editing workspace. You can adjust LUTs, white balance, HSL, RGBY Curves, Color Wheels, and other color properties, or use Color Mask when only a specific part of the frame needs correction.
Below, we'll walk through how to correct video colors in Filmora on desktop and mobile, and how to use Color Mask for more precise local adjustments.
In this article
Color Correction vs. Color Grading: What's the Difference?
Color correction and color grading are closely related, but they solve different problems.
- Color Correction: Fixes technical color problems such as incorrect exposure, white balance, contrast, saturation, or inconsistent colors between shots.
- Color Grading: Shapes the creative look of the footage after correction, such as making a scene warmer, cooler, more cinematic, muted, dramatic, or stylized.
A practical workflow is to correct first and grade second. Start by creating a balanced image, then build the visual style you want.
Filmora Color Tools at a Glance
Filmora provides several tools for different stages of the color editing workflow:
- Basic Color: Adjust LUTs, white balance, lighting, color, sharpening, and other fundamental properties.
- HSL: Control the hue, saturation, and luminance of individual color ranges.
- RGBY Curves: Fine-tune tonal values and individual color channels.
- Color Wheels: Adjust shadows, midtones, and highlights separately.
- AI Color Palette: Extract and apply a color palette from reference footage or an image to create more consistent colors between shots.
- Color Mask: Restrict color adjustments to a selected part of the frame instead of affecting the entire image.
How to Color Correct Video in Filmora Desktop
Filmora's desktop color workspace lets you start with broad corrections and then move into more precise controls such as HSL, Curves, and Color Wheels.

 secure download

Step 1. Import the Video and Adjust the Basic Color Settings
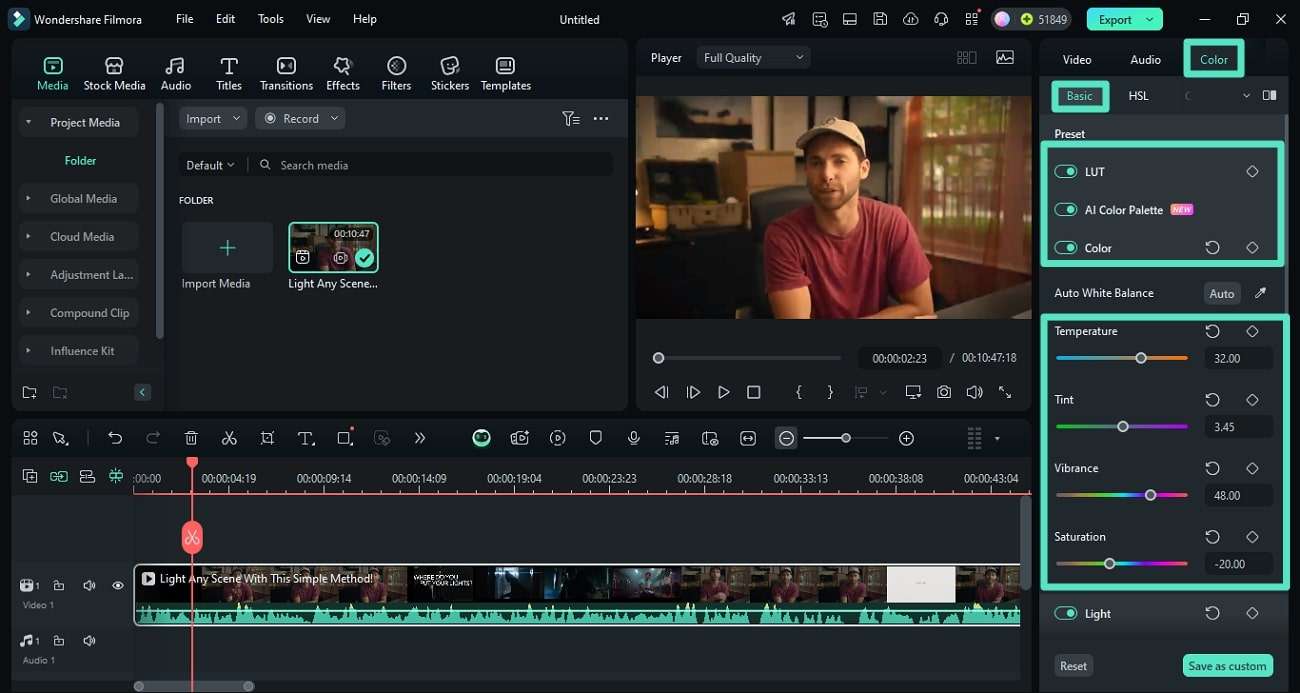
Launch Filmora, create a project, and import your footage. Drag the video to the timeline and select the clip. Open Color > Basic to access controls such as LUT, white balance, light, and other basic color adjustments.
Start by correcting obvious problems such as exposure, temperature, tint, contrast, or saturation before moving to more detailed adjustments.
Step 2. Fine-Tune Individual Colors With HSL
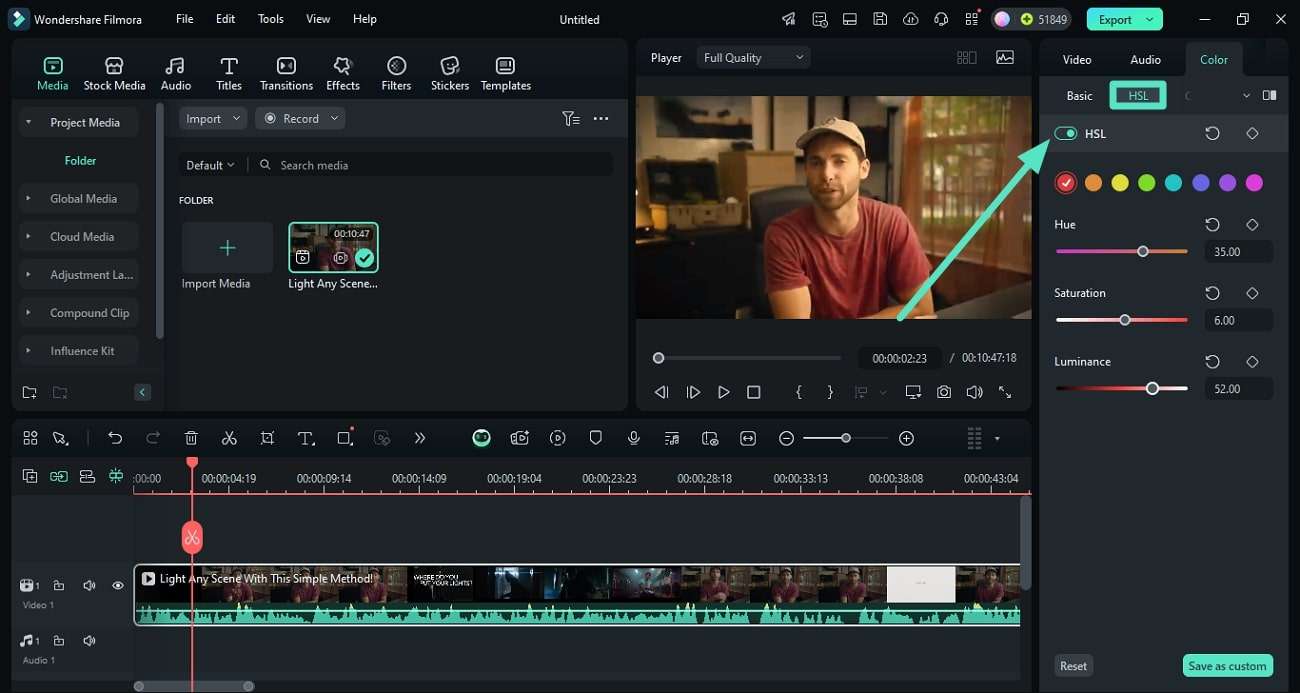
Open the HSL section to adjust individual color ranges. Select a color and modify its Hue, Saturation, and Luminance.
This is useful when one color needs adjustment without dramatically changing the rest of the image—for example, reducing overly saturated greens or changing the luminance of a blue sky.
Step 3. Fine-Tune Tonal and Color Values With RGBY Curves
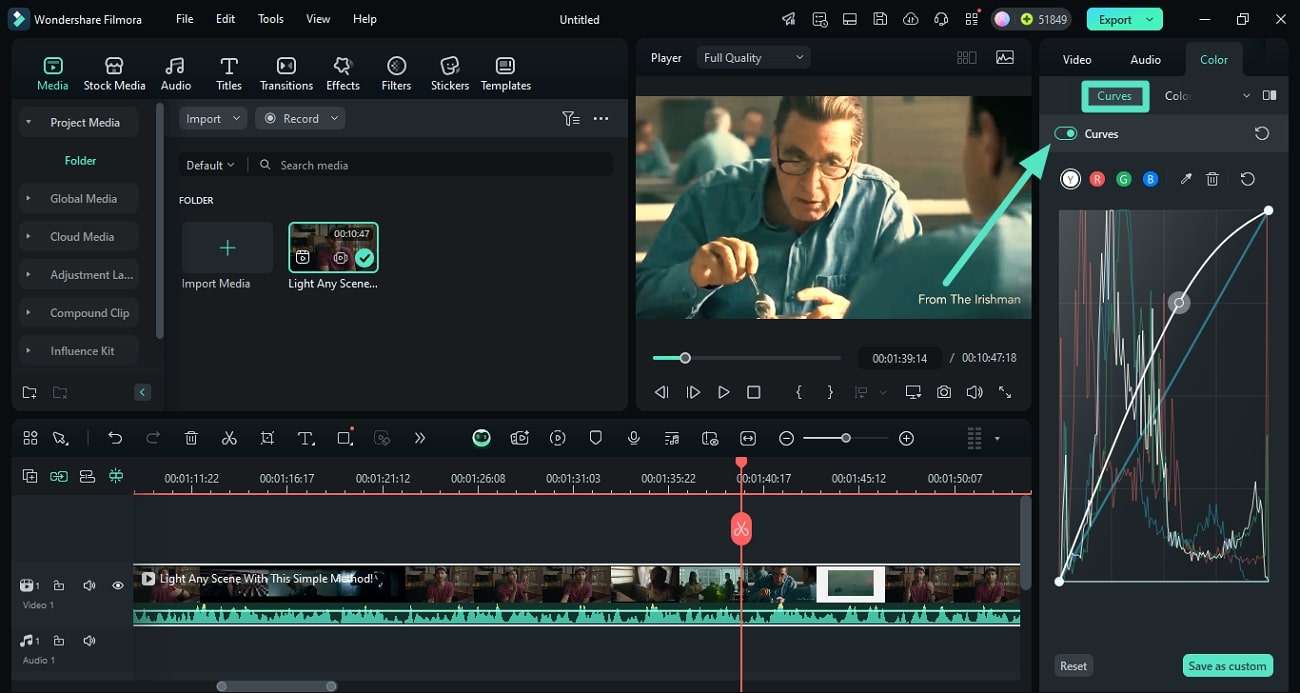
Open the Curves section to make more precise tonal adjustments. The master curve can refine overall brightness and contrast, while individual color channels give you more control over the color balance.
Step 4. Adjust Shadows, Midtones, and Highlights With Color Wheels
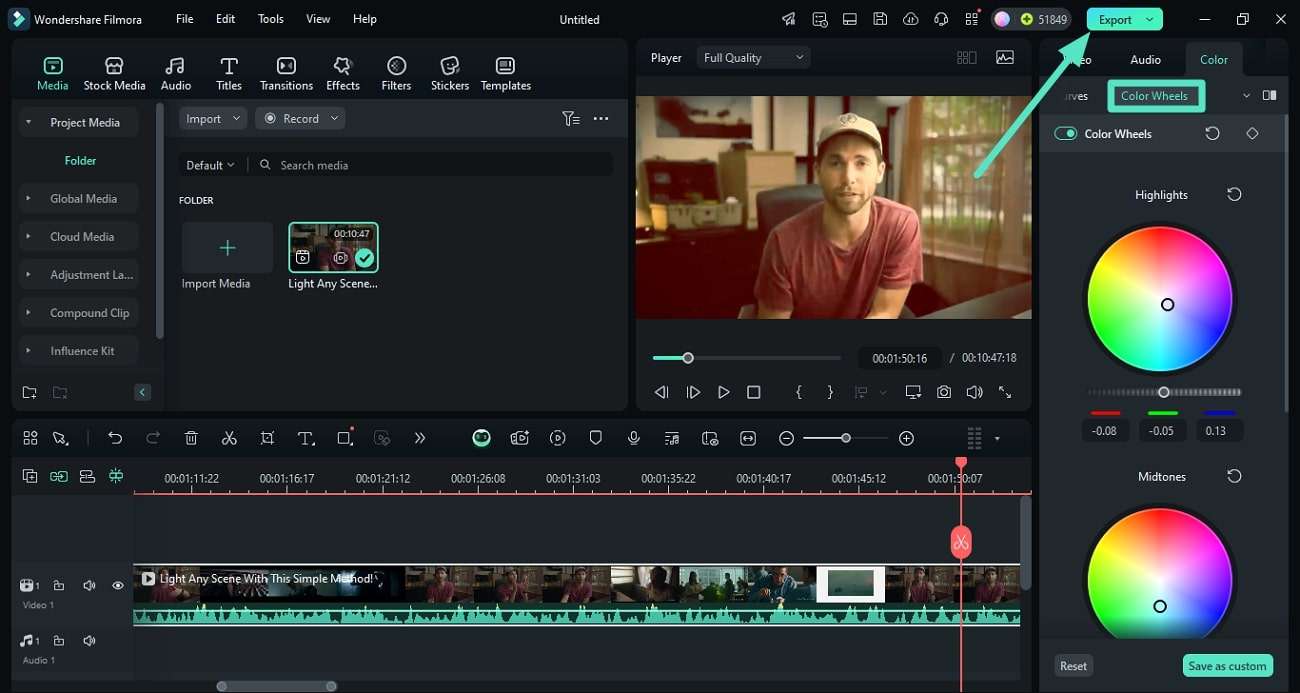
Open Color Wheels to control different tonal regions independently. Adjust the Shadows, Midtones, and Highlights until the footage has the balance or creative look you want.
Preview the result as you work. When you're satisfied with the correction and grading, click Export to save the finished video.
How to Use Color Mask for Selective Color Correction
Sometimes the entire frame does not need correction. The subject may look right while the sky is too bright, one side of the image may have an unwanted color cast, or a product may need a more precise local adjustment.
This is where Color Mask is useful. Instead of applying the same color adjustment across the whole frame, Filmora combines grading layers with adjustable masks so you can control where the correction appears.
Color Mask is different from Filmora's general masking tool. A regular video mask is commonly used to reveal or conceal parts of a clip for compositing and visual effects. Color Mask is specifically designed to limit color and tonal adjustments to selected areas.
Step 1. Add a Grading Layer
Select the video clip on the timeline and open the Color Mask panel. Under Layers, click Add Grading Layer. This creates a separate layer for the color adjustment instead of changing the entire clip directly.
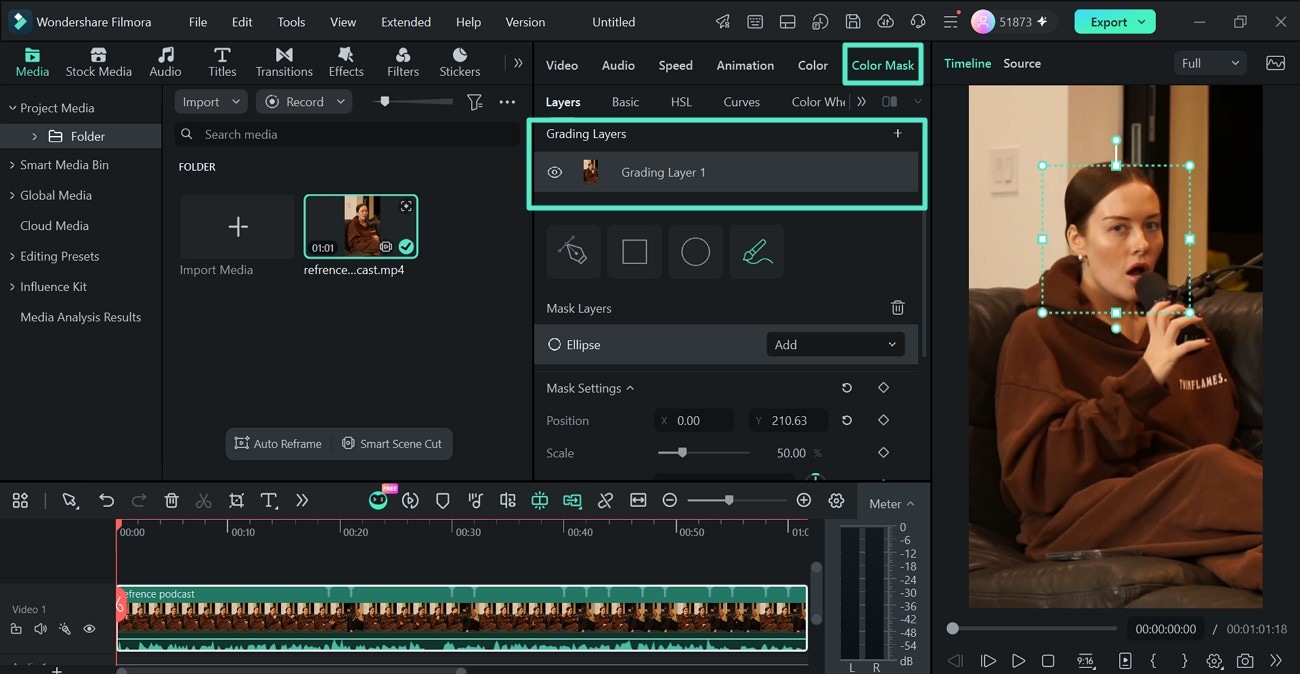
Step 2. Adjust the Color Settings
Open Curves under Color Mask and adjust the curve to change the tonal or color values of the grading layer. You can work with the available color channels depending on the correction you want to make.
If you want to reuse the curve setup later, select Save as Custom.
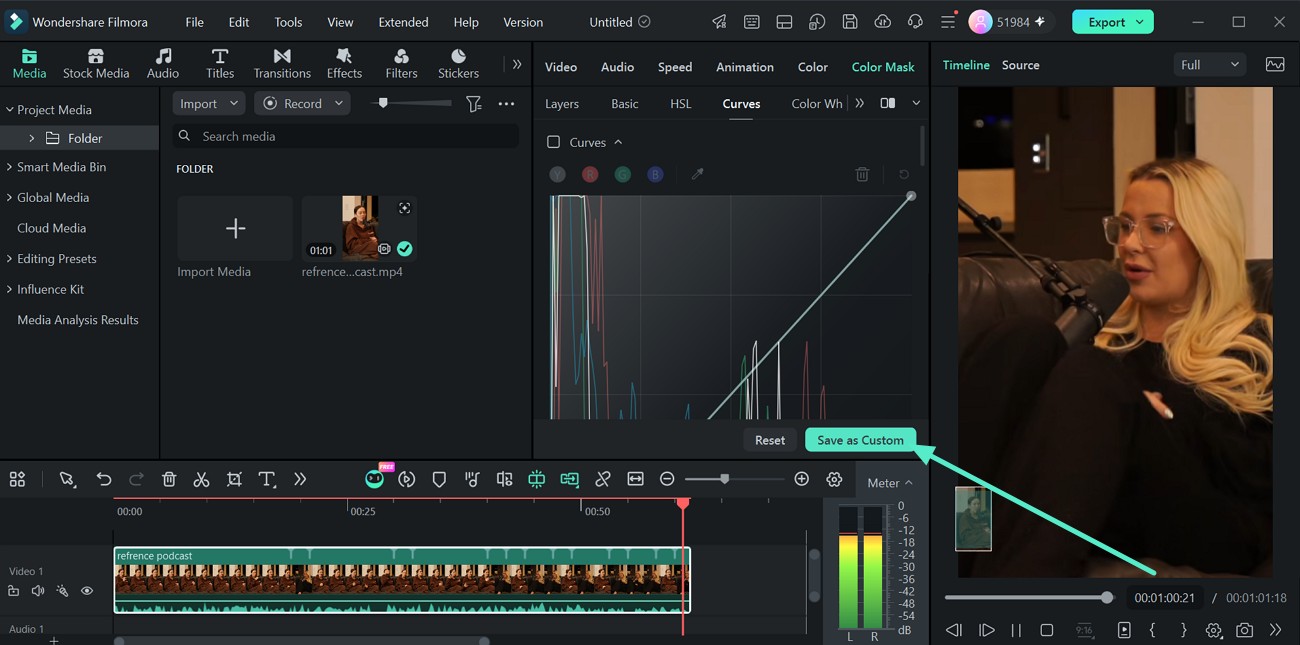
Step 3. Add and Refine the Mask
Return to Layers and choose a mask shape. Filmora provides options such as Rectangle, Circle, and custom drawing for defining the area you want to affect.
Use Mask Settings to refine the selection. Available controls include:
- Position
- Scale
- Rotate
- Width and Height
- Radius
- Blur Strength
- Opacity
- Invert Mask
Use Invert Mask when you want the correction to affect everything outside the selected area instead.
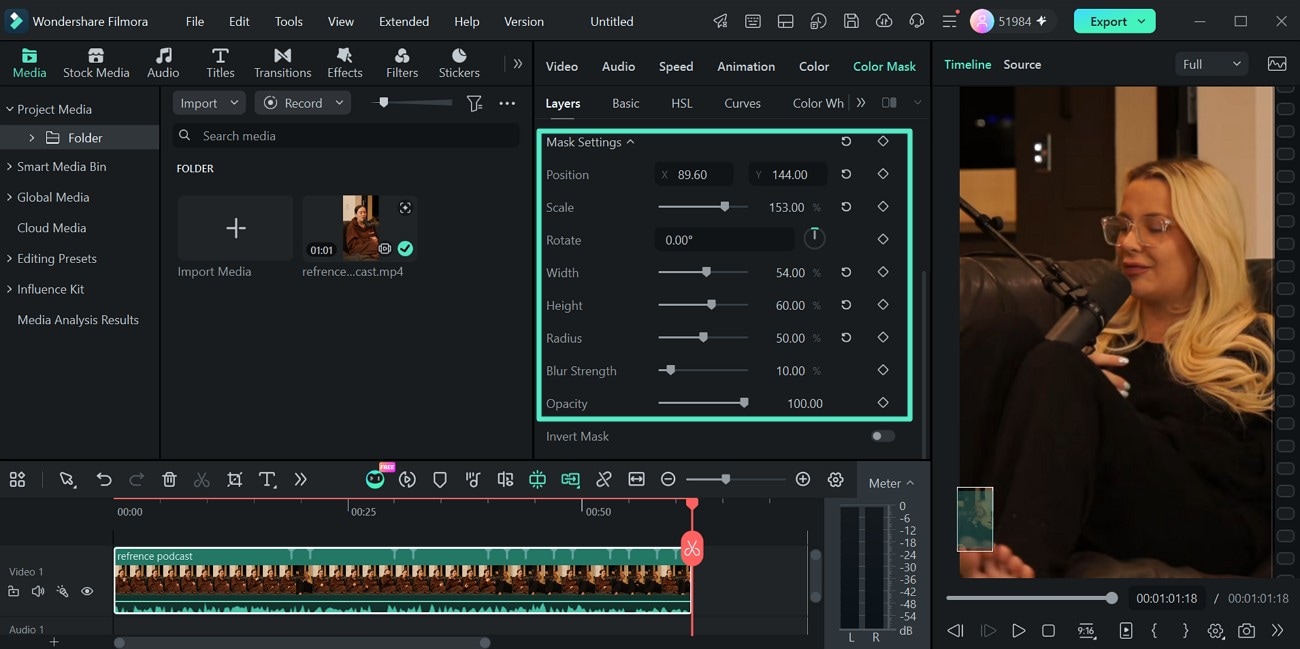
Step 4. Preview and Export
Play the video and check how the masked correction looks throughout the clip. Refine the grading layer or mask settings if necessary. Once the local color adjustment looks right, click Export.
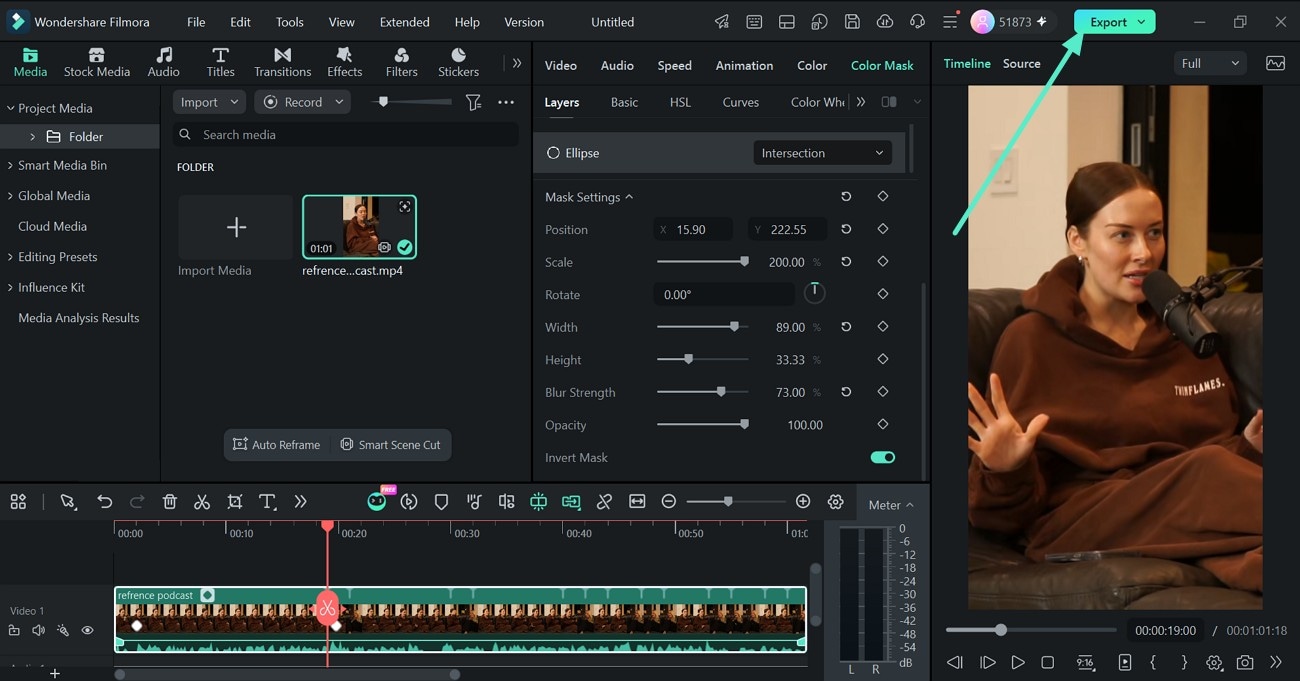
For platform-specific instructions, see the Filmora Color Mask Guide for Windows or Color Mask Guide for Mac.
When Should You Use Color Mask?
- Sky correction: Adjust an overexposed or overly saturated sky without changing the subject.
- Face or subject correction: Refine a selected area while keeping the surrounding scene unchanged.
- Product videos: Make targeted color adjustments around a product or specific part of the frame.
- Mixed lighting: Correct an area affected by a different light source or unwanted color cast.
- Creative grading: Apply a stylized color treatment only to a selected region.
secure downloadHow to Color Correct Video on the Filmora App
If you prefer to edit on your phone, the Filmora App also provides color correction controls for mobile workflows.
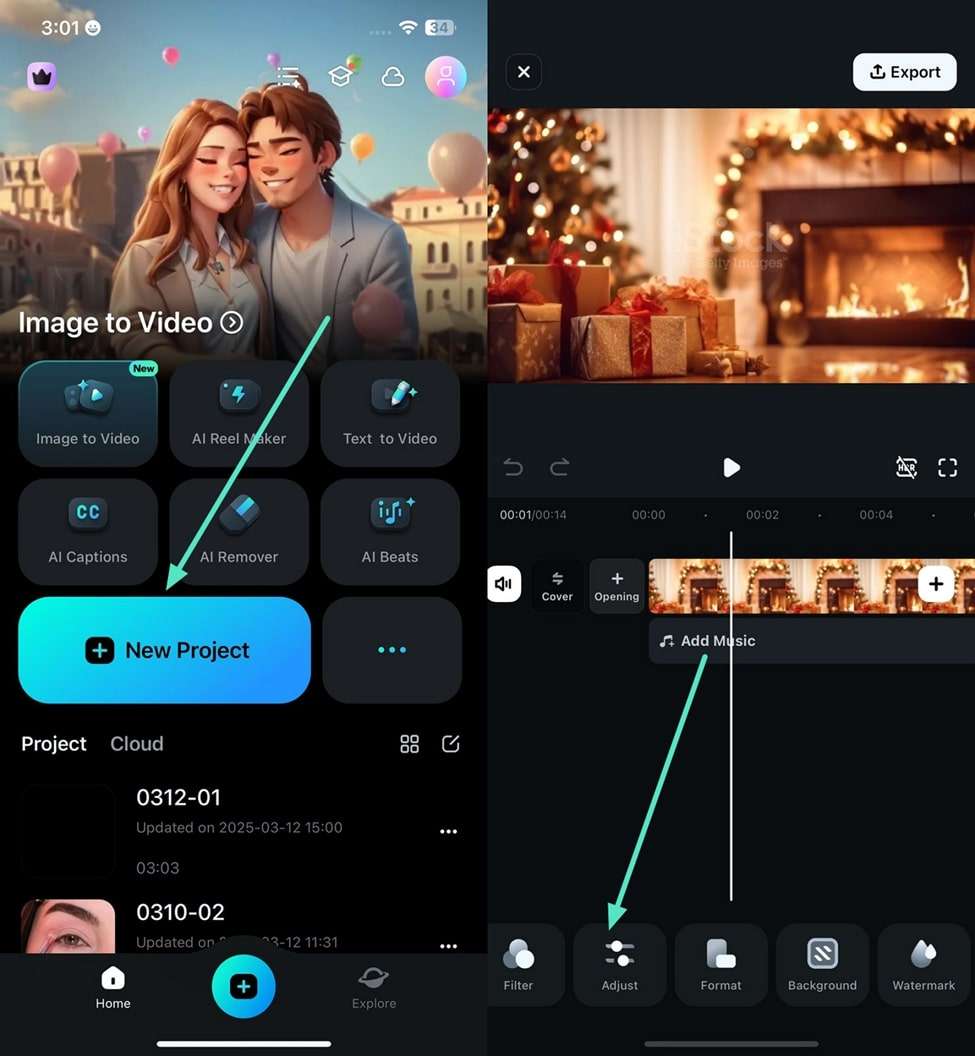
Step 1. Import the Video and Open Adjust
Launch the Filmora App and create a New Project. Import your video, select the clip, and tap Adjust in the bottom toolbar.
Step 2. Adjust Individual Colors With HSL
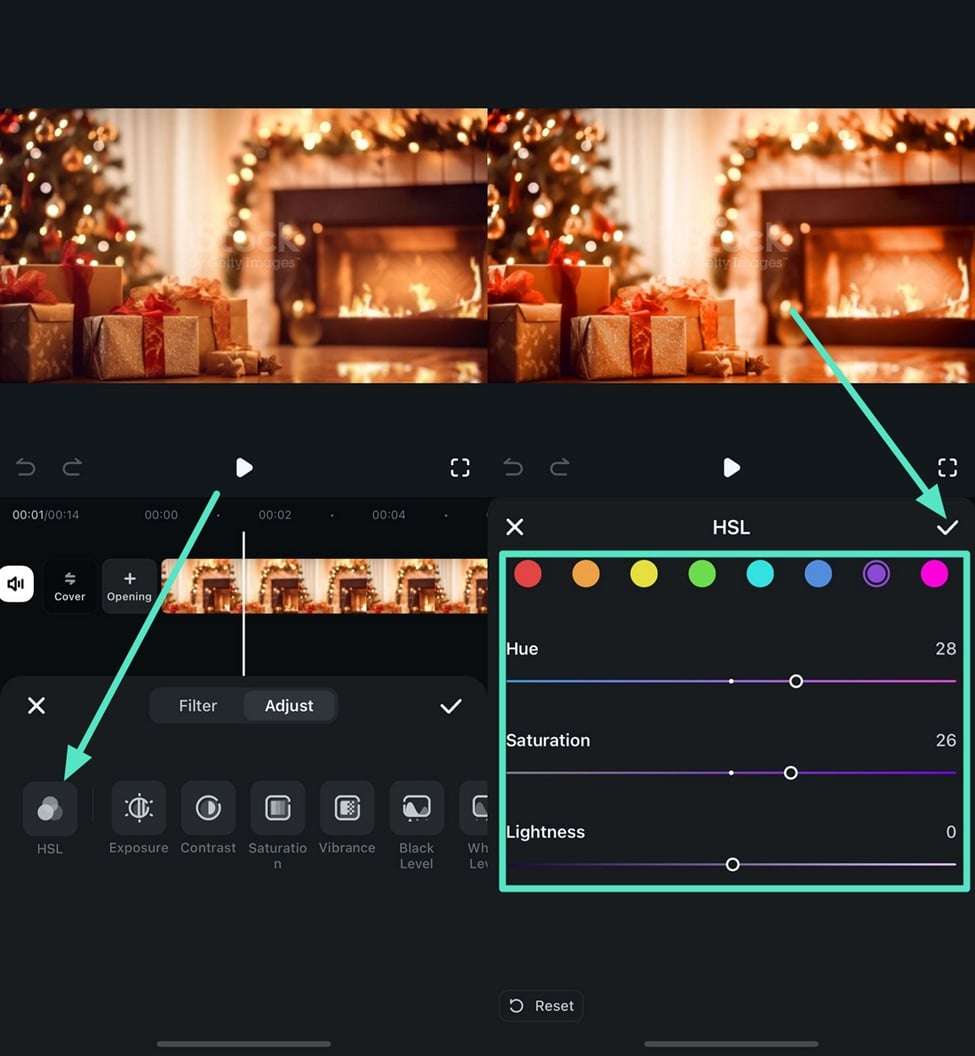
Open HSL and select the color range you want to modify. Adjust its Hue, Saturation, and Lightness while previewing the result.
Step 3. Refine the Colors and Export
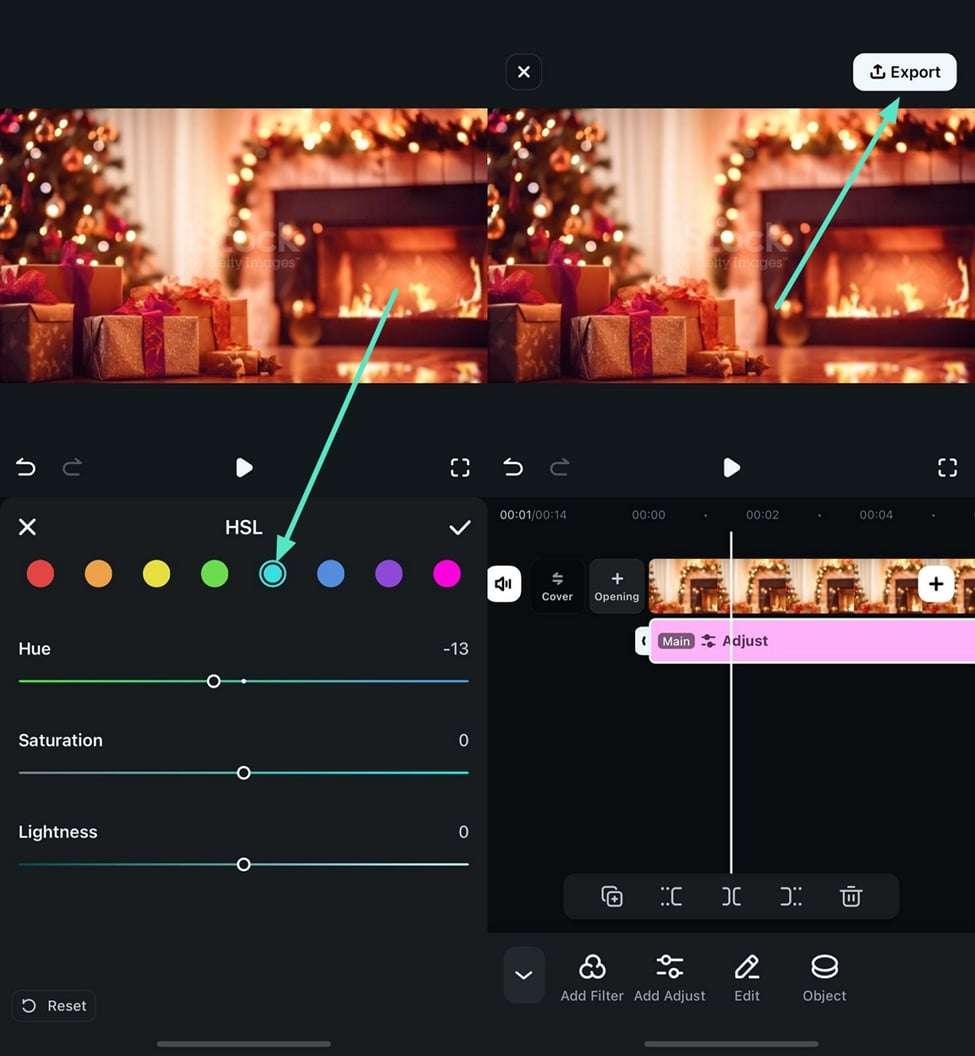
Continue selecting individual colors and adjusting their HSL values until the footage looks balanced. When you're satisfied with the result, tap Export to save the video.
Which Filmora Color Tool Should You Use?
Filmora includes several color tools, but they are designed for different editing tasks.
- Need to fix overall exposure, white balance, or saturation? Start with Basic Color Correction.
- Need to adjust one color range? Use HSL.
- Need more precise tonal or channel control? Use RGBY Curves.
- Need separate control over shadows, midtones, and highlights? Use Color Wheels.
- Need multiple shots to share a similar color palette? Use AI Color Palette.
- Need to correct only one part of the frame? Use Color Mask.
A single project can use several of these tools together. For example, you might first correct the overall exposure, use HSL to refine individual colors, and then add a Color Mask for a specific area that still needs attention.
FAQs About Video Color Correction
1. What is video color correction?
Video color correction is the process of fixing technical color and exposure issues so footage appears balanced and consistent. Common adjustments include white balance, exposure, contrast, saturation, shadows, highlights, and individual color ranges.
2. What is the difference between color correction and color grading?
Color correction focuses on fixing technical problems and creating a balanced starting point. Color grading is more creative and is used to establish a particular visual style, atmosphere, or mood.
3. Does Filmora have professional color correction tools?
Filmora includes tools such as white balance and basic color controls, HSL, RGBY Curves, Color Wheels, LUTs, AI Color Palette, and Color Mask for different levels of color adjustment.
4. What is Color Mask in Filmora?
Color Mask lets you apply color and tonal adjustments to a selected part of a video instead of changing the entire frame. It combines grading layers with adjustable mask shapes and mask controls.
5. What is the difference between Color Mask and regular masking in Filmora?
Color Mask limits color adjustments to a selected area. Filmora's regular masking feature is primarily used to reveal or conceal areas of a clip for compositing, transitions, and other visual effects.
6. Can I use Filmora to adjust only one color in a video?
Yes. HSL lets you select individual color ranges and modify their hue, saturation, and luminance. If you need the adjustment to affect only a particular region of the frame, you can combine more localized color editing with Color Mask.
7. Can I color correct videos on my phone with Filmora?
Yes. The Filmora App provides mobile color adjustment tools, including controls for correcting and refining the colors of video clips directly on a smartphone.
Conclusion
Good video color correction starts by fixing the fundamentals: exposure, white balance, contrast, and saturation. From there, tools such as HSL, RGBY Curves, Color Wheels, LUTs, and AI Color Palette give you more control over the final look.
When the problem is limited to only one part of the image, Filmora Color Mask provides a more precise workflow by combining grading layers with adjustable masks. This lets you refine a sky, subject, product, or other selected area without applying the same correction across the entire frame.
secure download
Benjamin Arango
staff Editor
