After achieving a tremendous victory, you may wish to share the experience with your friends and the gaming community. As an advanced platform, Twitch allows users to easily produce short, shareable clips straight from their live streams or recorded videos. Whether it's a humorous moment or a remarkable highlight, this streaming platform lets you capture these thrilling snippets.
This article will show you how to create highlights on Twitch using both desktop and mobile platforms. If you want to elevate your highlights through advanced editing, we will also recommend a top alternative for creating and refining your twitch highlights.
In this article
Part 1. How to Create Clips on Twitch Using Built-In Tools
Twitch is well-liked in the gaming community for its live-streaming features. Its Clip feature enables users to capture and share the most memorable moments from their streams. Once you've created a highlight, you can trim it to emphasize particular moments and also modify its layout for an enhanced viewing experience. Following are the steps on how to make Twitch highlights, both on the desktop and mobile app:
Creating Clips on Desktop
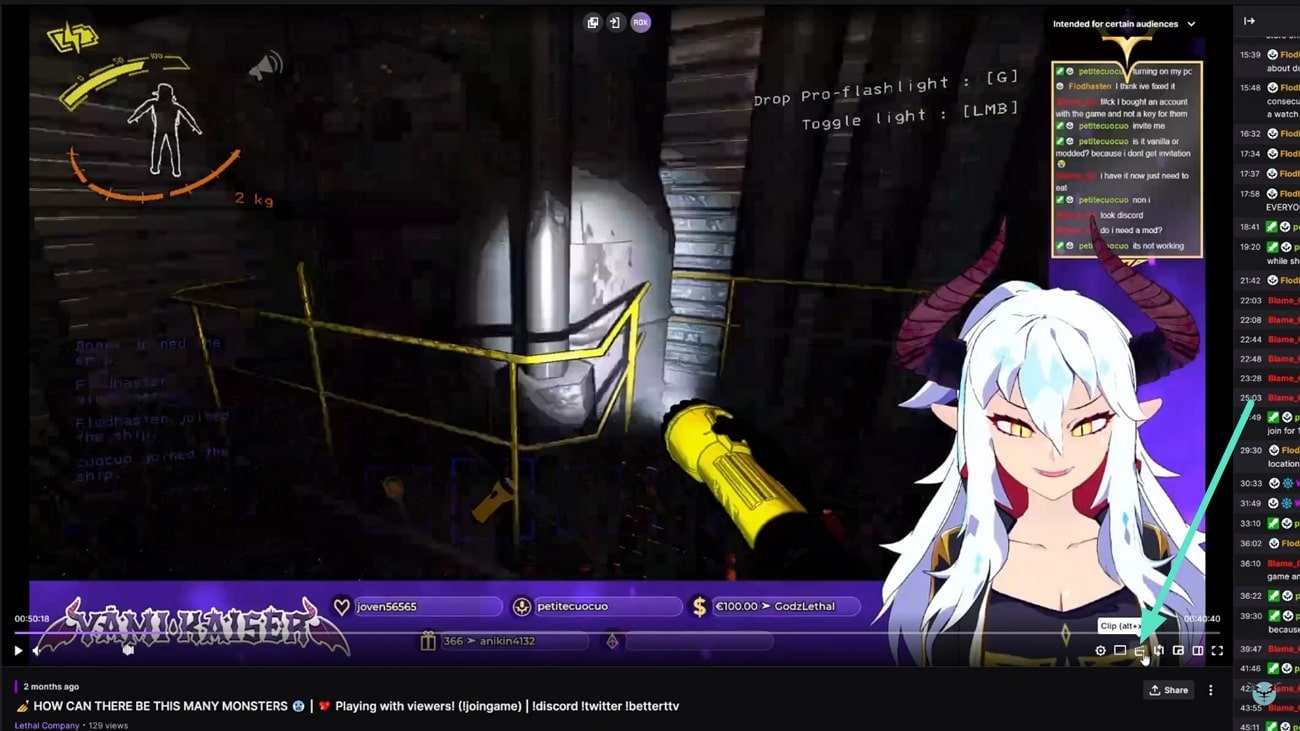
Step 1. Open the stream or recording you want to clip after logging in to your Twitch account. Now, place the cursor over the video and click the "Clip" icon at the bottom-right corner of the video.
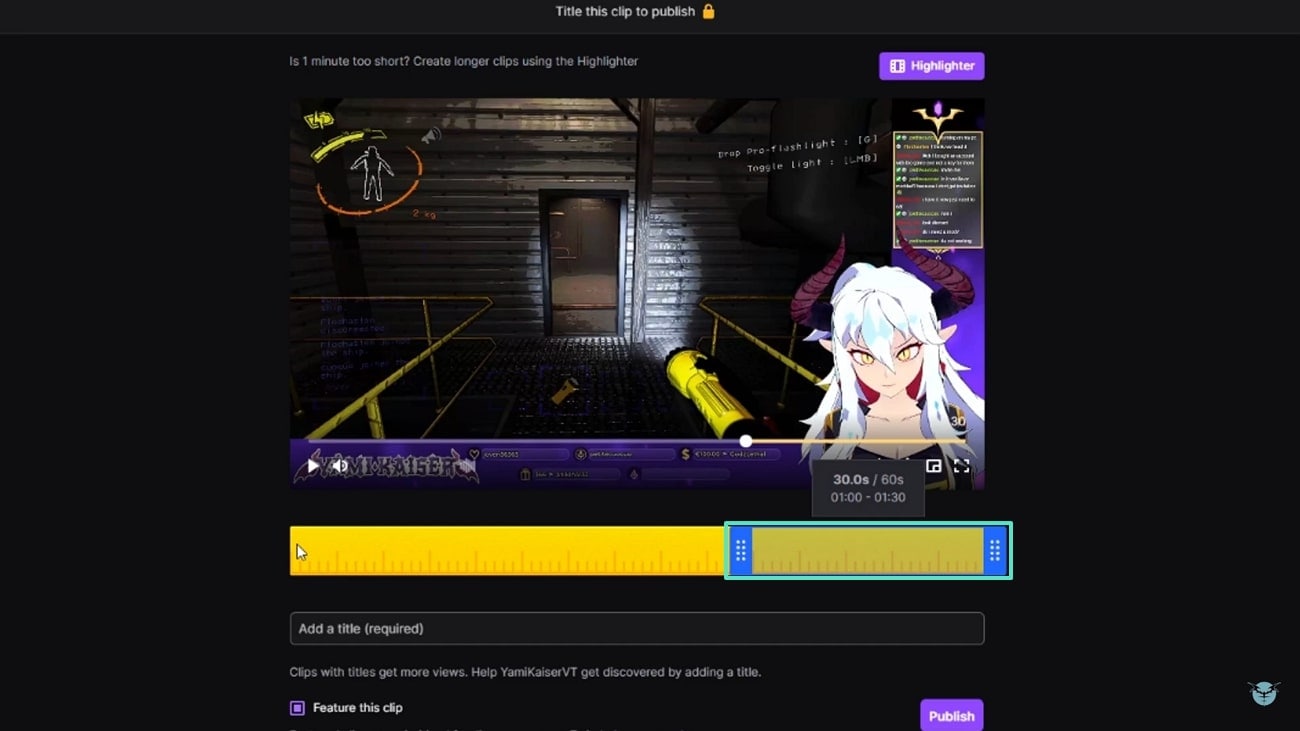
Step 2. Following this, a clip editor will open, where you need to adjust your clip's start and end points by dragging sliders.
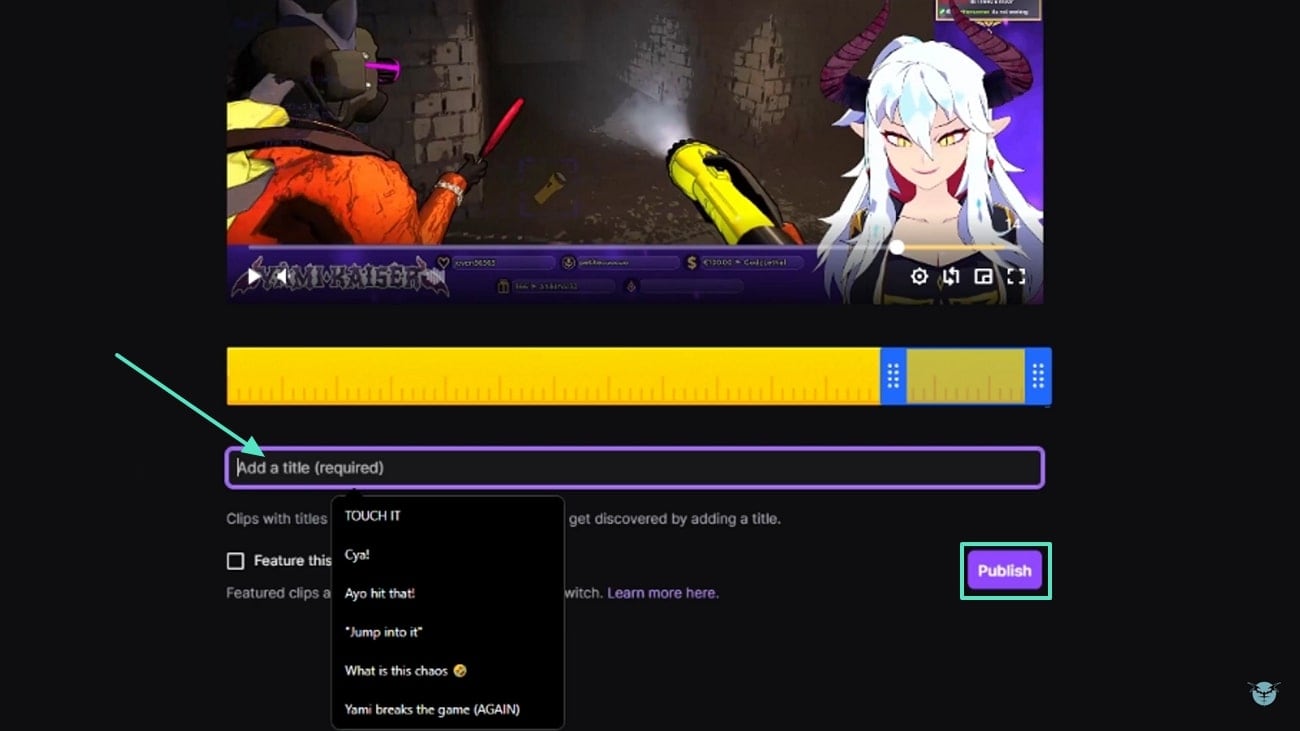
Step 3. Once you've adjusted the clip, choose the suitable title for the clip under the "Add a title" section. Lastly, click on the "Publish" button to add the clip to the platform.
Creating Clips on Mobile
Gamers who stream on mobile can also create highlights using the Twitch mobile app. The following section focuses on how to make Twitch highlights on mobile by outlining the step-by-step guide:
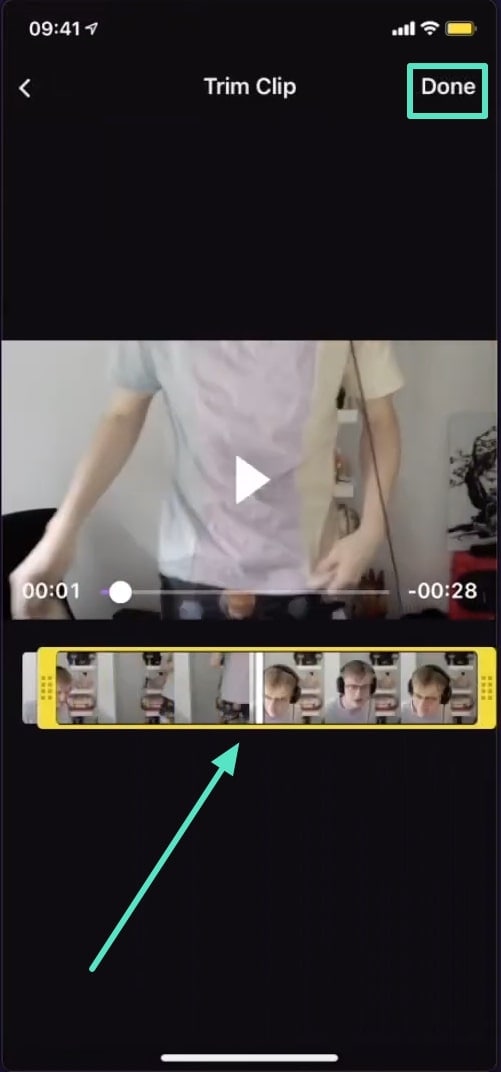
Step 1. Launch this application on your mobile device and navigate to the video from which you wish to create clips. Next, press the "Clip" icon located in the top-right corner of the display. On the new screen, choose "Preview and Edit" and tap on the "Trim Clip" button.
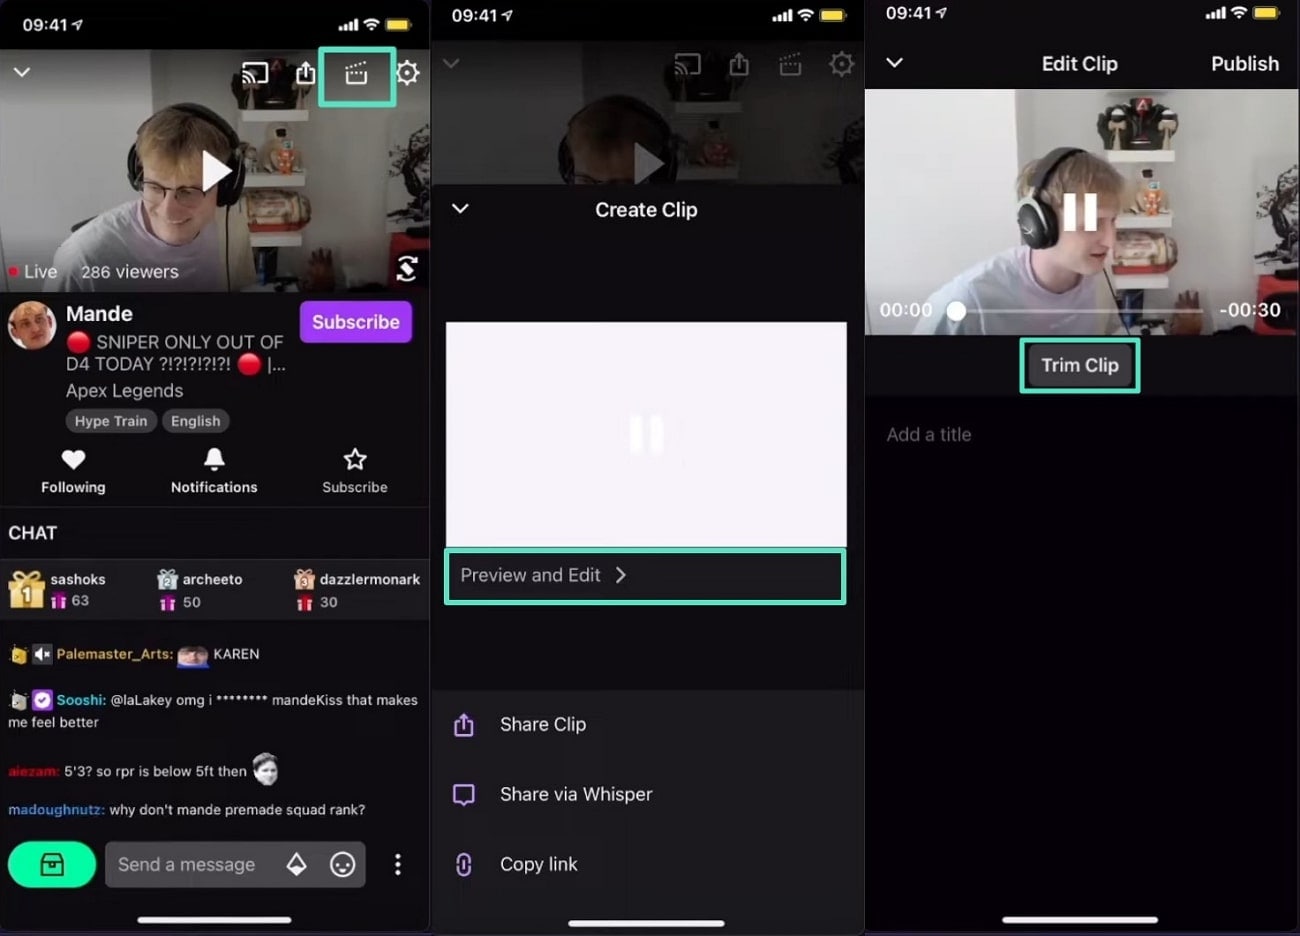
Step 2. Moving forward, you have to adjust the start and end points of the clip by dragging the sliders. Once the clip is generated, hit "Done" to confirm your selection and proceed with this task.
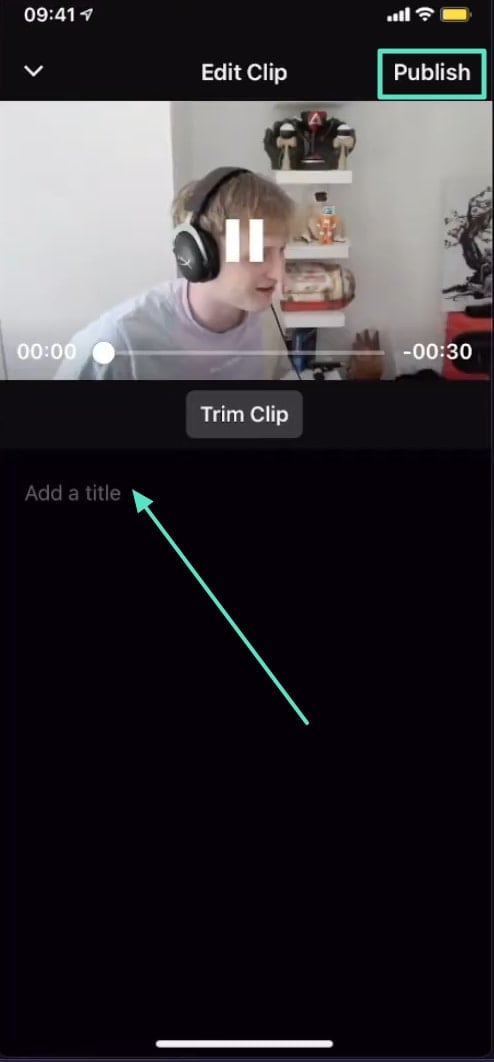
Step 3. Next, add a title for the clip into the provided text field below the video preview. Finally, tap the "Publish" button to share it on Twitch when satisfied with the look of the clip.
Twitch Clip Limitation vs. Filmora's Advanced Clip Creation: A Comprehensive Comparison
Although Twitch's Clip feature is excellent for learning how to make Twitch highlights and sharing highlights from your streams, it does have some drawbacks. You are able to cut clips and modify their arrangement, but additional features such as incorporating effects, transitions, or adjusting audio levels are not included. Wondershare Filmora is the ideal choice for a more thorough editing experience.
Its Smart Short Clips for desktop users automatically identifies the best moments from the streaming to generate engaging short videos. Moreover, the AI Reels Maker in Filmora's mobile app utilizes AI to select the main highlights from the streams, turning them into professional-quality clips. To better understand how Filmora compares to Twitch's clip creation tool, let's take a look at the comparison table.
| Twitch Limitations | What Filmora Offers? |
| Manual Editing: Twitch requires users to manually trim and select clips. | Automatic Highlight Detection: Smart Short Clips and AI-Reels Maker tool automatically identify key moments in your stream without manual selection. |
| Basic Editing Tools: Only basic trimming and title additions are available. | Advanced Editing Features: Filmora offers a comprehensive editing package featuring effects, transitions, text overlays, and color correction to improve videos. |
| No Mood or Theme Customization: Twitch lacks features that allow you to personalize the mood or theme of your clips. | Theme and Mood Personalization: Filmora allows you to select themes, moods, and soundtracks to customize your videos. |
| Restricted Clip Length: You can make clips that are a maximum of 60 seconds long on Twitch. | No Duration Restrictions: Smart Short Clips auto-adjusts duration; AI Reels Maker allows up to 2 minutes |
| Lack of AI Integration: No AI-driven enhancements | AI-Powered Automation: Both Smart Short Clips and AI Reels Maker utilize advanced AI algorithms to automatically select the best moments from streams. |
After going through the above comparison table, it's clear that Filmora offers a far more advanced solution for understanding how to make Twitch highlights than Twitch. Though Twitch is great for quick clip creation with basic features, Filmora stands out with its automated highlight detection, advanced editing tools, and no-duration requirements.
Part 2. How AI Tool Can Help You Create Impactful Twitch Clips
As discussed above, Filmora offers clip creation utility for both desktop software and mobile applications. This section will explore how to use both methods to create engaging highlight clips for your Twitch streams, whether on your PC or mobile device.
Desktop Solution: Using Smart Short Clips on Filmora
As the best alternative to learning how to create highlights on Twitch, you can follow these steps to create gaming clips using Smart Shorts Clip in Filmora's desktop software:
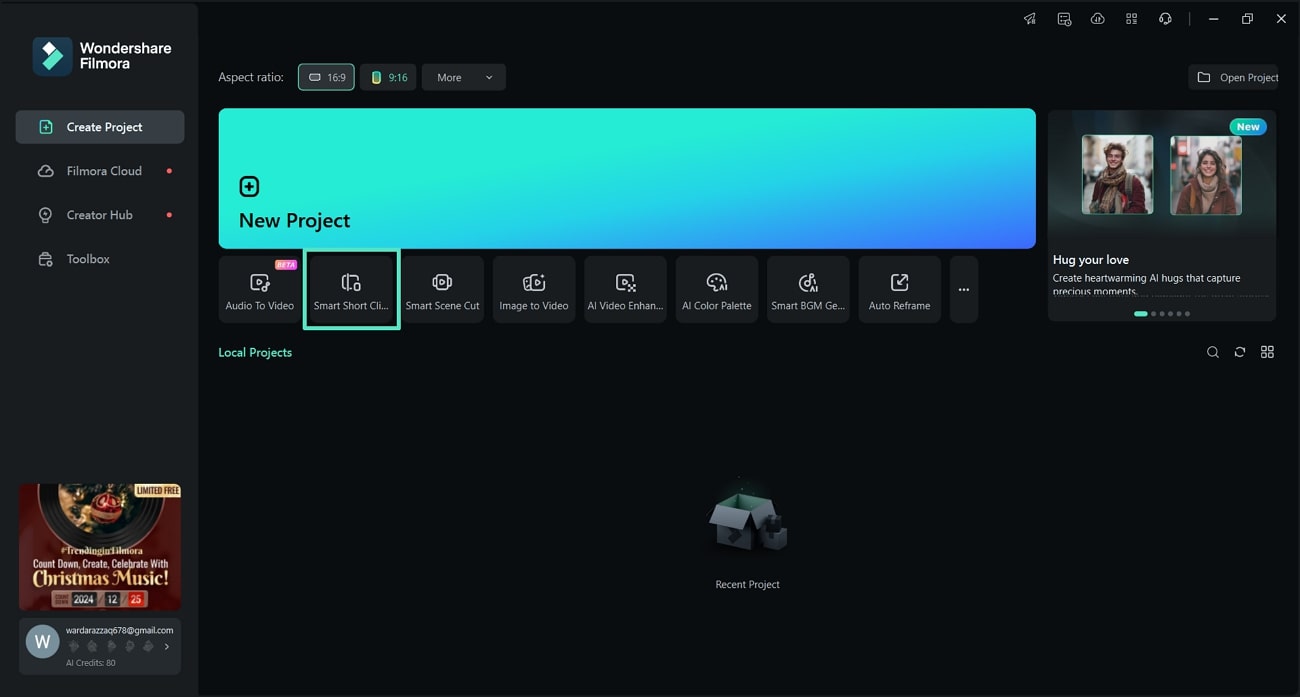
Step 1. Access the Smart Short Clips Feature
To begin, download and launch the Wondershare Filmora software on your PC. On the homepage of Filmora software, click on the "Smart Short Clips" feature to open a new window.
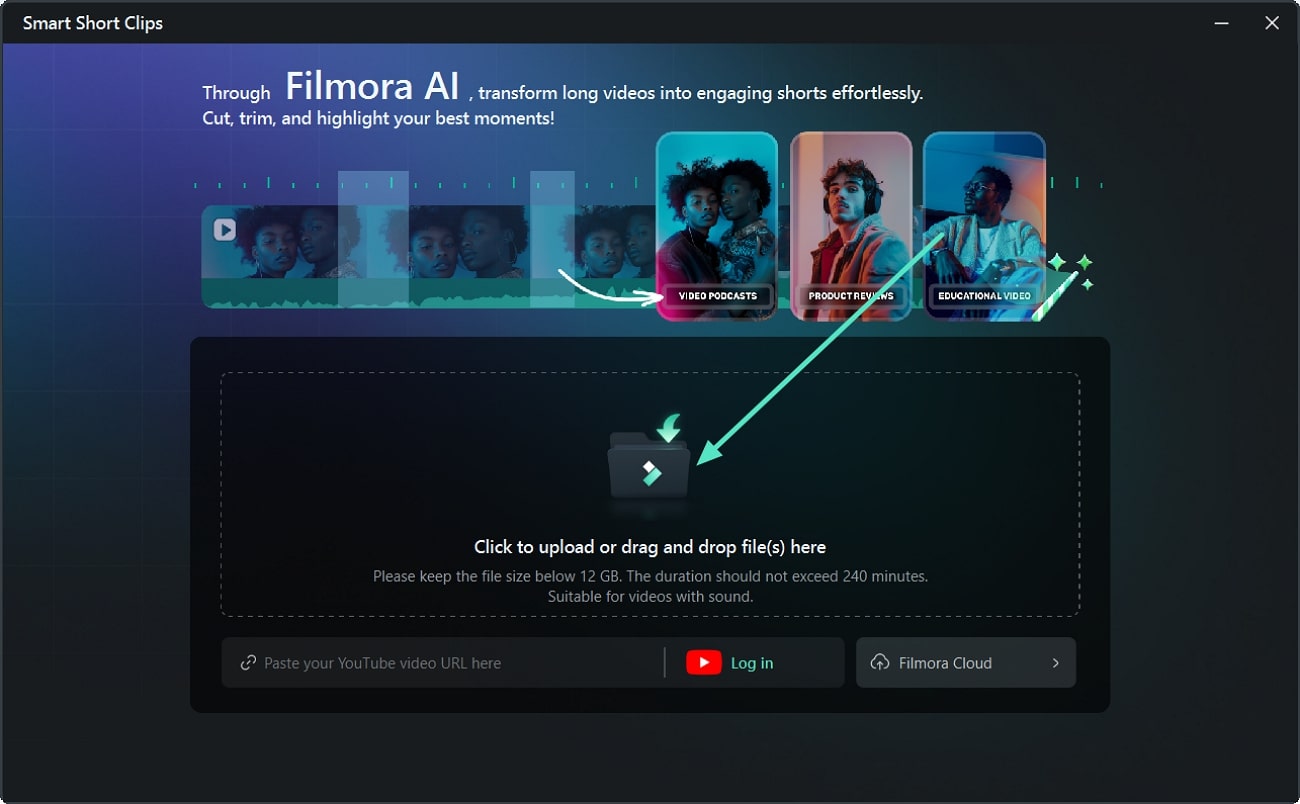
Step 2. Import the Gaming Stream
In the Smart Short Clips window, tap within the designated upload area to add your gaming stream for a short generation.
Step 3. Adjust Settings and Generate Shorts
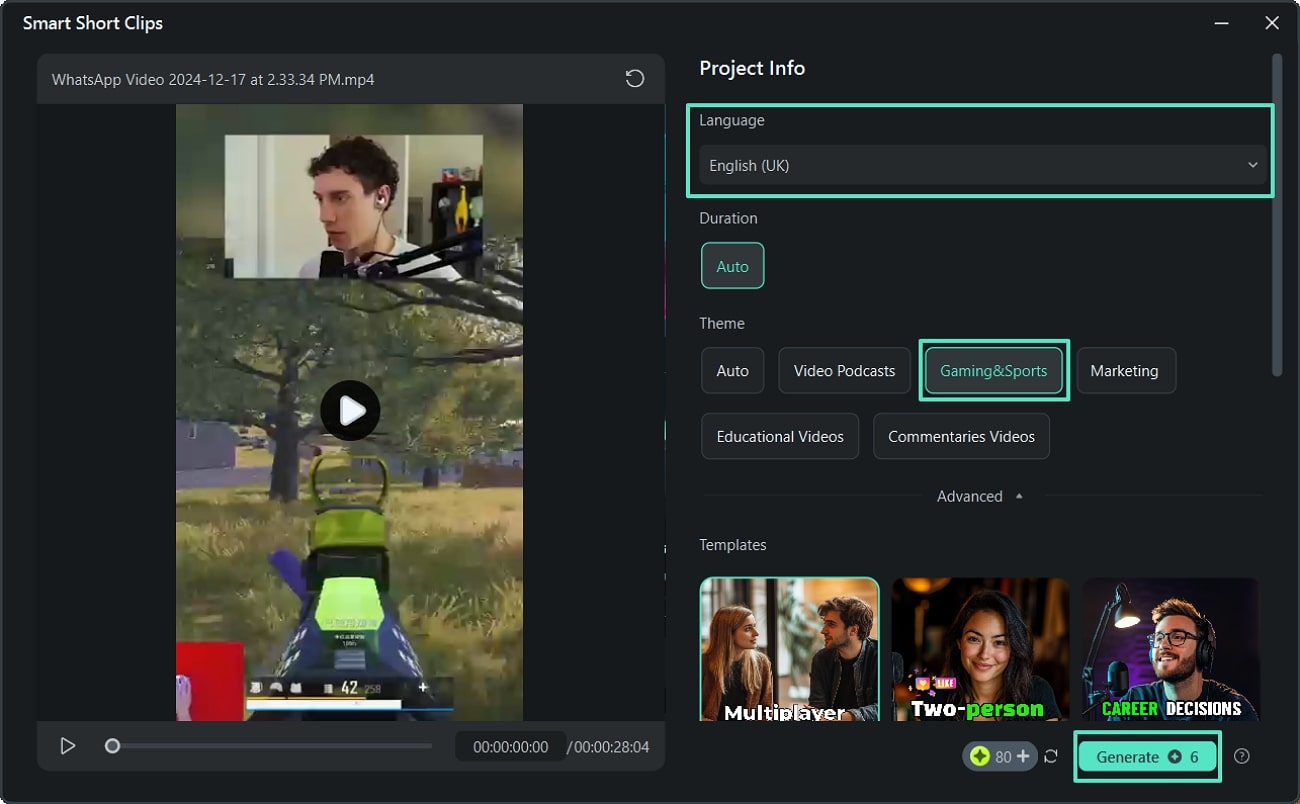
Once the video is imported, navigate to the "Language" section and choose the source language. Next, choose "Gaming & Sports" under the "Theme" section. Finally, press the "Generate" button to initiate the creation of short clips.
Step 4. Save the Generated Clip Across Filmora
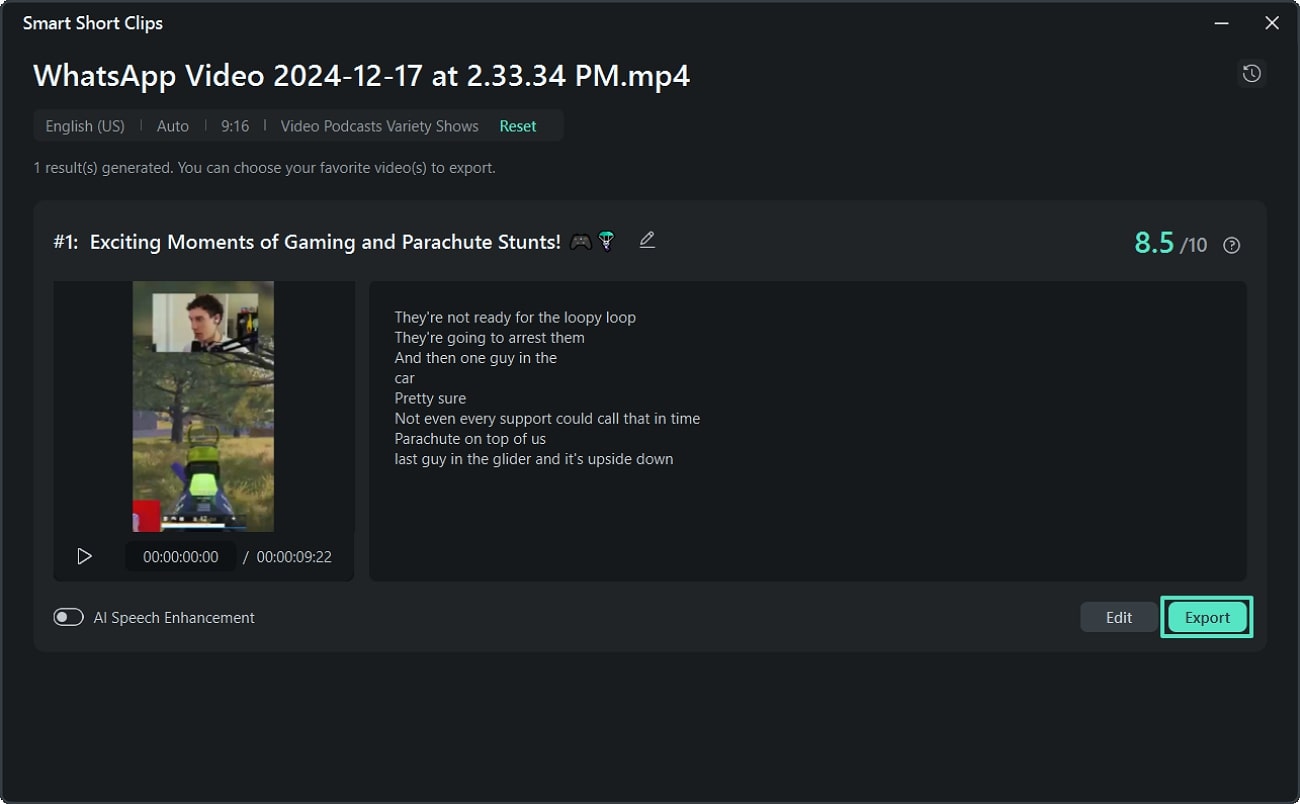
When the clip-generation process is over, the results will be displayed in the next window. Tap on the "Export" button to save the generated clips to your device for further sharing.
Mobile Solution: Using AI-Reels Maker on the Filmora App
For users who prefer generating shorts on the go, the AI-Reels Maker tool within Filmora's mobile application provides a quick way to create engaging highlights from gaming videos. Follow these steps to learn how to create highlights on Twitch mobile using Filmora's AI-powered app:
Step 1. Open the AI-Reels Maker Tool
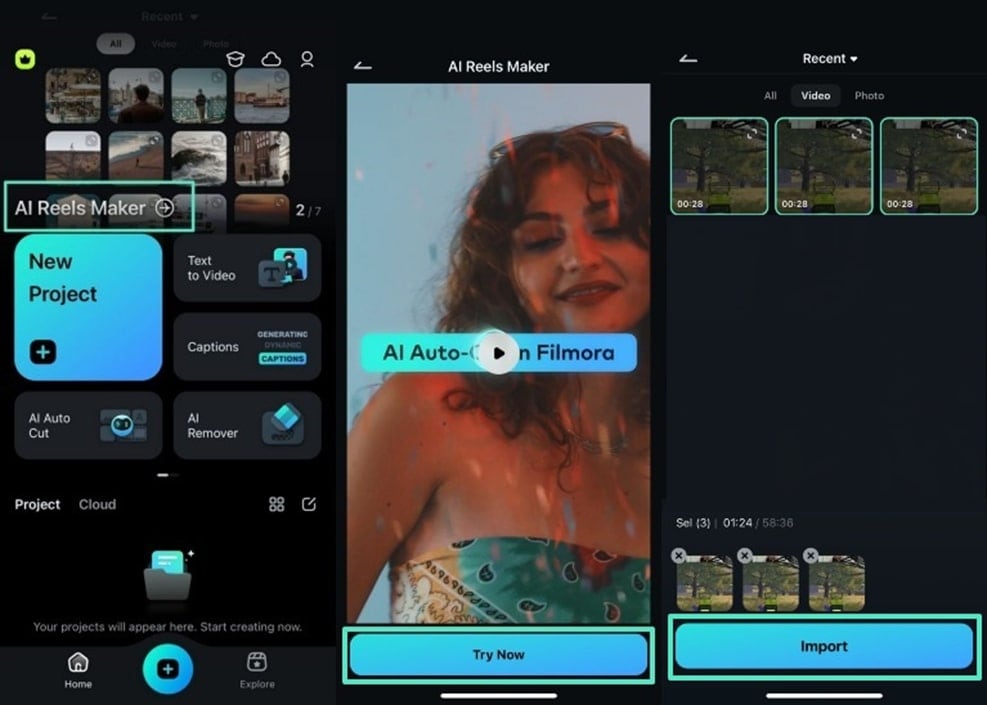
From the main screen of Filmora's mobile application, swipe right on the top menu and click on the "AI-Reels Maker" tool. Then, tap "Try Now" to choose gaming videos from your phone to create a reel. After selecting the videos, press the "Import" button to proceed.
Step 2. Customize the Output Reel in the Filmora App
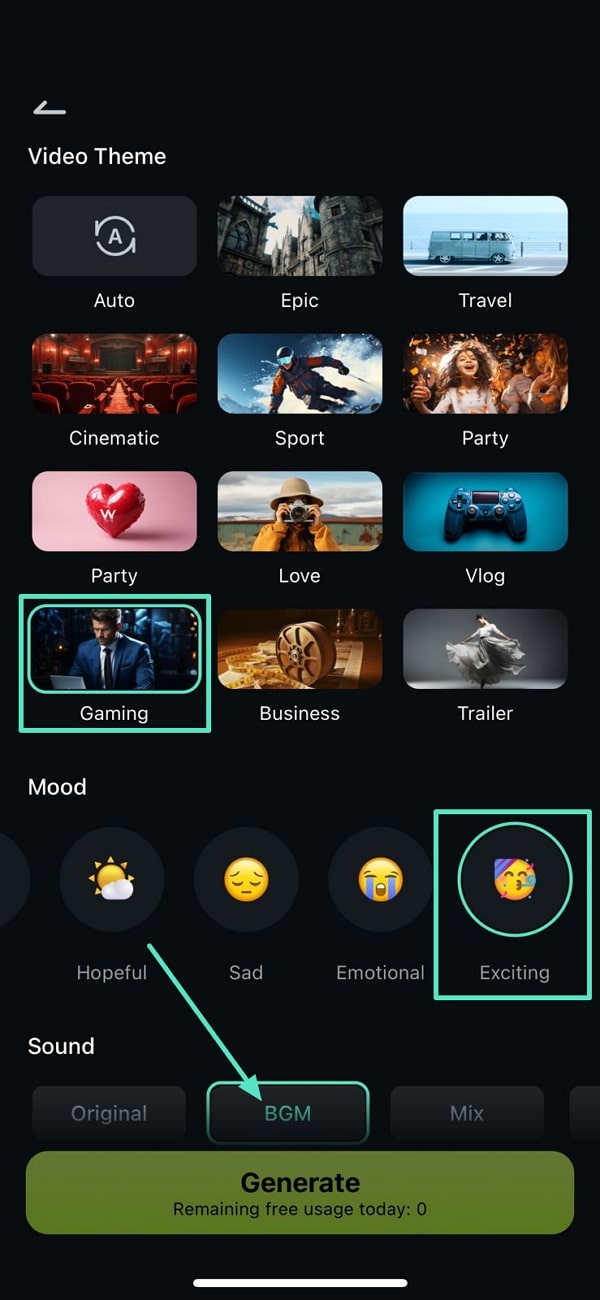
After importing the videos, choose "Gaming" under the "Video Theme" section. Then, choose your desired "Mood" and "Sound" to personalize the reel.
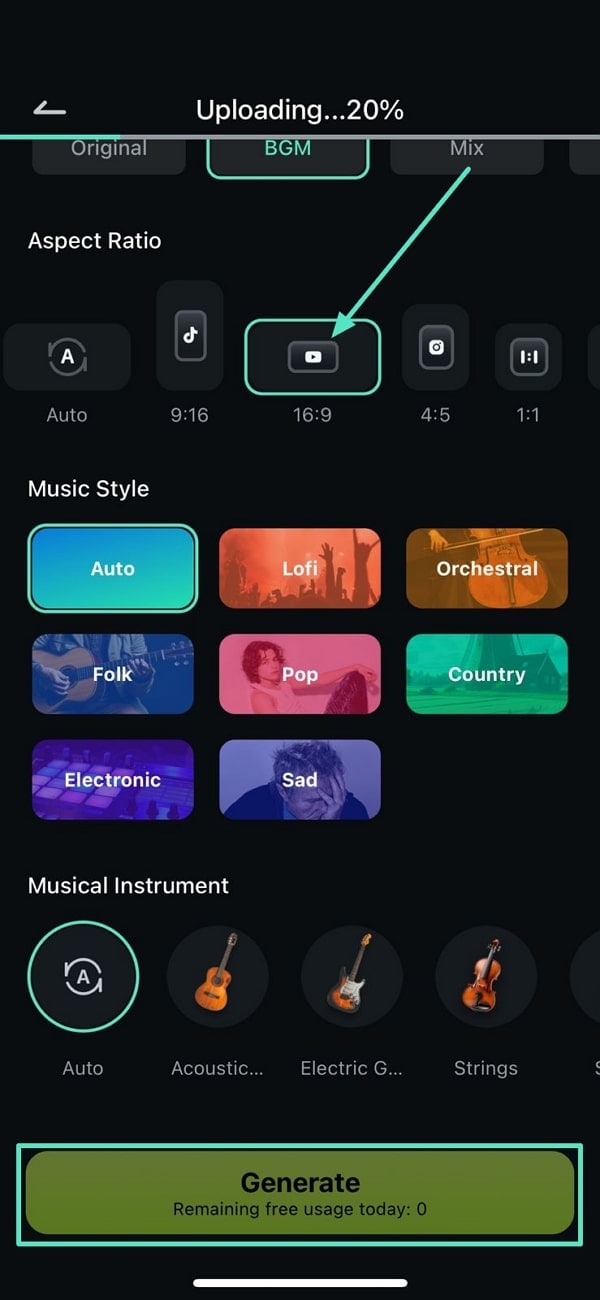
Step 3. Select Aspect Ratio and Generate Reel
While learning how to make a highlight on Twitch, head to the "Aspect Ratio" section and select "16:9" for the reel. Once set, tap on the "Generate" button to create your gaming highlight reel.
Filmora for Mobile Filmora for Mobile Filmora for Mobile Filmora for Mobile Filmora for Mobile
Make Highlight Reels in Filmora
- • Powerful Brand New AI Features.
- • User-friendly video editing for beginners.
- • Full-featured video editing for professional.
Editing Functions Within Filmora to Enhance Clips
- Screen Record: With a screen recording feature, Twitch streamers can capture any area of their screen and webcam or record the whole screen. Moreover, you can choose between different recording modes, allowing you to make additional edits and effects to them.

- Video Denoise Tool: Users have the ability to automatically eliminate unwanted grainy textures from their videos with the Video Denoise feature. This is especially beneficial for recordings captured in dim lighting, where noise may become more apparent.

- Auto-Enhance: The Auto-Enhance function modifies different elements of your gaming videos, like brightness, contrast, and saturation. AI reviews the footage and applies improvements that refine your clips, eliminating the need for manual changes.

- AI-Color Palette: This feature uses advanced AI algorithms to extract and apply color palettes, ensuring consistent color matching across different shots. It simplifies color correction, making it accessible even for users without expertise in detailed adjustments.

- Sharpness Adjustment: Filmora provides a slider for fine-tuning the sharpness of your videos, allowing you to enhance or soften details for a crisp appearance. Using this tool helps achieve the desired clarity level, improving your content's overall visual quality.

Part 3. How to Upload Twitch Highlights to YouTube
All your highlights will be available in the Video Manager panel, so you just have to click on the Download button located directly below your freshly created highlight if you want to save the clip to your computer before uploading it to YouTube.
Twitch also offers a much faster way of sharing highlights to YouTube, although you first need to go over to Twitch Settings and locate the Connections option. Afterward, just click on YouTube and your Twitch and YouTube channels are going to be connected.
Head back to the Video Manager, click on the Export button and proceed to insert the title, description, and tags. Make sure that you are signed in to your YouTube account, before clicking on the Export button so you don't have to go through the entire process twice.
Part 4. Tips for Making Twitch Highlights
As you can see there is nothing complicated about the process of creating Twitch Highlights. The following tips will help you understand the process better and explain why you should produce highlights for each new stream you share on your channel.
- Twitch Highlight is a Promotional Tool: Building a sizeable audience isn't easy and you should use every available resource to increase the number of your subscribers. Highlights of the best gaming moments from your broadcasts are an excellent way to summarize what your channel is about and to impress the visitors of your channel.
- Keep It Short and Creative: Although there are no strict rules regarding the length of a Twitch highlight, you should try to stay well within the two-minute mark. Of course, there is nothing stopping you from making highlights of any duration, just keep in mind that viewers don't always have the time to watch ten or fifteen-minute video. If you choose to go for a longer highlight format, try to be as inventive and creative as you can.
- Share Twitch Highlights on Other Social Media Channels: YouTube is the largest video sharing platform on the Internet that hosts an incredible amount of content related to gaming. That's why sharing high-quality videos on YouTube can help you get more followers on your Twitch account. Although sharing Twitch highlights on other social media networks can't hurt your chances of gaining more fans on Twitch it will hardly have the same impact as sharing the best moments of your broadcasts to YouTube.
Conclusion
In conclusion, gamers find it essential to learn how to create Twitch highlights to capture and share their best moments. This article provided a detailed guide on creating gaming highlights on desktop and mobile using Twitch. While Twitch offers basic highlight-creation tools, Filmora offers an advanced alternative. Its Smart Short Highlights feature for desktop and AI-Reels Maker for mobile make it easier to create professional-quality highlights with enhanced customization options.


 100% Security Verified | No Subscription Required | No Malware


