Get ready to master the world's most popular free software for recording and editing audio. With Audacity audio recording, this open-source, user-friendly audio recording software is perfect if you are a podcaster, content creator, or just want to get creative with sound. "How can I record on Audacity?" You may be curious. Keep reading and we will include a step-by-step guide to using Audacity audio recording software.
In this article
Things You Need to Do to Record Audio With Audacity
Before we jump to the recording, you usually need to install additional software beyond the basic installation of Audacity so it can work properly and enhance the audio quality.
Install FFmpeg
If you want to export the audio into other special file formats, you need to download the installer from FFmpeg for the Audacity page for your Windows or Mac.
Install LADSPA Or VST Plugins
Additionally, you can install LADSPA or VST plugins for advanced effects and sound processing. VST plugins can be installed through Effects, where you can click Add. LADSPA plugins are available for download online.
Configure Sample Rate and Bit Depth
If you are looking for high-quality recordings, we suggest configuring Sample Rate and Bit Depth. Just go to Edit, then in Preferences choose Quality and set the Default Sample Rate, and Default Sample Format.
You can explore more plugins online for extra setup and high-quality audio recordings.
How to Use Audacity for Audio Recording?
Now it's time for the real recording action. Here are the steps to use Audacity for recording sound on your PC.
How to Record System Sound With Audacity on Windows?
1. Launch Audacity on your PC, click on Audio Setup, and choose Windows WASAPI as the Host.

2.. Navigate to Recording Device and select the output you want to record, in this case, Speakers.
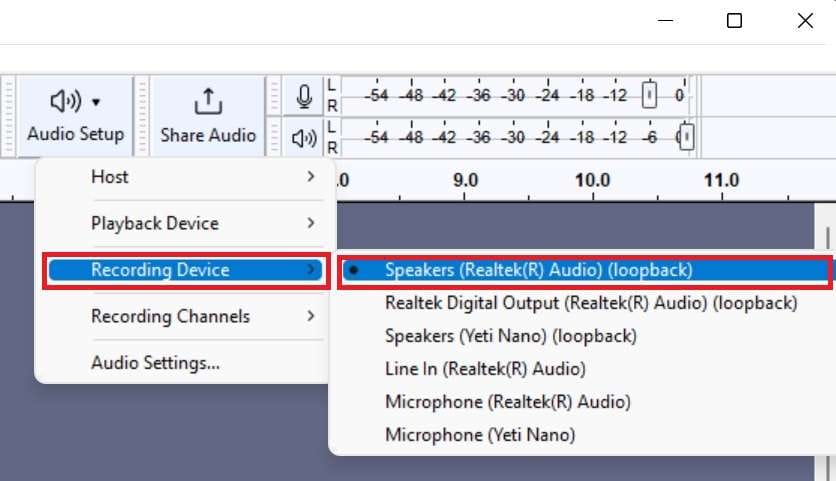
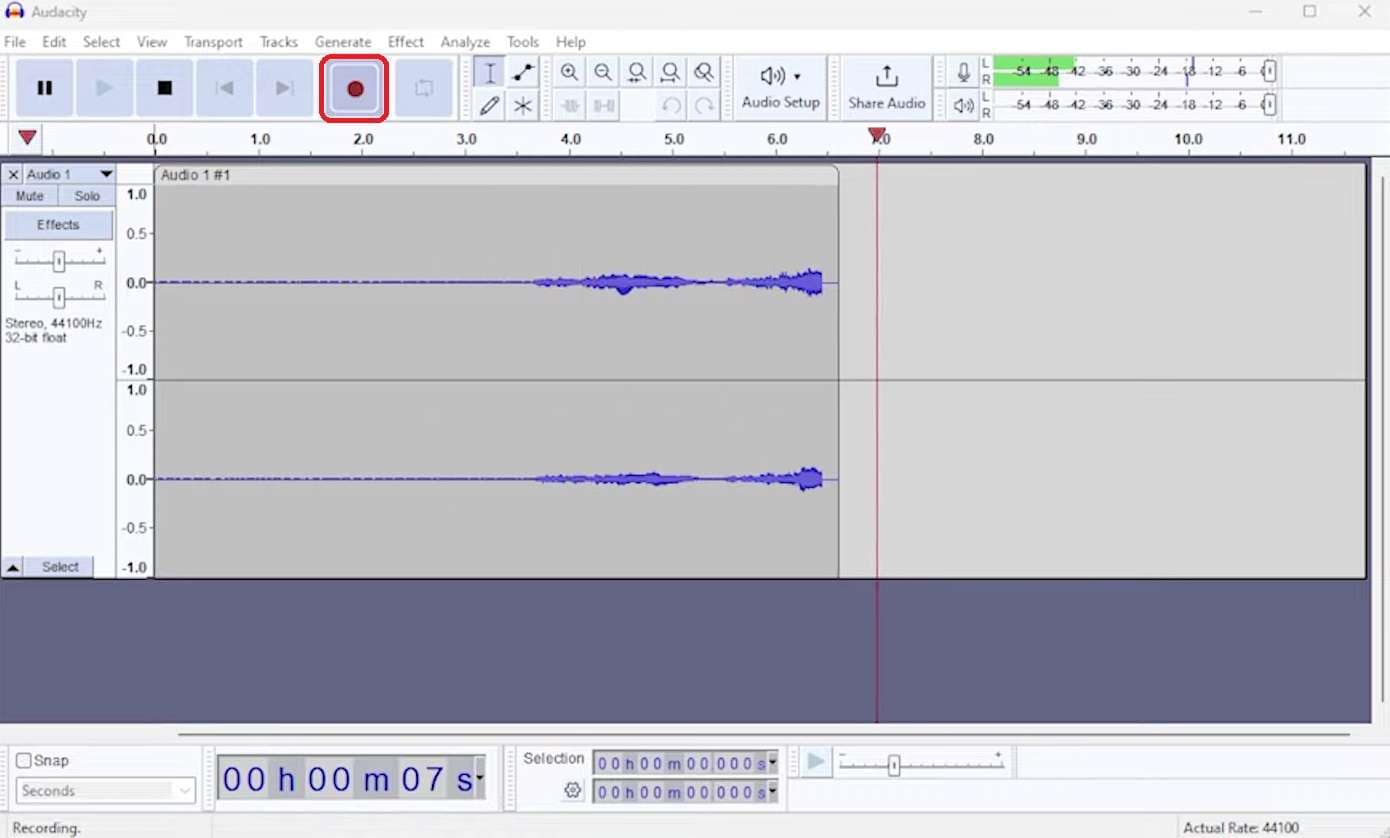
3. . Click on the Red button, and the recording will start.
Recording audio on Mac using Audacity is quite the same as for Windows, but the preparation is a little different as you need to download and install Soundflower to record desktop audio on Mac.
- Open the Audio MIDI Setup app, select Applications, then choose Utilities.
- In the bottom left corner, press the + button and choose Create Multi-Output Device.
- In the panel on the right, select Built-in Output and Soundflower (2ch).
- Press the Ger button and select use this device for sound output. Now you can launch Audacity, click the Audio Setup button, and set Soundflower (2ch) as the recording device. From there, the recording is the same as on Windows devices.
How to Record Microphone Sound With Audacity?
The Audacity voice recorder is the same for both Windows and Mac, so start by connecting your mic to the right port. From there, follow these simple steps:
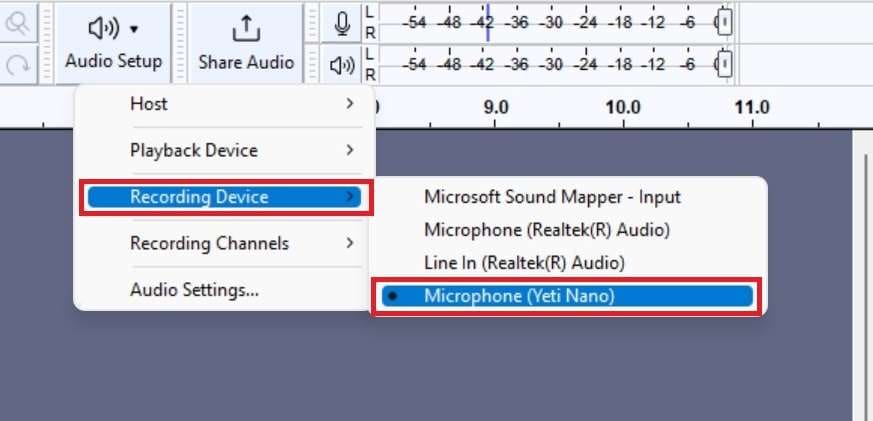
1. . In Audacity, navigate to the Recording Device and select the Microphone.
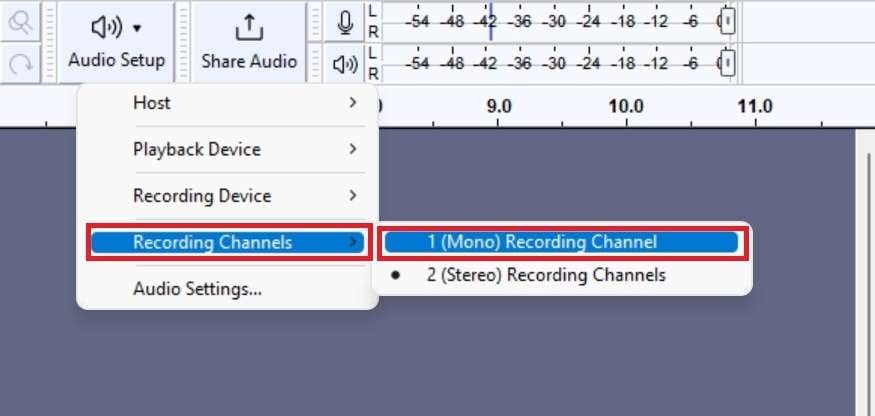
2. . Now go to the Recording Channels and select Mono.
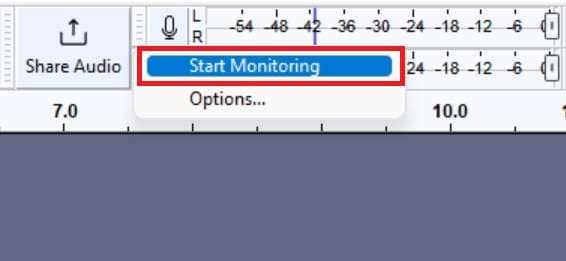
3. . Select the Microphone icon and choose Start Monitoring. If the green bar moves when you tap the mic, your setup is done.
4. . Start recording by clicking the Red button, and everything you say on your mic will be recorded in Audacity.

How to Edit Audio Recordings in Audacity?
After mastering the Audacity audio recording, it's time for some editing advice.
To edit an audio recording in Audacity, you must record the sound or import an existing audio file through the File > Import menu. You can also drag and drop files into the window. When you finish that, you'll see a waveform of your sound, and we can proceed with editing.
Remove a part of the audio
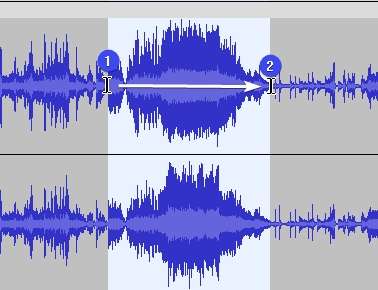
To remove an unwanted part of your audio, select the start point in the audio and drag the cursor to the right over the waveform. When you have your selection, press Delete or Backspace on your keyboard and delete that part.
Resizing and trimming of audio
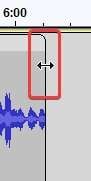
If you want to trim your clip, place your cursor near the upper third of either the left or right edge of a clip. Now, you can click and drag the edge to trim your clip to the desired length. If you want to split your clip somewhere in the middle, just right-click on the file and select Split the clip.
Effects in Audacity
Audacity has different effects and plugins. Each effect does different things, but you can apply them the same way. Just select the audio file, go to the Effect menu, select the effect you want to use, and this window will appear:
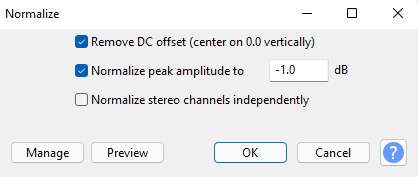
Choose your effect, click the Preview button to check if you like it before applying, and click OK to apply the effect.
Pros and Cons of Using Audacity Audio Recorder
Now, here is the table that shows all the pros and cons of using an Audacity audio recorder for Windows and Mac.
Best Audio Recording Alternative to Audacity – Filmora
Audacity may look a little outdated with its old design, and some steps can be complicated for beginners. That's why we want to introduce you to a fantastic alternative with a modern design, easy-to-use interface, and AI-powered features. Get ready to meet Wondershare Filmora, which is software compatible with Windows, Mac, Android, and iOS and is perfect for both beginners and advanced users.


This Wondershare product is created mainly for video editing, but you can come across various additional functions. With Filmora, you can record both system audio and external voiceovers simultaneously for unlimited time, and after you are done with simple audio recording functions, you can process audio editing in the same environment.
How to Record Audio Using Filmora?
First, you'll need to download and install Wondershare Filmora on your computer.
- Launch Filmora and start a New Project.

- Click on the Record option and select the Record PC Screen.

- The Wondershare Screen Recorder window will pop up, and there, you can turn the camera off and select if you want to record the microphone, system sound, or both. Simply click on the Red button to start recording, and your session will begin. Piece of cake, right?

- Click the stop button to finish recording, and then all recordings will appear in the Filmora editing interface. You can choose to edit or export.
Bonus Tip to Enhance Recorded Audio
If you want to enhance the recorded audio, Filmora has a whole treasure chest for audio editing options, especially ones powered by AI technology.
AI Audio Denoiser
The AI Audio Denoiser can accurately remove background noise from your audio or video based on the type of noise. This magical feature has three options to remove unwanted background noise – AI Voice Enhancement, Reverb Reduction, and Hiss Reduction.
AI Vocal Remover
If you also want to separate vocals from songs, extract audio from the track, or remove vocals from the track, you can try AI vocal remover. It is a smart tool that isolates vocals from audio without losing the quality. After completing this one-click process, you can immediately access the audio extract, edit, and adjust it seamlessly.
AI Voice Enhancer
AI Voice Enhancer is another smart feature that fixes the clarity of the sound and has adjustable controls for fine-tuning audio adjustments.
It's a perfect feature for content created in outdoor settings that can silence unwanted sounds and enhance the one in focus. You can edit your audio in real-time processing with up to 100 adjustable levels and beautification options.
Conclusion
In this article, we have discussed how to use Audacity for audio recording. Although they may look complicated and come from the old interface design, it is a good audio recording software. However, if you want to convert audio to text or enhance audio with AI, you may need to use alternatives like Wondershare Filmora. Let's go ahead and record audio with Filmora and try AI-powered options. You'll never try another software again!
FAQs
-
Why is Audacity not recording computer audio?
It's probably related to your input device settings or the missing audio driver. Make sure you selected the correct audio host. On Windows, that's Windows WASAPI, and on Mac, that Soundflower third-party tool must be installed before recording.Always check that you selected the correct input device, like speakers, stereo mix, or Windows. On Mac, you need a multi-output device set up to record both system and microphone audio. -
How long can you record audio on Audacity?
There is no time limit for audio recording in Audacity. You can record as long as your PC's resources allow you. Be aware that longer recordings can create system performance issues on older devices. -
Is Audacity suitable for recording voice?
Yes, it's great for voice recording. Podcasters, YouTubers, and other social media content creators use this software, but we suggest you try Filmora.This Wondershare product is easier to use, with a modern design and enormous possibilities to enhance the quality of your audio. -
Can Audacity record system audio on a Mac?
Yes, you can record system audio on a Mac with Audacity. You'll just need to install a third-party tool such as Soundflower. If you want to skip this extra setting, try Filmora on your Mac; system recording will be easy.