
 100% Security Verified | No Subscription Required | No Malware


 ChatGPT
 Perplexity
 Gemini
 Claude
 Grok
Grok
Do you encounter the dreaded OBS encoding overloaded error but don't know how to fix that? Don't worry – in most instances, it's a simple error that can be easily fixed. Have a look below at the top methods you could try to fix encoder overload in OBS.
In this article
Why OBS Encoding Overloaded Issues Happen?
When you encounter the encoding overloaded OBS error, it means that there's an issue with capturing, compressing, and converting your data. You might experience lagging issues, and some frames might not be captured at all.
That can happen for a variety of different reasons. Some of the most common causes of OBS video encoder overloaded errors are as follows.
| Cause | Description | Solution |
| Other programs running in the background | Programs running in the background can clog up computer resources and cause lags and errors. | Close all other programs when running OBS. |
| Not enough disk space | Screen captures and live streams can often take up a lot of storage. If there isn't enough disk space, you could encounter errors. | Free up disk space. |
| OBS set at low priority | Processes with low priority will get fewer CPU resources, making them more prone to crashing or glitching. | Set OBS as a high priority. |
| High resolution | High output resolution can overload your CPU and lead to OBS errors. | Reduce output resolution |
| High FPS | High FPS (over 30 FPS) can easily overload your CPU and lead to OBS errors. | Reduce FPS |
| Improper encoder balance | Improper CPU/video quality balance can lead to lags and OBS errors. | Increase encoder balance. |
| Outdated drivers | Outdated drivers can lead to numerous issues, including OBS encoding overload. | Update drivers. |
- Record videos with unlimited time.
- Experience with no lag
- Powerful AI for effortless content creation.
- Intuitive, professional yet beginner-friendly.
- Works on Mac, Windows, iOS, and Android.


How to Fix the OBS Encoding Overloaded Problem?
While it can be nerve-wracking when your OBS says "encoding overloaded", it's generally a common issue that can easily be solved. Here are the top methods you could try to fix encoding overloaded in OBS.
Close Other Programs
If you have numerous programs running in the background, they can compete with OBS for CPU resources, slowing it down and leading to errors. That's why it's always in your best interest to close everything you won't need while recording or streaming – whether you're using OBS or any other screen capture tool.
Here's how to fix encoding overloaded in OBS by using Task Manager:
- Exit all programs and windows you don't need by clicking the X icon;
- Right-click on your Taskbar and select Task Manager;

- Look through all the active programs;
- Find the programs you don't need, right-click on them, and select End Task.

Free up Disk Space
OBS (or any other screen recorder) needs both RAM and adequate disk space to function properly. If you don't have enough storage, you won't be able to capture or live stream any kind of audio and video content.
Fortunately, freeing up disk space is relatively straightforward. You can approach the task manually and delete/uninstall all the files you no longer need from a given disk – photos and videos take up a lot of space, as do games and apps. You can also transfer them to another disk or external device.
Additionally, you can clean up your disk:
- Open File Explorer;
- Right-click on the drive you want to clean up and select Properties;
- Go to General > Disk Cleanup;
- Select Clean up system files and click OK.

Set OBS as High Priority
Your CPU is designed to handle many processes simultaneously, but they're not all given the same attention and treatment. So, if OBS is designated as "low priority", it won't get the resources it needs to capture, compress, and transmit data. Ultimately, this could lead to OBS encoding overload errors.
Here's how to perform an OBS encoding overloaded fix by setting it up as a high priority:
- Right-click on your Taskbar and select Task Manager;
- Right-click on OBS in the Processes tab and select Go to details;

- Locate OBS in the Details tab and right-click on it;
- Go to Set Priority and select Above Normal or High.

Reduce the Resolution
Resolution is one of the main determining factors that impact how much CPU usage OBS needs. So, adjusting your resolution could immensely impact the tool's performance.
Here's how to adjust your resolution and hopefully fix the OBS encoding overload error:
- Launch OBS on your device and go to Settings;
- Navigate to the Video tab;

- Under Output (Scaled) Resolution, put in a lower resolution;
- Click Apply > OK, then restart your PC and start up OBS.

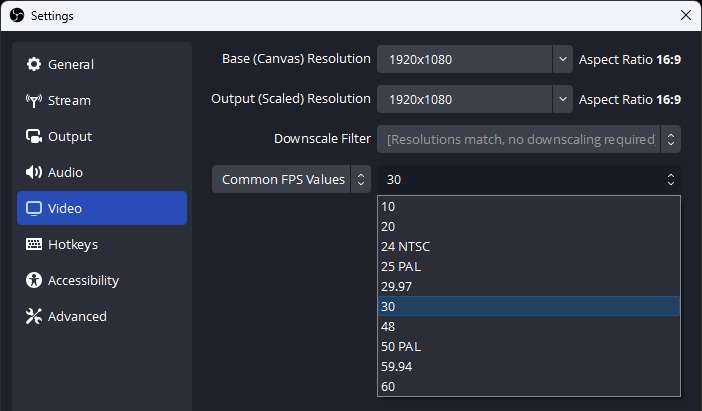
Reduce FPS
It should come as no surprise that a higher FPS while recording puts more strain on your GPU. Although recording at 48, 60, or higher FPS offers a smoother viewing experience, it's not always necessary. You can record at lower FPS, reduce the chances of encountering OBS encoder overload errors, and still ensure that your viewers are satisfied.
Here's how you can do just that:
- Launch OBS on your device and go to Settings;
- Navigate to the Video tab and locate Common FPS values;

- From the drop-down menu, select 30 or lower;
- Click Apply > OK, then restart your PC and start up OBS.
Use the More Balanced Encoder Preset
The encoder presets you're using impact both the quality of your recordings in OBS and the strain your recordings put on your CPU.
In OBS, choosing a more balanced encoder preset for your CPU is relatively straightforward:
- Launch OBS on your device and go to Settings;
- Navigate to the Output tab;

- If needed, go to Streaming, set the Encoder at Software (x264), and check the Enable Advanced Encoder Settings box;
- Under Encoder Preset, select Superfast or Ultrafast, then click Apply > OK and restart your device.

Update Your Drivers
If you've tried everything else and nothing seems to work, you could update your drivers as a last resort. Typically, OBS will send out an error asking you to check whether your drivers are up to date and if it's your video or graphics drivers that are causing issues. However, it's possible to encounter an encoding-overloaded error instead.
You can easily update your drivers by following a few simple steps:
- Use the Search box to look for Device Manager and open it;
- Expand Display adapters (or other relevant driver);
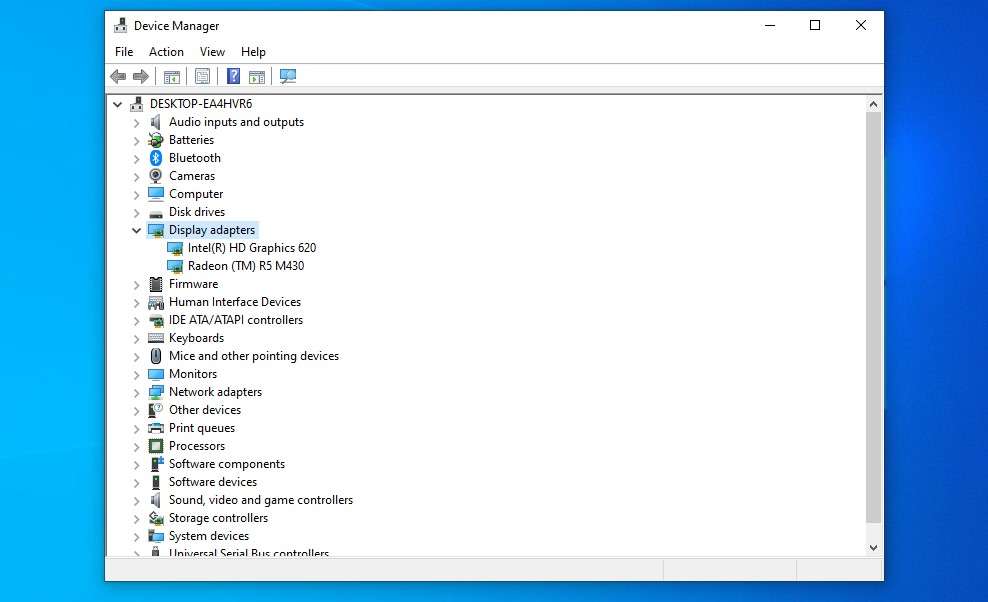
- Right-click your Graphics card and select Update driver;
- Select Search automatically for drivers.

More Lightweight Alternative to Consider: Filmora
Although OBS can be a great solution for recording and live streaming, it is prone to encountering bugs and errors. It's a resource-intensive tool that can take lower-end devices to their breaking point and be quite cumbersome to deal with. If you want a powerful solution for recording and streaming that's lightweight, stable, and easy to use, you'll want to look into solutions like Wondershare Filmora.
A comprehensive recorder and video editor in one, Filmora offers an abundance of advanced features and yet remains as light as possible on your CPU and GPU. It's fast, reliable, and delivers outstanding video quality.
Capable of recording in up to 4K and 240FPS without affecting your device performance, it's the ideal choice for gameplay videos, tutorials, reviews, and more.
It allows you to fully customize your recording area, capture your webcam, system, and microphone audio, display mouse clicks and keystrokes, and more. Once you're done recording, head straight to its editor to perfect your footage and publish it on any platform.
Here's how to screen record using Wondershare Filmora:
- Install Filmora on your device and log in to your Wondershare account;
- From the Main Menu, select Screen Recorder;

- Set your recording area – Full Screen, Custom, Target Window, or input preferred video length and width;
- Enable/disable Microphone, System Audio, and Camera;

- Expand Settings to adjust Frame Rate, Count Down, Record Timer, and more;
- Click the red Record button to start recording.

Conclusion
Encountering the encoder overloaded error in OBS is pretty commonplace among users. Fortunately, there are several easy solutions you could try to fix the issue and continue recording or streaming without interruptions.
However, if you're tired of encountering frequent errors and want a powerful but lightweight solution that offers greater stability, you should check out Wondershare Filmora.
