If you want to attract a larger following on social media, you need to post content relatively frequently. You also need to add a bit of versatility to your content. With Instagram, that’s fairly easy.
You can seamlessly post photos, videos, reels, stories, carousels, and perhaps most importantly – live videos.
IG live recorder can help you attract a much larger following, increase your audience engagement, and allow you to stand out from the crowd. Learn how to record IG live and start collecting those likes and follows.
In this article
About Recording IG Live
IG live record is precisely what it sounds like – a real-time video you can share with your followers on the platform. Since it is life, after all, the key to making it work is thorough preparation. You won’t be able to edit out any awkward segments or weird pauses. So, you’ll need to have a complete plan in mind – prepare a script, define how you’ll interact with comments and questions, and figure out how you’ll deal with the occasional troll.
If you’re well prepared, you can expect countless benefits when you record IG live:
- Personalized interactions – you’ll be able to communicate with your audience in real-time, offering a more personalized approach;
- Improved audience engagement – with live videos, even audience members who might not be very active in your comment section will feel encouraged to participate, ask questions, and send reactions;
- Wider reach – Instagram sends out notifications to your followers whenever you go live, so they’ll be much more likely to start watching and enjoying your content;
- Increased visibility – live streams on Instagram are prominently displayed and prioritized over stories. Moreover, they’re marked with a bright pink ring to stand out more. All of this makes them more visible and, therefore, more intriguing to your target audience.
If you want to enjoy these benefits and more, you’ll need to learn how to record an IG live like a pro.
How to Record With Instagram Live
Going live on Instagram is a simple process if you’re using an Android or an iPhone. In fact, it’s so simple that it’s relatively easy to do it by accident.
Here are the steps you’ll need to follow to use the Instagram live recorder:
Step 1: Launch the app and go to your profile;
Step 2: Tap the + icon in the upper right-hand corner and select Live;
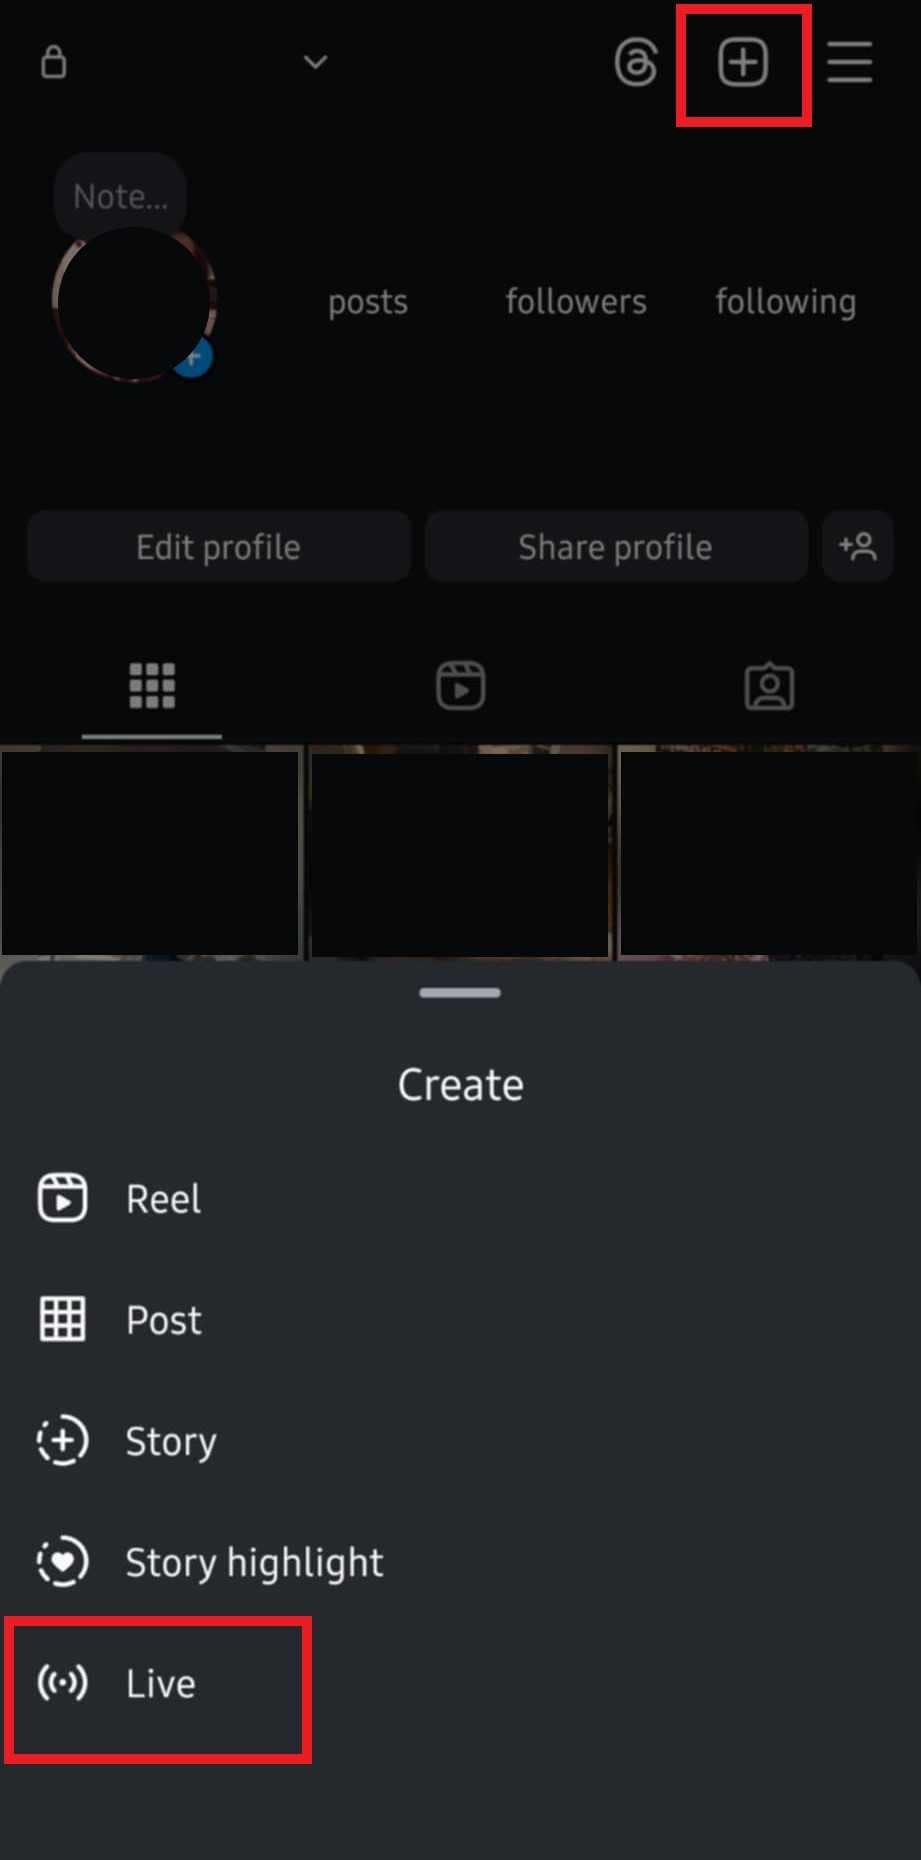
Step 3: Tap the Go Live button.
If it’s easier for you, you can also skip going to your profile. Directly from the home page, tap the + icon at the bottom of your screen, select Live, and start sharing your live video.
Record Instagram Live on Windows
A great thing about using an Instagram live recorder is that it lets you connect with your audience in real-time. A bad thing about it is that your video is gone as soon as your live recording is finished. It’s not like reels, which can stay available for as long as you have your account, or stories, which stay available for 24 hours and can be rewatched in that time frame.
When your live video is done, it won’t be available for further viewing – unless you use a tool like Wondershare Filmora on Windows to capture your recording while you’re making it.
Filmora is a suite of video editing software with excellent recording capabilities. Mainly used by professionals like content creators, educators, marketers, and filmmakers, it helps you let your creativity shine with countless audio and video effects, AI-powered tools, and advanced editing features.
Virtually anything you can imagine, you can create with Filmora.
Now, to record your live Instagram video with this tool, you’ll need to set things up properly. You’ll need a secondary Instagram account that you can log into via your Windows computer. From there, you just have to follow a few simple steps:
Step 1: On your computer, sign in to your secondary Instagram account to be able to join the live video from your primary account as an audience member;
Step 2: Download and install Filmora, then register your Wondershare account;
Step 3: From the main menu, select Screen Recorder;
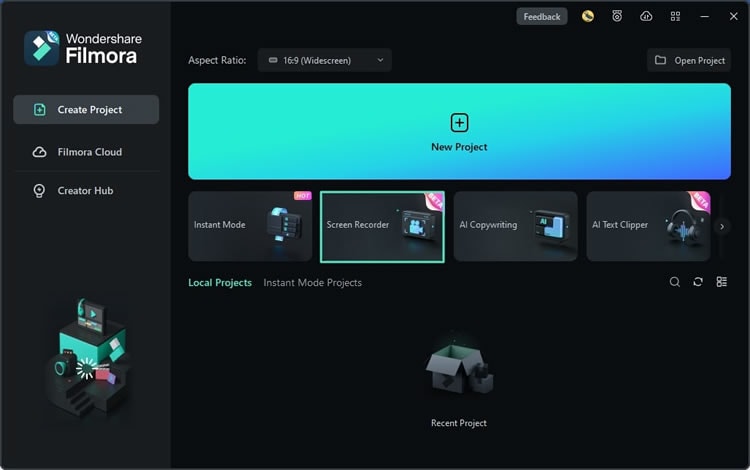
Step 4: Specify the screen resolution you want to record in (full screen, custom area, or target window);
Step 5: Adjust microphone, system audio, and webcam recording settings;

Step 6: Expand the Settings tab to adjust frame rate, video quality, and more;
Step 7: Press the Record button to start recording.

From there, you can use your primary Instagram account to start your live video, and Filmora and your secondary account to start recording it.
Record Instagram Live on Mac
You can take a similar approach and record your Instagram live videos on a Mac computer using the built-in QuickTime player. While mainly used for viewing media, QuickTime does allow you to make screen recordings with relative ease.
Again, you’ll first need a secondary Instagram account you’ll use for watching your live video via your Mac browser. From there, follow these steps to record everything with the QuickTime player:
Step 1: Open the QuickTime player;
Step 2: Go to File > New Screen Recording;
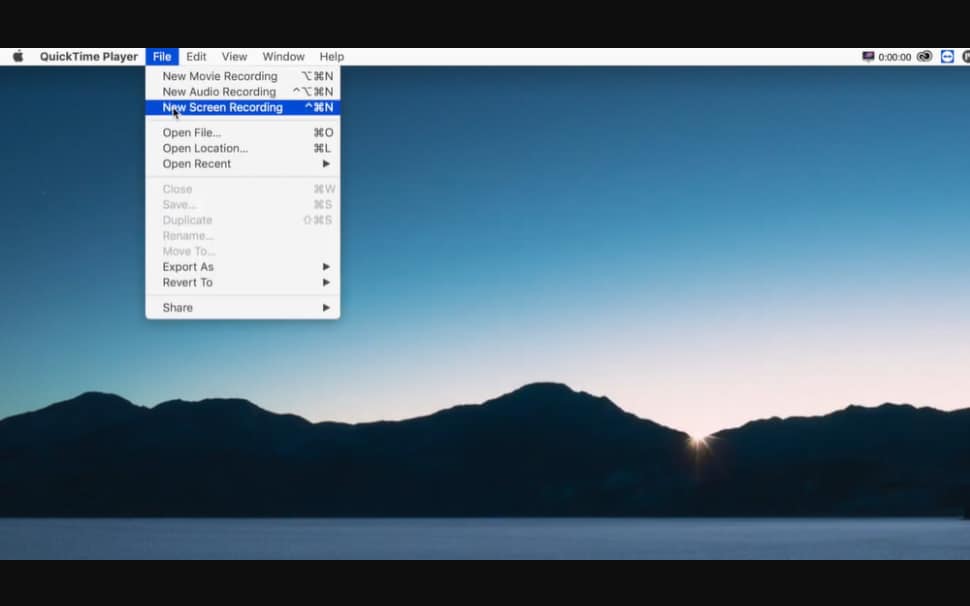
Step 3: Click the Arrow by the record button to adjust the microphone input;
Step 4: Start your live video on your primary Instagram account, and start watching it on your Mac browser with your secondary account;
Step 5: Click anywhere on a window to start recording or drag your cursor over a custom area to record and click Start Recording.
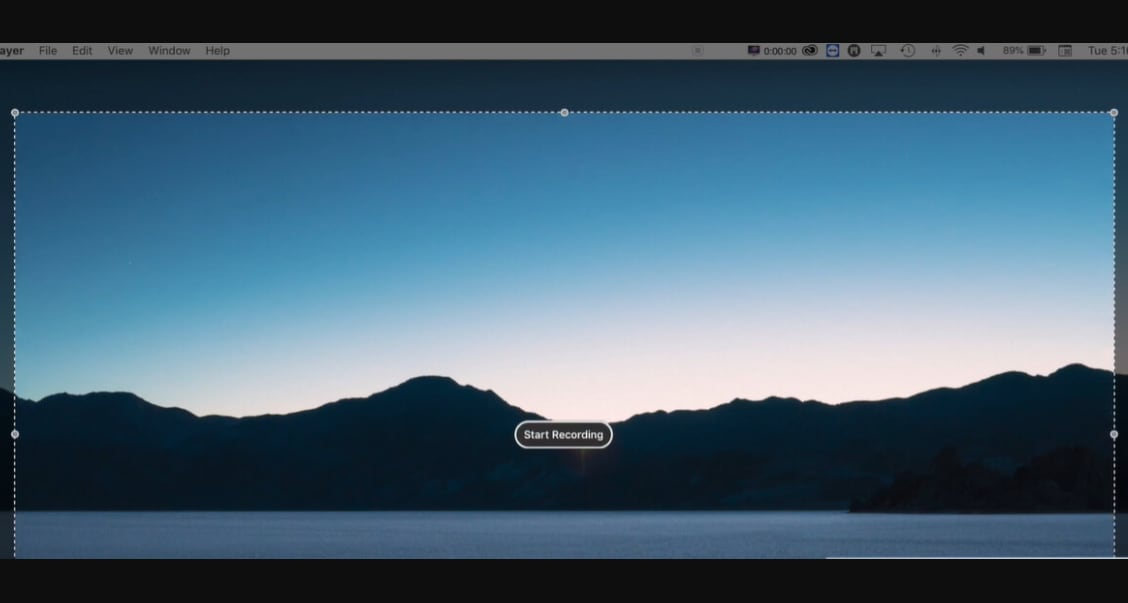
Once you’re done, you can use any video editor of your choice to enhance your video or make changes to it before publishing it on a new platform.
Record Instagram Live with an Online Tool
If you find it easier, you could also use more lightweight online tools like Wondershare DemoAir to capture and publish your live videos from Instagram and different platforms.
DemoAir is fully browser-based, easy to use, and comes with all the required features to make your captures pop. It has several convenient recording modes, allowing you to capture your screen, browser tab, camera, and microphone audio with ease.
As was the case with Filmora and QuickTime, you’ll need to have your primary and secondary Instagram accounts ready for live streaming/watching, and then you just need to follow a few steps to get started with DemoAir:
Step 1: Visit the DemoAir website and sign in to your account (optional);
Step 2: Select Online Video Recorder;
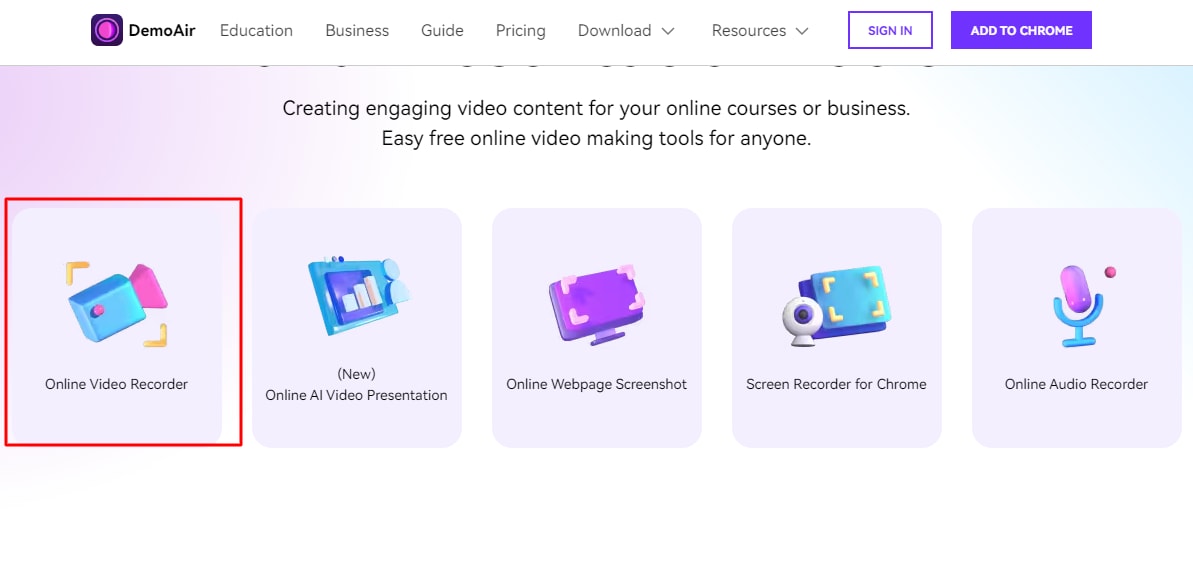
Step 3: Choose your recording mode and click Start Recording.
DemoAir also has a convenient Chrome browser extension you can install and use whenever you need it.
Record Instagram Live with a Mobile Recorder
Most users find it easier to access and navigate Instagram directly from their phones rather than from their computer browsers. If that’s the case for you, you might want to use a screen recorder for Android/iOS to capture your live Instagram video.
Fortunately, both devices come with built-in screen recorders you can easily use. However, keep in mind that you’ll again need your primary and secondary Instagram accounts, and you’ll also need two devices – one for live streaming and the other for recording the live stream.
If you’re using an Android, you’ll want to start your live video with your primary account and start watching it with your secondary one. On your secondary phone, follow these steps to record your video:
Step 1: Drag your finger down the screen to access the Quick Menu;
Step 2: Select Screen Recorder;
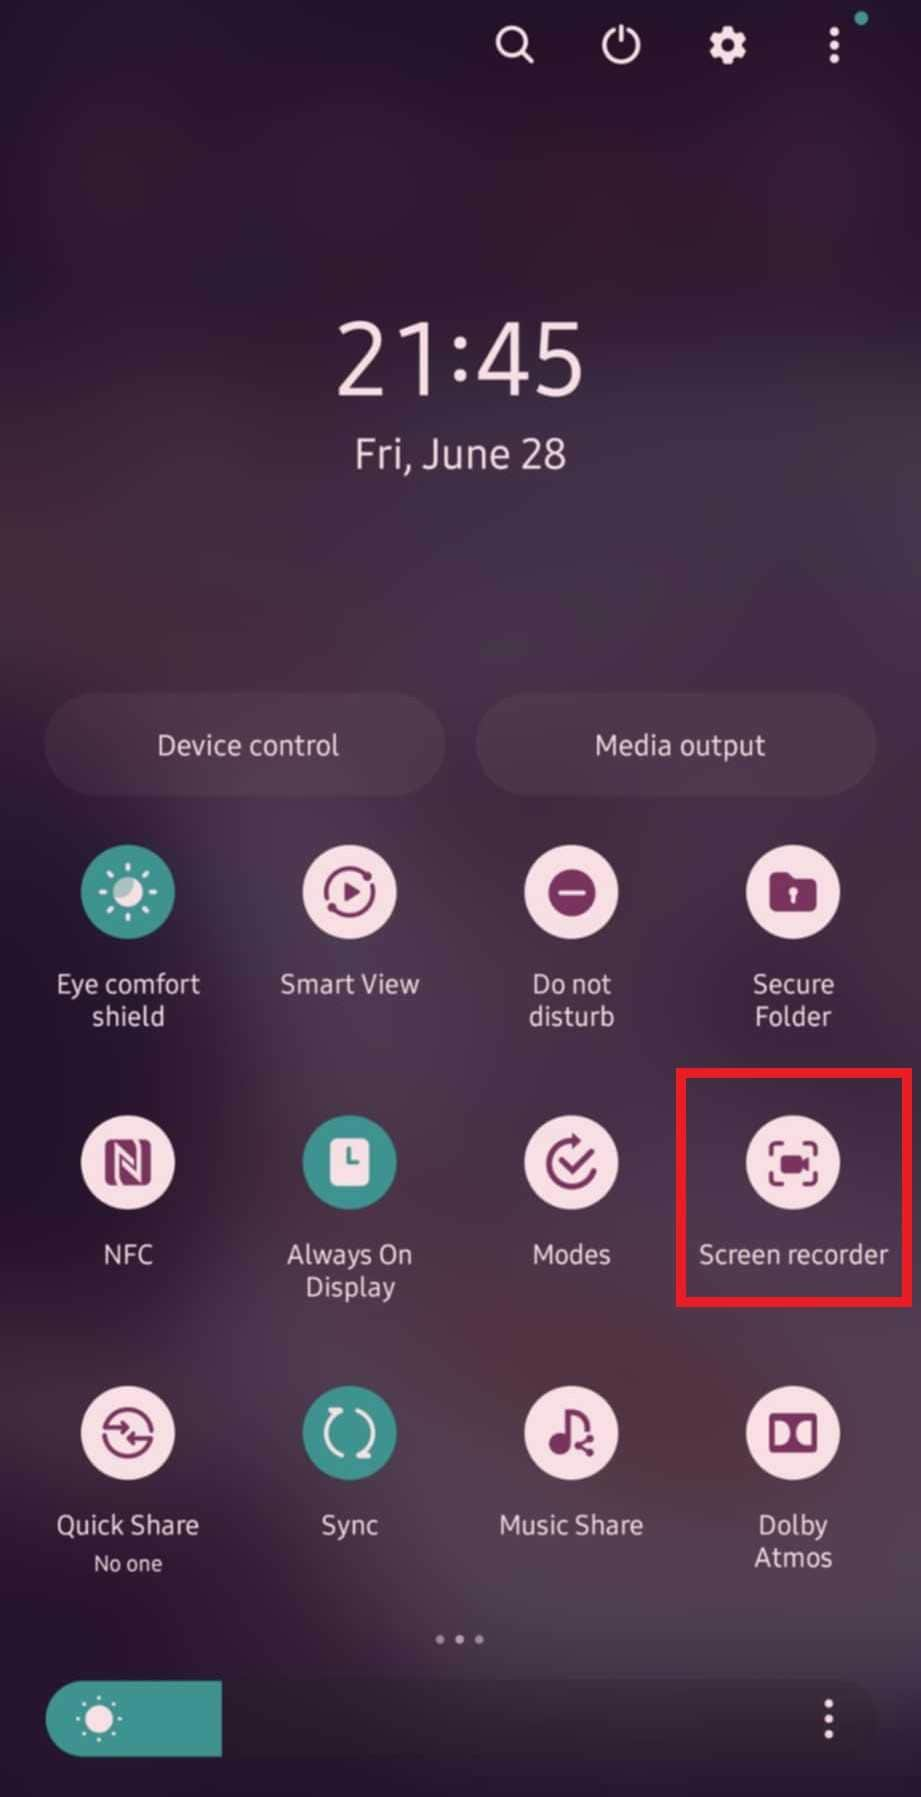
Step 3: Grant the necessary permissions;
Step 4: Tap Start Recording.
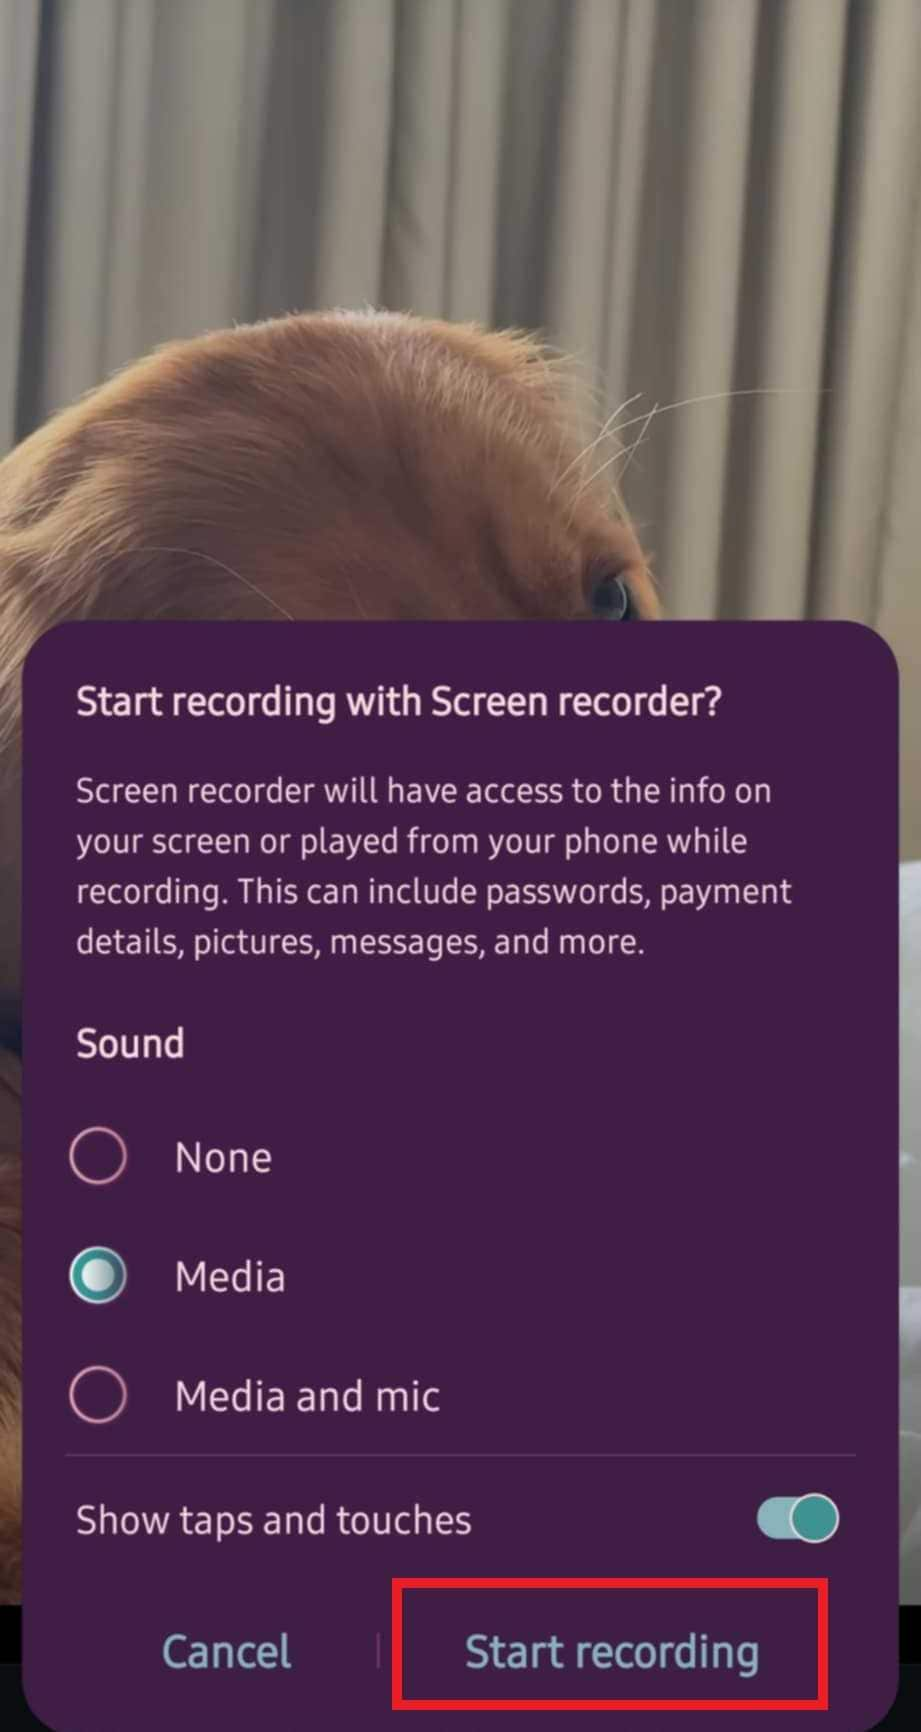
Once you’re done, you’ll be able to find your video in your Gallery.
If you’re using iPhone devices, the process is slightly different. Start your live video, use your secondary device and account to watch it, and then follow these steps on your secondary account:
Step 1: Go to Settings > Control Center > Customize Controls;
Step 2: Scroll down and select the + icon next to Screen Recording;
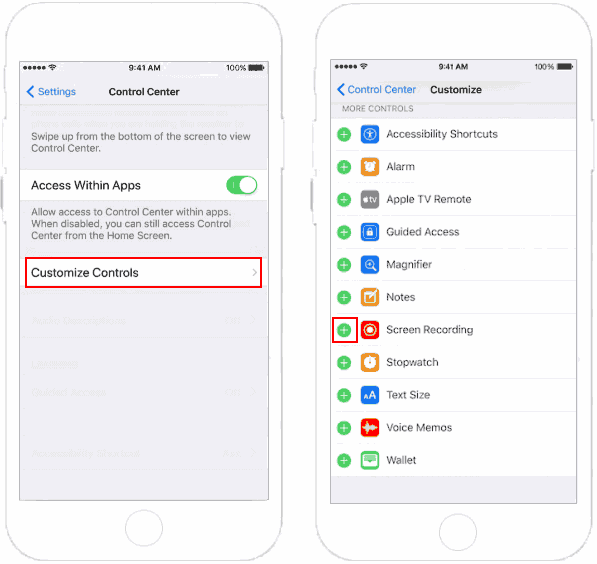
Step 3: Tap the gray Record button and start recording after the three-second countdown.
You’ll be able to find your recording in your Photos app.
Conclusion
Live videos on Instagram are highly beneficial for attracting and engaging your audience. However, once you stop your video, the content is no longer available for viewing. So, if you want to post your live video highlights, for instance, extract clips from it or even take screenshots of it, you’ll need to record it using additional tools.
Wondershare Filmora, QuickTime player, DemoAir, and built-in screen recorders on Android and iOS devices can help you immortalize your live videos and turn them into a more permanent type of content.


 100% Security Verified | No Subscription Required | No Malware


