

 ChatGPT
 Perplexity
 Gemini
 Claude
 Grok
Grok
You may have wanted to capture your favorite desktop/mobile events with sound but didn't discover the proper tools to support your experience. That's probably the main reason why you visited this guide. Luckily, we've discovered the best screen capture with sound options for all devices to help you navigate the journey and get the desired results.
We'll present detailed guides for Mac, Windows, Android, and iOS devices. Moreover, we'll discuss third-party solutions, built-in tools, and online screen recorders you can use according to your preferences. Without further ado, let's jump into the ultimate screen capture with the sound guide below.
In this article
Is it Difficult to Capture the Screen With Sound?
Some people may find it difficult to capture their screens with sound. However, most modern devices have built-in solutions to help you reach the desired results. Moreover, third-party recording applications are also intuitive and easy to use, and you can quickly get the desired content in a few clicks, even with no previous experience.
Recording your screen with sound is easy, intuitive, and simple, even if you've never tried such apps and solutions before.
How to Record Screen with Sound on Windows and Mac?
If you want to capture your favorite desktop moments with sound, you can check out the solutions below for an efficient journey.
1. Record Screen with Sound on Windows and Mac with Filmora
Wondershare Filmora is the ultimate recording and editing third-party app everyone can use. It can record your screen in up to 4K quality and capture your audio perfectly. The best part about this tool is that you can use the advanced AI editing features to improve your content.


For instance, you can remove background noises, enhance the voice, remove backgrounds, add annotations, and much more.
This solution is among the most intuitive tools on the market, and it'll take you only a couple of minutes to master all the features it offers. Head to the official website, download the tool to your desktop device, and begin the screen recording with sound experience by following the steps below:
- Open Wondershare Filmora and tap the New Project option from the main menu.

- Next, tap the Record button from the top bar and select Record PC Screen from the drop-down menu.
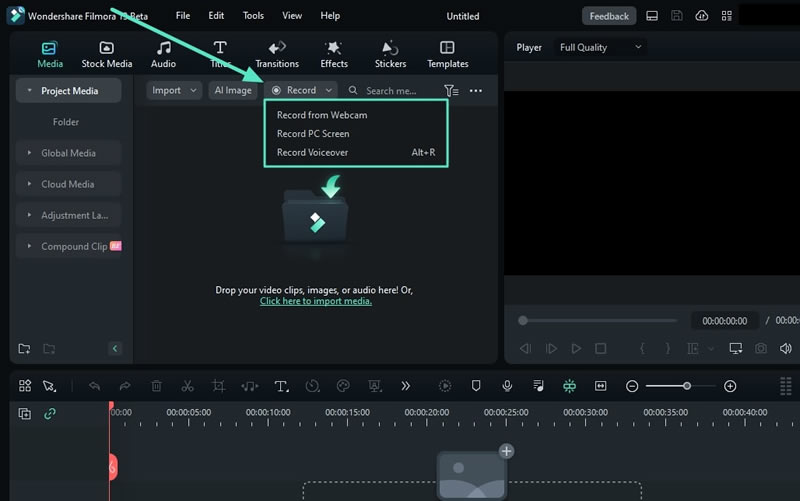
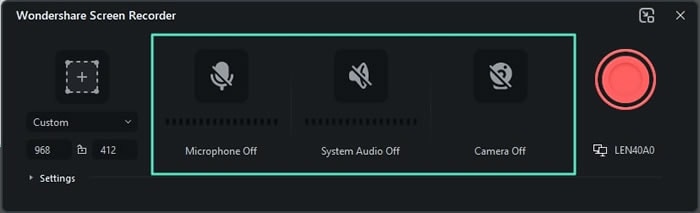
- Set your recording preferences, such as camera, audio input, etc. You can enable Microphone and system audio at the same time.
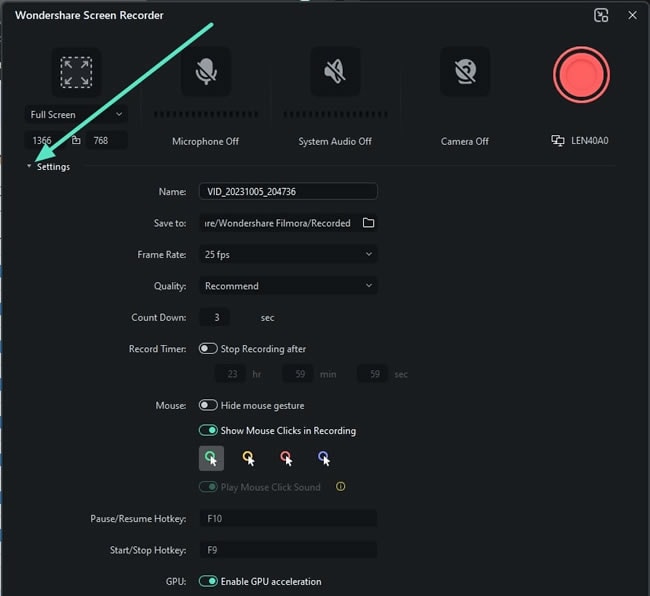
- Tap the Settings option for more customization options.
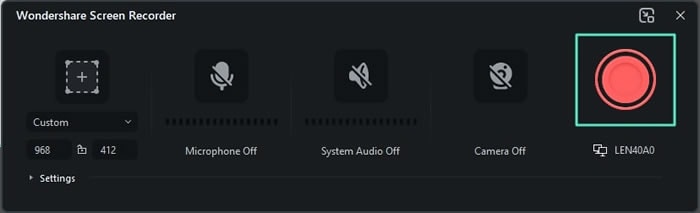
- Click the red Record button to begin the recording process.
- Press F9 to finish recording, and you can export the video according to your needs.
For the latest Screen Recorder features (Filmora V15.6 and above), including Teleprompter support and Marker shortcuts, please update your app and follow the guide: Optimized Screen Recording in Filmora
2. Record Screen with Sound on Windows Using the Xbox Game Bar
If you want to record screens with sound on Windows, you can also try its built-in Xbox Game Bar. This simple tool can be difficult to navigate, but if you use it several times, you'll get used to it. Aside from this, you can capture videos up to 1080p with solid audio quality. Read ahead to learn how to use the Xbox Game Bar to record your screen and audio.
- Press the Windows + G keys on your keyboard to open the Xbox Game Bar.
- Next, click the Capture option.

- Select the recording preferences, such as turning the mic on while recording.

- Click the red record icon to start the process.
Navigating the Xbox Game Bar may be less intuitive, but you'll quickly master your recording skills.
3. Record Screen with Sound on Mac Using Quicktime
Mac also has a built-in solution you can use to capture your favorite desktop moments. QuickTime Player is an application you can quickly access to get the desired results.
You can choose a resolution of up to 1080p, customize the audio source, and do much more with this solution. However, the downside is that your videos may lag if you record them in the highest-quality settings.
To learn how to use the QuickTime Player app and record your screen and audio on Mac, follow this guide:
- Open the QuickTime Player app from the applications folder.
- Head to File > New Screen Recording from the top bar, as presented in the image below.

- Click the arrow next to the record button to choose the audio source.

- Tap the record button to start the process.

As you can see, this solution is simple, and you can easily record your screen with audio.
How to Record Screen with Sound on Mobile?
Most Android and iPhone devices have built-in tools to capture your favorite moments. We'll teach you how to do it below and maximize your mobile recording efficiency.
1. Record Screen with Sound on Android with Built-in Tool
Android devices have an easy-to-access screen recording with an audio feature you can activate through the drop-down notification bar. The quality is solid, but you may experience some issues if you record for longer periods. Moreover, the audio experience may not be the best, and you may end up with muted and unclear audio. You can learn how to access and use the solution by following these steps:
- Open the notification bar and tap and hold the Screen Record option, as presented in the image below.

- Under Sound settings, choose the desired audio you want to record alongside your screen. You can also customize other recording preferences, such as the quality and more.

- Next, return to the notification bar and tap the Screen Record option again.
- Tap the red record icon to start.
2. Record Screen with Sound on iPhone with Built-in Tool
The iPhone also has a built-in screen and audio recording feature you can use. Here are the steps to record screens with sound on an iPhone.
- Open the Control Center.
- Press and hold the Screen Recording option.

- Tap the microphone icon to enable sound recording.

- Tap the Start Recording button to begin.
How to Record Screen with Sound Online?
If you don't want to use the built-in options and don't have enough space to download third-party applications, online screen recorders may be your ideal solution. You can record your favorite moments using the browser and customize the experience while getting the best results.
One of the most versatile options on the market is Wondershare DemoAir. It allows you to customize the audio source, choose the part of the screen you want to record, and more. However, if you are using the free version, you can only record for up to 10 minutes. Here are the steps:
- Open the official DemoAir website.
- Select the recording mode and preferences, such as the audio input, camera, etc.

- Tap the Start Recording button and choose the part of the screen you want to record.

Which Is the Best Option for Recording a Screen With Sound?
If you don't know which screen recording with the sound option you should choose, we're here to help you. We've prepared a comparison table with all methods to help you navigate the experience and get the desired results.
| Tool | Ease of use | Compatibility | Audio Quality | Editing Features |
| Wondershare Filmora | Very Easy | Windows, Mac, iOS, Android | Professional | Yes |
| Xbox Game Bar | Medium | Windows | Solid | No |
| QuickTime Player | Medium | Mac | Solid | No |
| Android built-in | Easy | Android | Low | No |
| iPhone built-in | Easy | iPhone | Solid | No |
| DemoAir | Easy | Web-based | Solid | No |
As you can see from the table above, using Wondershare Filmora is easy, and it'll get you the best results.
Conclusion
We've prepared all methods with detailed guides you can use to record screens with the sound, no matter which device you are using.
If you want the best experience but don't want to spend hours navigating and learning the tool, we advise you to check out Wondershare Filmora. It's the ultimate solution for all your screen and audio recording needs, even if you have no experience. The best part is that you can easily create professional content with the help of advanced AI editing features.
FAQs
-
Does screen recording capture outside sound?
You can capture your microphone's sound regardless of the screen recording tool you use. Such options are available on all devices, but you should be aware that built-in options may not be able to capture outside sounds efficiently. We advise you to use third-party options like Wondershare Filmora to maximize efficiency. -
How do you capture a video with sound on Windows?
Windows has a built-in tool called Xbox Game Bar you can use to capture your screen and sound simultaneously. You can follow the steps presented here to learn how to activate the feature:- Press the Windows + G keys to open the Xbox Game Bar.
- Head to the Capture option.
- Customize the recording preferences, such as the audio source.
- Tap the red record icon to start the recording process.
Alternatively, Wondershare Filmora also provides the best results for capturing a video with sound on Windows. -
How can I record my screen with sound on Android without installing new apps?
Most Android devices have built-in tools you can access to start the screen recording experience with sound. You can follow the guide below to access and activate the feature:- Open the control center on your mobile device.
- Press and hold the Screen Recording option from the menu.
- Select recording preferences, such as the sound, quality, and more.
- Return to the menu, tap the Screen Recording option again, and tap the red record button to start the process.
-
Can I record my screen with sound while talking on the phone?
That will depend on the device you're using. Many phone providers don't allow recording your screen and audio during phone calls due to privacy concerns and potential misuse. iPhone devices are strictly against recording your screen and audio during phone calls.On the other hand, some Android devices still have screen and audio recording options during calls. However, the results will be inconsistent, and you won't be able to capture the conversation.
