It’s quite frustrating to see a video project where the audio and visuals just didn't seem to click. Aligning audio and video perfectly is a real struggle for people without professional editing experience.
Manual syncing is a tedious and time-consuming process especially when you're on a deadline. And for longer videos, it gets even more complicated. Manual syncing can produce inconsistent results, making it difficult to achieve a professional look.
Many video editing software lacks advanced features for easy audio-video synchronization. Also, out-of-sync audio causes viewers to lose interest and stop watching. What if you spend hours trying to perfect the timing only to find that the audio still feels off?
But fear not! There's an easier solution. You can automatically synchronize using Filmora sync audio and video with just a few clicks to achieve professional-quality results without any hassle.
In this guide, we'll talk about the challenges of manual syncing and the benefits of using Filmora's Auto Synchronization feature. We'll share a step-by-step process to help you achieve professional-looking results in no time.

In this article
Part 1. Why Do Your Video and Audio Get Out of Sync?
Want to know why your audio and video don’t line up perfectly? Audio and video desynchronization can occur for a variety of reasons, often resulting from differences in recording equipment, environmental factors, or technical limitations.
- One common issue is that different cameras and microphones may have slightly different internal clocks. These devices might not be perfectly synchronized, leading to the gradual drifting of audio and video.
- If you’re using incompatible or incorrectly encoded audio and video file formats, this can cause playback issues and synchronization problems.
- External factors also play a role. Changes in temperature, humidity, or even electromagnetic interference can affect the recording environment, causing tiny shifts that lead to desynchronization.
- Sometimes, the issue lies within the video editing software itself. Bugs or limitations can prevent accurate syncing.
- Problems with your computer's graphics card, video processing hardware, or playback device can also contribute to synchronization problems.
- Streaming content on unstable internet connections can cause buffering and playback delays, leading to desynchronization.
- When you record audio and video separately, mismatched timecodes in your audio and video files can result in desynchronization.
- Aggressive video compression can introduce artifacts and can affect synchronization.
Part 2. 3 Easy Methods to Sync Audio and Video So They Match Perfectly
When your audio and video don’t sync up, it can completely ruin your project. However, there are some straightforward methods to sync audio and video. Whether you're using Wondershare Filmora to sync audio and video or sticking to traditional techniques, here are three easy methods to match your audio and video perfectly.
[Method 1] How to Sync Audio and Video with Wondershare Filmora
Wondershare Filmora is an advanced and professional video editing software that offers a wide range of tools and features to help you create high-quality videos. One of its standout features is Auto Beat Sync which simplifies the process of synchronizing audio and video.
Filmora audio sync automatically analyzes the rhythm and tempo of your audio track. It then identifies corresponding moments in your video footage and aligns them to create a visually stunning and rhythmically captivating result. This feature is useful for music videos, social media content, and any project where you want the audio and video to be perfectly in sync.
Step-by-Step Process
Here's how to use Auto Beat Sync in Filmora:
- Step 1. DownloadFilmora on your device (Windows, Mac, iOS). Install it to proceed further.
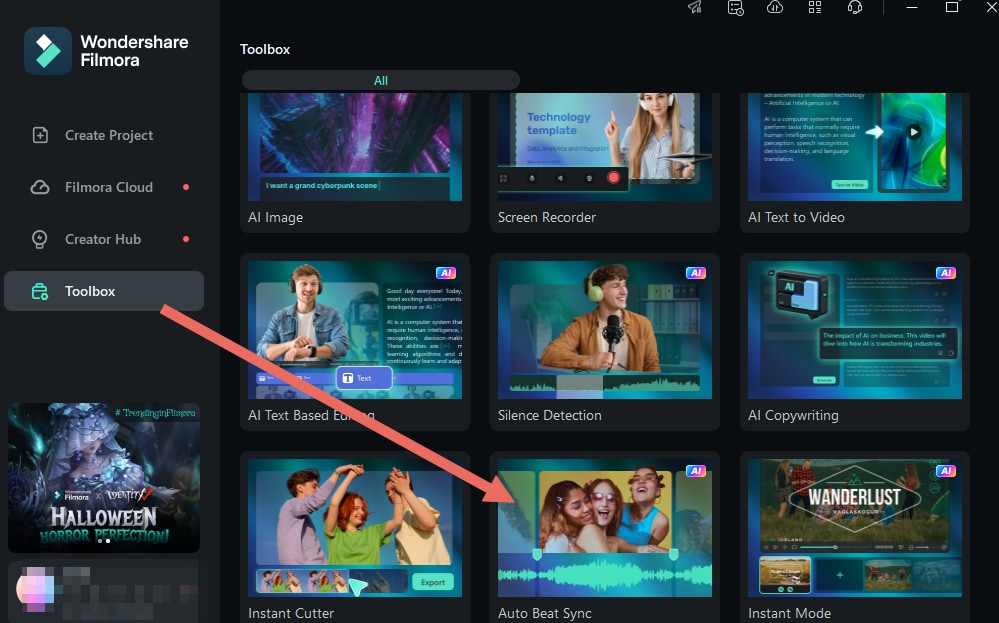
- Step 2.Open Filmora and go to the “AI Toolbox”. Then find > Auto Beat Sync and click on it.
- Step 3. Import your video and audio files into Filmora's media library.
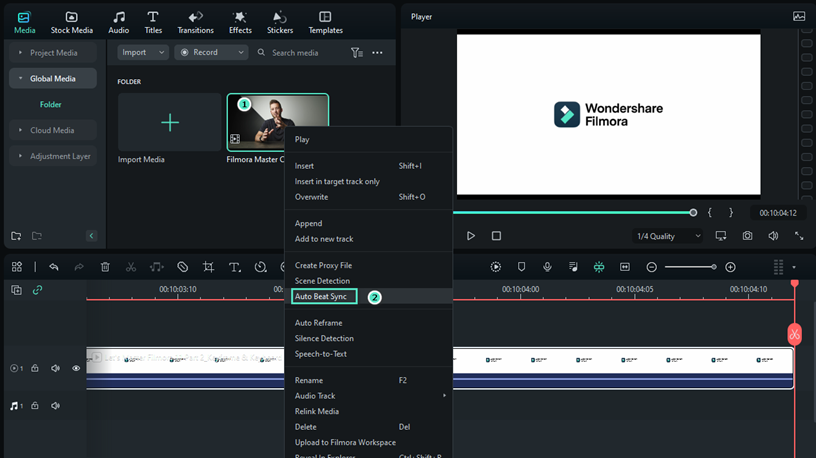
Note: If you’ve already imported your files, simply right-click on them in the Project Media section and select "Auto Beat Sync."
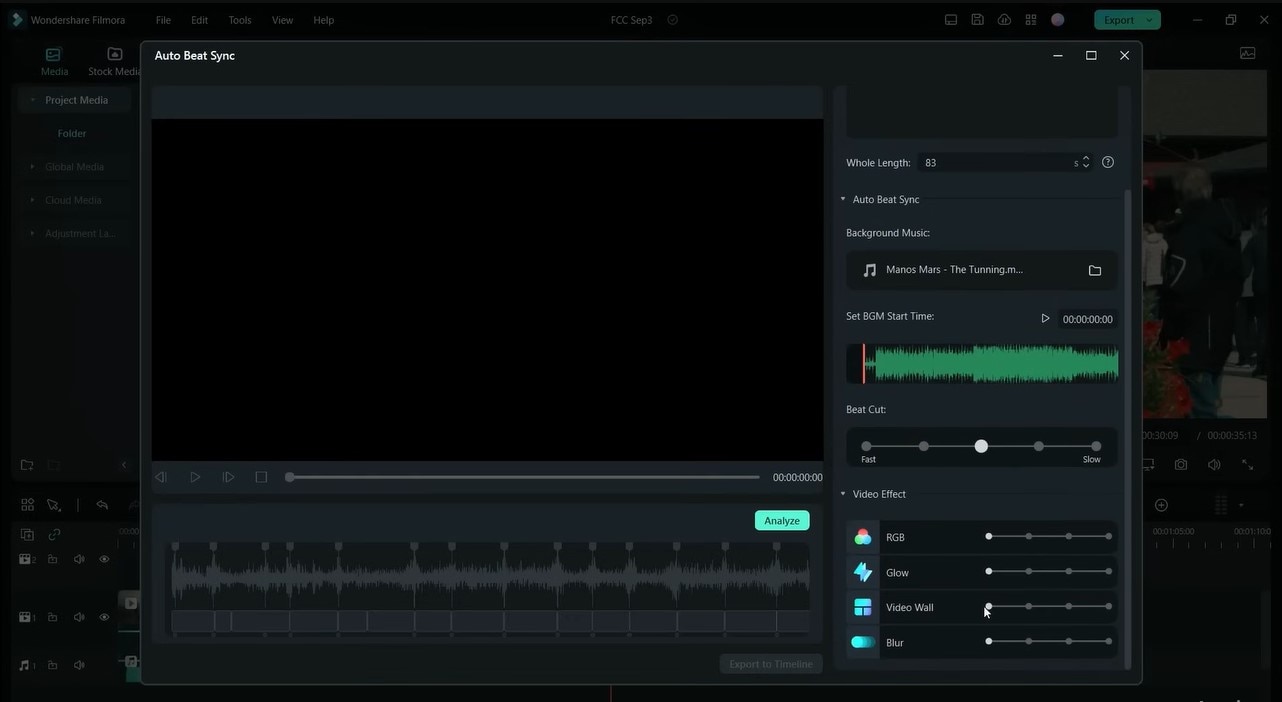
- Step 4. Select the video and audio clips you want to sync. You can add, remove, or reorder clips and adjust their length. Import your background music and set the start time. Adjust the beat cut speed (fast or slow) to fine-tune the synchronization. Customize the appearance of your video by applying effects.
- Step 5. Click the "Analyze" button and Filmora will analyze the audio track and automatically adjust the video timing to match the beat.
- Step 6.Click> Play button to preview the synchronized video to ensure you're satisfied with the results. Once you're happy, click> export to save your video in your desired format.
[Method 2] How to Sync Video and Audio Manually Using a Clapboard
You can use a clapboard instead of directly using the Filmora auto synchronization feature. Using a clapboard is a tried-and-true method for syncing audio and video. However, this manual approach has some limitations and drawbacks.
You may decide to manually sync your audio and video on Filmora, instead of using Filmora’s auto synch. However, you would need cues to help you properly match your videos and audios.
This is where a clapboard comes in!

Clapping the board at the beginning of your recording causes a sharp spike in the audio waveform. This is your cue—an easy way to know where your audio begins.
Simply upload your video and audio on Filmora, and align your audio to your video. Noting where the sharp spike makes it easy to match the start of your audio to the start of your video.
[Method 3] How to Sync Audio and Video Manually Using Visual Cues
You can opt for visual cues as an alternative to clapboards—if you don’t have one close by, or if you prefer a regular day-to-day mannerism. More ideally, you can combine both visual cues and a clapboard for even better results.
In this case, your cue may be a hand gesture, a nod, hair flip, a smile, or just any action that can visually notify you of the start of your video. Record your video as usual. Upload on Filmora and adjust the timing, using your visual cue to align it perfectly to the corresponding sound.

A Quick Comparison of Methods
| Methods | Wondershare Filmora Auto Beat Sync | Clapboard Syncing | Manual Visual Cue Syncing |
| Ease of Use | Very easy | Medium | Difficult |
| Accuracy | Excellent | Good | Good |
| Best for | Beginners and experienced users who want fast editing and quick results | Professional editors, musicians, or those with experience in audio-video synchronization | Advanced users with a lot of patience and technical knowledge |
| Flexibility | Very High | High | High |
| Speed | Fast | Moderate | Slow |
Part 3. How to Enhance Your Audio with Filmora Equalizer
Apart from using the Filmora auto synchronization tool, you can also use the Filmora equalizer to further enhance the quality of your video’s audio. An audio equalizer allows you to adjust the balance of different sound frequencies in your audio recording.
Equalizer reduces low-frequency noise, such as wind or traffic. By gently lowering the sliders on the left side, you can minimize the impact of these unwanted sounds without affecting the overall audio quality. If you've used a denoising tool and find that your audio sounds thin, the equalizer can help. You can restore a more natural sound to your dialogue by slightly boosting the low frequencies.
When using background music, it's essential to ensure it doesn't overpower your voice. If the music has b low frequencies, use the equalizer to reduce the bass, allowing your speech to stand out.
Steps to Use the Equalizer in Filmora
Here's a simplified guide on how to use the equalizer in Filmora:
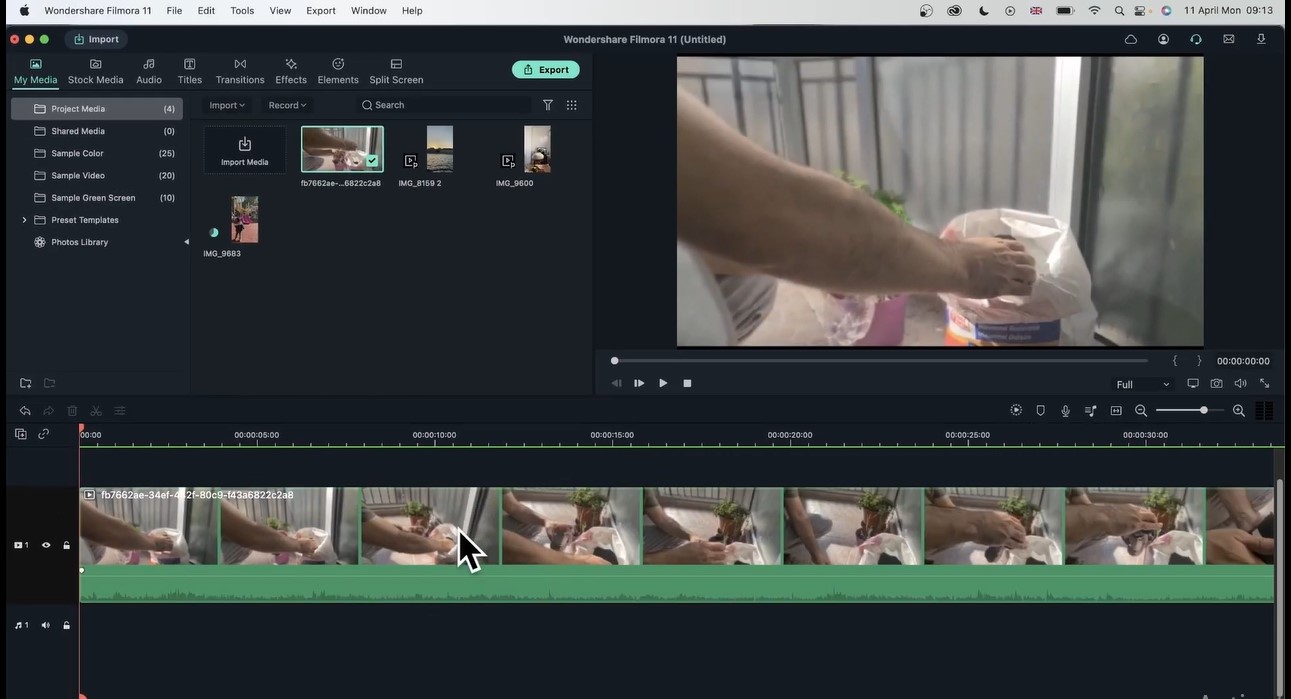
- Step 1. Import the video or audio file you want to edit into your Filmora project.
- Step 2. Double-click on the audio clip in the timeline to open the audio editing menu.
- Step 3. Head over to the audio, you will see an equalizer option. Click on it, select any preset, and hit the OK button.
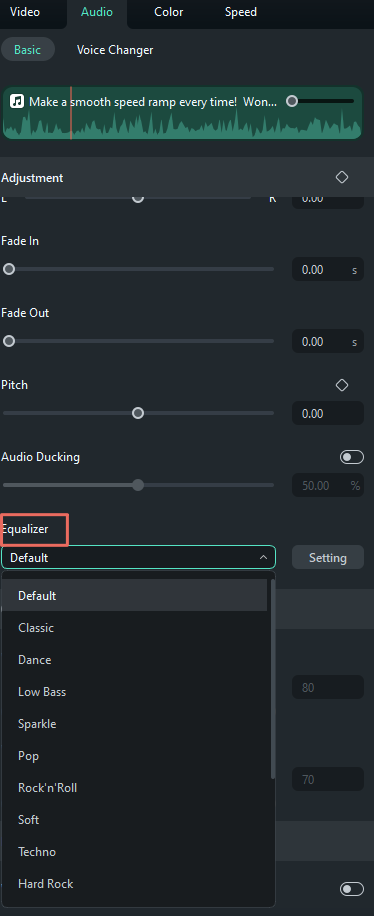
- Step 4. Filmora offers various preset equalizer settings. You can select one based on the audio type or your desired effect. If you prefer more control, click the "Customize" button. You'll see a series of sliders representing different frequency ranges. Drag the sliders up to boost a frequency or down to reduce it.
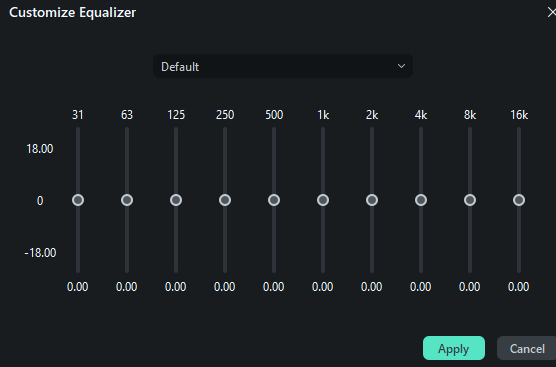
Step 5. Listen to the audio with the equalizer applied. Make adjustments as needed. Once satisfied, save your changes.
Part 4. Tips for Optimal Audio-Video Sync
While the Filmora sync audio tool is amazing and gives professional results, there are additional steps you can take to get the best possible audio-video synchronization.
- Always record audio with your camera’s built-in microphone, even if you’re using an external mic. This gives you a reference point for easy syncing during editing.
- Start your recordings with a clapboard or a loud hand clap. This creates a distinct audio marker that makes synchronization much simpler in Filmora.
- If you’re streaming or editing online, ensure your internet connection and computer are fast and stable to avoid any lag that could affect the sync.
- Invest in a dedicated external microphone. It not only improves audio quality but also reduces the chances of sync issues compared to using the built-in mic.
- Use a tripod or stabilizer to minimize camera shake. Stable footage ensures that audio disturbances are less likely to occur.
- If your audio and video are slightly out of sync, adjusting the playback speed can help bring everything back into alignment.
- While Auto Beat Sync is highly effective, you may need to make manual adjustments in Filmora's timeline to achieve perfect synchronization. Filmora offers manual sync tools such as Equilizer that allow you to fine-tune the alignment of audio and video waveforms.
- Be aware of potential audio delays if using external equipment, and compensate accordingly.
- Always take the time to carefully review your synchronized video and make any necessary fine-tuning adjustments.
Conclusion
Achieving perfect audio-video synchronization is necessary for creating professional-quality videos that engage your audience. Without proper sync, even the most visually stunning footage can lose its impact. However, manual synchronization can be time-consuming and challenging, especially for beginners.
Wondershare Filmora’s Auto Synchronization tool automatically analyzes your audio and video, ensuring seamless synchronization. By using Filmora, you can save time, achieve professional results, and enhance the overall quality of your videos.
Using Filmora’s sync audio and video features, you can easily align your audio and video. But don’t stop there—try different techniques, from manual methods to advanced Auto beat sync options, to find what works best for your projects. It will improve the quality of your videos and deliver content that your viewers will love.


