- Advanced lens correction with minimal distortion.
- Vast video/audio effects and creative assets.
- Powerful AI for effortless content creation.
- Intuitive, professional, yet beginner-friendly.
- Works on Mac and Windows.
Have you ever taken a photo or a video and had it come out slightly different than expected? Lines that are supposed to be straight are a bit bent. Perhaps those that are a bit curvy are suddenly straighter? The perspective is off, and some elements are either elongated or shortened.
These issues are more common than you might think and are most likely the byproduct of the lens distortion effect.
The good news is that this is nothing that some lens correction or lens distortion overlays can’t fix.
Using the proper methods during shooting and relying on a good editor can help you eliminate every last sign of distortion and keep your photos and videos looking their best.
In this article
Lens Distortion Effect Explained
Your camera lens is a complicated apparatus. Depending on your specific lens, it could have dozens of glass (and other) elements within it. While all these distinct elements are designed to work together to produce a high-quality image, they can also often work against each other and cause issues like lens distortion. Even the most expensive lenses can have this problem.
Put plainly, distortion is a deformity in your final image/video.
It refers to your images or videos not representing the natural, aka "real," state of the elements as they were shot.
At times, distortion can be a welcomed sight. It can provide a unique perspective (think of the fisheye effect), make your shots look more eye-catching, and wow your viewers. At times, it can be a nuisance that ruins the shot.
Types of Lens Distortion
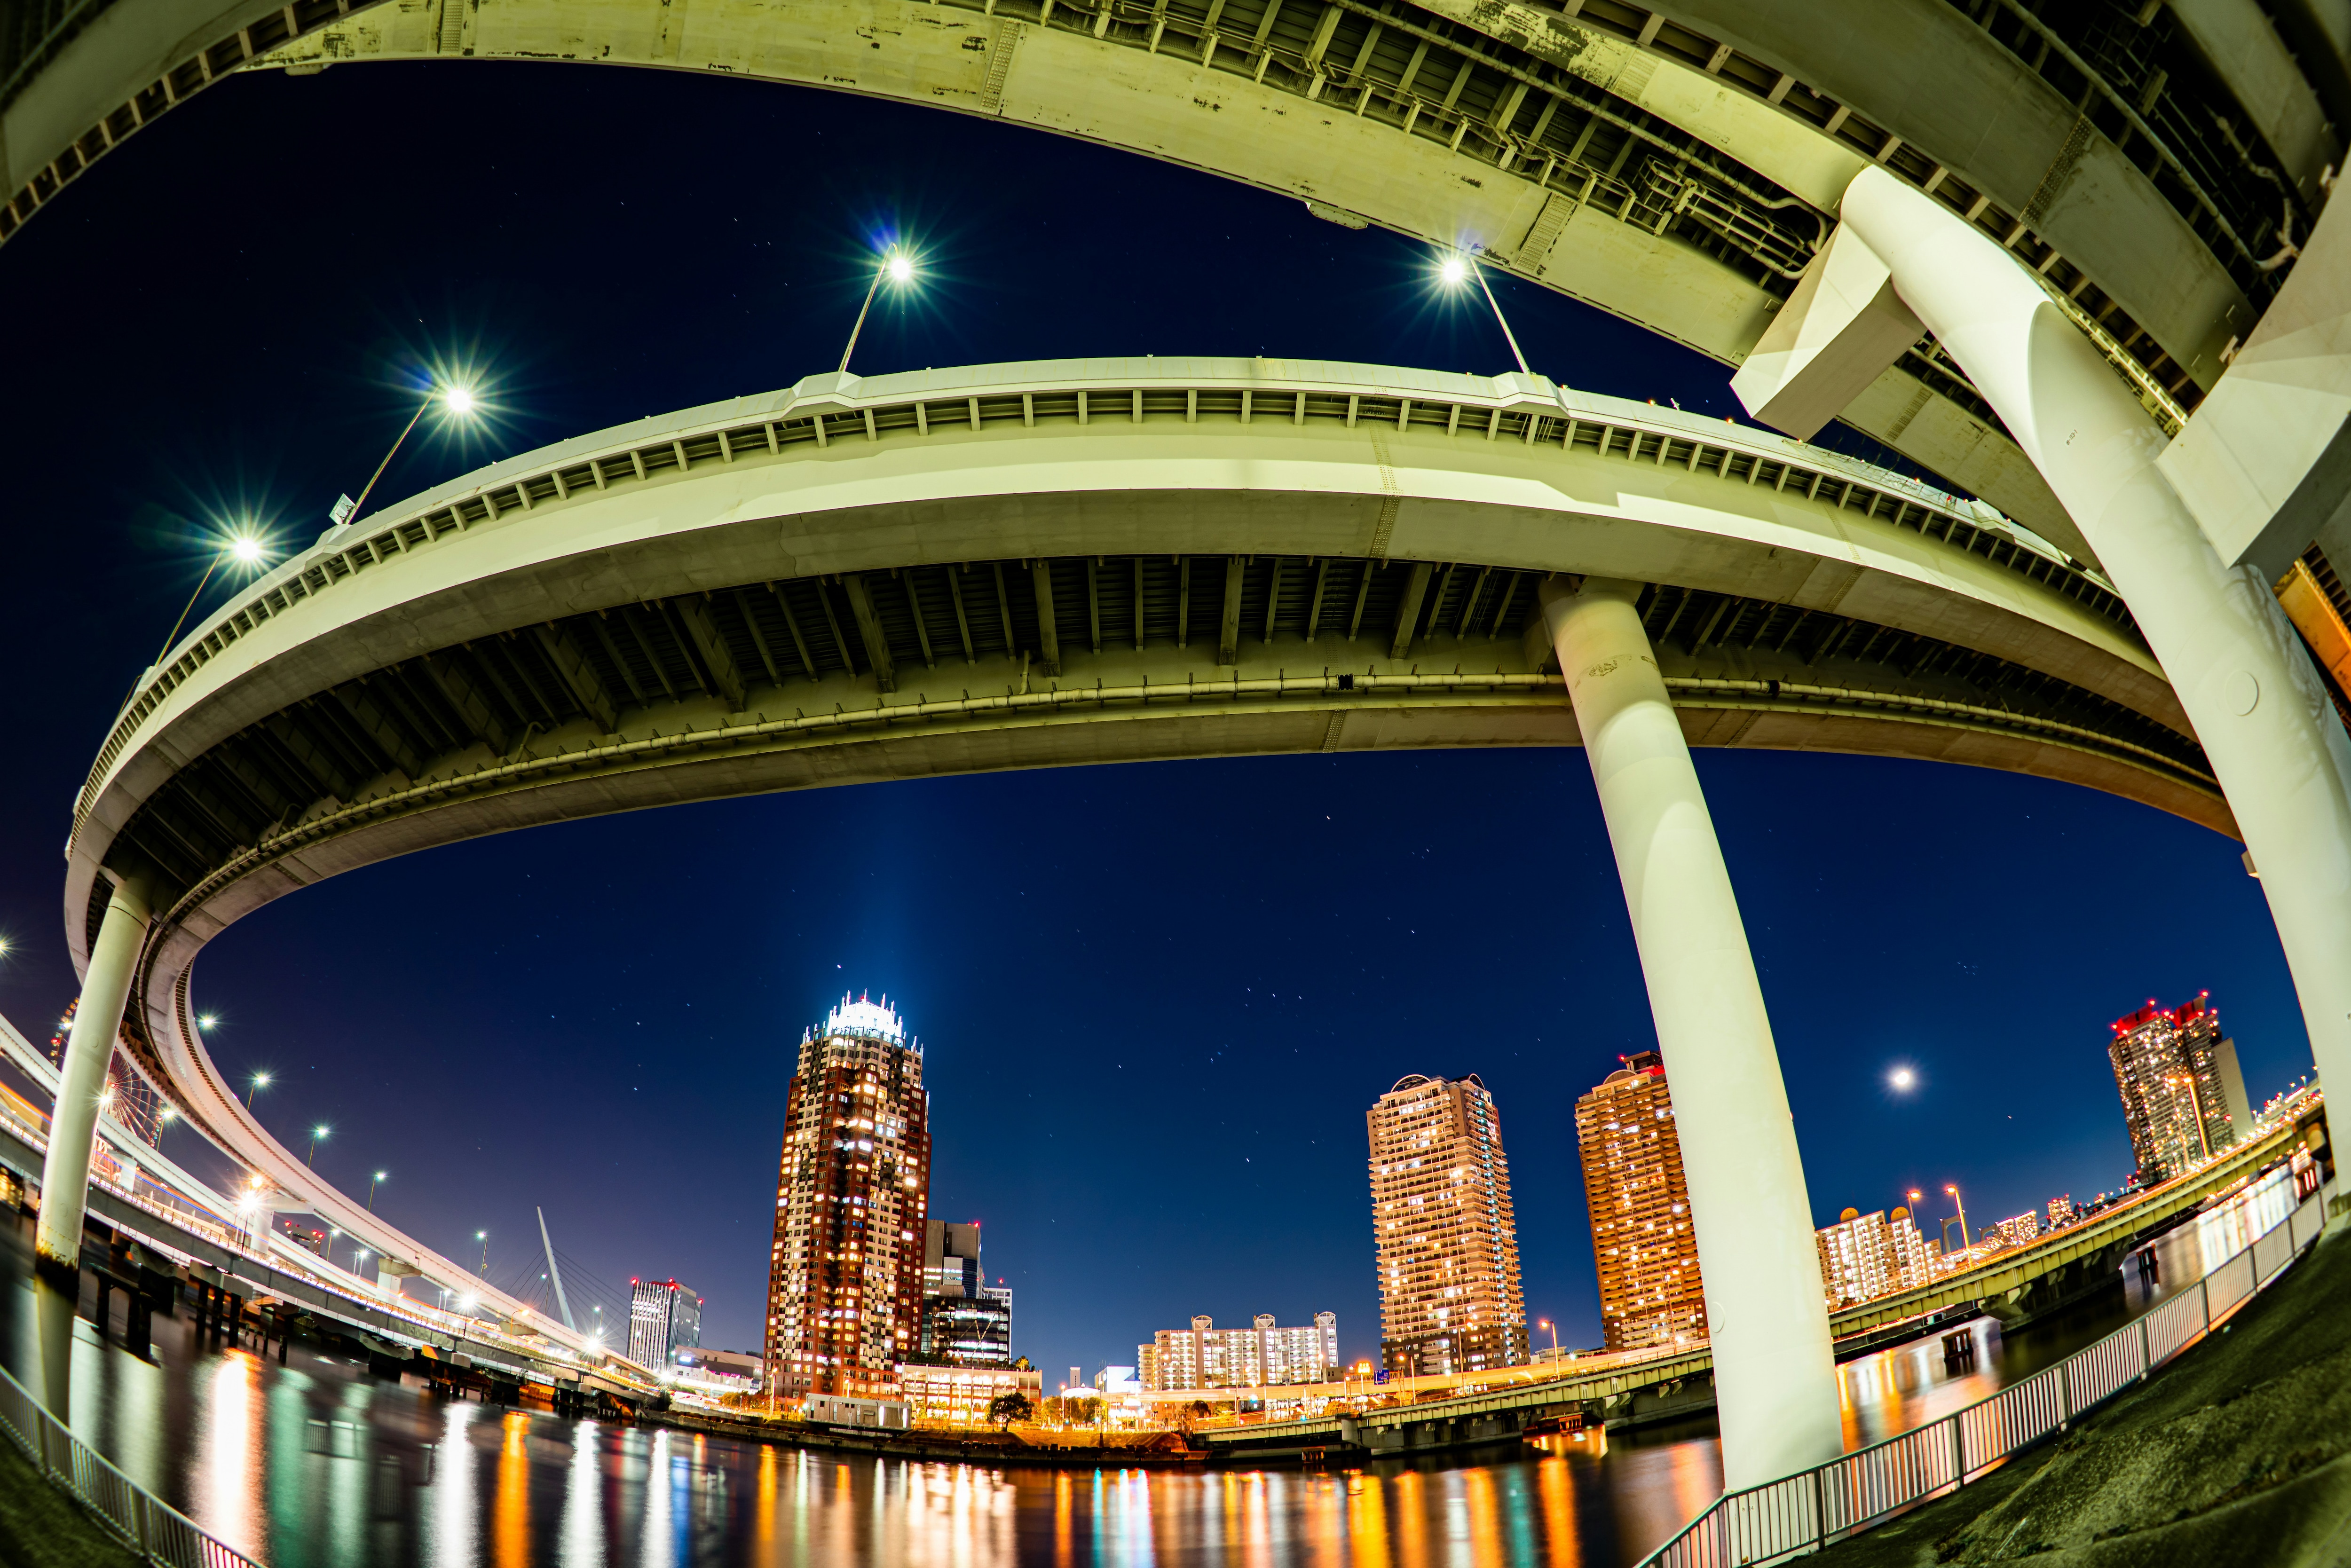
Lens distortion isn’t just one specific deformity. It comes in all different shapes and sizes. Still, you’ll most commonly encounter what’s known as a geometrical aberration that causes misshaping of the elements in your shots.
Geometrical aberrations come in three common varieties:
- Barrel distortion
- Pincushion distortion
- Waveform (mustache) distortion
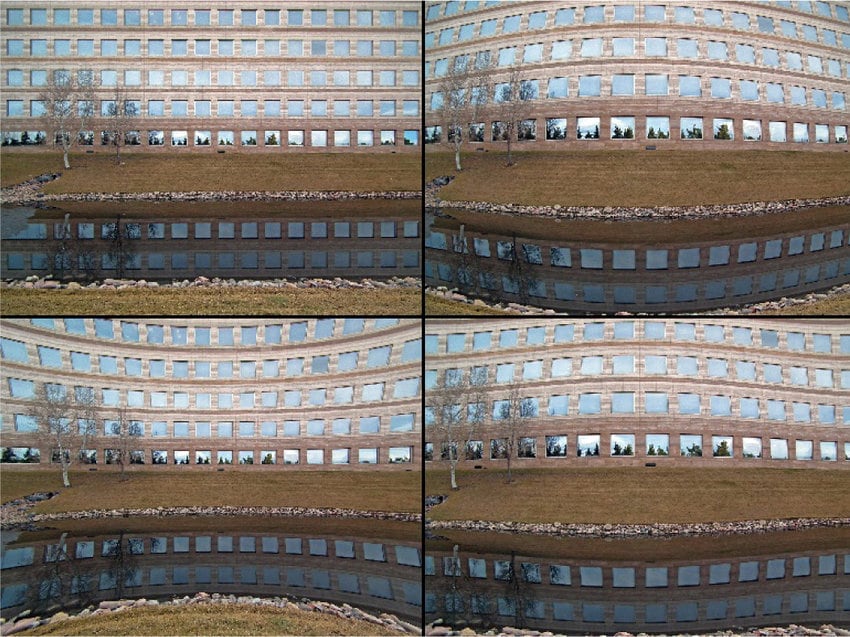
Barrel distortion is most common with wide-angle lenses. It makes lines that stand straight in real life look like they’re going outwards in the image, creating a shape similar to a barrel (hence the name).

Pincushion distortion is the opposite. It makes straight lines appear like they are going inwards into the image.

Finally, waveform or mustache distortion is a combination of barrel and pincushion distortion types. Towards the center of your image, straight lines appear to be going outwards (like in barrel distortion), while the lines at the edges appear to be going inwards (like in pincushion distortion).
Lens Correction Methods During Shooting
Although all cameras have some lens distortion, there are a few things you can do while shooting to minimize the effect and lighten your workload in post-processing:
- Be mindful of the lens you're using – the best lenses for avoiding distortion are 35mm with 50mm focal length. It’s the closest you’ll get to capturing an image or video as it appears to the human eye. Shorter focal lengths can cause the barreling effect, while longer ones can cause the pincushion distortion;
- Don't put the main subject at the edge – lens distortion is usually most evident at the corners of your images or videos, so keep your main subjects in the center. On the one hand, it will minimize distortion of the subject; on the other, it will give you enough space to crop the edges where distortion is more evident;
- Take panoramic shots – panoramic shots allow you to capture a wider field of view even with a longer focal length lens. Moreover, they give you more room to crop away distorted edges.
These are just some general tips that will help you minimize distortion. How much distortion you're dealing with will depend on your unique shooting style, the equipment you're using, and the subjects you’re shooting. So, you might have to play around a little until you've figured out how to completely minimize distortion.
Lens Correction Using Editing Tools
As mentioned, virtually every camera and every lens will cause some distortion. While you can minimize it, you can’t entirely eliminate it during shooting. You can, however, get rid of it completely during the editing stage.
The following are some of the top tools for Photoshop lens distortion correction.
Wondershare Filmora
Wondershare Filmora stands out as one of the most versatile video editors available. Filled with advanced features that help you perfect every last frame of your shots, it’s user-friendly, powerful, and convenient. It’s compatible with both Mac and Windows.
Its lens correction feature enables you to remove any last trace of distortion that could impact your video quality. The best part about it is that it achieves this in just a few simple steps:
Step 1: Download and install Filmora, then click the Login button in the main menu to register your account;
Step 2: Click New Project and go to File > Import Media to upload your clip;
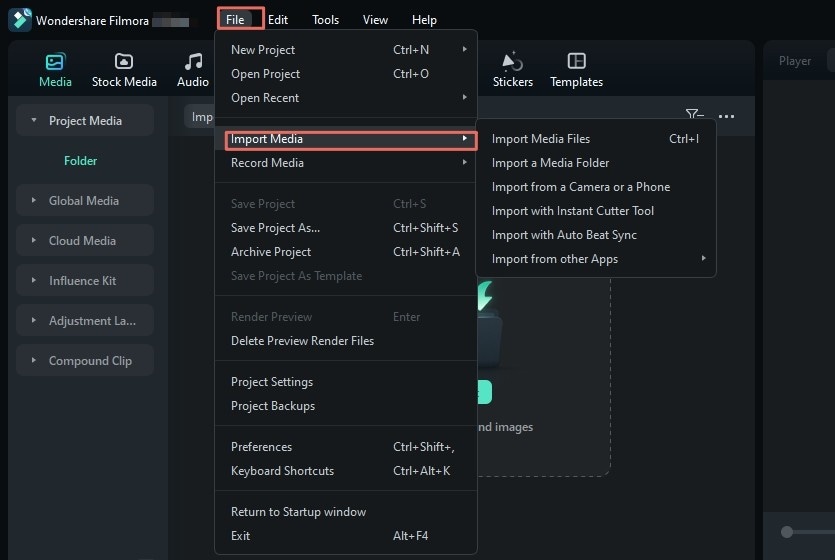
Step 3: Drag the clip to the timeline and select it;
Step 4: Go to Video > AI Tools > Lens Correction and drag the slider to its On position;
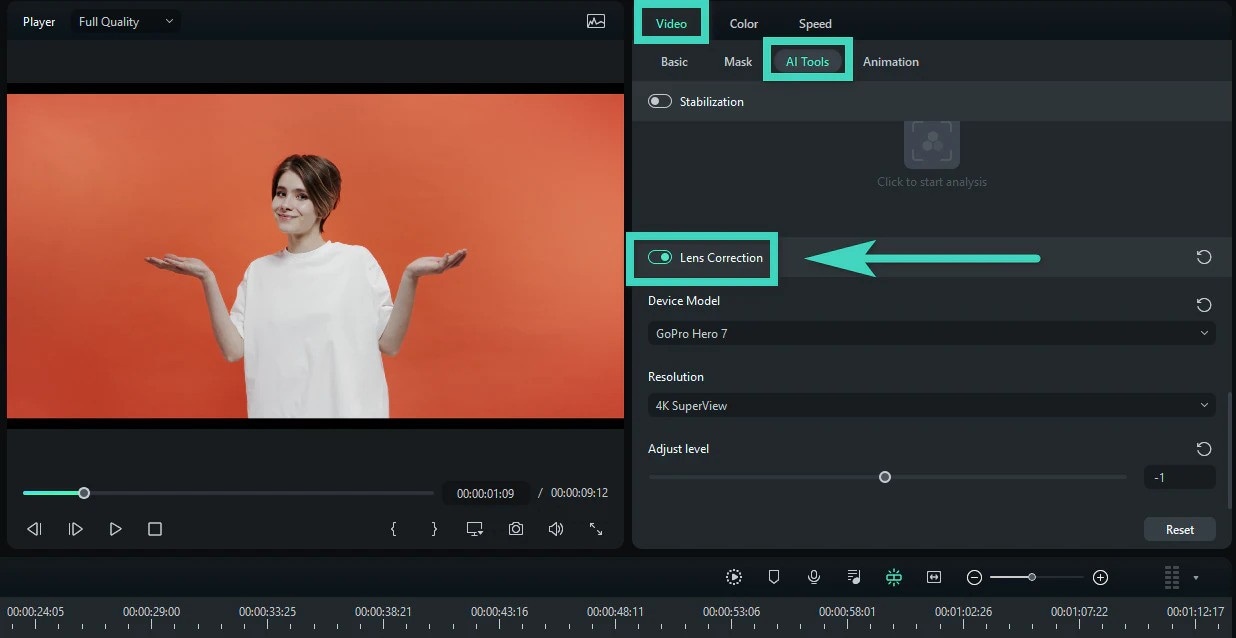
Step 5: Click the drop-down list under Device Model and select your camera model;
Step 6: Click the drop-down list under Resolution and select the capture mode resolution you were using when you shot the video;
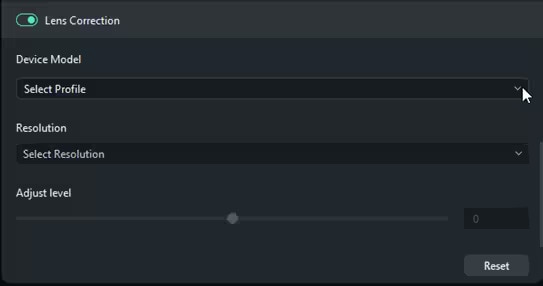
Step 7: Use the Adjust Level slide bar to adjust the correction level;
Step 8: Examine the results in the Preview window and make any further adjustments as needed.
If you’re satisfied with the results, click the Export button and save your video. Alternatively, keep editing your clip using the countless features you can access.
DaVinci Resolve
DaVinci Resolve is among the most popular solutions out there. It’s an all-in-one editor with excellent color correction and grading capabilities, visual effects, audio editing, and more. Developed by BlackMagicDesign, it’s compatible with Windows, Mac, and Linux.
Compared to Filmora, this tool is expensive, but there is a free version that lets you improve your video content, and the lens correction feature is good – whether using the automatic or the manual approach. However, Filmora is much more intuitive to use, particularly because the interface is much more user-friendly.
In any case, here’s how to use it:
Step 1: Launch DaVinci Resolve on your device and go to File > Media > Import Media to upload your video;
Step 2: Drag the video to the timeline, then go to Edit > Inspector > Lens Correction;
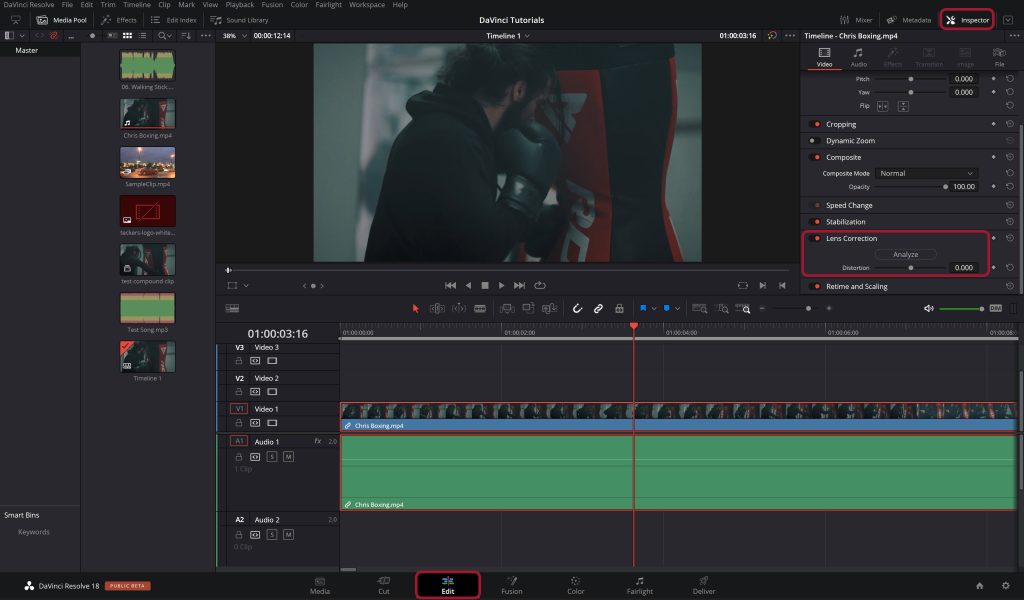
Step 3: To automatically remove distortion, click Analyze;
Step 4: To make manual adjustments, drag the Distortion slider.
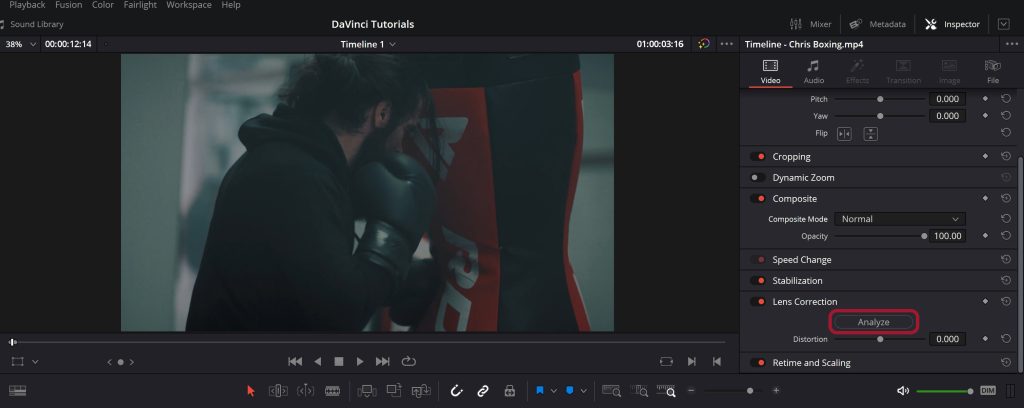
Whether you’re making manual or automatic adjustments, always preview your video before saving the changes. Overcorrecting lens distortion could make matters worse.
Final Cut Pro
If you’re a Mac user, Final Cut Pro could be the tool you need to Photoshop lens correction. Stable, fast, and easy to get used to, it offers various features to enhance your content.
It works with all types of videos, from standard-definition to 8k ones. What’s especially useful is that it works with ProRes and ProRes RAW footage, giving you more room to play around and improve your videos however you’d like.
Unfortunately, lens correction isn’t a standard feature in Final Cut Pro. You’ll need to install a suitable plugin or try the Fisheye hack.
In a nutshell, Final Cut Pro has a Fisheye effect that makes your videos look even more distorted than they already are. However, since you can adjust the level of the Fisheye effect, you can technically remove lens distortion by playing around with the Fisheye value. Here’s how you can do that:
Step 1: Launch Final Cut Pro, upload your video, and drag it to the timeline;
Step 2: Go to Effects, select the Fisheye effect, and drag it to the timeline;
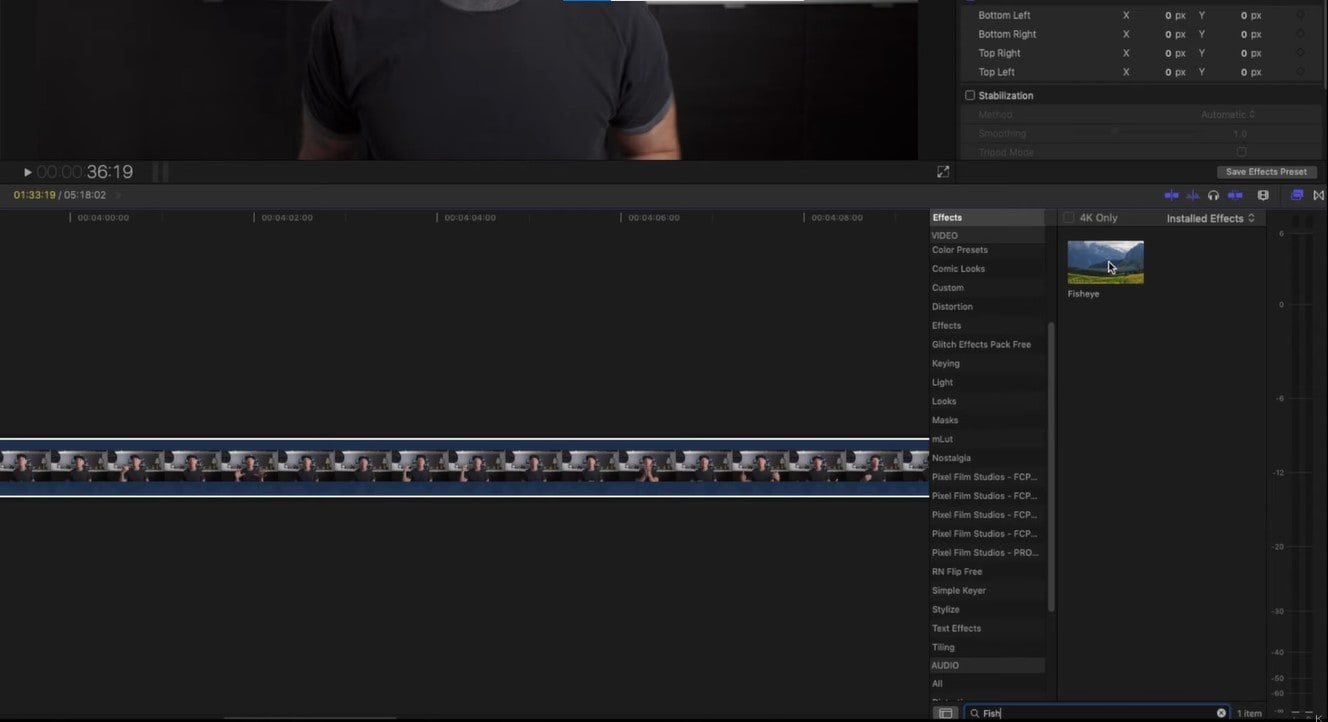
Step 3: Use the slider next to Amount to bring the Fisheye effect into the negative;
Step 4: Keep adjusting the Amount until you’ve eliminated the distortion.
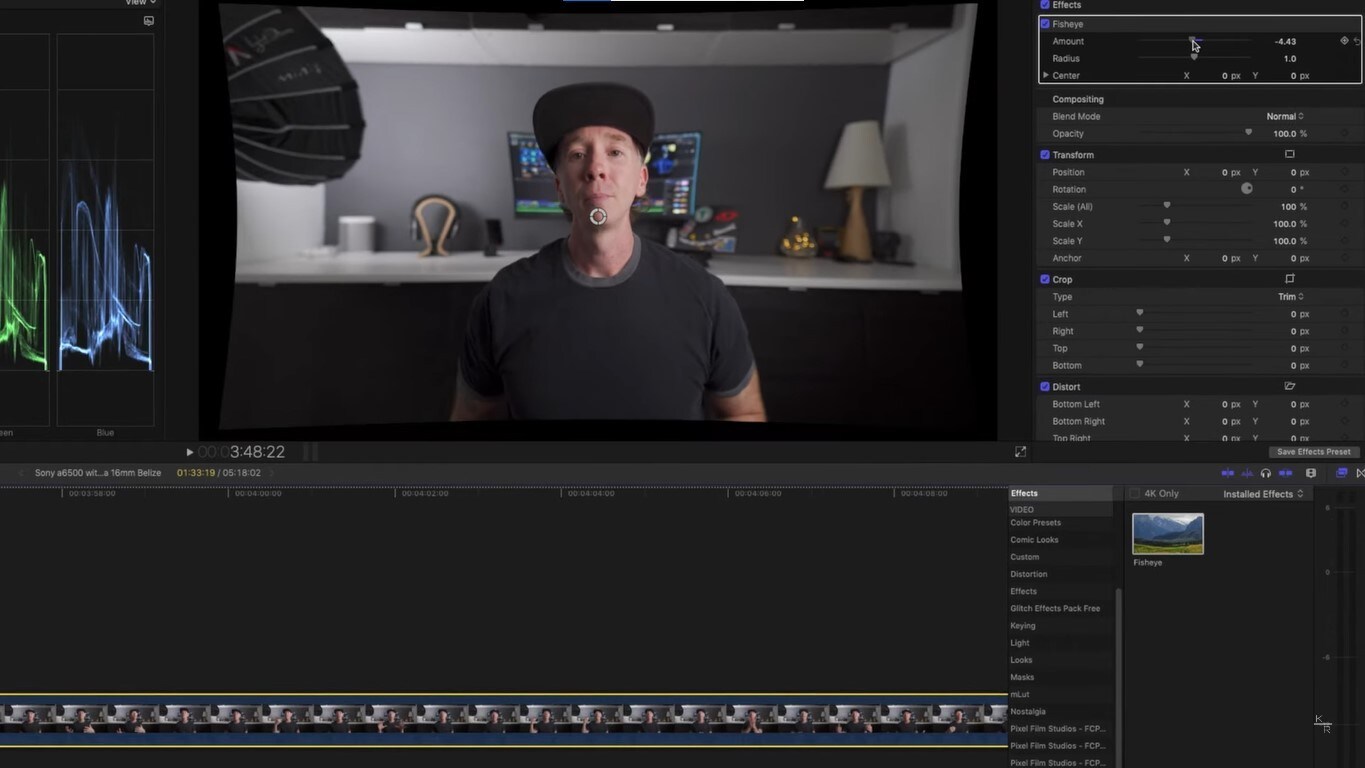
The exact Amount value will vary based on the type of lens distortion you’re dealing with and the overall effect you’re trying to achieve. You might need to play around with the Amount slider until you’ve found what works for you.

Conclusion
Lens distortion is a natural byproduct of the way camera lenses are made. Regardless of the specific lens you’re using, its price tag, and unique specifications, you’ll likely encounter issues with distortion no matter what you do.
The good news is that you can minimize distortion with proper shooting methods and eliminate it with lens correction using tools like Wondershare Filmora.


