With its various potent tools, Adobe Audition enables audio producers to obtain the absolute best results from their recordings. Adobe Audition removes echo and will have something that will assist you in bringing everything back under control so that your audio sounds great, regardless of whether the problem is unruly instruments or rowdy hosts.
When recording audio, there are numerous factors to consider. Some spaces can generate more reverb than others, like a cluttered echo effect due to various factors, including reflective surfaces, distant objects, and large, cavernous spaces. This will allow you to remove echo auditions for use in podcasts, movies, and musical compositions.

In this article
Part 1: How to Remove Echo with Adobe Audition?
Producers may use various compelling features in Adobe Audition to get the most out of your audio. Whether rogue hosts or instruments, Adobe Audition has a solution to help you regain control and make your audio sound great. We'll demonstrate how to eliminate echo in Adobe Audition in this tutorial. Adobe Auditions can reduce echo from your video files in a few steps. Want to learn how?
Well, here are the five prime steps.
Step1 Pick Audio
Load the project you are currently working on in Audition, and then choose the audio file with the echo that needs removal. Choose a segment of the waveform that is relatively quiet to eliminate some of the ambient noise that your camera or another nearby device may have caused.
Select "Capture Noise Print" from the contextual menu visible when you right-click on the portion. This will assist the Audition in differentiating the primary audio from any background noise.
Step2 Begin Noise Removal
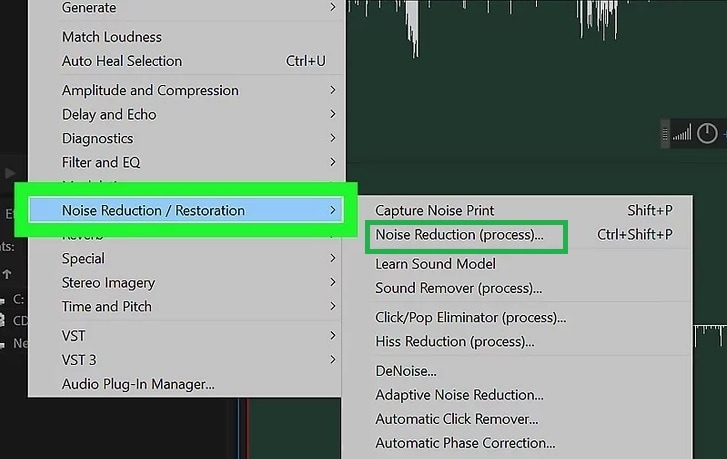
Select the noise that you want to get rid of, and then go to "Effects" > "Noise Reduction / Restoration" > "Noise Reduction (process)." After selecting "Select Entire File," play your audio file again to see whether the background noise got eliminated.
You may also make the gating effect more noticeable by going to the Advanced tab and lowering the Spectral Decay Rate. When satisfied with the adjustments, you may make them permanent by clicking the "Apply" button.

Step3 Add Effects
Next, choose "Dynamics Processing" from the "Effects" menu after clicking on "Amplitude and Compression."
This will load an effect like compression, which you can then utilize to modify the waveform. You should be able to see a diagonal line that extends from one side of the Dynamics Processing display to the other when you first launch the program. It will affect the echo if you drag on this line so tiny that it bends below the default route. You will need to experiment with the line's location and compare the new audio to the old one until you get a satisfactory result.
Step4 Apply Effect
After adjusting the Dynamics Processing settings to your satisfaction, ensure that your complete waveform is chosen before clicking the OK button to apply the effect.
Your audio's amplitude, or loudness, will reduce as a result; however, you may restore the original level by selecting "Effects" > "Amplitude and Compression" > "Normalize" from the menu bar.

Step5 Clean Up the Audio
Finally, clean up some of the frequencies the echo has produced since they are murky and irritating.
Select "Effects" followed by "Filter and EQ" and then "Parametric Equalizer" from the menu. You will get access to seven primary frequency bands to work with by default and a low-pass and high-pass band devoted to their respective functions. We need a few bands to eliminate those undesirable frequencies in the middle.
When you hear a harsh sound, start by amplifying one band (and the Q value of that band), then gently proceed across the frequency range until you reach the next band. After that, bring the band below 0 dB so that it may remove some of the roughness.
Part 2: How to Remove Echo in an Easy and Free Way?
Although a great deal of software is available to eliminate echo, the Wondershare Filmora Video Editor is the one we suggest you use. Let's go right down to the meat of the matter. It can remove echo auditions and any other background noise.
The newly released version of Filmora includes enhanced waveforms, volume keyframing, peak metering, and audio transitions in addition to the standard audio editing tools. All of these improvements contribute to a more satisfying and high-quality audio editing experience for the user. Here are some advantages of Getting Rid of Echo and Other Background Audio Noise Using Filmora:
- You may adjust the height of the track for more accurate audio manipulation of waveforms.
- Using only one click, the Denoise function may eliminate any unwanted background noise.
- Adjusting the Denoise level to either weak, mid, or strong may provide much improved results in terms of noise reduction.
Filmora Video Editor makes it simple to eliminate background noise from an audio recording or a video recording. It can even do both simultaneously. You may separate the audio from the movie using this user-friendly video editor, then use the Audio Mixer or Audio Equalizer tools to make additional adjustments to the audio. Finally, you can Export the audio in MP3 format after editing it. The specific steps are listed down below.
Step1 Run Filmora and Import Video
Import your video into Wondershare Filmora's timeline pane. A video preview can help you see the portions you don't wish to keep can be edited out and removed.
Step2 Choose Detach Audio
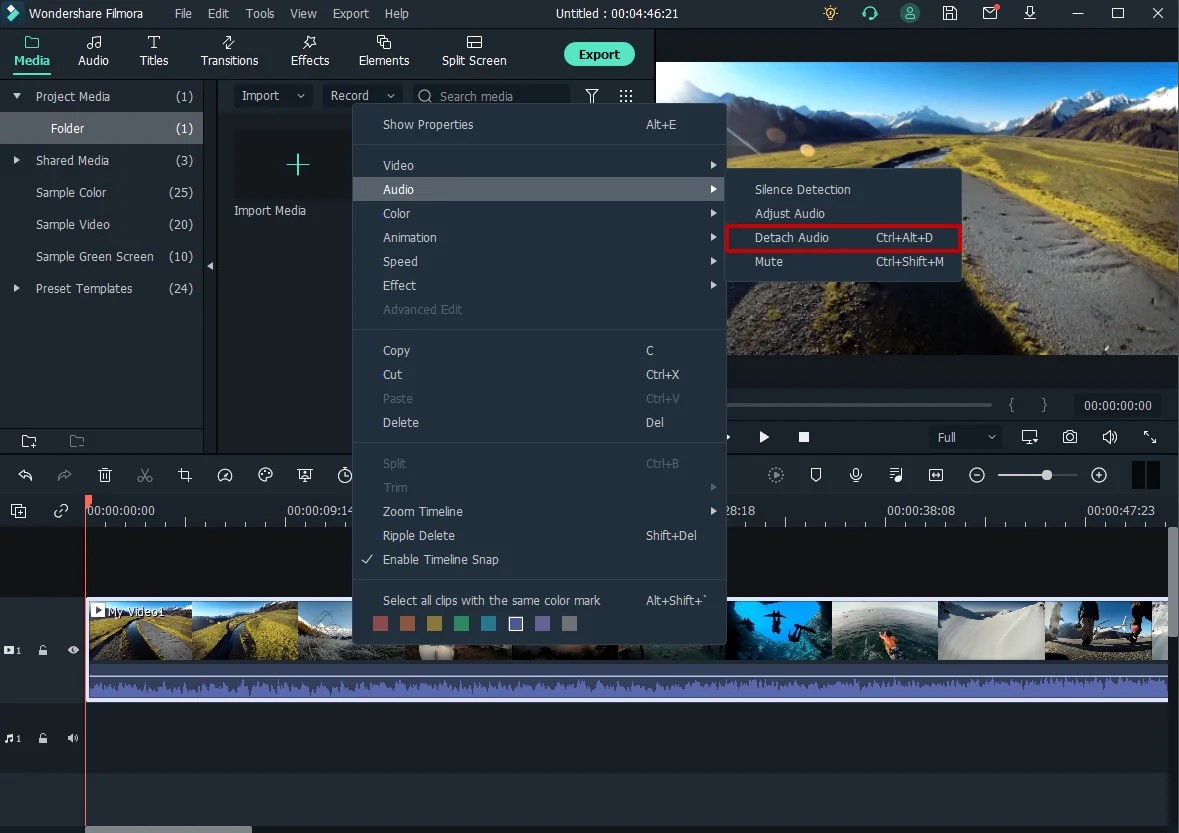
A drop-down option will appear when you right-click the video in the timeline. Choose "Audio" from the list. Silence detection, audio modification, audio disconnect, and mute are the four choices you'll see. If you wish to separate the audio from the video, choose "Detach Audio" from the drop-down menu.

Step3 Tick Remove Background Noise
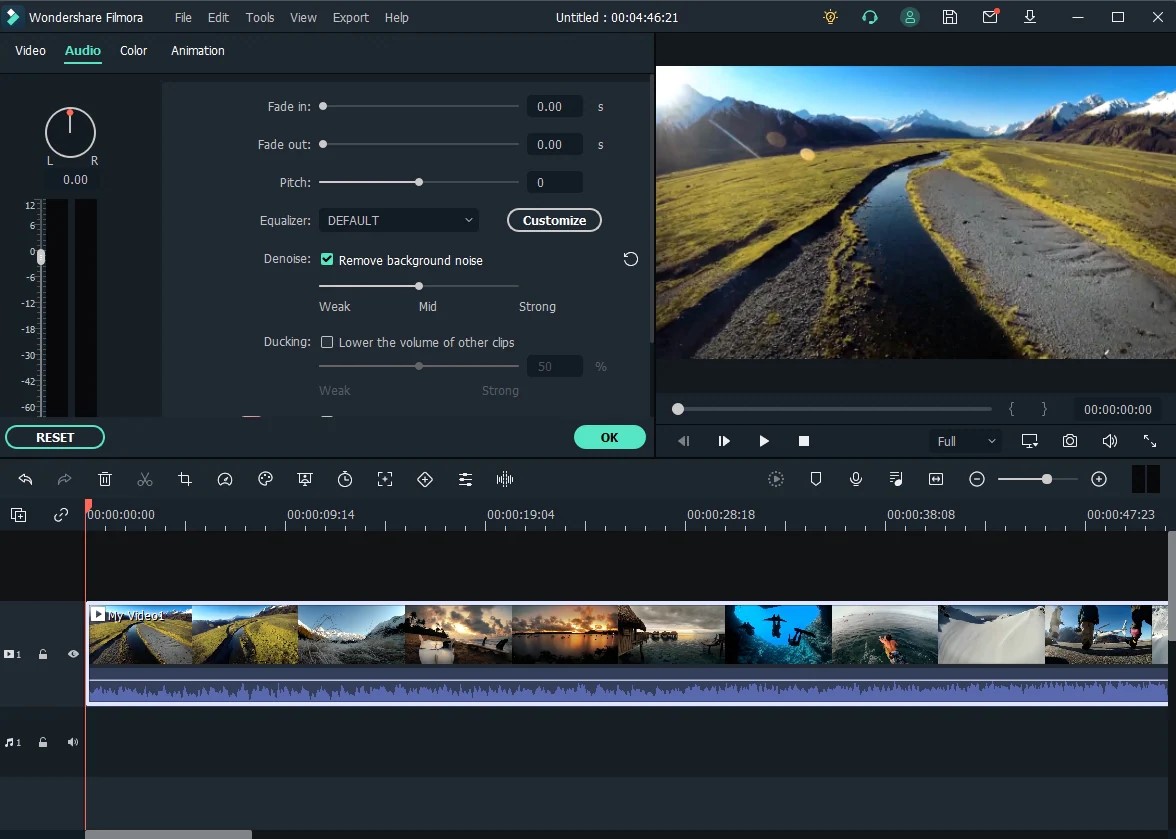
Double-click the audio track, then choose the Edit panel and the "Remove background noise" option to remove the background noise instantly.

To access the Editing panel without first separating the audio from the video, you may alternatively double-click the video clip in the timeline. Selecting the Audio tab in the Editing panel may adjust the audio and eliminate the noise.
Step4 Fine Tune and Export
You may also make minor adjustments to the audio by utilizing the editor's Equalizer feature to give it a more realistic tone. To enhance the overall effect, frame-by-frame adjusts the audio to match the picture. You may instantly post the video to YouTube or Vimeo after seeing the findings or click the Export option to save it to your PC with the noise reduction performed.
Part 3: Recording Tips: How to Record Without Echo?
Now that you know how to use Adobe Audition to remove echo let's share some tips to help you record without an echo.
So, here are a few recording tips.
- Keep things quiet. When recording audio, pay more attention to the peaceful sounds in the background. There may be humming from machines with fans, buzzing from lights, or jingling from your pet's collar. Pay attention to where you are recording and find ways to shut down anything else.
- Put your mobile phone in airplane mode. Phones send out signals when they receive calls or do searches in the background that the recording system can pick up. By putting your phones in "airplane mode," you can stop them from making noises during good takes.
- Minimize echo. Set up your recording space, so your voice stays on the walls only a little and back to your microphone. Use things that soak up the sound instead of reflecting it, like a thick rug or a comforter. You can make your voice echo in post-production if you want it to.
- Upgrade your microphone. The hardware you use will be the most significant limit to what you can record. You can improve your recordings by plugging an external microphone into the microphone jack on your camera or with a professional microphone to record the sound separately.
- Adjust your levels. Before you hit the record button, check to see how loud the sound you want to record is. Adjust your levels (the sensitivity of your microphone) until the sound is between -6 DBS and -12 DBS. This range allows your sound room's source to get louder without the recorded sound getting cut off. Don't worry because you can always increase the editing volume.
- Start with a sound cue. If you're recording separate audio that you'll later sync to your video, start your recording with a short, loud sound like a clap or a high-pitched "beep." Later, while editing, finding the part where your video and the additional audio match will be much easier.
- Move toward the sound. Move your microphone close to the sound you want to record. The closer your microphone is to the sound source, the lower you can set your microphone's sensitivity. If you turn down your levels, sounds you don't want to record will also sound less loud.
Part 4: FAQs
1. How do you remove echo from recording?
Removing Echo in Audacity with Noise Gate: Choose the track you want to work on, go to the Effects menu, and look for the Noise Gate plug-in (scroll down a bit). Check to see that Gate is on Select Function. Use the preview to change the settings. When happy with the effect, click OK to apply it to the whole audio file.
2. How do you remove echo from a microphone?
Lessen the volume of your speakers to get rid of the echo. If your microphone or audio device is close to a wall or other surface that reflects sound but doesn't absorb it, you should move the microphone away from the surface or change its direction. Additionally, you can use Wondershare Filmora or Adobe Audition echo removal technique.
Conclusion
Hence, as we saw Adobe Audition is a valuable tool for removing echo auditions from audio files. Even if you're starting, it takes little time to improve the quality of your recordings. There are many ways to dig deeper and improve your audio quality if you are more ambitious or your recordings have many echoes.
But no matter what you do, Adobe Audition reduces echo, and you can look forward to recordings without an echo.


 100% Security Verified | No Subscription Required | No Malware

