If you are wondering if there is an easy way to sync music with your video so you can leave endless listening and manually capturing beats behind, we have good news for you! Get ready to meet and explore Adobe Premiere Pro beat detection tool, your new music assistant.
Even if you are an amateur who wants professional-looking content for your social media, we have your back with some straightforward audio and video syncing tips, perfect for beginners.
Keep reading and explore the beat detection Premiere Pro plugin BeatEdit and an excellent alternative.
In this article
Premiere Pro BeatEdit: Top Functions, Pros and Cons
Let's begin with the most notable functions of BeatEdit to see why this plugin is a helpful tool inside Premiere Pro. Then, we can provide a quick comparison of the pros and cons of using the Premiere Pro beat detection plugin.
- Robust beat tracking technology– BeatEdit is a plugin from music research groups eager to simplify beat detection by analyzing audio tracks quickly to identify beats and mark them for further editing.
- Beat markers– Once it detects beats, the BeatEdit plugin marks them, helping you align them with video clips and transitions.
- Auto-cutting– After catching the beat, you can automatically cut tracks at detected beats and reduce your editing time.
- Random beat selection to create more variation– BeatEdit lets you make diverse edits with randomly selected beats. This way, the automatic tool helps your creativity evolve by doing the boring part of the job for you.
- Option to add extra markers at other rhythmic points– You can place them where the plugin detected beats and at intervals like off-beats, subdivisions, or any specified rhythm, enjoying more flexibility.
- Audio waveform visualization– Check how loud your audio is throughout the track by visualizing the sound. You can spot the loud and quiet parts to guide you in editing.
- Real-time preview– You can preview everything you do in real time for perfect syncing.
How to Install Premiere Pro BeatEdit Beat Detection Plugin
The installation process of the BeatEdit plugin starts with the purchase at Aescripts. Additionally, you will need a free Aescripts ZXP installer. Ensure you have the compatible version for your PremierePro and that the program doesn't run during the installation. Now we can start:
- Step 1: Locate the downloaded file and run the installer.
- Step 2: The installer may prompt you to choose the installation location. You can leave it in the default folder. Follow the on-screen instructions and agree on the terms and conditions.
- Step 3: Once you install the plugin, launch PremierePro and locate BeatEdit by going to Window > Extensions > Beat Edit.

- Step 4: When you purchase the plugin, you must enter a license key to activate it. Check your confirmation email.
How to Use Premiere Pro BeatEdit Beat Detection
After the installation process, it's time for beat detection. Here are the steps to using BeatEdit and automatically catching beats for seamless syncing with your video:
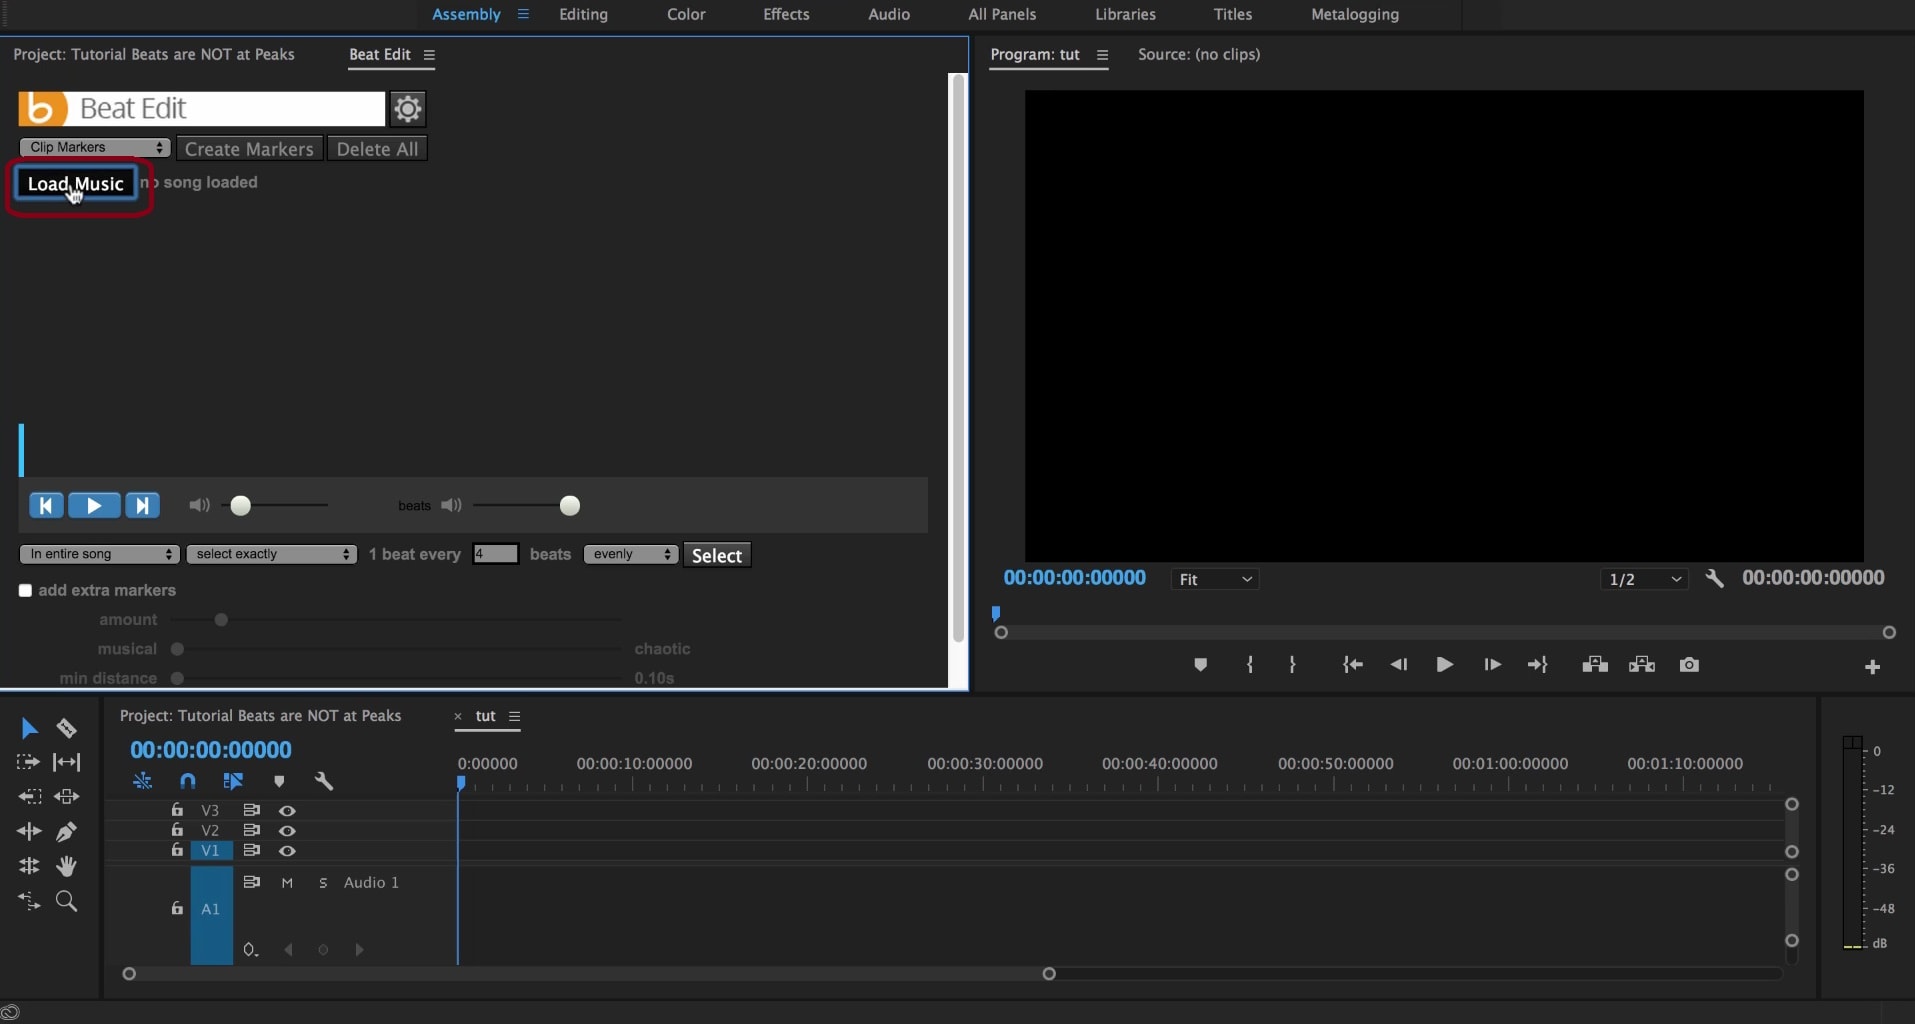
- Step 1: Click Load Music to add audio for beat detection.
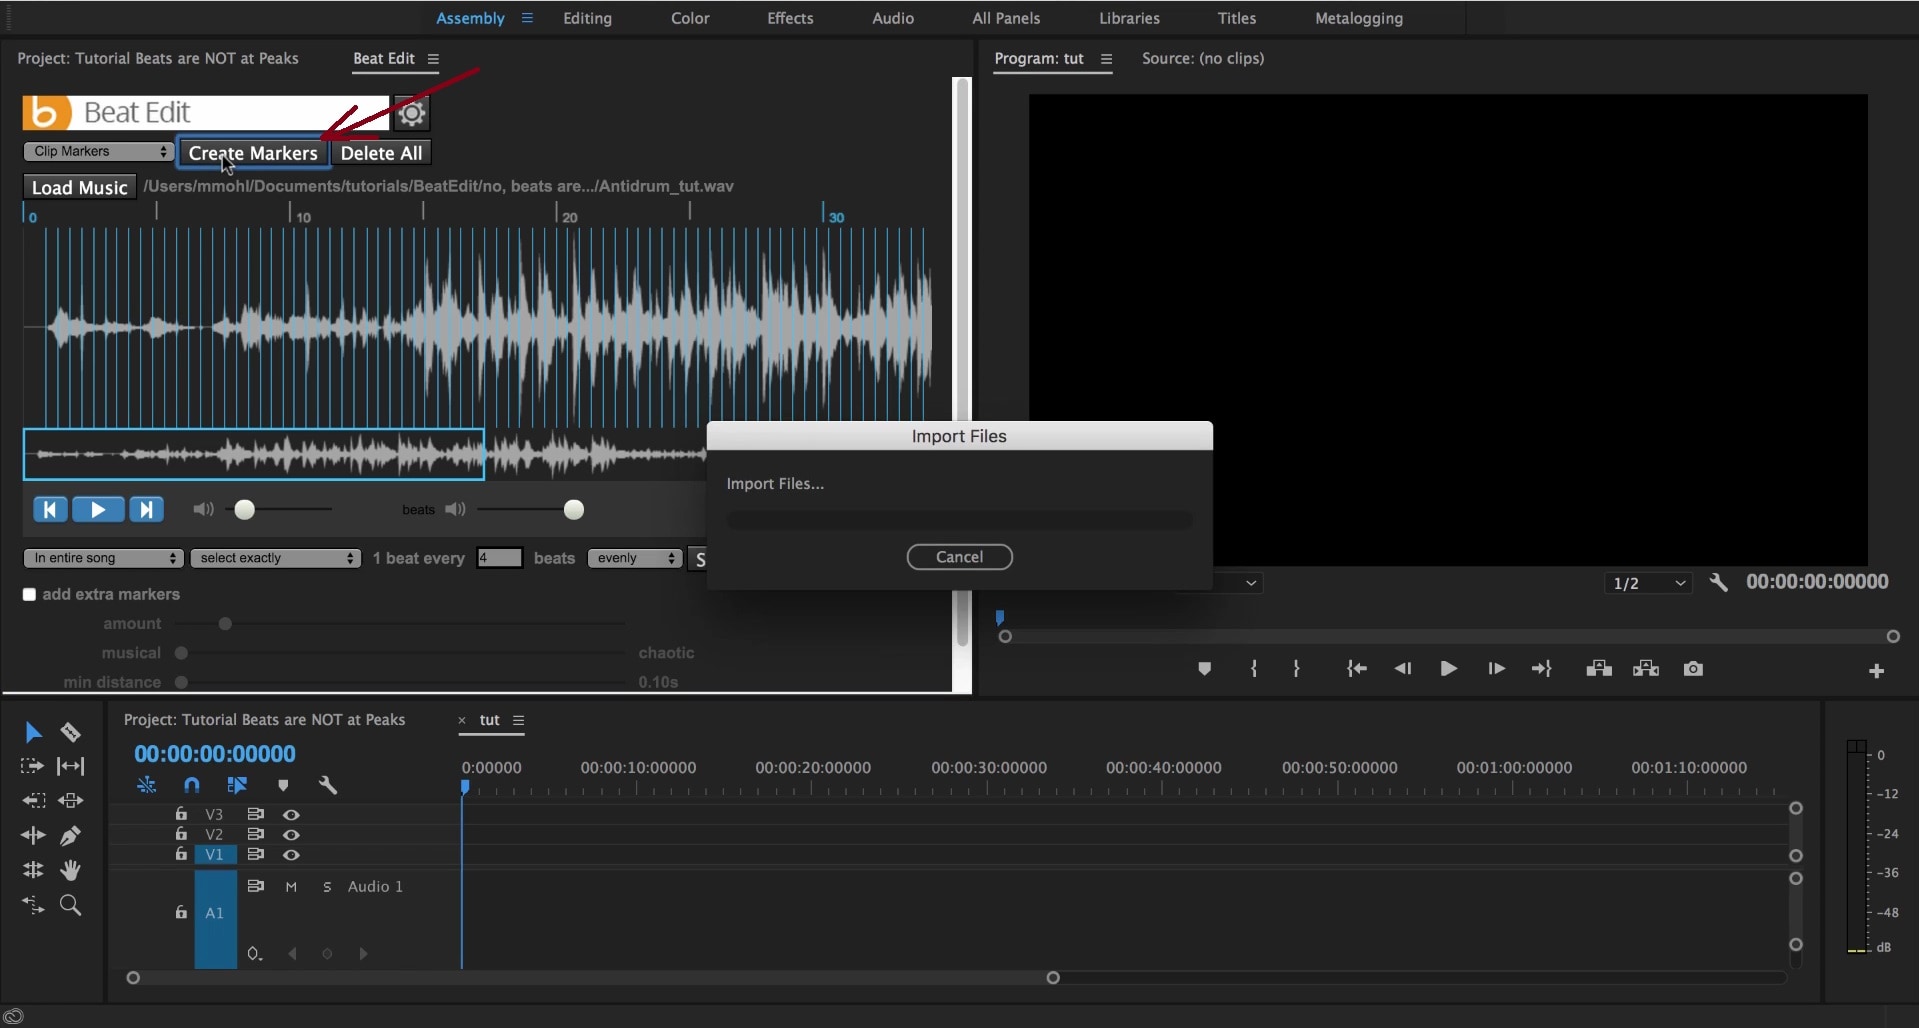
- Step 2: Click Create Markers to detect the beats in your audio file.
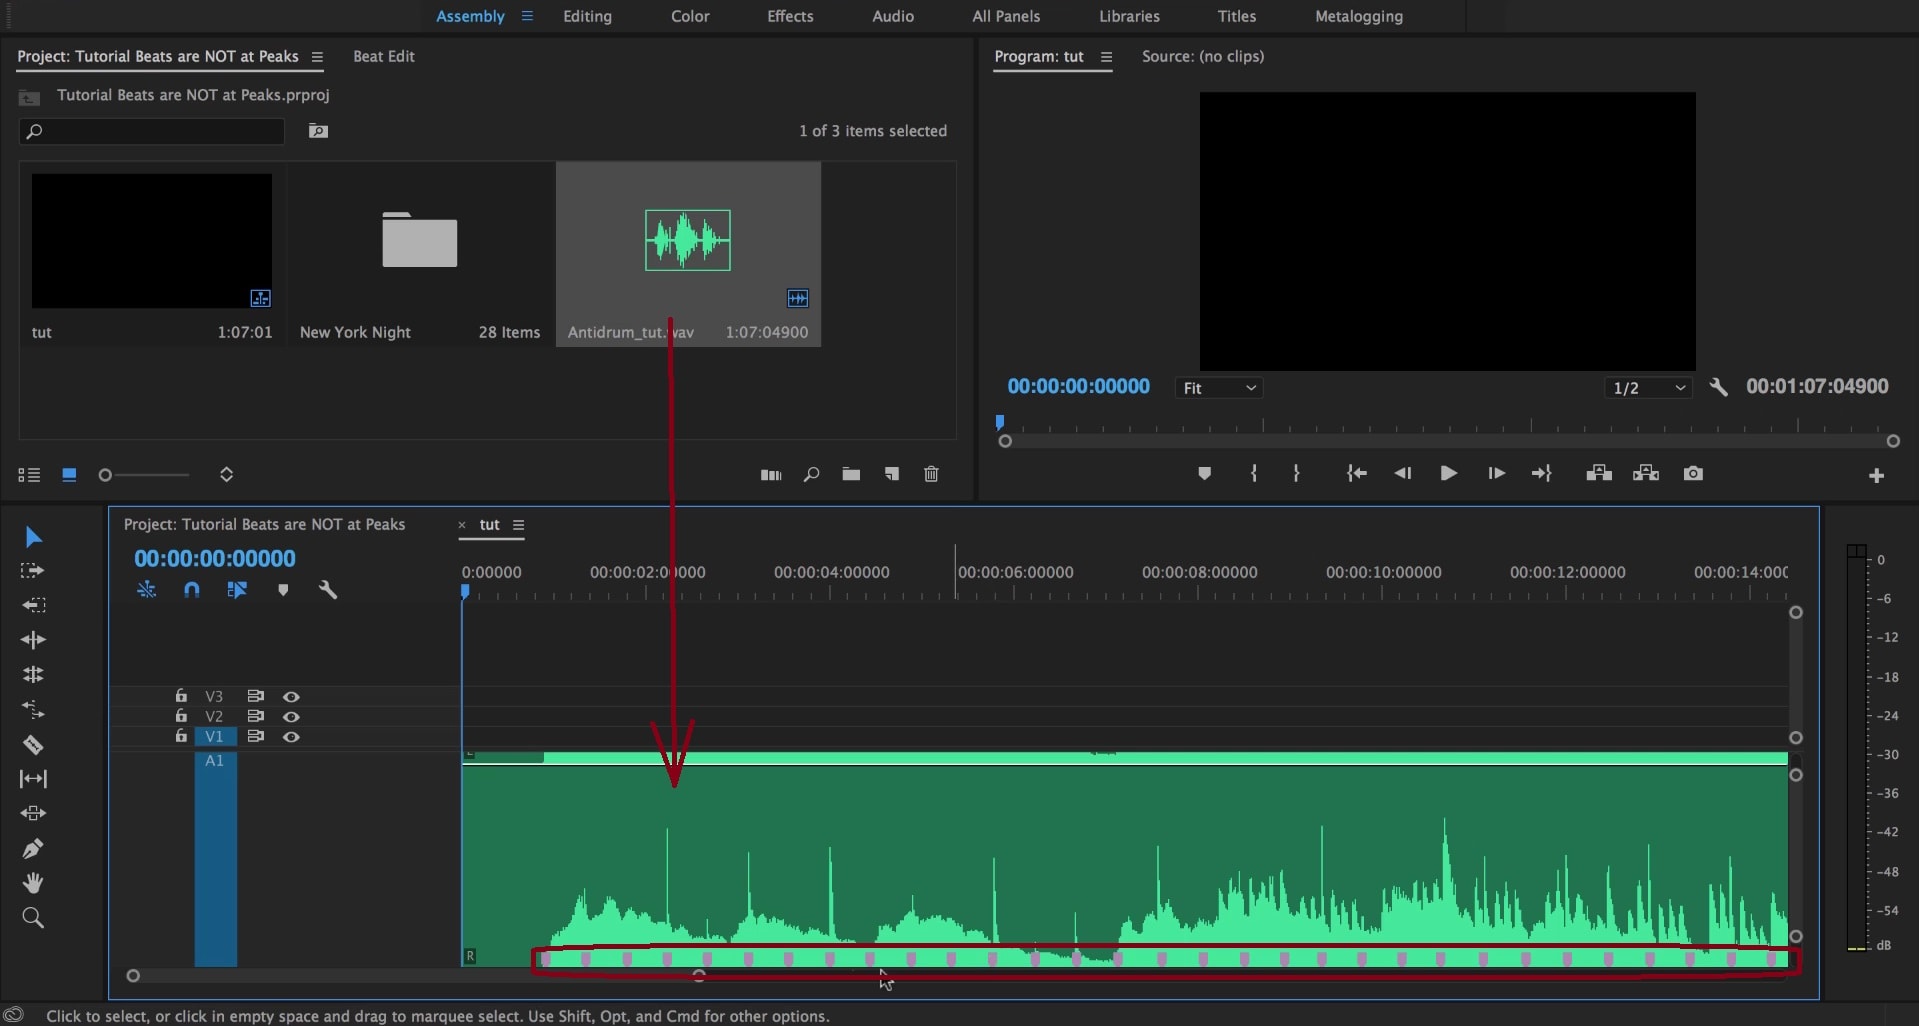
- Step 3: Drag the audio to the timeline. You will see beat markers there.
- Step 4: Add the video you want to sync with audio beats to the timeline. Then, select Sequence Markers and click Create Markers.
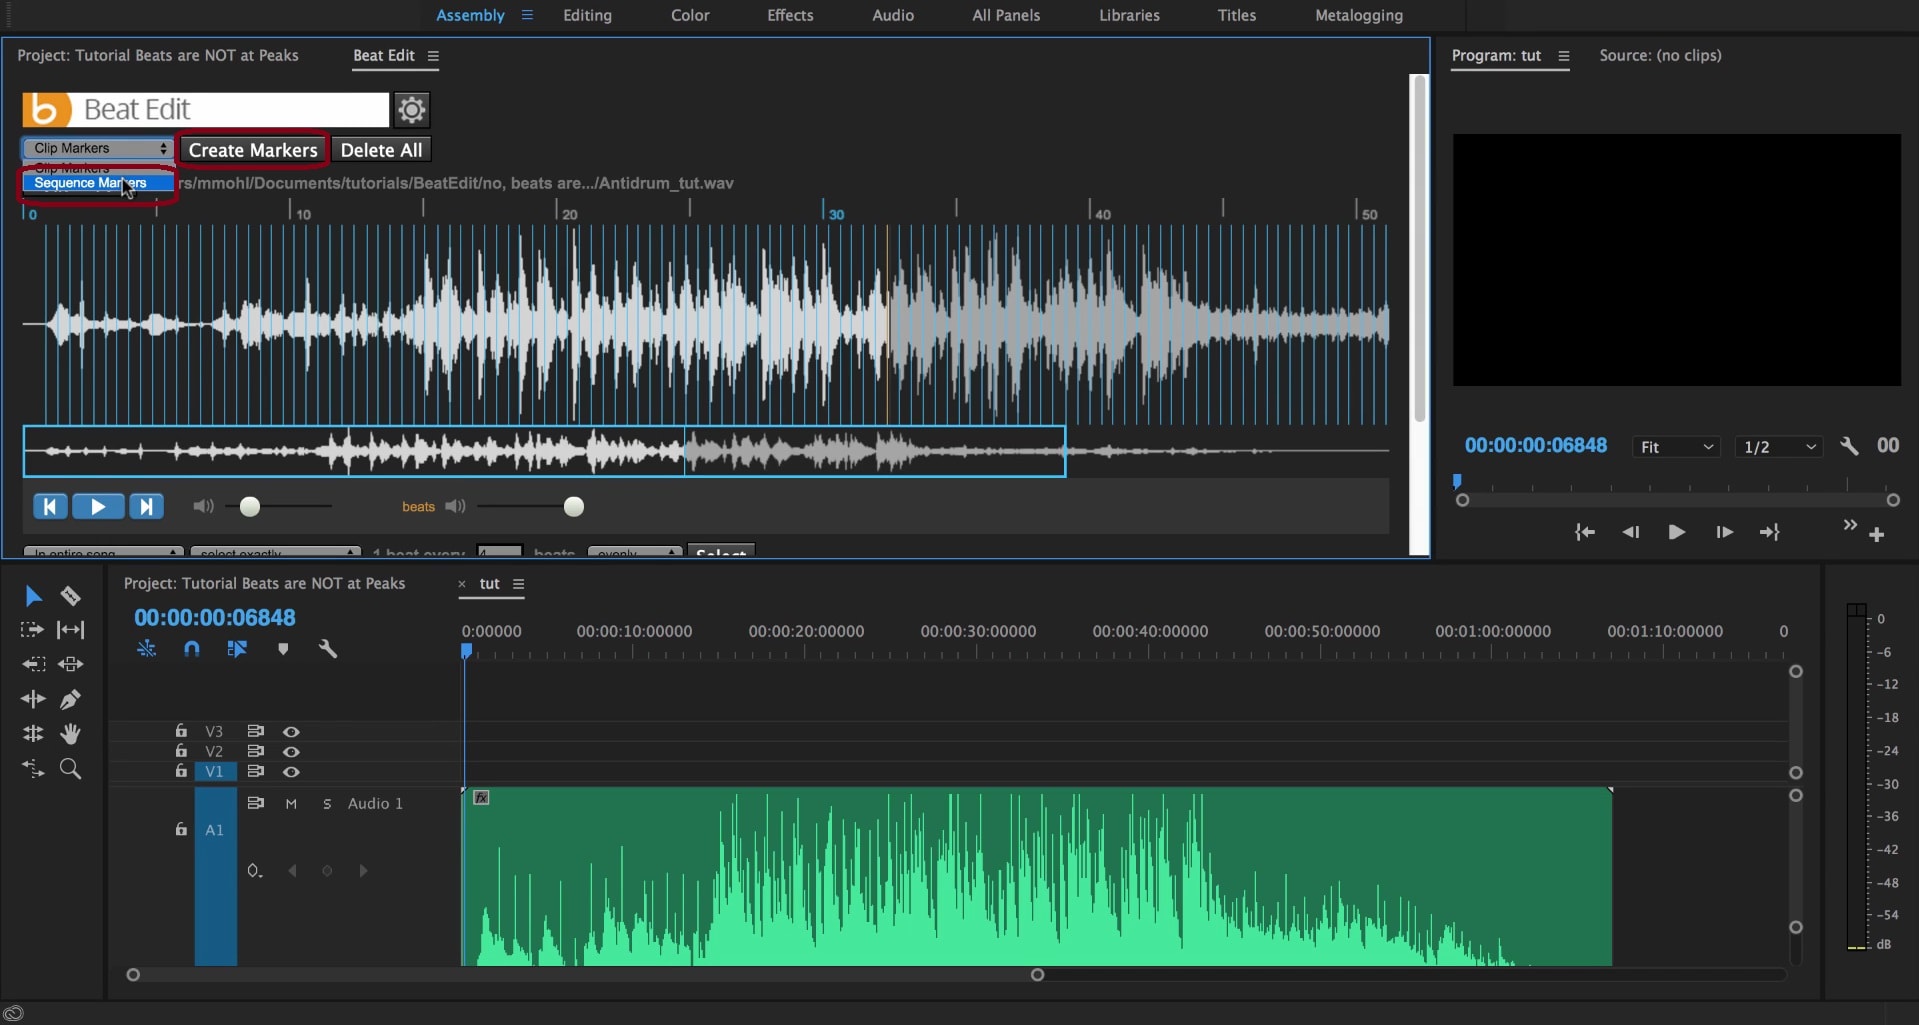
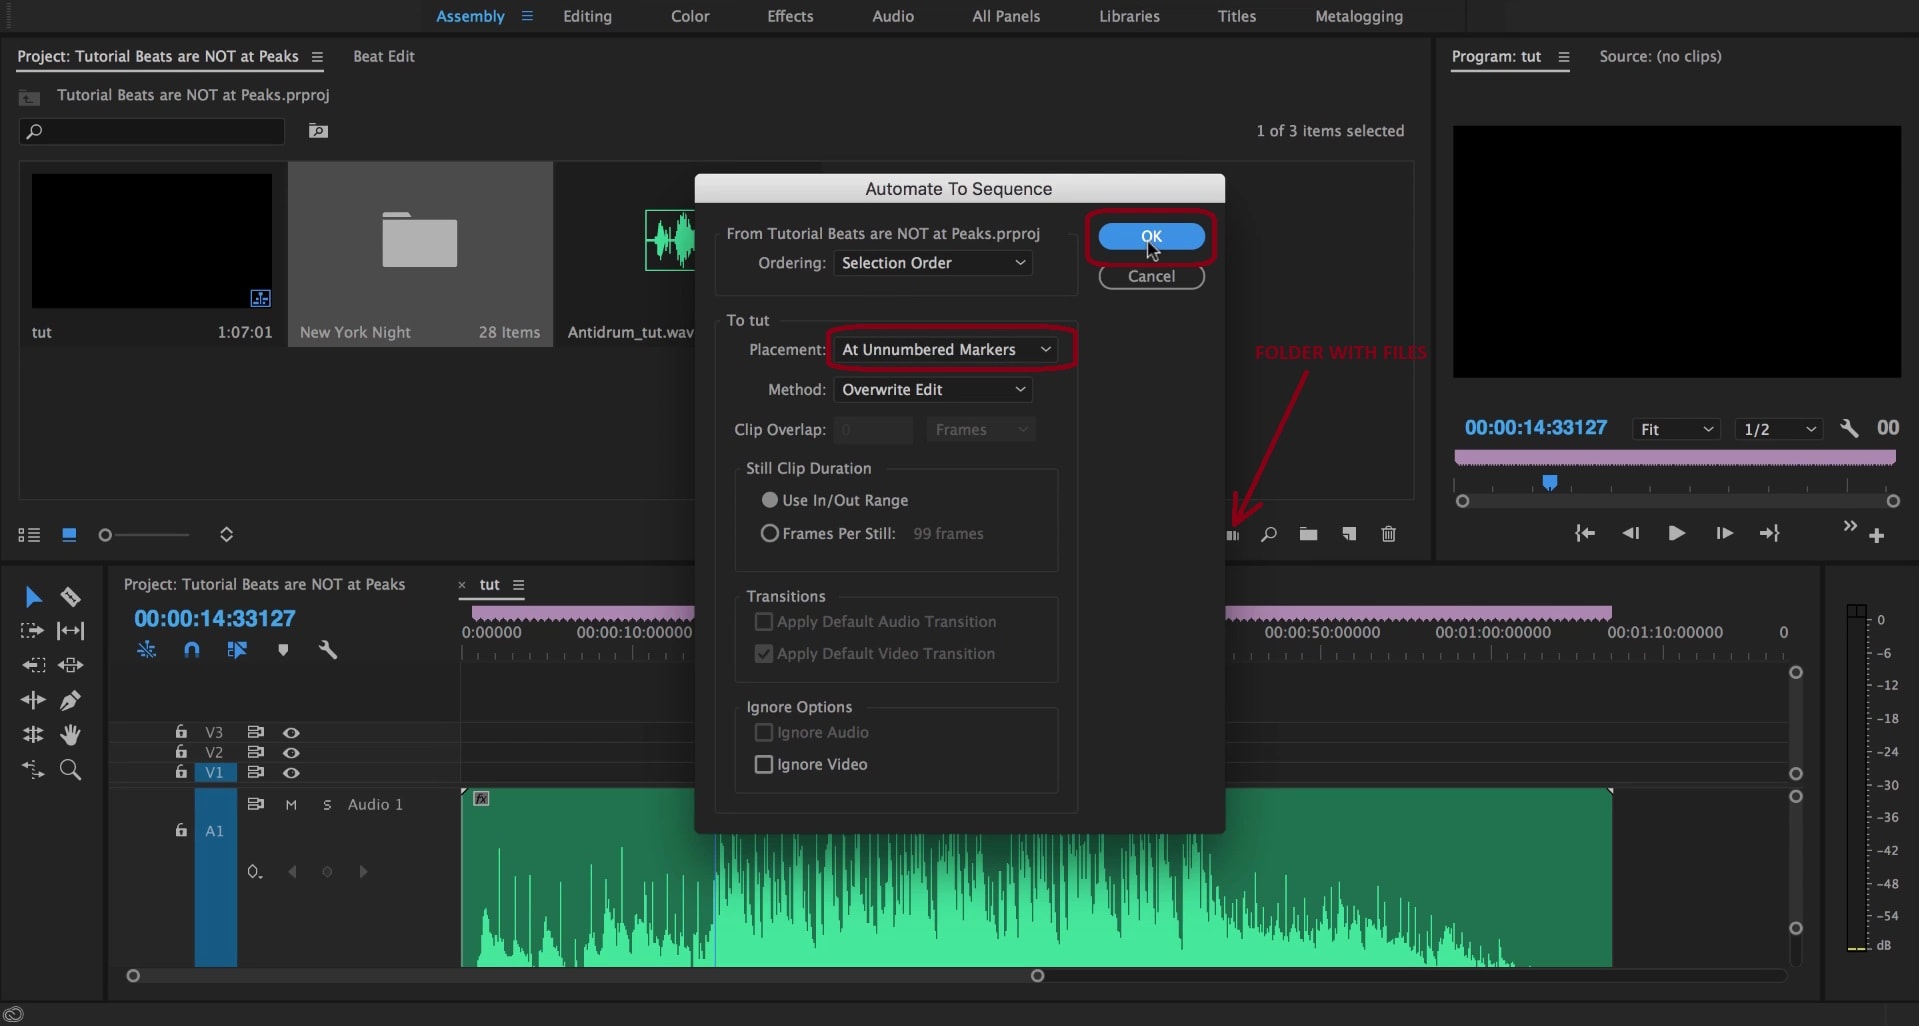
- Step 5: Choose where to start syncing on the timeline, select the folder with audio and video files, and click Automate To Sequence. Select to distribute footage At Unnumbered Markers under Placement and click OK.
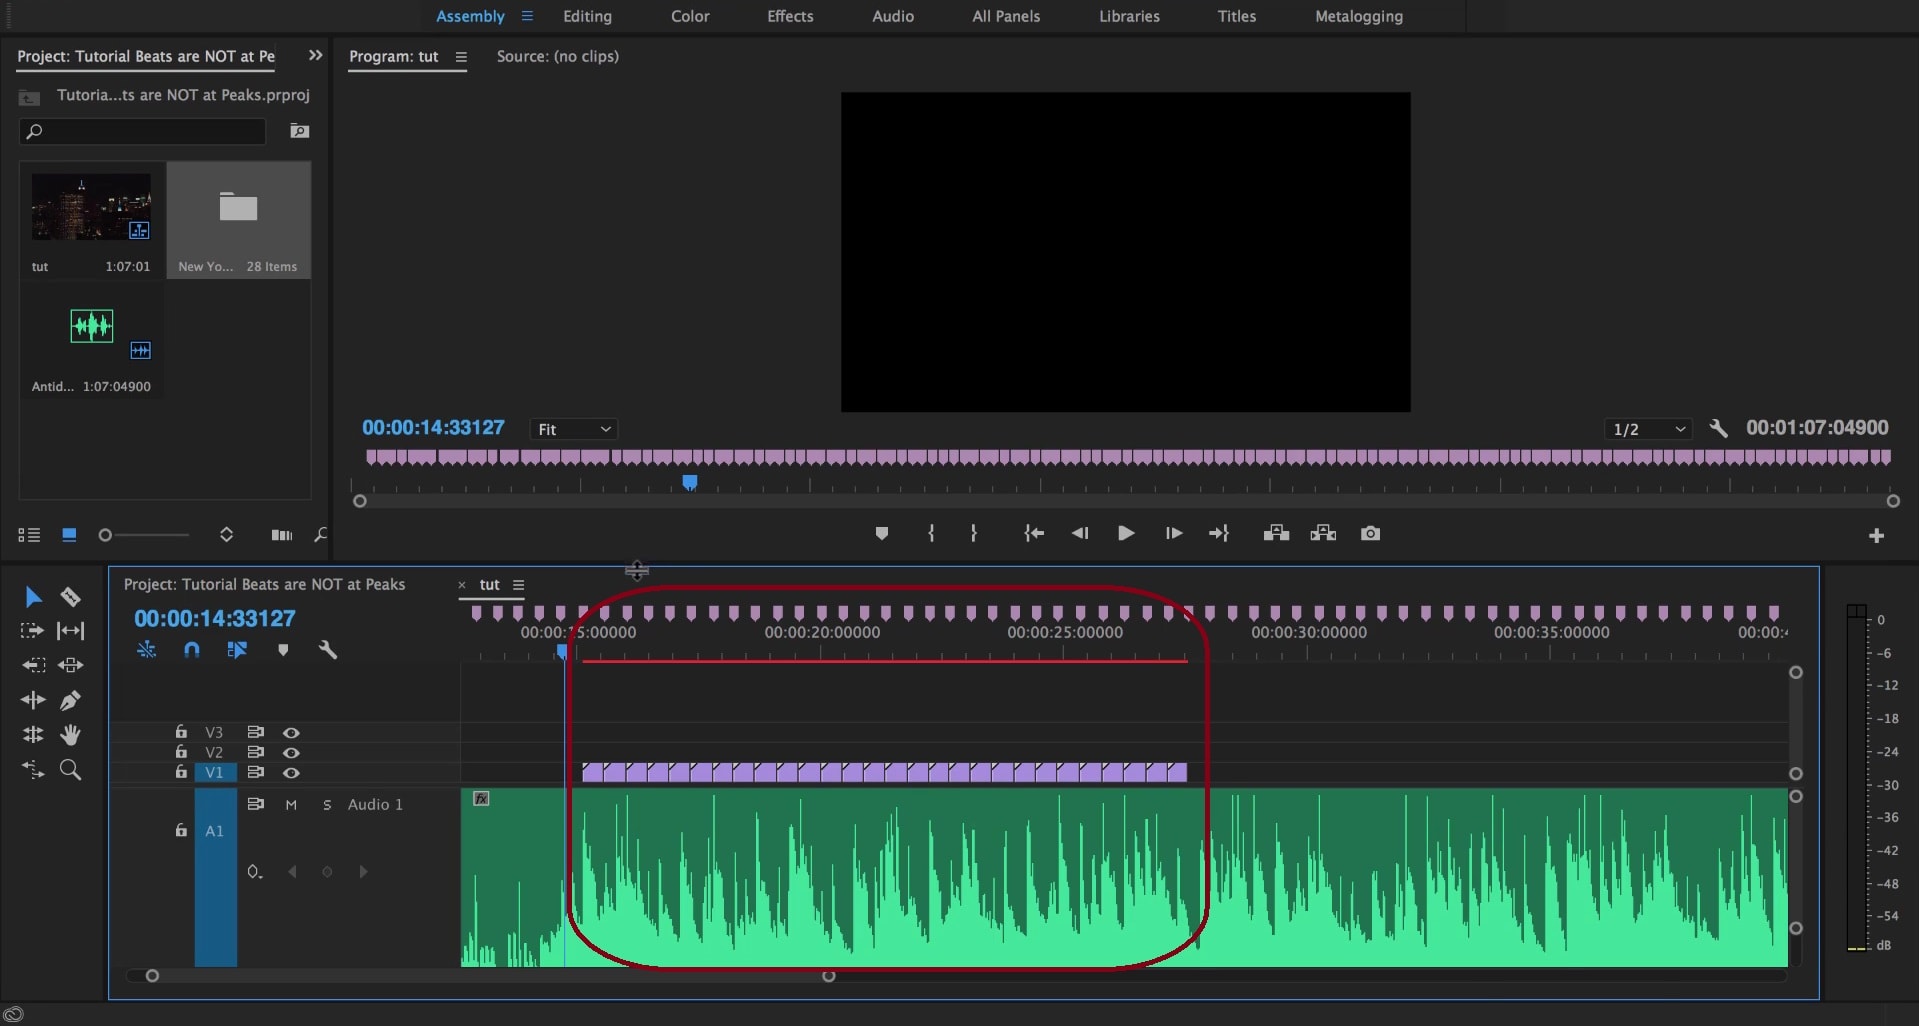
Here's how BeatEdit will sync the beats from the audio with your video.
An Alternative to Consider: Wondershare Filmora

If the beat detection process in Premiere Pro was a little overwhelming for you, we have a more straightforward solution for beat detection: Wondershare Filmora. Filmora is a professional video editor with various standard, advanced, and AI-powered video, audio, and text editing features, streamlining content creation.
Even as a beginner, you will feel like a pro with Filmora. Excellent video editing possibilities like multi-camera editing, Keyframing, smart scene cut, and magnetic timeline are already well known, but wait to see what audio features this software has.
From audio waveform visualization and audio syncing tools to the AI Voice Enhancer, AI Audio Denoiser, AI vocal remover, and AI audio stretch, Filmora guarantees the highest video and audio quality.
All these and other options are easily accessible in a user-friendly environment. Of course, Filmora's extensive community and tutorials can help you master all the features. Still, you don't have to be tech-savvy to achieve high-quality, professional results in Filmora; this budget-friendly solution can help you sync audio with video without a hitch.
Filmora for Mobile Filmora for Mobile Filmora for Mobile Filmora for Mobile Filmora for Mobile
Edit Videos on Your Mobile Phone with 1-Click!
- • Powerful Brand New AI Features.
- • User-friendly video editing for beginners.
- • Full-featured video editing for professional.
How to Use Beat Detection in Filmora
Let's get to work and see how easy it is to detect the beats and match them to your video:
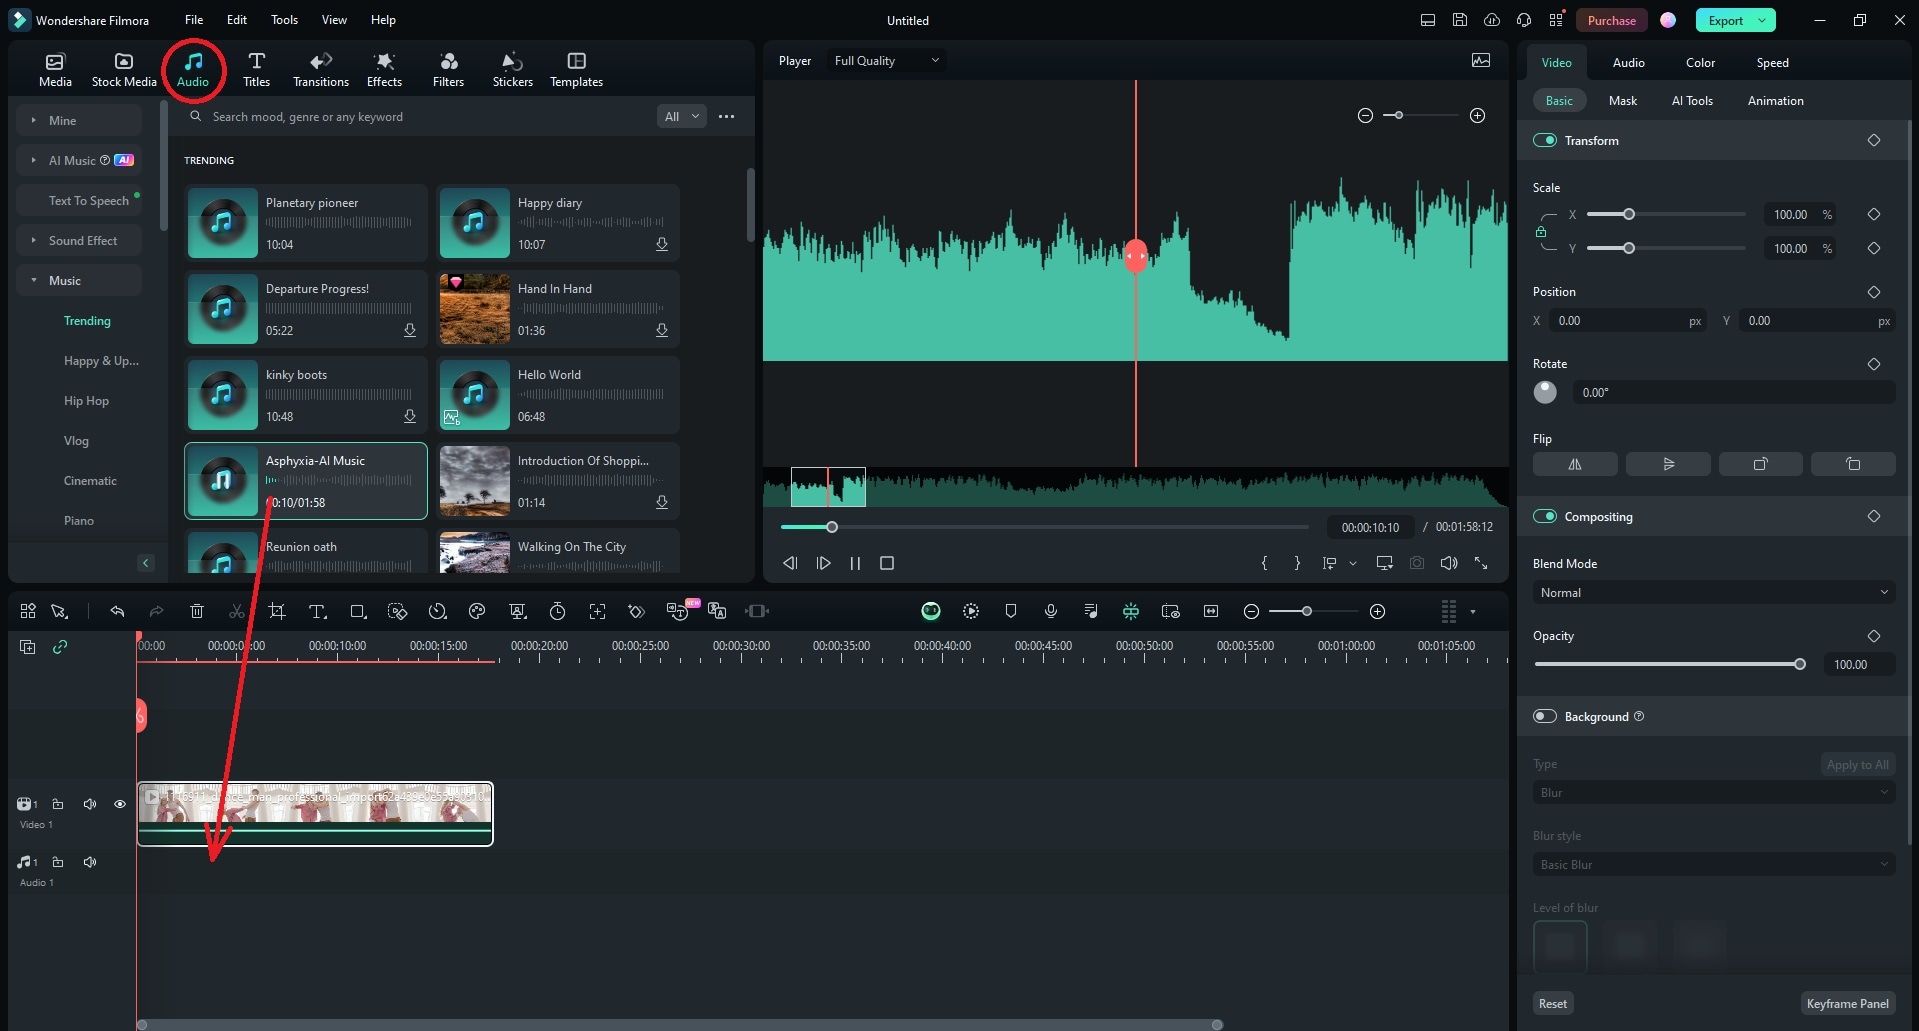
Step 1: Download and install Filmora before launching the software and starting a New Project. Then, add the video you want to edit, drag and drop it onto the timeline, and go to the Audio tab. Choose the tune you want to match with your video and add it to the timeline.
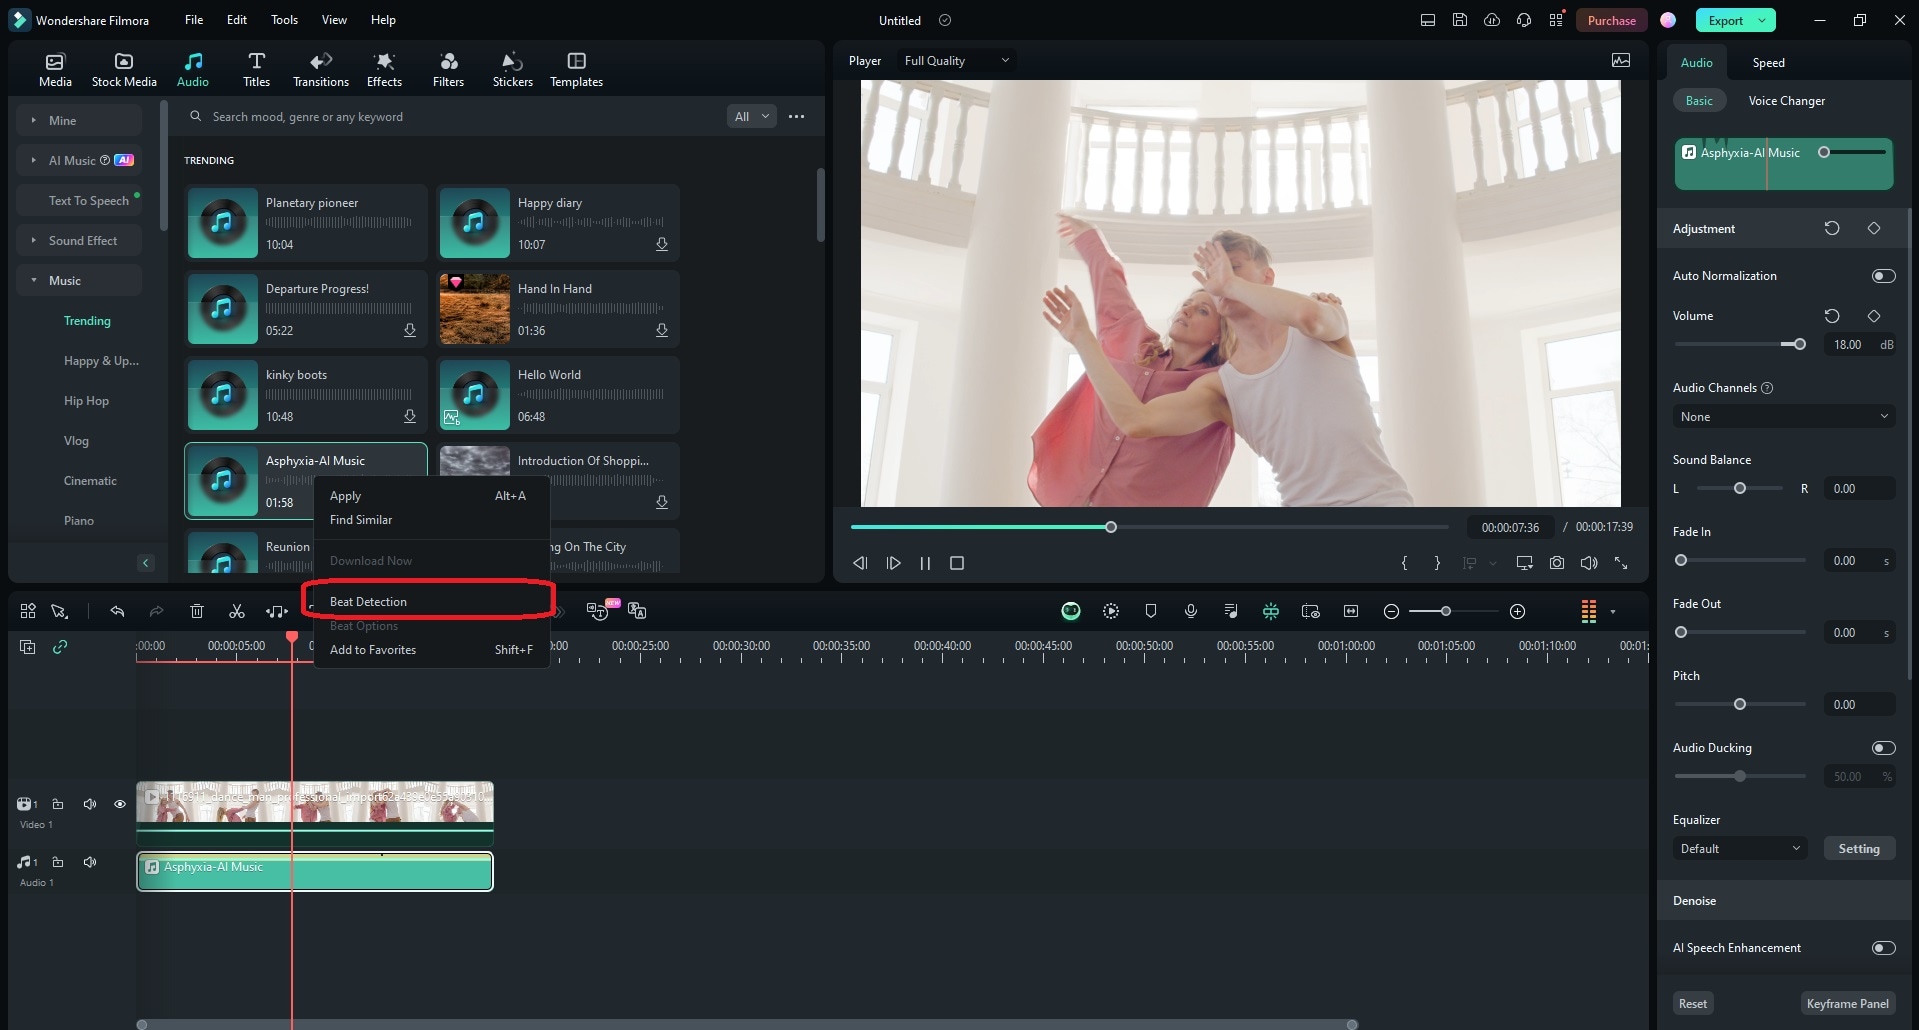
Step 2: Right-click the audio on the timeline and select Beat Detection. The process is fast, taking only a few seconds.
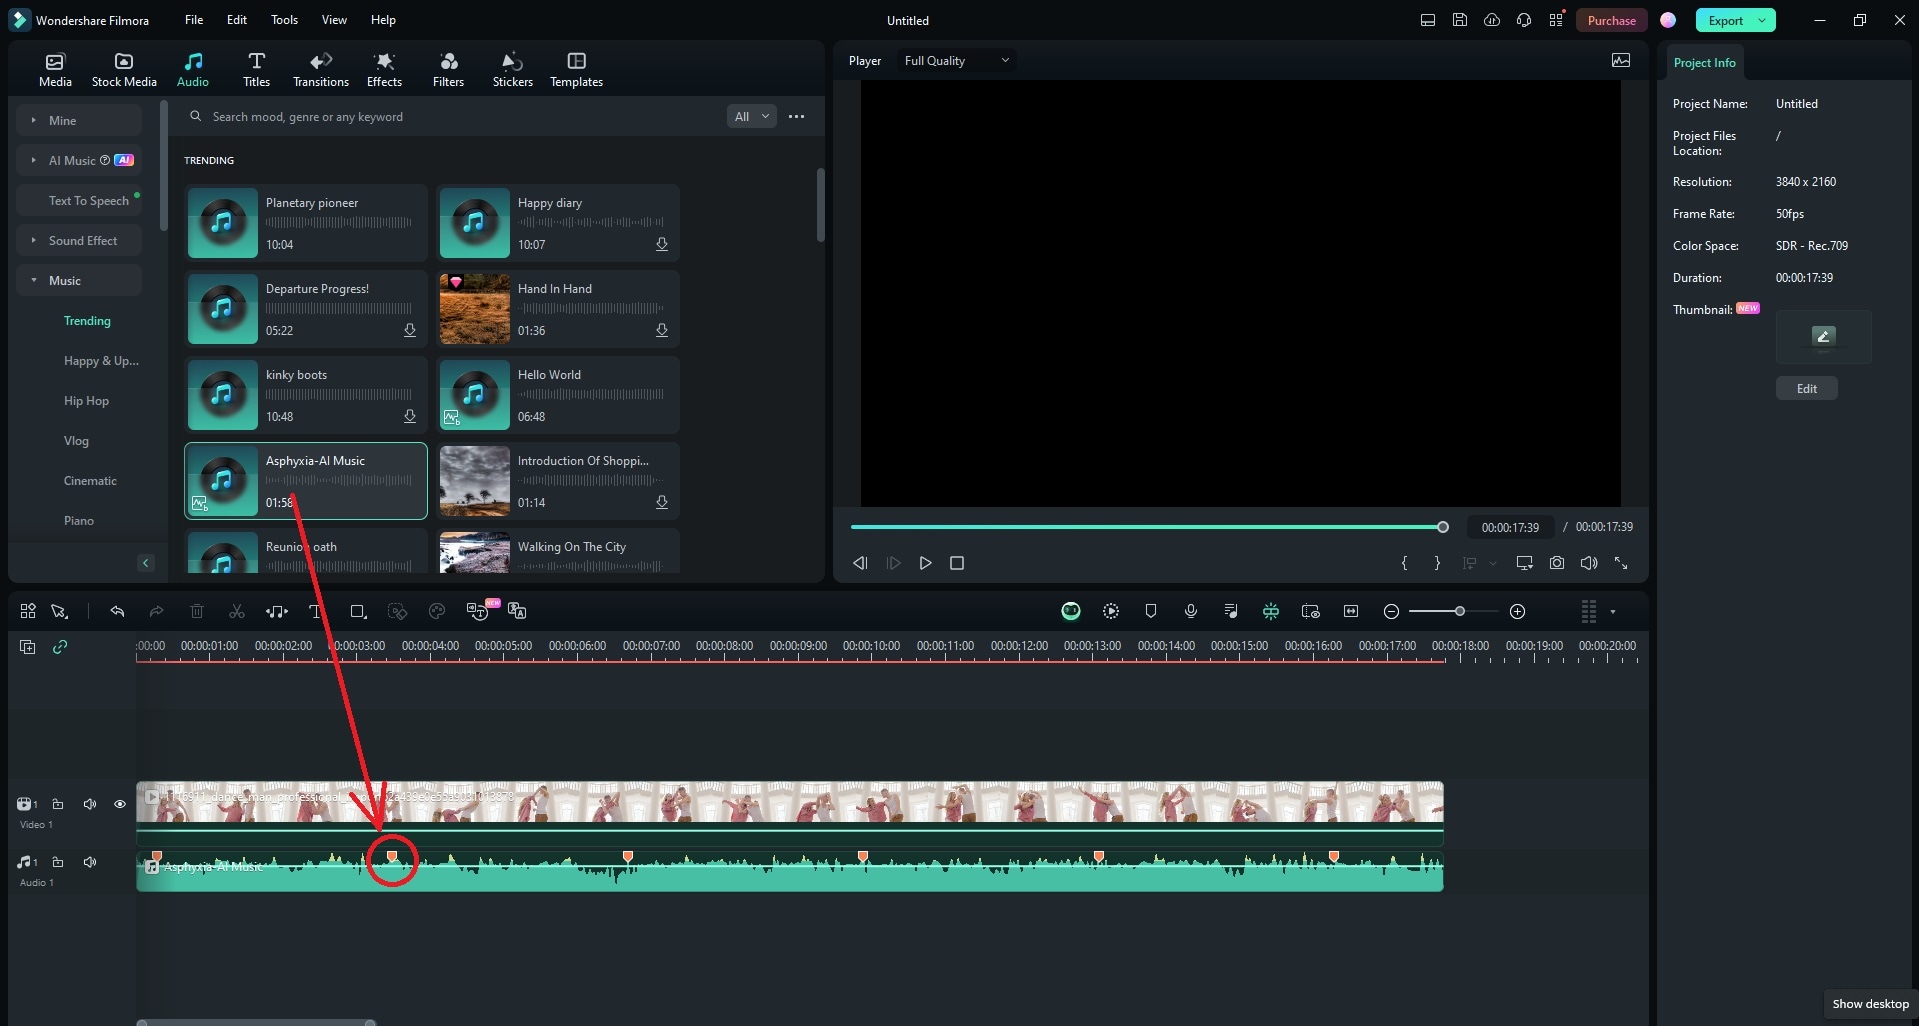
Step 3: Add the audio with detected beats to the timeline. You will see markers at the beats.
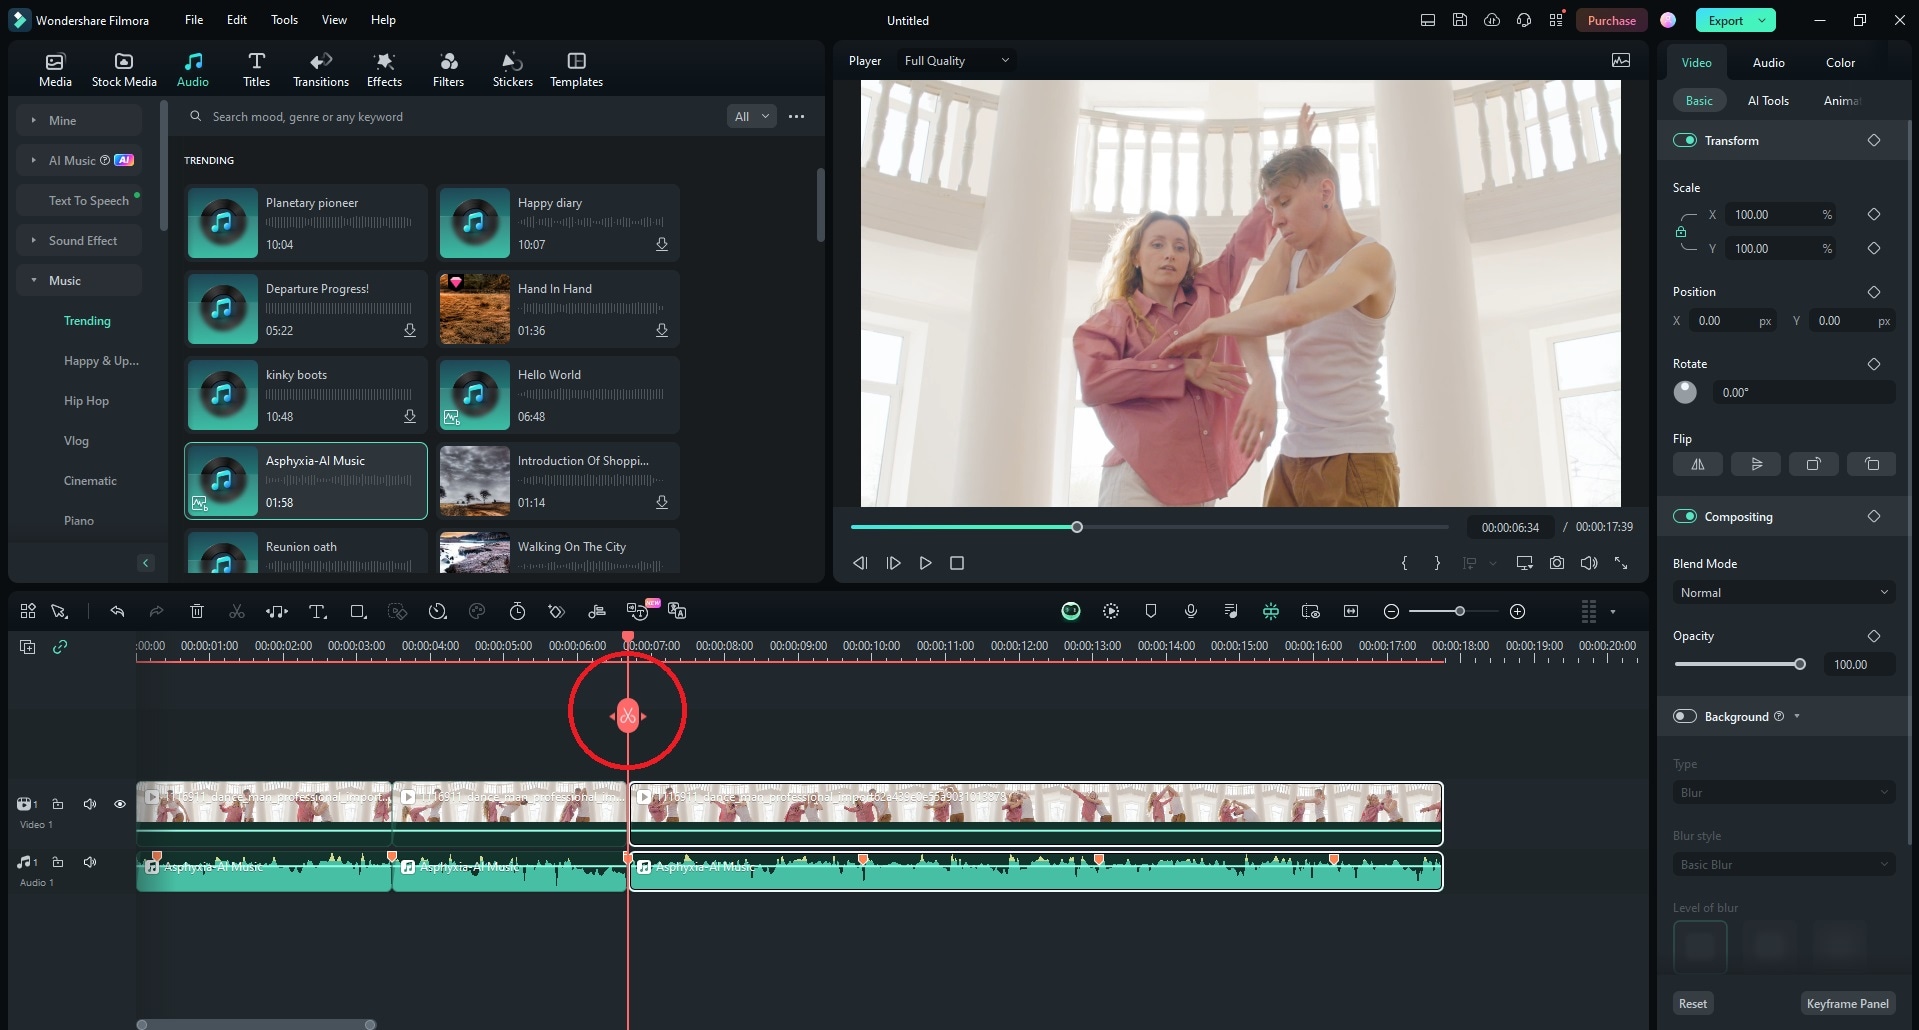
Step 4: Sync your footage with the audio by aligning the video with markers and cutting it at marked places with the Split (scissors) tool.
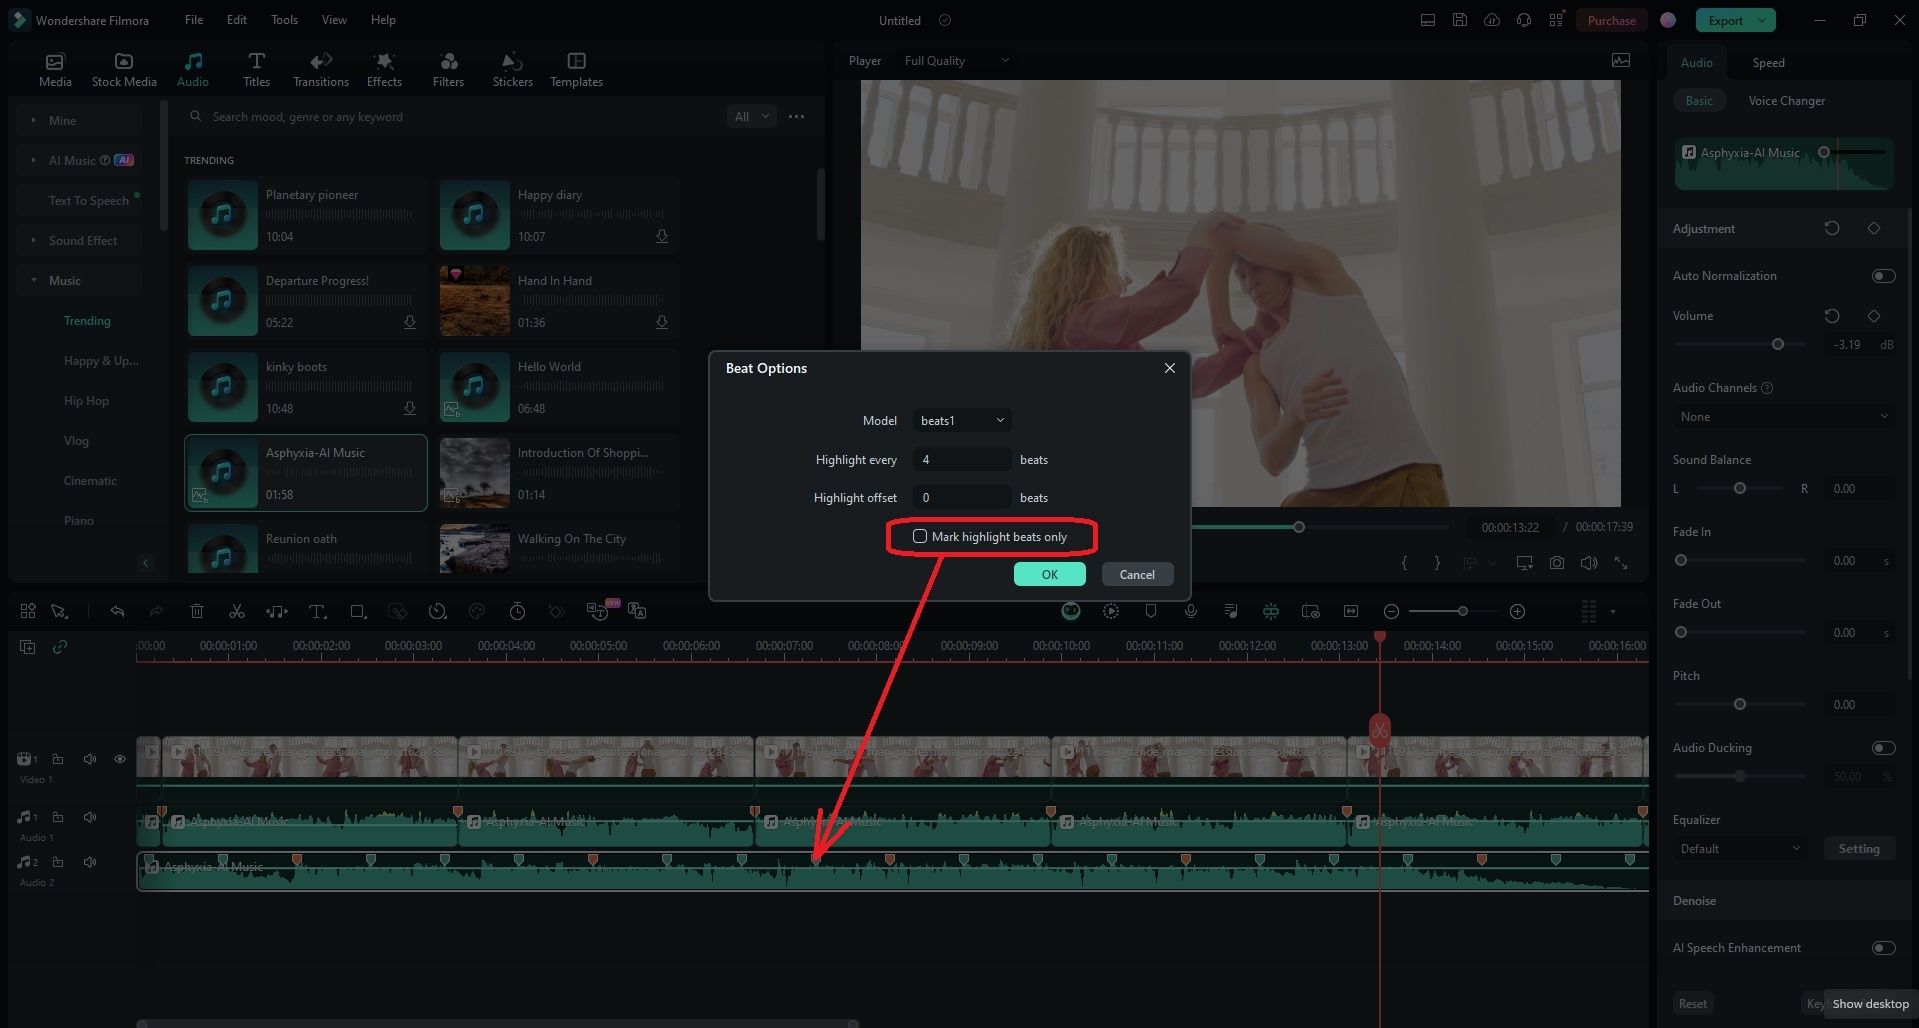
Step 5: Select Beat Options on the audio file to change the markers and adjust the values. For instance, highlighting every four beats means Filmora won't catch every beat. You can skip several beats at the beginning (if it is a silent part) and change the offset value. If you want blue markers for low or medium beats, uncheck the Mark highlights beats only checkbox.
Filmora vs. Premiere Pro: Audio & Beat Editing Comparison
| Feature | Filmora | Premiere Pro |
| Beat Detection Method | Automatic, intuitive, built-in. | Plugin-based, analyzes, marks. |
| Ease of Beat Sync | User-friendly, low learning curve. | Requires plugin setup, can be complicated. |
| Advanced Audio Features | AI Voice Enhancer, Denoise, Ducking. | Auto-cutting, customizable markers. |
| Integrated Audio Library | Massive royalty-free music/SFX. | / |
Conclusion
Beat detection is straightforward, requiring only a few clicks and eliminating the need to mark beats manually. The BeatEdit PremierPro plugin is the perfect solution for professionals willing to pay for another plugin for their Adobe software. Automatic beat detection is Premiere Pro's time-saving feature, ideal for those familiar with its environment.
However, if you have limited video and audio editing knowledge, Filmora can save you from time-consuming manual beat catching with user-friendly audio options for beat detection. Try it today and explore the seemingly unlimited options this member of the Wondershare family has.


 100% Security Verified | No Subscription Required | No Malware


