You may think of iMovie as a video editor that can only do basic editing tasks, such as changing the video playback speed or adding text to a video. However, you can actually use it to do some color correction and basic color grading.
Doing color grading or color correction in iMovie can help you adjust your video's vibrancy or balance the colors to create a consistent look across your video. If you are not familiar with this function, we will introduce you to iMovie's color correction tools on Mac and discuss an alternative option for those looking for even more control and flexibility in color grading.

In this article
Part 1. Color Grading in iMovie
iMovie is a built-in video editing software available on all Apple devices, including iPhone, iPad, and Mac. While it offers basic video editing features across all platforms, the color correction tool is exclusive to iMovie for Mac. So, if you are using an iPhone or iPad, you need to find alternative methods for color correction.
Color Grading Tools in iMovie for Mac
If you want to do color grading in iMovie, it's managed through the Color Balance and Color Correction tools, which provide a range of options to adjust the color and overall look of your video. For Color Balance, the available tools are:
- Auto: It works by analyzing the video and then applying color corrections automatically to your video. This tool is useful for quickly enhancing video quality without needing manual adjustments.
- Match Color: This tool allows you to match the color of one clip to another. You can select a reference clip, and iMovie will adjust the color balance of the target clip to match the reference.
- White Balance: You can manually adjust the white balance to correct color temperature issues. This tool helps in correcting videos that have unnatural color casts caused by lighting conditions.
- Skin Tone Balance:This tool is designed to make skin tones look more natural and consistent. It adjusts the colors in your video to ensure that skin tones appear as intended.

Meanwhile, Color Correction provides even more advanced tools for fine-tuning your video, where you can adjust shadows, brightness, contrast, highlights, color saturation, and color temperature. Or, you can use Filters for easy color-grading presets in iMovie.
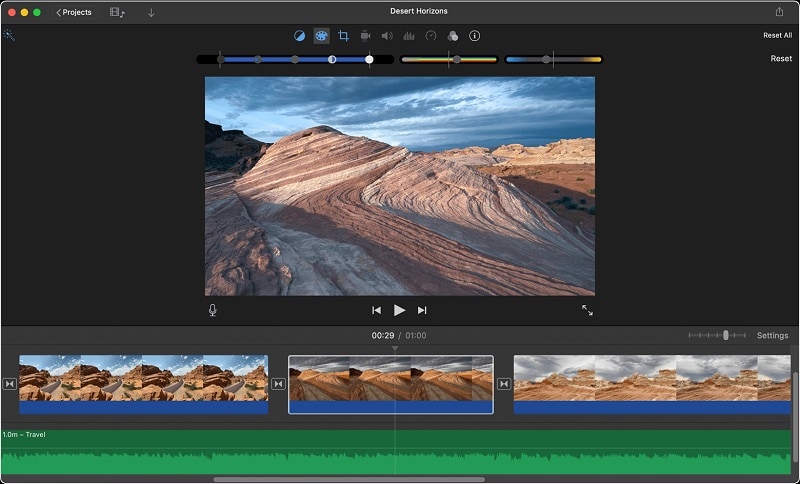
In the following sections, we will focus on two main options: auto color correction using Color Balance and Manual Adjustments with the Color Correction tool, since these tools provide essential functionality for improving your video's appearance.
Part 2. How to Use Auto Color Correction in iMovie
Auto Color Correction in iMovie is a fast and easy way to improve your video's look. While it might limit you from making further adjustments, it automatically adjusts the color balance to make your footage look better quickly.
This method is great for users who want to enhance their video with minimal effort, without the trouble of navigating detailed color settings.
How to adjust colors manually on iMovie
- Step 1: Select Your Clip
In the iMovie app, choose the clip or section you want to adjust from either the browser or the timeline.
- Step 2: Access Color Balance Controls and Apply Automatic Corrections
Click on the Color Balance button to reveal the color adjustment options. For a quick fix, click the Auto button.
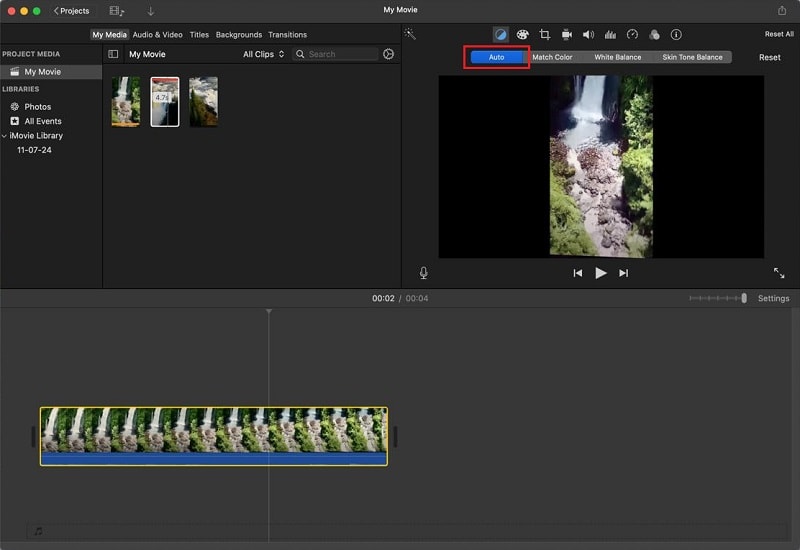
This will automatically adjust the color values, correct color casts, and enhance contrast. Both the Color Balance and Auto buttons will be highlighted to show that automatic adjustments have been applied.
- Step 3: Undo Changes (if needed)
If you want to revert to the original settings, click the Reset button located next to the color balance controls.
Part 3. How to Manually Adjust Color in iMovie
Does the Auto color correction on iMovie not give you the results you want? You can manually adjust the color in iMovie to achieve a more customized look. Manual adjustments let you fine-tune various aspects of your video's color and brightness to correct specific issues.
You can adjust your video's color balance, including brightness, contrast, color temperature, and more to better match your vision. They are all present in sliders so you can have precise control over each setting. Here's how
How to adjust colors manually on iMovie
- Step 1: Select Your Clip and Open Color Correction Controls
Select a clip or a segment of your video again. Then, click on the manual Color Correction button (the color palette icon) to reveal the adjustment options.
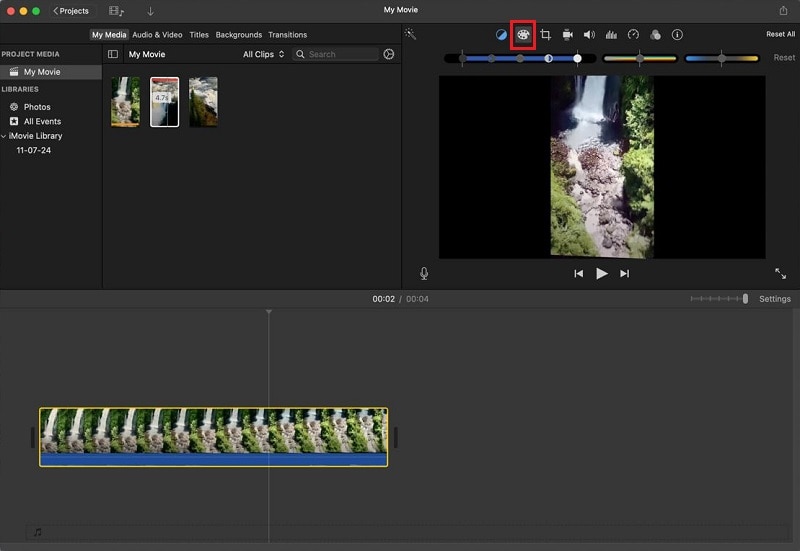
- Step 2: Adjust Color Settings
Here, you can adjust each slider depending on the effect you want to achieve, whether it's adding shadows, correcting brightness, adjusting color saturation, and more:
- Shadows: Move the black slider within the multislider control to adjust shadow details.
- Brightness: Use the gray slider in the multislider control to modify the overall brightness.
- Contrast: Adjust the contrast by moving either of the half-moon sliders in the multislider control.
- Highlights: Change the highlights by dragging the white slider in the multislider control.
- Color Saturation: Increase or decrease the color saturation with the Saturation slider.
- Color Temperature: Modify the color temperature using the Color Temperature slider.
iMovie's color grading features may not be as advanced as those found in professional video editing software, but they are enough to improve your video's colors with minimal effort. If it doesn't meet your needs, you can check a recommended iMovie alternative in the next section.
Part 4. Best iMovie Alternative for Consistent Color Correction
You might choose iMovie for its simplicity, but it may not offer the level of color correction you need. If you want a video editing tool that is as user-friendly as iMovie but with more advanced color grading features, your best solution is Wondershare Filmora.
Color correction should make your video look more alive and match the atmosphere you want to go for. To help you out, Filmora offers an AI Color Palette (Color Match) feature where you can use artificial intelligence to analyze your video or reference images and recommend color schemes that improve your footage's visual appeal.

You may often use a color palette app on Mac like Colori or Pikka to assist with selecting color schemes. With Filmora's AI Color Palette, you can get smart recommendations and adjustments based on your video's content or a reference pic you upload.
This feature is an addition to a range of advanced color correction tools available on Filmora, such as HSL settings, Curves, and Color Wheels that give you extensive control over the color grading process.
Comparing iMovie and Filmora Color Correction Tools
| Filmora | iMovie | |
| Control Over Color Correction | Extensive control with sliders, Color Wheels, HSL settings, Curves, and more | Basic control with Color Balance and Color Correction tools |
| Special Features | Color Presets, AI Color Palette (Color Match), Auto White Balance, Skin Protect, Vignette, and more | Auto Color Correction, Match Color, White Balance, Skin Tone Balance |
| Color Grading Flexibility | High flexibility with multiple grading tools for custom looks | Limited to basic adjustments and presets |
| System Compatibility | Windows and macOS | macOS |
The main difference between iMovie and Filmora in terms of their color correction function is that Filmora offers more controls. You can choose if you want to correct colors using basic color adjustment, HSL (Hue, Saturation, and Luminance) settings, Curve, or Color Wheels. Moreover, Filmora also supports both Windows and Mac. So, it can also be a good option for Windows users.
How to Do Color Correction on Filmora
Step 1: Import Video to the Timeline
After launching Filmora on your Mac, start by importing your video into Filmora and placing it on the timeline. This is where you'll perform all your editing tasks, including color correction.

Step 2: Apply Color Correction
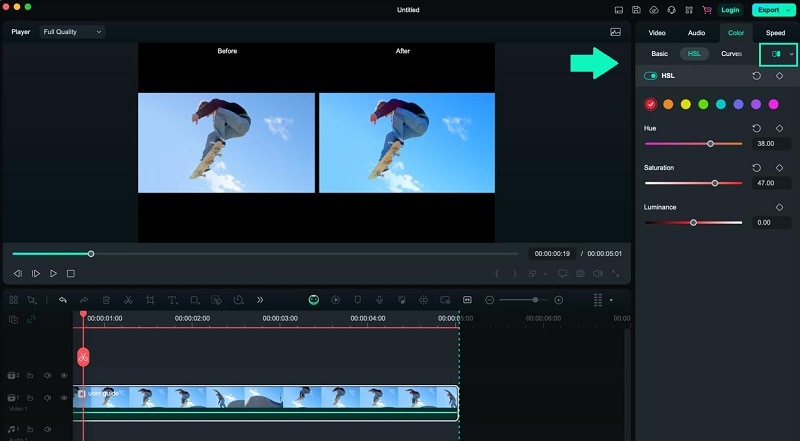
Select the clip on the timeline and navigate to Color on the right panel. You can experiment either with the color wheel, HSL settings, Curves, or basic adjustments to fine-tune the hue, saturation, contrast, etc.
- Basic Color Adjustment: Controls for making general color adjustments. You can adjust brightness, contrast, saturation, and exposure with simple sliders.
- HSL (Hue, Saturation, and Luminance) Settings: HSL settings allow you to control the hue, saturation, and luminance of individual colors within your video.
- Curve: The curve tool allows you to adjust the brightness and contrast of your video using a graph where you can manipulate different points to fine-tune color levels.
- Color Wheels: Color wheels offer three separate wheels for adjusting highlights, midtones, and shadows. Each wheel allows you to tweak the color balance and intensity in different tonal ranges.
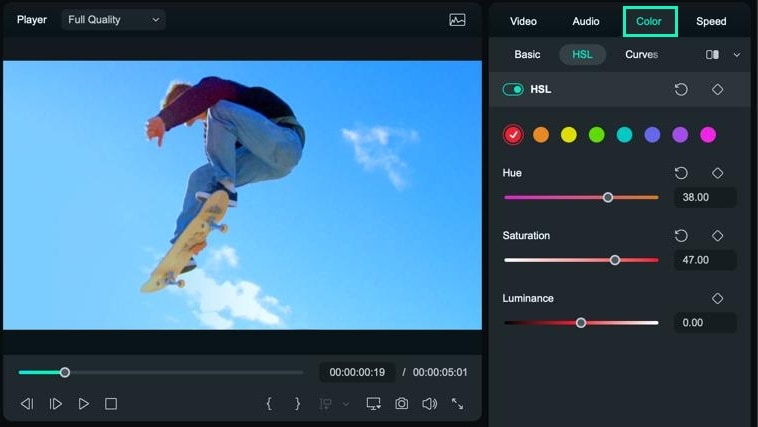
After applying color corrections, preview your video to compare the changes. Click on Side-by-Side view to ensure that your adjustments have improved the visual quality of your footage.
Step 3: Using AI Color Palette
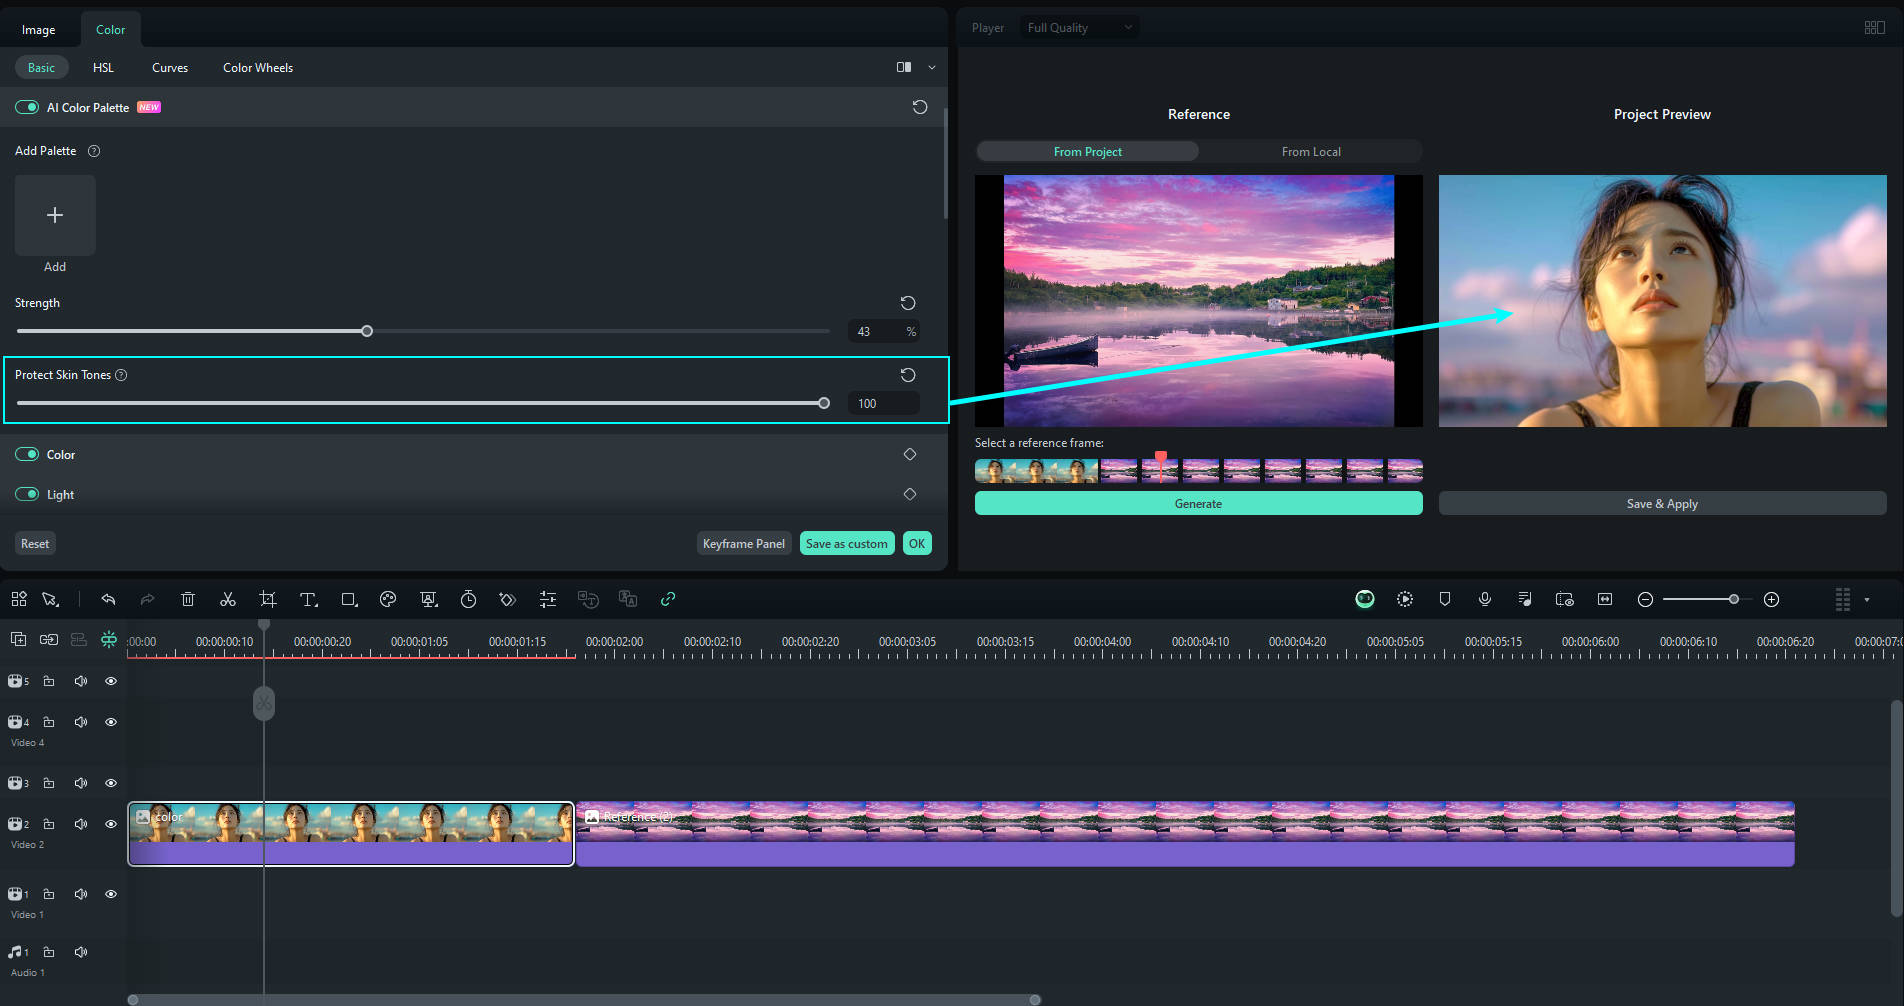
If you want to use the AI Color Palette, make sure you have Filmora 14 or later. Enable the AI Color Palette tool and click “Add.”

Choose whether you want to take a reference from the project or upload a new image/video from the available color palette for macOS.

In the property panel, modify the strength by dragging the slider, which ranges from 0 to 100. Once you've set the desired strength, click OK and review the adjusted result.
Conclusion
When you need to make a quick color adjustment to your video, iMovie's color correction tools can be quite useful. The Auto Color Correction feature can instantly enhance your video by adjusting the colors automatically. If you prefer more control, you can use the manual settings to fine-tune brightness, contrast, and other color elements yourself.
However, if you require more advanced color adjustment options for your video, you might consider using a more specialized video editing software like Wondershare Filmora. Filmora offers a range of sophisticated tools for precise color grading and correction, giving you greater flexibility and control to achieve the exact look you want for your video.


 100% Security Verified | No Subscription Required | No Malware

