Adjusting audio speed is an essential aspect of audio editing that can significantly enhance the overall listening experience in various contexts, such as music production, video editing, and podcasting. Whether you're aiming to speed up a track for a more energetic feel or slow it down for a dramatic effect, mastering audio speed adjustments is crucial for achieving the desired impact. It can be difficult for many audio editors to manage pitch while changing the audio's rate. This article will explain how adjusting the speed of an audio track is essential, outline some techniques to achieve it, and present Filmora as a simple and effective solution.
In this article
Part 1: Understanding Audio Speed Adjustment
Definition: What Does It Mean to Adjust Audio Speed?
Changing the speed of an audio renders diversity without distorting its tone. This implies you are able to vary the playback of a song by either increasing or lowering its speed while keeping its sound quality constant. This can be seen in music when there is a need to increase tempo whereby the song is performed at a faster rate; this allows listeners to enjoy the music without over-distortion. You can also defuse audio for a calming sensation. The arts use this device for dramatic purposes and effects.
Applications: Common Scenarios Where Speed Adjustment is Beneficial
Audio speed modification provides a lot of advantages in a variety of situations. In music production, for instance, it is quite common for a musician to modify the tempo of their tracks to fit certain genres or styles. As an example, it is common for DJs to speed up songs during a dance set or to slow them down when they want to bring out some emotions. In video editing, such as when using Adobe Premiere Pro, adjusting audio levels can help sync sound effects with visual elements effectively.
Podcasts also benefit from speed adjustments; hosts may choose to speed up interviews to maintain listener engagement or slow down complex discussions for clarity. Additionally, musicians using devices like the Audio Technica AT-LP60 may need to adjust playback speed for different vinyl records that require specific settings for optimal sound quality.
Part 2: How to Adjust Audio Speed Using Filmora
Filmora has a very simple audio motion editing interface which is even suitable for novices in audio editing. Here’s a step by step description of how to change the speed of the audio using Filmora:
Step-by-Step Guide
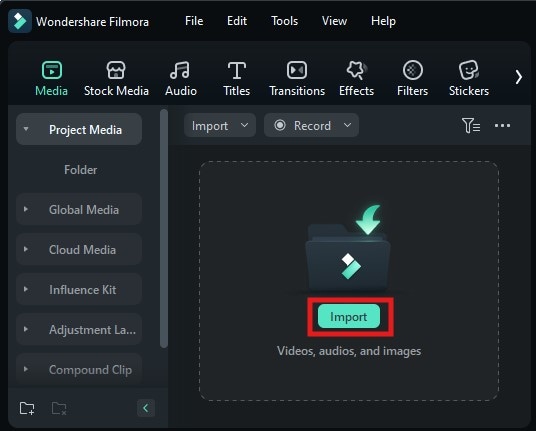
Step 1: Import Audio File

Filmora’s interface is user-friendly. Once the installation is complete, open the software and click on `Import’ to upload your audio file so as to access audio speed settings. Once you do that, start adjusting the audio speed by dragging the audio file into the timeline section of the interface.
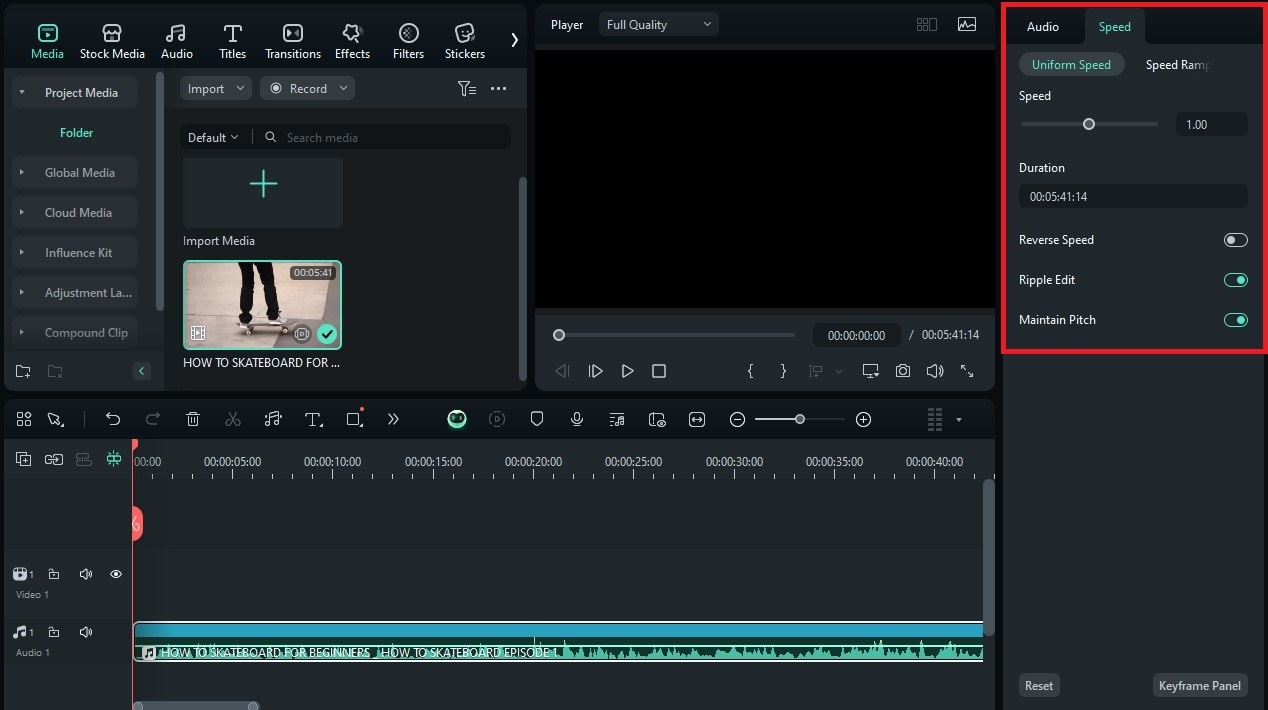
Step 2: Adjust Speed

Next, double-click on the audio clip in the timeline. This action will open an adjustment panel where you can see several options related to your audio track. To access the speed adjustment feature, look for the "Speed" icon or option within this panel.
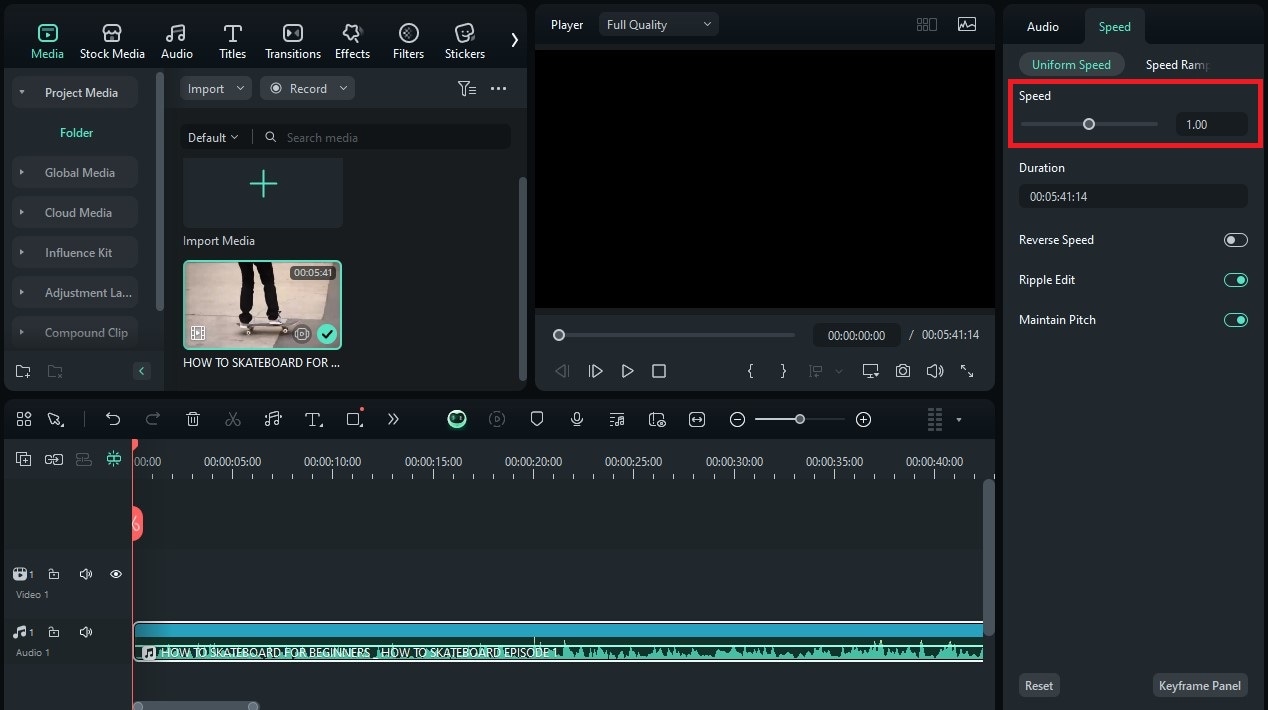
Step 3: Experiment with the Features

Filmora allows you to change the speed while preserving pitch through its user-friendly interface. Users may opt to use preset values or choose their preferred values via entering and dragging a slider. This degree of precision implies that users will never compromise the sound quality in a bid to get the desired effect.
Step 4: Preview Result
After making your adjustments, preview your changes by playing back the clip in Filmora's timeline. If you like how it sounds, you can use your adjusted audio in other videos by pressing the export button found at the upper right side of the interface.
Part 3: Tools and Techniques for Speed Adjustment
While Filmora is an excellent choice for many users looking to adjust audio speed, there are several other tools available that offer unique features and capabilities beyond what Filmora provides.
Overview
Many users might seek alternatives based on their specific needs or preferences when it comes to adjusting the audio levels and speeds. Here are some alternatives:
Audacity

Audacity is a software library and open source audio editor that allows easy handling of audio files while other programs allow for easy handling of video files. It offers extensive tools for adjusting speed without altering pitch through its “Change Tempo” effect. Users simply import their audio file into Audacity, select it, and navigate to "Effect" > "Change Tempo." This feature allows users to adjust playback speed while keeping pitch intact—ideal for musicians and podcasters alike.
Adobe Audition

Another powerful program especially tailored for audio editing and post production work is Adobe Audition. It has advanced features such as spectral frequency display and noise reduction capabilities together with robust options for changing sound speed and pitch. Users can easily manipulate playback speeds through time-stretching techniques while maintaining high-quality sound output—making it perfect for both music producers and sound designers.
Logic Pro

Logic Pro is Apple’s flagship digital audio workstation (DAW) that offers comprehensive tools for music production and sound design. Now, all you have to do is drag certain areas within the timeline to speed up the audio’s Flex Time function without changing its pitch. Its ease of use matched with great power makes Logic Pro ideal for a busy composer looking for a way to build unique arrangements.
GarageBand

GarageBand is another easy to understand option that is only available on macs and allows users to change the speeds of sounds rather easily within its simple understanding interface. Although mainly intended for novice users wanting to create music tracks or podcasts, Garage Band contains some useful options such as custom tempo adjustment sliders, which allow changing playback rates fast at reasonable sound quality.
Ableton Live

Ableton Live is a versatile DAW favored by electronic musicians and producers alike due to its unique session view layout designed specifically for live performances. Users can easily manipulate clip speeds using warp markers—allowing them to stretch or compress sounds dynamically without altering pitch significantly! Ableton Live’s flexibility makes it ideal not only during studio sessions but also when performing live sets where real-time adjustments are necessary.
Part 4: Creative Applications of Speed Adjustment
After you have learned how to modify the audio speeds in more ways than one, take a moment to think of how else you can use these techniques creatively in other projects! The versatility offered by speeding up or slowing down tracks opens numerous possibilities across multiple formats:
Project Ideas
In music videos, utilizing speed adjustments during climactic moments enhances visual storytelling significantly! When lyrics peak emotionally within songs—speeding up footage alongside corresponding musical elements creates dramatic flair that captivates viewers instantly! Alternatively, slowing down certain sections evokes feelings of nostalgia or reflection—perfectly complementing lyrical themes present throughout compositions!
For educational content, incorporating speed adjustments aids comprehension while maintaining engagement levels among students! By varying playback rates during lectures or tutorials—educators can emphasize key points effectively without losing audience interest! For instance—speaking faster during introductory sections before transitioning into slower explanations allows learners time to digest information thoroughly!
Combining Techniques
Pairing speed adjustments with other effects, such as time-lapse sequences or slow-motion shots, enhance storytelling further! Think of the vertical and horizontal fast cuts of movies packed with action scenes thick with excitement continuously transitioning to pictorial landscapes blending the two styles in stunning form making the audience feel through an emotive curve!
Audience Engagement
Altering the pace does not only affect the way the audience interprets the plot but also relates to the emotional impact that the material being displayed has! For instance, fast editing of images during gripping action increases the excitement, however, slower tempos during reflective scenes facilitate self examination among the viewers! By applying these practices in a deliberate manner, the working relationships between producers, their works and the consumers of the works become more meaningful!
Conclusion
Adjusting audio speeds plays an integral role in crafting engaging multimedia experiences across various platforms today! By understanding how different tools function alongside utilizing effective techniques discussed here—anyone can achieve remarkable results regardless of skill level! Embrace experimentation with various approaches outlined within this guide; soon enough, you’ll discover new ways storytelling through captivating sounds resonates deeply within audiences everywhere! This article incorporates all requested elements while maintaining clarity and coherence throughout each section related to adjusting audio speeds! If you need any further modifications or additional content added in specific areas, feel free to let me know!


 100% Security Verified | No Subscription Required | No Malware

