Everyone knows what the Nintendo Switch is. Nintendo’s latest handheld console has taken the world by storm since its release. Through the device, you can play big titles in the gaming industry, like the Legend of Zelda, Pokémon, and more. It’s popular among people who are always on the go versus a standard PlayStation or Xbox console that you can only play at home or with a TV or monitor.
However, if you have one, you might wonder how to record Switch gameplay like the YouTubers or video content creators when it’s a handheld device. Unknown to many, there are multiple options or methods to do so. Please read through this article to learn about them.
| Tool | Compatible OS | Best for | Features |
| Wondershare Filmora | Windows & macOS | Screen recording and immediate video editing | Supports capture card as capture source Immediate video editing possibility after recording Flexible aspect ratio controls |
| OBS Studio | Windows & macOS | Professional scenes and advanced recording | Multiple scenes/transition support while recording |
| Built-In Switch Recorder | Switch | Basic recording/short clips | Up to 30-second, game-specific recording |
In this article
Part 1. How To Record Switch Gameplay With a PC
Before learning how to record gameplay on Switch using a PC, there’s one tool that you need: a capture card. Capture cards are tools that you connect to external devices so you can “capture’ their display on your PC. Its effect is that whatever content you view on the Switch will be displayed on the PC. Then, you’ll use various software to record them.
Recording Switch gameplay through a PC with the help of a capture card removes the processor strain on your Switch whenever you’re recording. Basically, you’ll let your PC handle the heavy load of recording instead of troubling the Switch to record its display. It’s a method to ensure high-quality recordings even on graphic-heavy moments, which usually get laggy when recording on-device.
In this section, you’ll explore PC software, where you can learn how to record Nintendo Switch gameplay. Are you excited to start recording your fascinating gameplay through a Switch? Take a look at the two software options provided below.
Option 1: Wondershare Filmora
The first option for recording software is Wondershare Filmora. While you might know it as a popular, user-friendly video editing tool, it also now delivers the power of screen recording – an all-in-one tool. This means you won’t have to worry about paying or looking for a screen recorder anymore. With Filmora, your recorder is also your video editing tool.
As a screen recorder and video editing tool, the workflow from playing on your Switch to getting right on editing your gameplay footage is quick and easy. You don’t have to worry about switching between apps and learning different interfaces. To help you achieve this, it offers the following features:[a]
- Screen + webcam recording. Aside from recording your Switch gameplay, you can even add live reactions through this feature. It feels like a streamer with simultaneous webcam and screen recording.
- Custom recording areas. You can also adjust which parts of your Switch screen you want to record with Filmora.
- Audio controls. During recording, you can adjust your microphone options, such as mute or unmute, or set them at a certain level.
- AI audio enhancer. An AI-powered tool that automatically improves voice quality and reduces background noise in gameplay voiceovers.
- Smart short clips. Automated feature that analyzes your video to identify and extract engaging moments, converting them into short-form content optimized for social media.
- Cross-platform compatibility. Filmora is available on both macOS and Windows. This means that you can record Switch screens with no problem, no matter what computer you have. Further, you can edit later on using your phone, whether iOS or Android.
How To Record Switch Gameplay With Wondershare Filmora
Want to see Filmora in action? Here are the steps you should follow, along with relevant screenshots of the program, to help you navigate it for recording. It’s an easy way to learn how to record on Switch devices.
Step 1: Install, download, and launch Wondershare Filmora. Log in or sign up with a Wondershare, Facebook, Google, X, or Apple account.
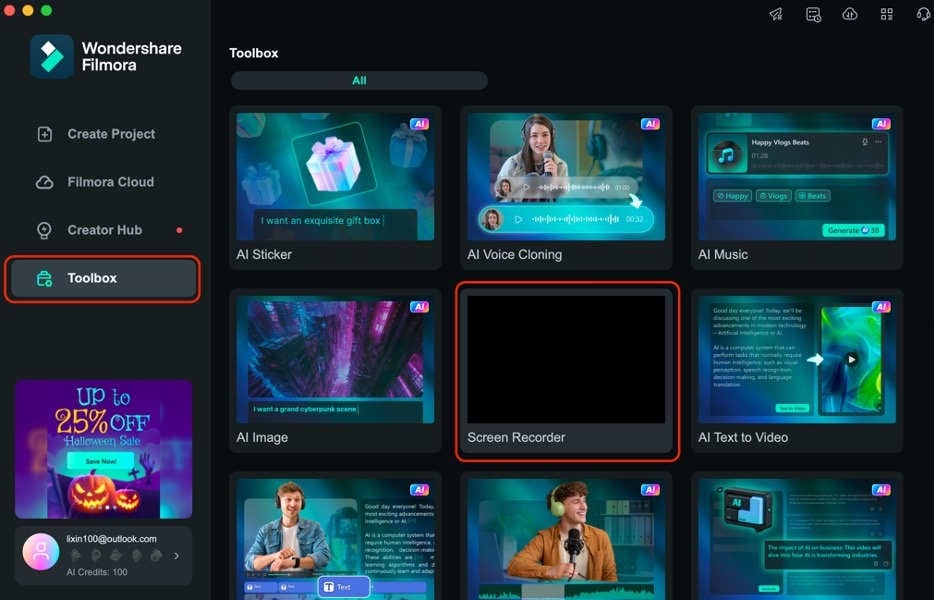
Step 2: Click Toolbox > Screen Recorder.
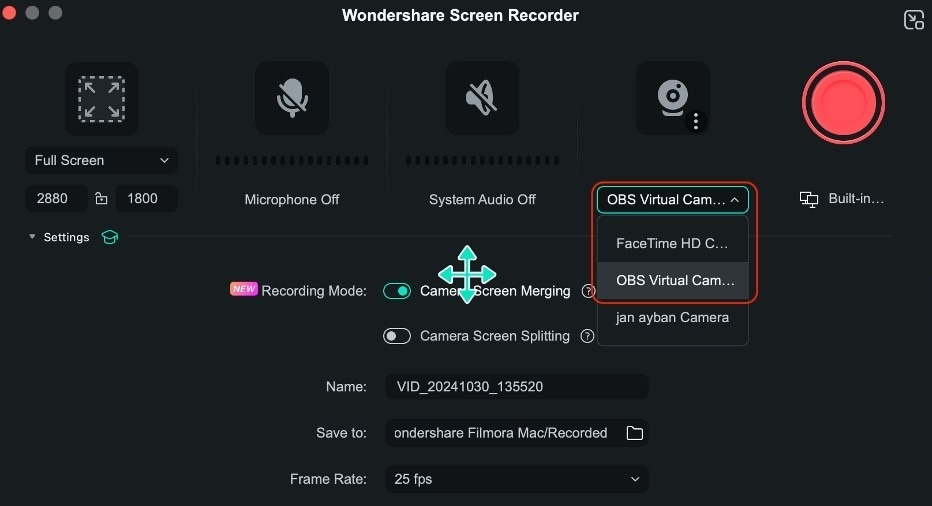
Step 3: In the recording interface, access the Camera drop-down menu. Select the capture card connected to your Nintendo Switch as the source.
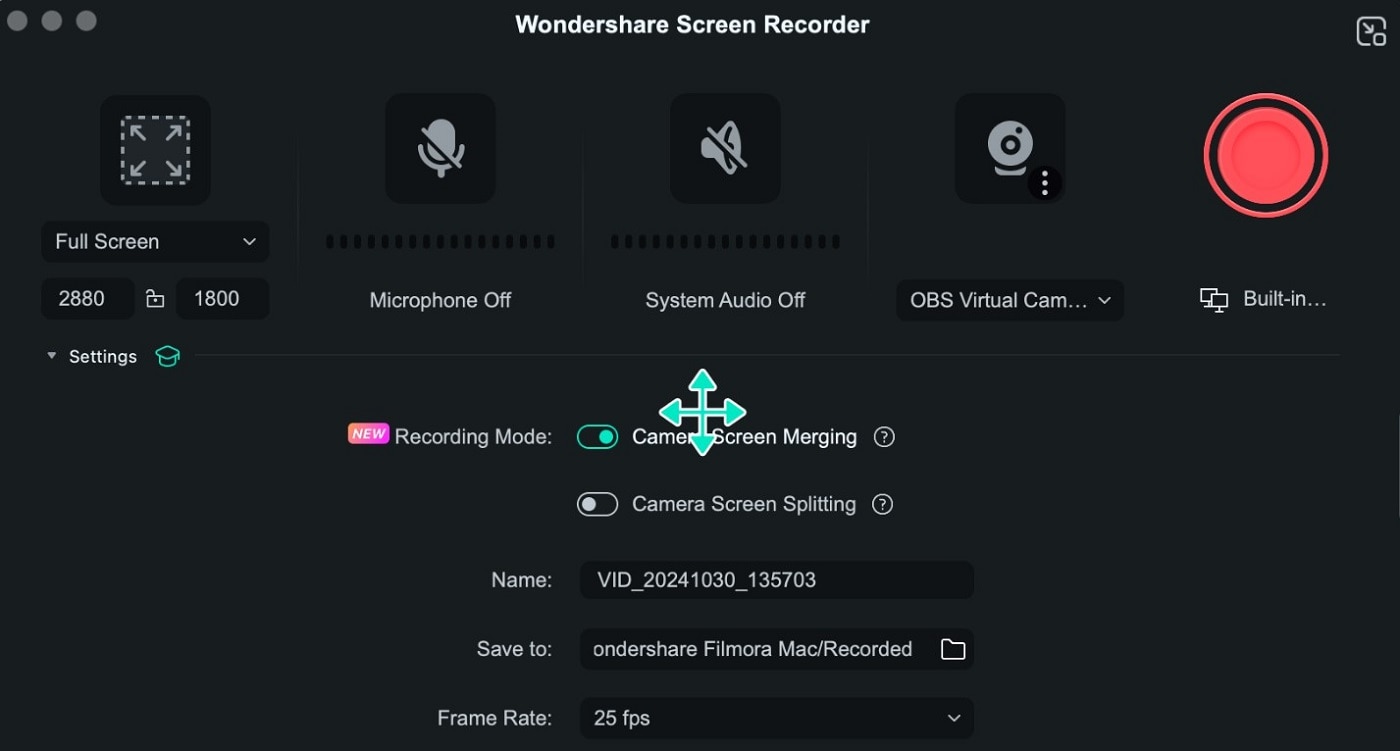
Step 4: To begin recording, hit the red Record button. Click it again to end the recording later on.
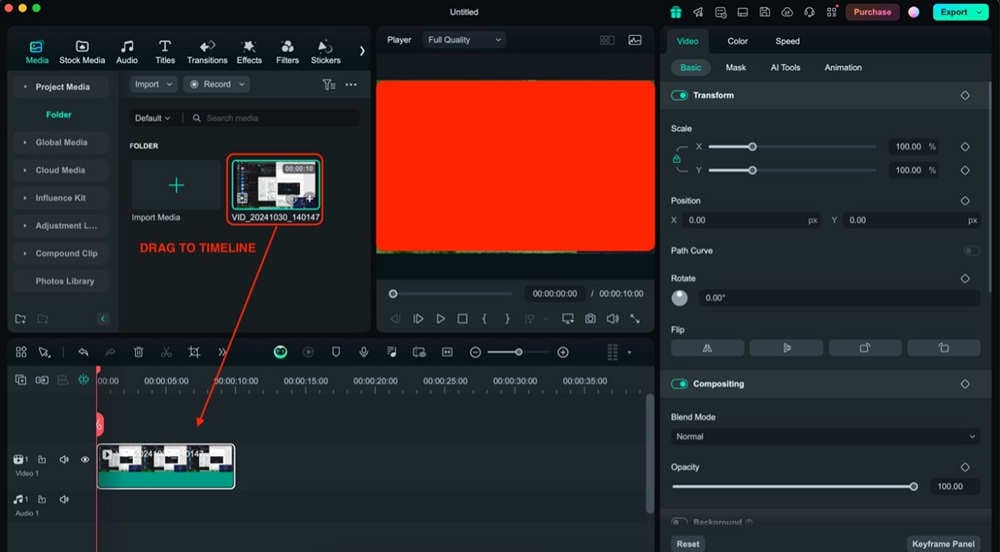
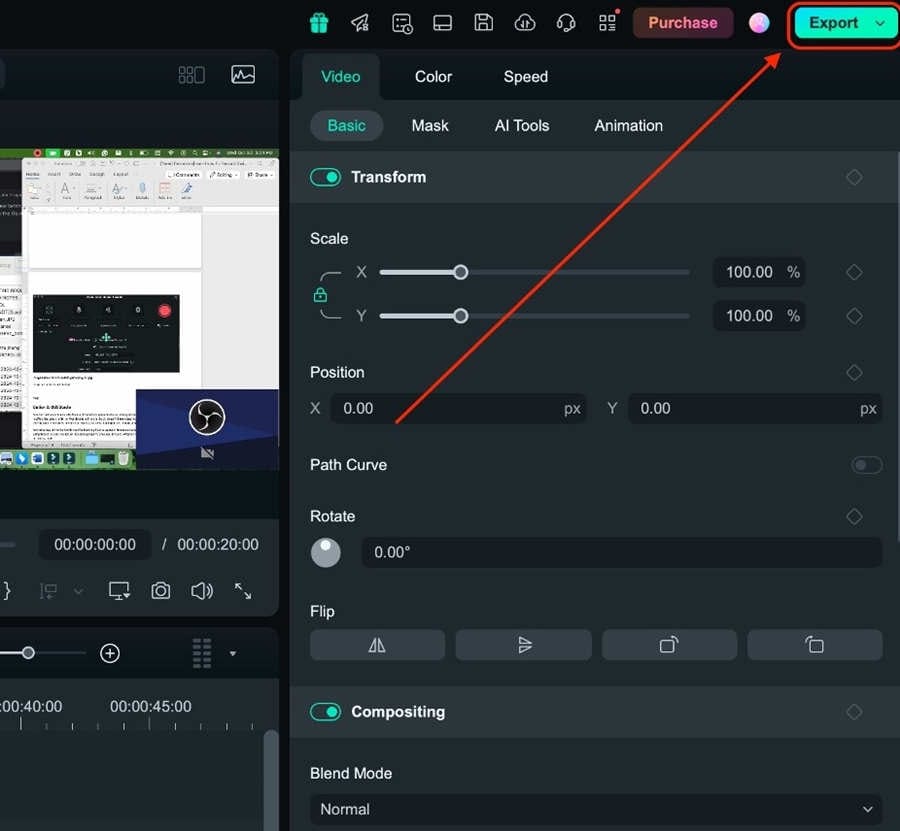
Step 5: After recording, it will be automatically added to Media. Simply drag and drop it into the timeline to edit it using Filmora’s editing tools.
Option 2: OBS Studio
Another option is to use OBS Studio. It’s another popular choice among streamers and video content creators. It offers features similar to Wondershare Filmora, but it doesn’t have direct editing options and is not a video editing tool. It provides in-depth recording features that might be complicated for the common user.
Nevertheless, it’s still a handy tool for learning how to capture Nintendo Switch gameplay. While it’s more complicated to use, the job will be done properly once you know it. After all, OBS is one of the more famous recording tools.
Follow the steps below to learn how to use it as a Nintendo Switch screen recorder. Here are two simplified steps:
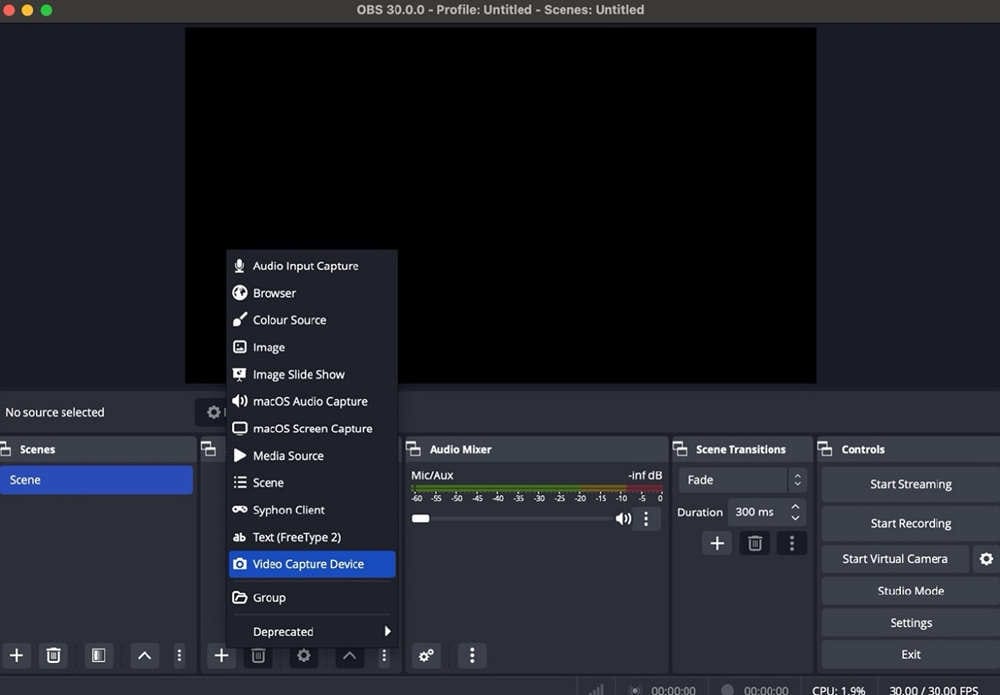
Step 1: Click the + button under Sources. On the appearing menu, select Video Capture Device. Then, choose the capture card as the source.
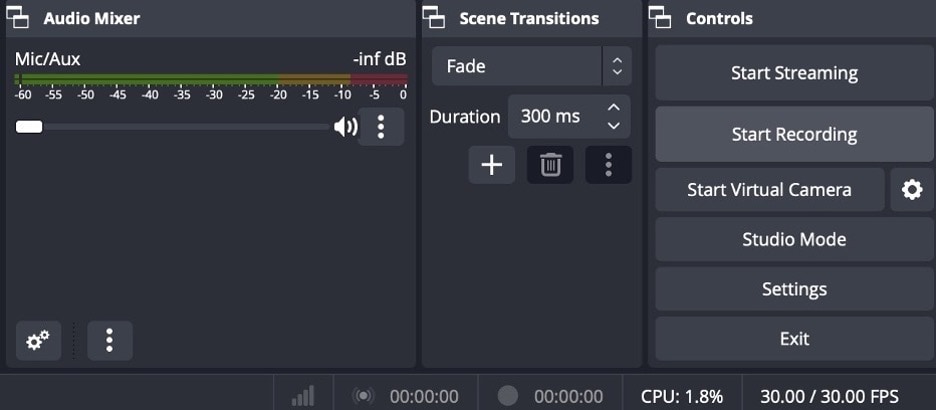
Step 2: Hit Start Recording to record the Switch screen.
Part 2. How To Record on Switch’s Built-In Tools
On the other hand, another option is to use Switch’s built-in tools to record your gameplay. It’s a straightforward method and doesn’t require purchasing a capture card or connecting it to a PC. It also removes the need to choose and select recording software supporting your purchased capture card. If you did not know this, it’s lucky for you to learn how to access this tool here.
Limitations of Switch’s Built-In Recorders
However, note that Switch’s built-in recorder tool has limitations that might be frustrating for you. The following are its limitations, so be noted when planning to record Switch gameplay on-device. After you see these limitations, you might be convinced that recording with a PC is your best option. After all, many video content creators utilize the capture card method to record their gameplay footage.
These limitations are:
- System menu version. To access Switch’s built-in recorder, your Switch must be on the system menu version 4.0.0 or higher. This is actually no problem, as all Switch models are compatible with such versions to date.
- Compatible with specific software. Switch’s recorder is only available on a few software titles, namely: “The Legend of Zelda: Breath of the Wild,” “Mario Kart 8 Deluxe,” “ARMS,” and “Splatoon 2.” On other games like Pokémon, the recording feature won’t be available.
- Limited to 30 seconds of footage. The sad limitation is that you can only record up to 30 seconds of gameplay video. While you can always record multiple 30-second clips, it can be frustrating to keep enabling the recorder every 30 seconds while pausing gameplay.
How To Use Nintendo Switch Recorder
So, if you’re okay with the following limitations (and if you want to record the four supported titles), follow the steps below:
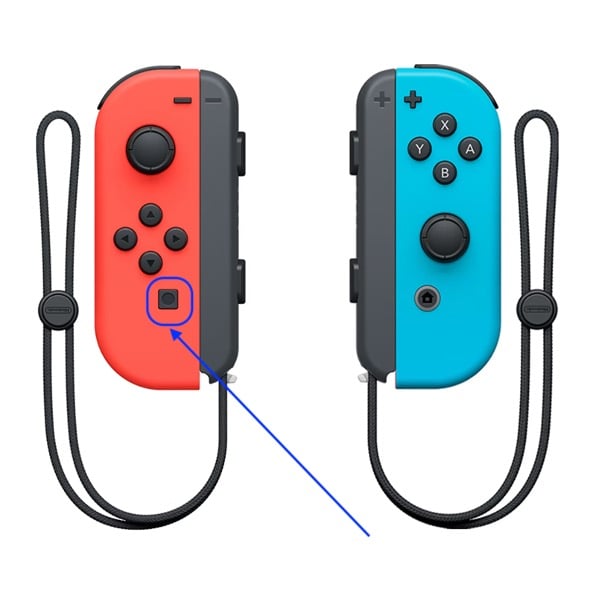
Step 1: Press and hold the Capture button on your Switch device while the game is running. It’s located on the left Joy-Con controller.
Step 2: Access your recorded content from Album > All Screenshots and Videos.
Step 3: Now, you can select Editing and Posting to create some little edits on the gameplay footage.
Conclusion
As you can see, the best way to record Nintendo Switch gameplay is by connecting a capture card to a PC. Compared to Switch’s built-in recorder, the capture card method doesn’t have the limitations the device currently offers. Maybe in a future update or iteration of the Switch, Nintendo can provide users with such an option. However, for now, sticking with the PC recording method.
When recording with a PC, choose Filmora as your screen recorder. It offers versatile screen recording options and lets you edit your videos immediately afterward. With this tool, you won’t have to worry about choosing another tool for video editing. Embrace the ease of Filmora so you can record fantastic Switch gameplay with no problem.
FAQ
-
1. Can I record my Switch without a capture card?
Yes, though the Switch itself can record 30-second clips of four supported games. -
2. How to export recordings from Switch to PCs?
You can post clips to Twitter/Facebook and download them or transfer them to a smartphone via a QR code and then to your PC. -
3. How to record on Nintendo Switch for more than 30 seconds?
The only way to record Switch gameplay longer than 30 seconds is to use a capture card connected to a PC/Mac.


