For Mac users, you may immediately think of using iMovie when you need to resize a video. It comes pre-installed on your laptop, has a pretty simple interface, and provides basic editing tools that are ideal for quick adjustments. So, how do we resize a video in iMovie?
To put it briefly, resizing videos in iMovie on Mac is possible using the crop tool. You can continue reading for more details on the steps. But since this method might come with some considerations, we will also provide you with other alternatives on how to resize videos on Mac, so you can pick the option that best fits your needs.

In this article
Part 1. How to Resize Video Using iMovie on Mac
One common reason people search for how to resize a video on iMovie is that they need to adjust the video to fit different screen sizes or social media platforms. If you are using macOS, iMovie provides a straightforward solution to video editing like resizing video. Using the Crop tool, you can adjust video dimensions to fit the platform you are intended to.
Follow the steps below on how to change the size of a video in iMovie:
Step 1: Open iMovie and Start a New Project
First, open iMovie and click Create New. Choose Movie to start editing your video.
Step 2: Import Video
In the iMovie editing interface, click the Import button and select the video you want to resize. You can also drag and drop the video file from your folder to the interface.
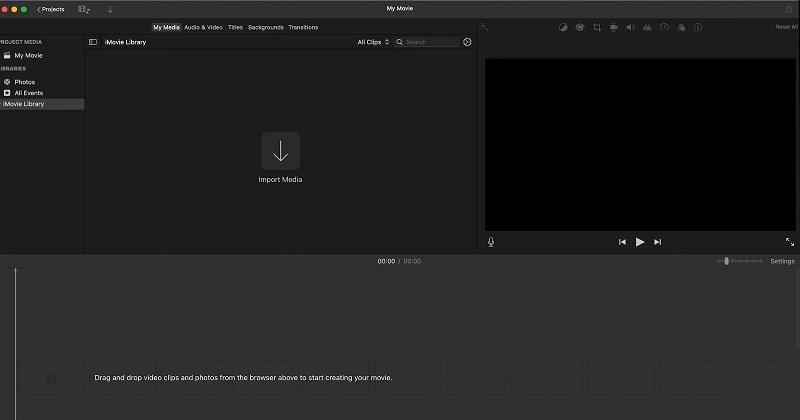
Step 3: Crop to Resize the Video
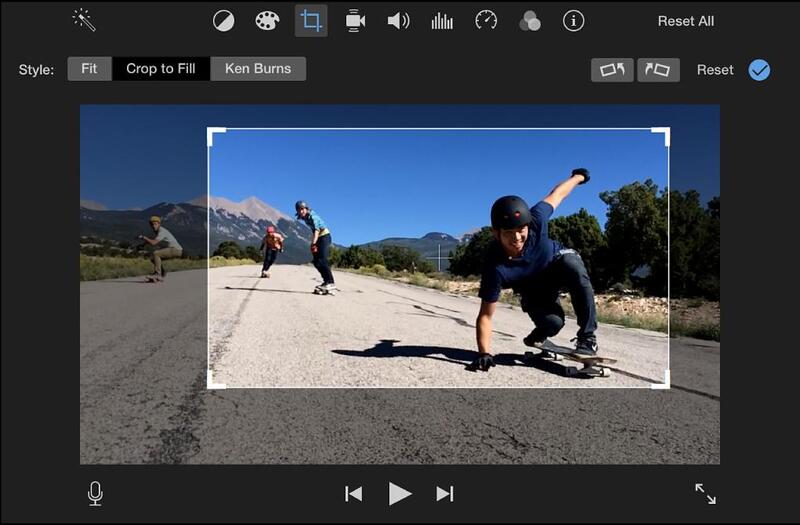
To resize a video on iMovie, click the Crop icon in the upper-right bar.

You'll see three crop options: Fit, Crop to Fill, and Ken Burns. Here's what each option does:
- Fit: This option resizes the video to fit within the frame without cropping, which can result in black bars if the aspect ratio doesn't match.
- Crop to Fill: This option lets you crop the video to fill the entire frame so you can focus on specific parts of the clip by adjusting the visible area.
- Ken Burns: The Ken Burns effect adds a dynamic zoom to your video or photo, making it appear as if the camera is panning or zooming in or out on the clip.
So, if you want to simply change the video size, choose Crop to Fill. Drag the rectangle that pops out in your video afterward and crop it as needed. When you're done and ready, click Apply (checkmark button).
When resizing videos in iMovie, you might run into some limitations. iMovie mainly resizes videos by cropping, which can cause problems if your video has a lot of movement or several subjects in the frame. This cropping can cut out important parts of the scene, leading to a final video that doesn't show everything you intended.
As a result, getting a balanced, professional look can be tough. For more control over how your video is framed, you might want to try Wondershare Filmora. This video editor offers several ways to resize your videos more efficiently.
Part 2. How to Resize the Video with iMovie Alternative
If you need more control over aspect ratios, Filmora is a fantastic alternative to resize video without iMovie. Optimizing for a YouTube widescreen format? An Instagram square? Or, a vertical frame for TikTok? It's easy to get done.
One of Filmora's best features for resizing video is Auto Reframe, which automatically detects the main subjects in your video and adjusts the frame as they move. This feature is especially helpful for action-packed videos, as it keeps the focus on the important parts without cutting them out.

Besides Auto Reframe, you can also resize your video using the Crop tool or change the aspect ratio. Cropping lets you manually adjust the frame, so you can highlight specific areas in your video. It's useful when you want to control exactly what appears in each part of the video.
Meanwhile, changing the project aspect ratio is ideal if you want to adapt your video for different platforms or formats without cropping it. However, this adjustment may result in black bars appearing on the sides or top and bottom of the video. The available aspect ratio formats include 16:9, 9:16, 3:4, 1:1, and more. You can also set custom dimensions if needed.
- Auto reframe video in 16:9, 1:1, 9:16, 4:3 or 21:9.
- Offers cool video effects and filters to make your video become professional.
- Cross-platform supported - (Windows, Mac, iOS, Android)
- Resize Your Videos Without Quality Lose

Here's how to change video size without iMovie using Filmora:
Method 1: Resize video using Auto Reframe
Step1Open Filmora and Select Auto Reframe
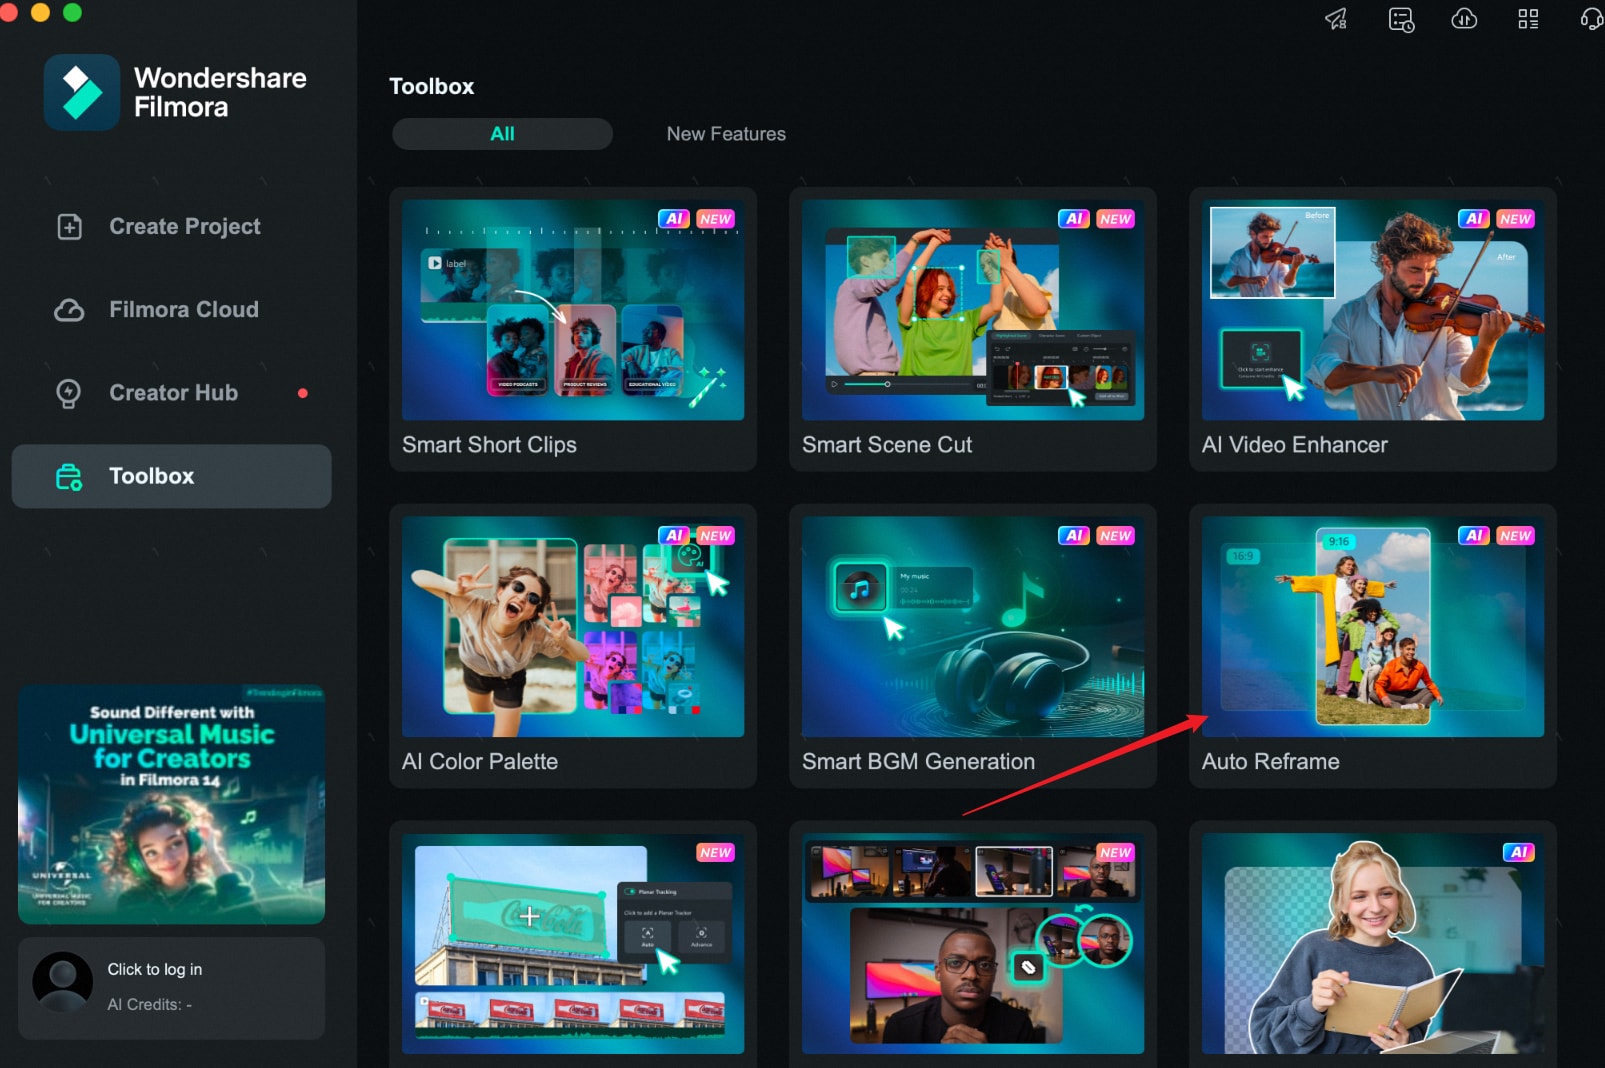
After opening Filmora, you can effortlessly spot Auto Reframe in the startup window. Find it in the AI Toolbox and click Auto Reframe.
Or, if you're already with your edited video, right-click the video and select Auto Reframe.
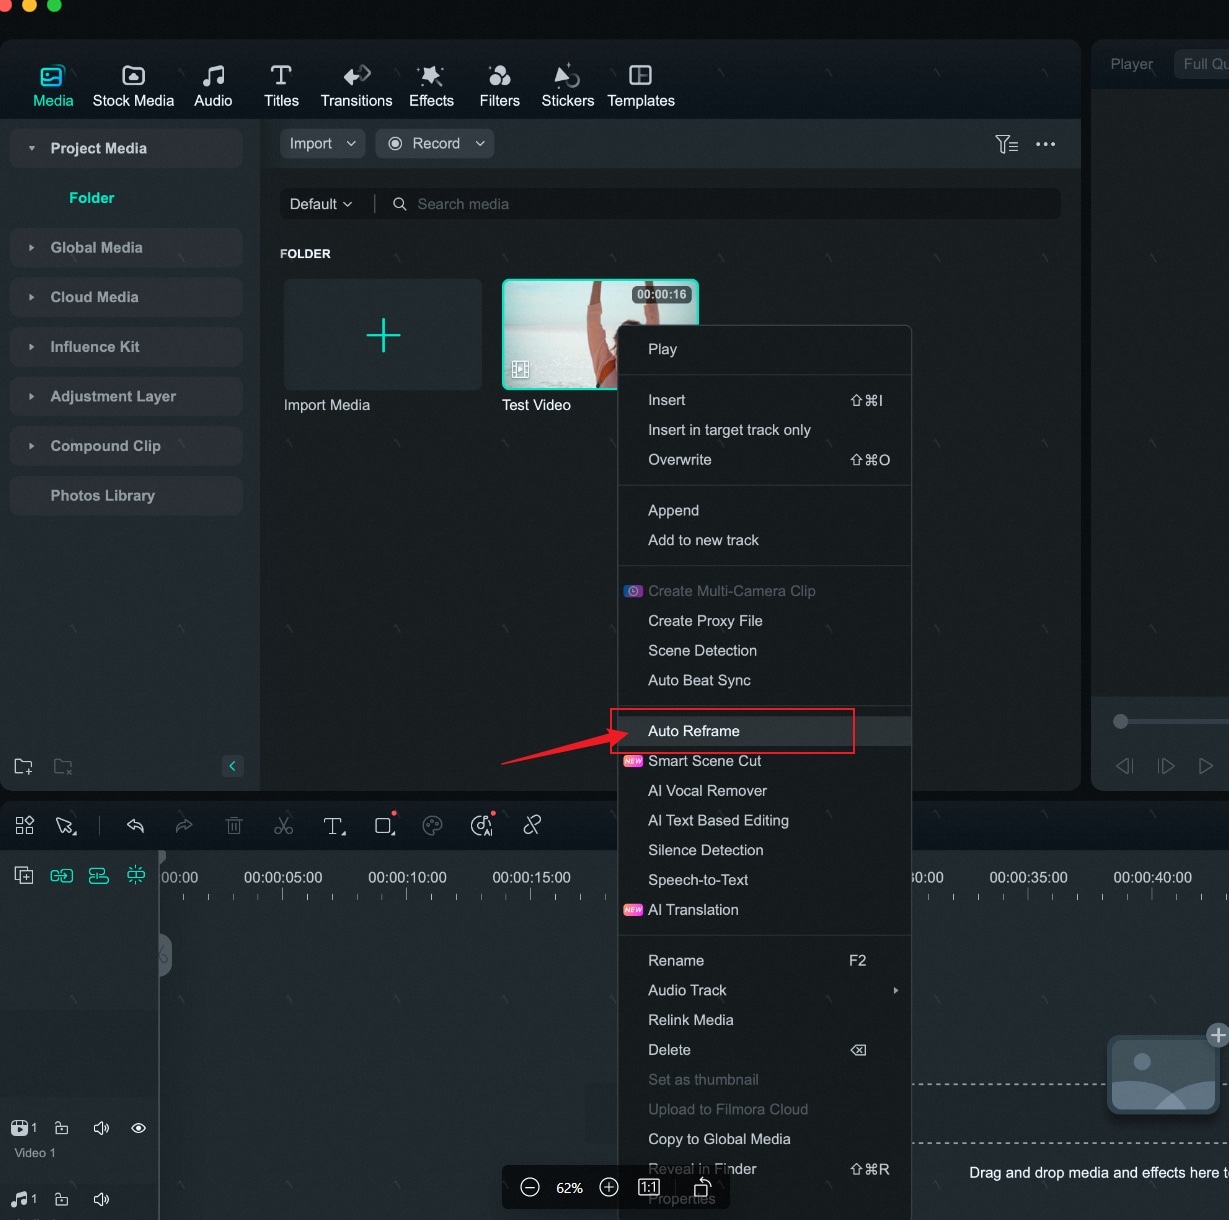
Step2Choose Your Aspect Ratio
In the Auto Reframe window, Filmora offers various ratios to be applied to your video:
- Widescreen (16:9)
- Instagram (1:1)
- Portrait (9:16)
- Standard (4:3)
- Cinema (21:9)

Step4 Change the Tracking Subject or Speed
To change the tracking subject or adjust the tracking speed, navigate to the Advanced tab under Adjust Frame.

In this section, you can select a secondary subject to track or customize the tracking speed according to your preferences.

Step5 Preview and Save
Before saving the video, you can do the preview to make sure everything's all set. Then, click the Export button to save your project. If you want to make further edits to the reframed video, choose the Upload to Filmora button.

Method 2: Resize the video using the crop tool
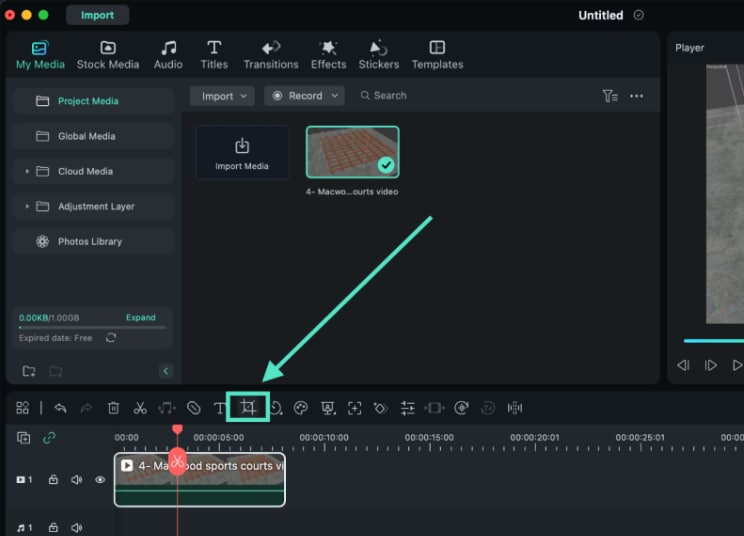
Step1 Access Crop Tool
Assuming you've imported the video, you can continue clicking the Crop icon.
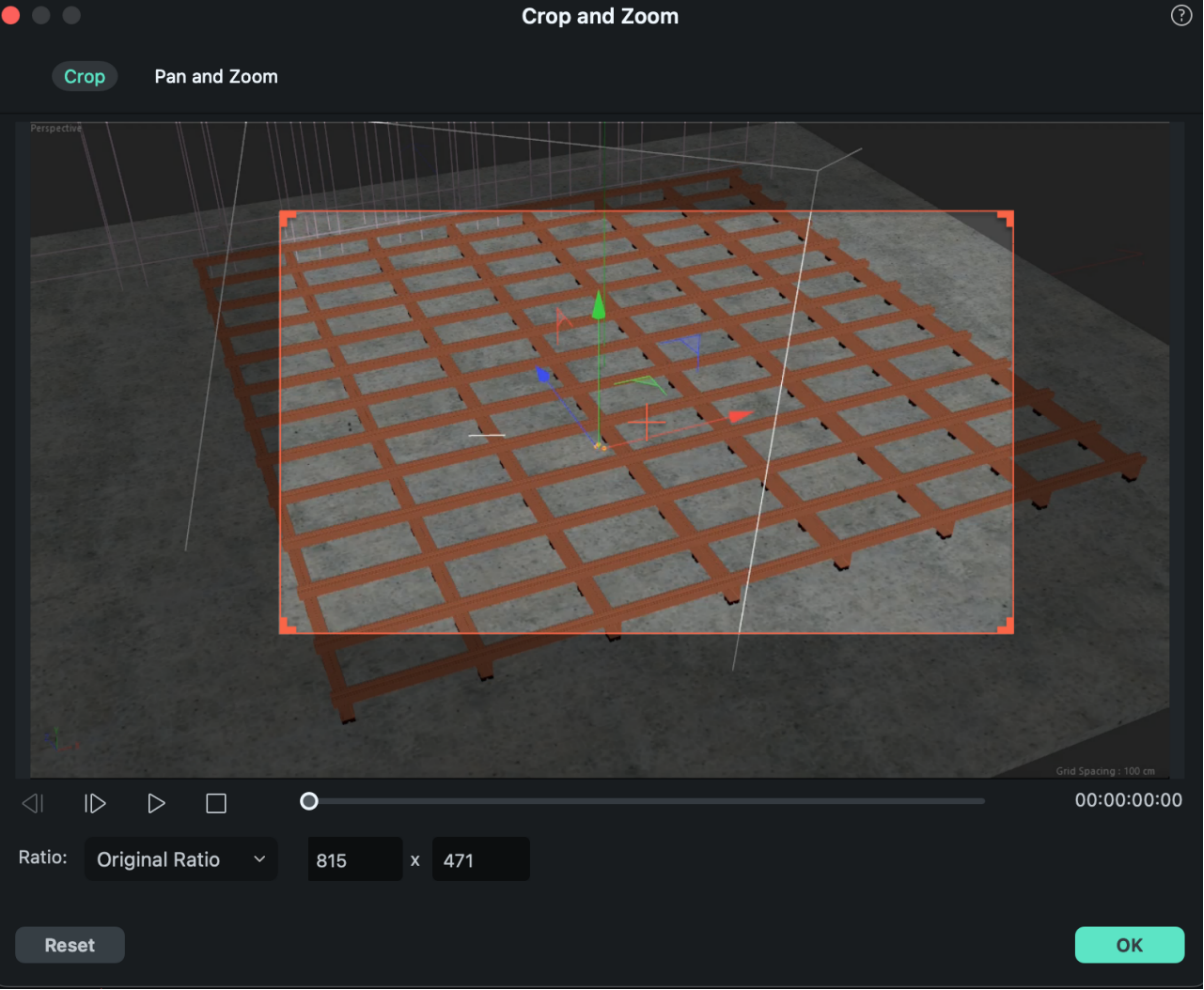
Step2Choose Ratio Aspect
In the Crop and Zoom panel, there are ratio options to choose from by your preference. After that, you can adjust the position of the cropped area. Click OK to finish resizing your video.
Method 3: Resize the video by changing the aspect ratio
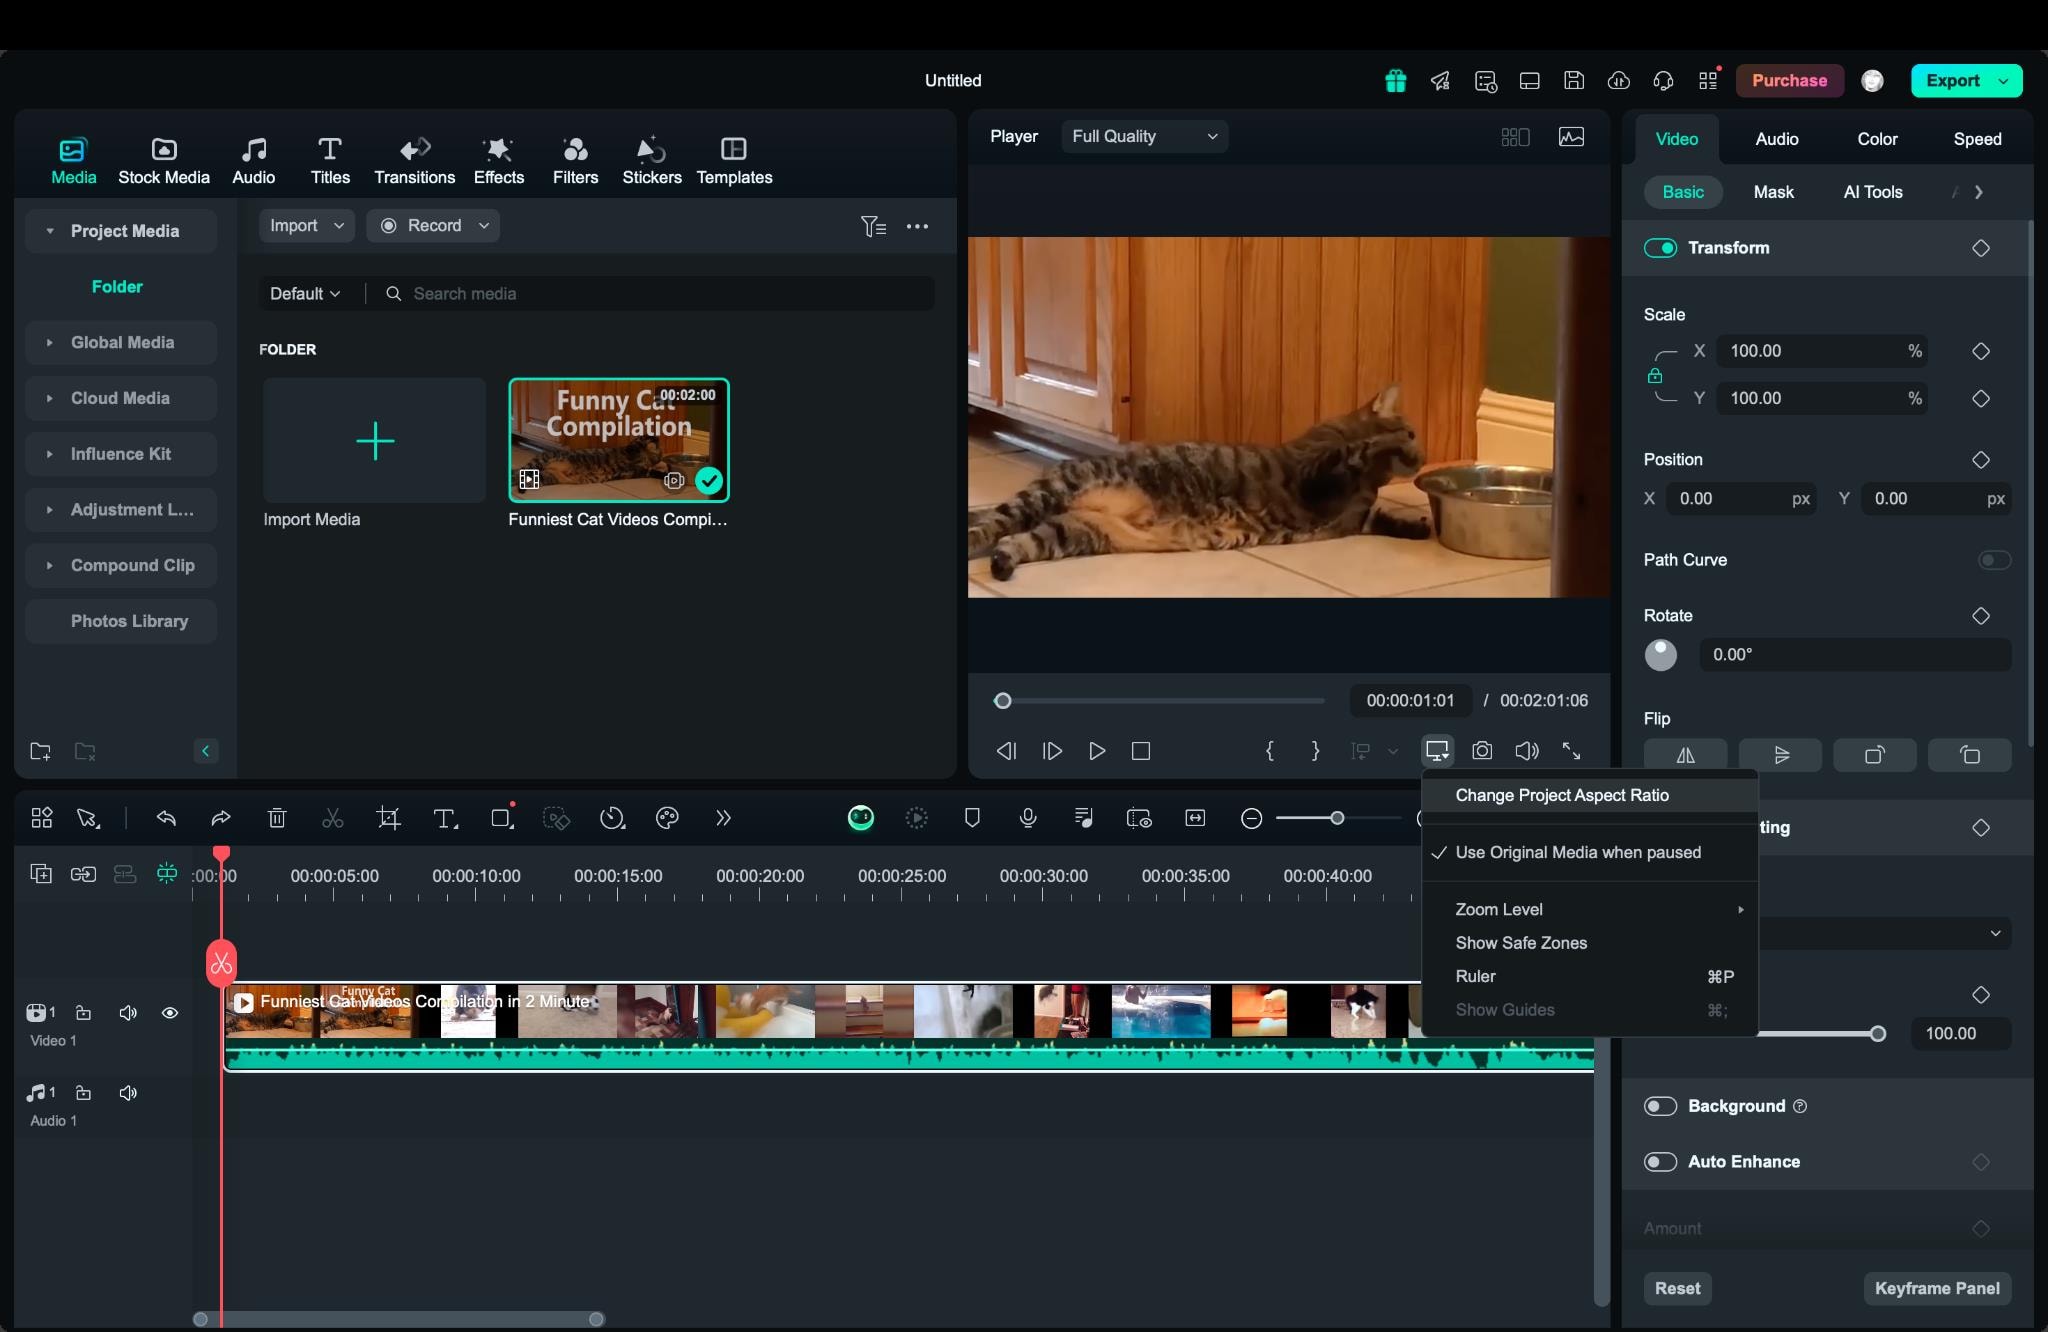
Step1Change Project Ratio
Even without iMovie, you can change video size by changing the project aspect ratio in Filmora. First, click on Settings and choose Change Project Aspect Ratio.
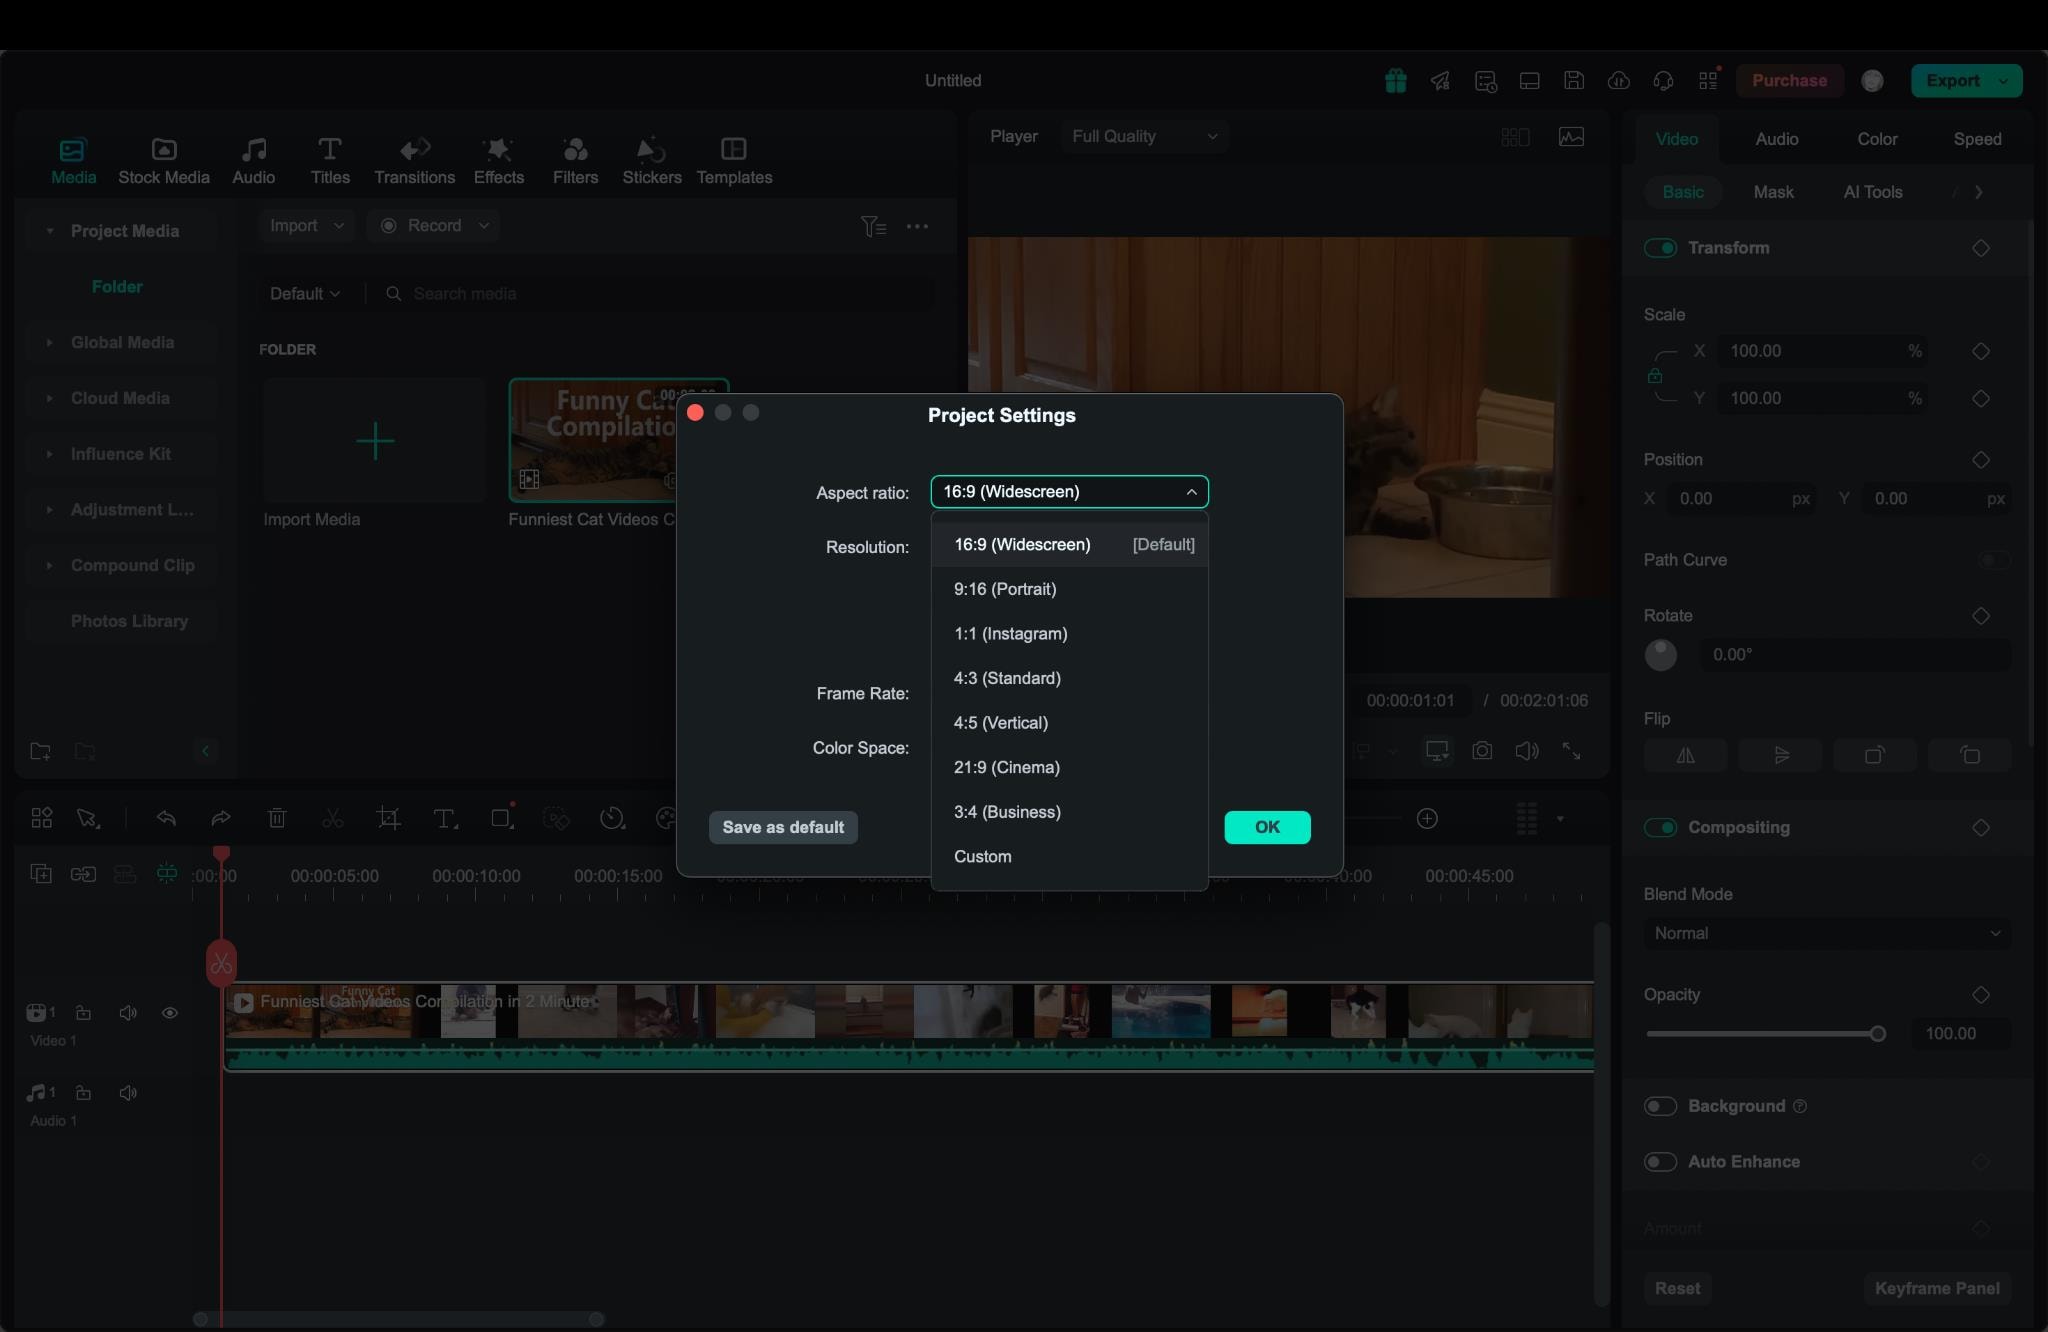
Step2Set Your Ratio
Select an aspect ratio such as 1:1 (square), 9:16 (vertical), or 16:9 (landscape), among others. Additionally, you can adjust the video's resolution and frame rate within these settings.
Bonus: How to Automatically Cut Long Video to Short
Another useful tool to help you repurpose your content for different platforms is Smart Scene Cut in Filmora. This feature helps you shorten a long video and capture only the best moments. It works by smartly scanning your video and identifying key moments, characters, and transitions. Then, it will automatically break the footage into separate scenes.
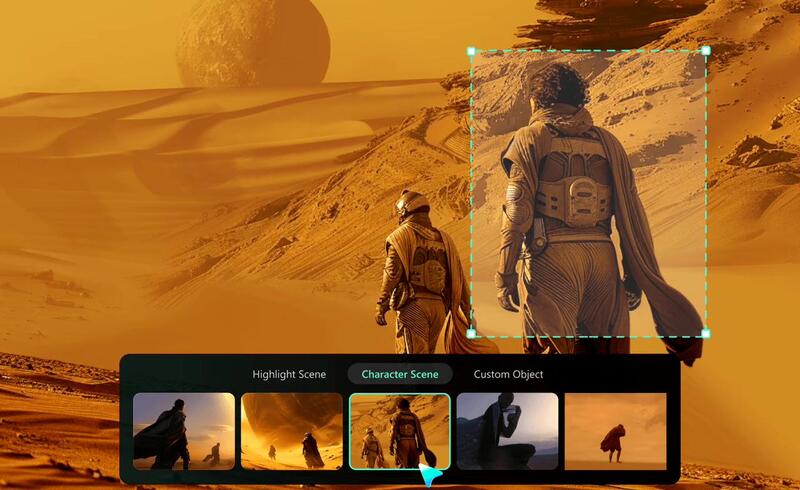
Smart Scene Cut is unique and useful for creating highlights on short videos. For example, you can use it to focus on action scenes or trim lengthy interviews. It is designed to help you quickly capture important segments without the need for manual trimming. Here's how to use it:
Step1Access Smart Scene Cut
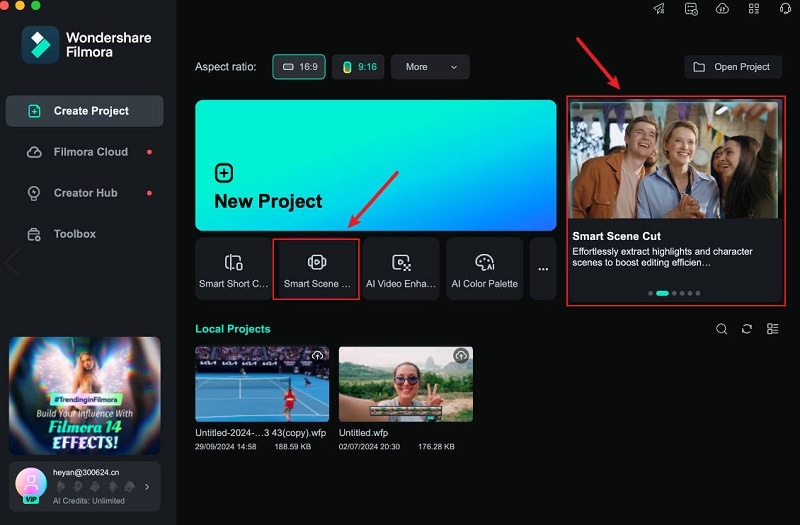
You can access the Smart Scene Cut feature in two ways. First, from the startup page, you'll find the Smart Scene Cut option under the New Project button.
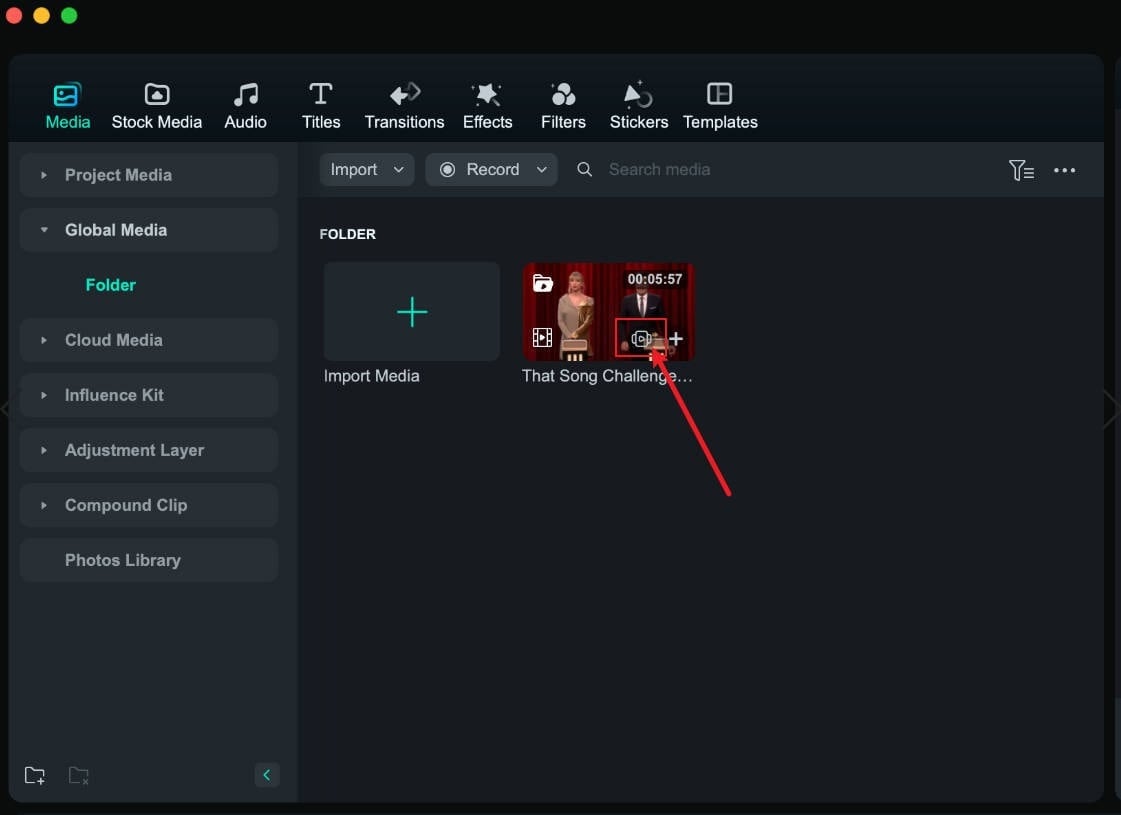
If you are in the middle of editing your video, you can click the Smart Scene Cut option on the video thumbnail.
Step2Navigate to the Smart Scene Cut Page
In the new pop-up window, click "Start" and wait for the upload to complete.

Step3Explore the Smart Scene Cut Results Page
On the results page, you'll find three selection categories: "Highlight Scene," "Character Scene," and "Custom Object."
- Highlight Scene: This option intelligently identifies highlight moments. You can choose segments you find impressive and add them to the timeline for further editing on the main track.
- Character Scene: This feature smartly extracts highlights based on character scenes, emphasizing significant segments.
- Custom Object: You can also select specific elements you want to capture in the video. Filmora will track these relevant fragments throughout the entire video.
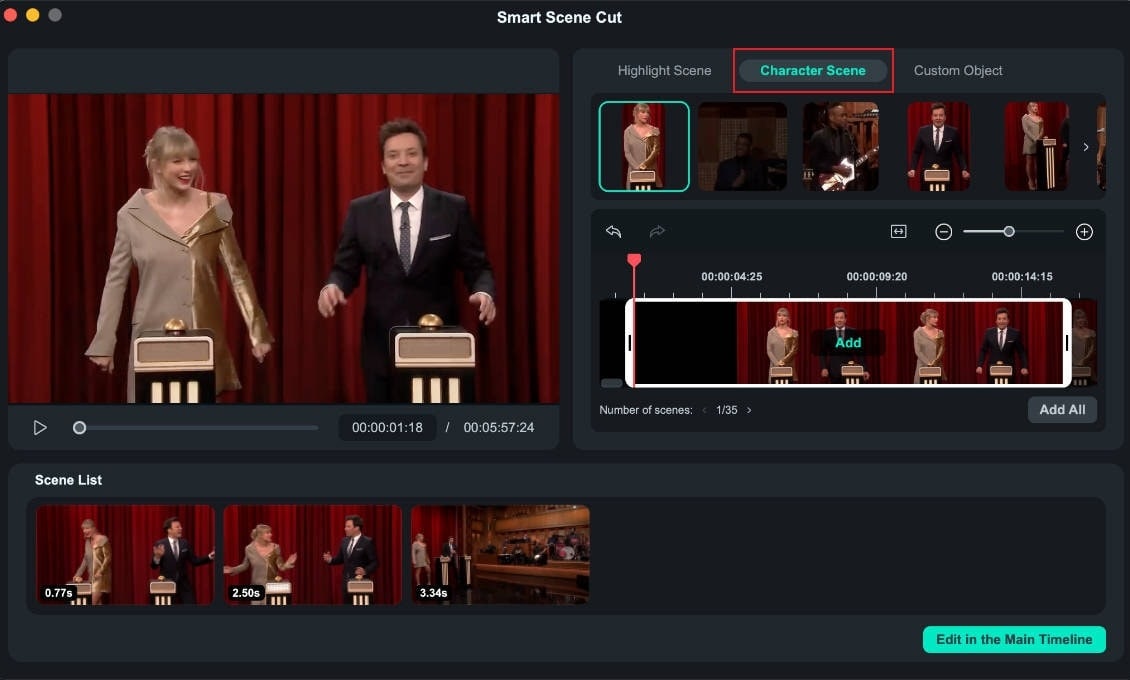
After selecting your desired scenes, click "Edit in the Main Timeline."
Step4Edit in the Main Timeline
Once your highlight clips are in the main timeline, you can edit them as needed. For example, you can add text, sound effects, transitions, and more. When you are satisfied with your edits, you can export and save your video.
Conclusion
After learning how to resize videos in iMovie on Mac, you'll find that while the process is simple, it is somewhat limited since it primarily relies on cropping. This method can unintentionally remove important sections of the video, particularly in scenes with motion.
If you're searching for a more flexible option than iMovie to resize videos, Filmora offers a variety of advanced features that make resizing videos easier and more precise. Its Auto Reframe helps you automatically detect key subjects and adjusts framing to keep them focused. Filmora also provides customizable aspect ratios suitable for any platform. These features make Filmora an excellent choice for creating quality videos that fit various screen requirements.


