ChatGPT
 Perplexity
 Gemini
 Claude
 Grok
Grok
Instagram may have started as a photo-sharing app, but these days, it's all about short-form videos. If you want to keep up, learning how to do voice overs on Instagram is a must. Voiceovers help you tell a story, add context, or just make your content more engaging.
But there's a catch. While you can record inside the app, you'll quickly notice its limits. So if you're wondering how to do a voice over on Instagram, you're in the right place.
This guide will walk you through how to add voiceover to Instagram Reels and Stories. It'll also show you how to fix the limitations and how to level up your content with fun voice effects. Let's get started.

In this article
Part 1. How to Add a Voice Over on Instagram Reels & Stories
If you're wondering how to do voice overs on Instagram, you'll notice a big difference between Reels and Stories. Here's a quick comparison to help you understand the differences:
| Feature | Instagram Reels | Instagram Stories |
| Record Voice While Filming | ✅ | ✅ |
| Post-Recording Voiceover | ✅ | ❌ |
| Voiceover Button | ✅ | ❌ |
| Volume Control | ✅ | ❌ |
| Audio Track Mixing | ✅ | ❌ |
So, when it comes to how to do a voice over on Instagram, Reels clearly gives you more options. You can record your voice after filming, fine-tune the volume, and even mix in music or sound effects. Stories, on the other hand, are more limited; you only get one shot to speak while recording.
Method 1. How to Add a Voice Over to Instagram Reels
Here's a quick step-by-step guide on how to add voiceover to Instagram Reels:
Step 1. Open the Instagram Reels Editor
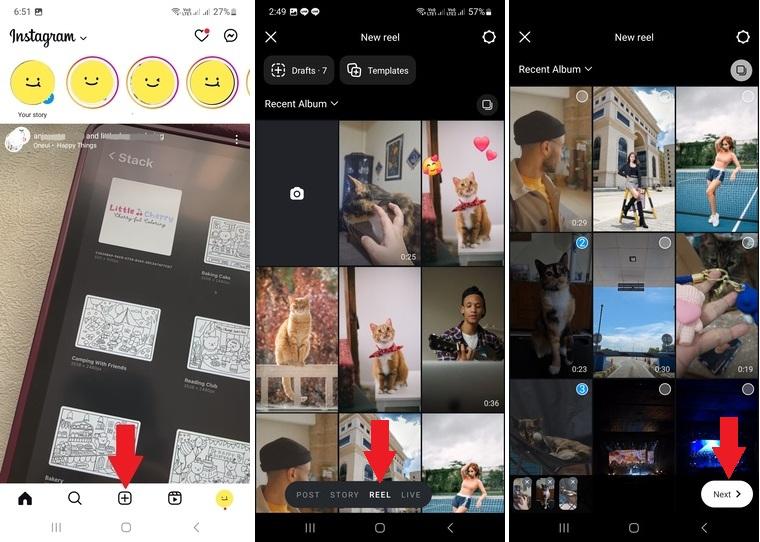
- Open Instagram and tap on the Plus (+) icon at the bottom of your screen.
- Swipe across the bottom menu and select Reel to start making your video.
Step 2. Select Your Video Clip for Reels
- Tap on the Camera icon to record a new clip.
- Or, select one from your gallery. To upload more than one, tap and hold a clip to select multiple videos.
- Once you're set, hit Next to move forward.
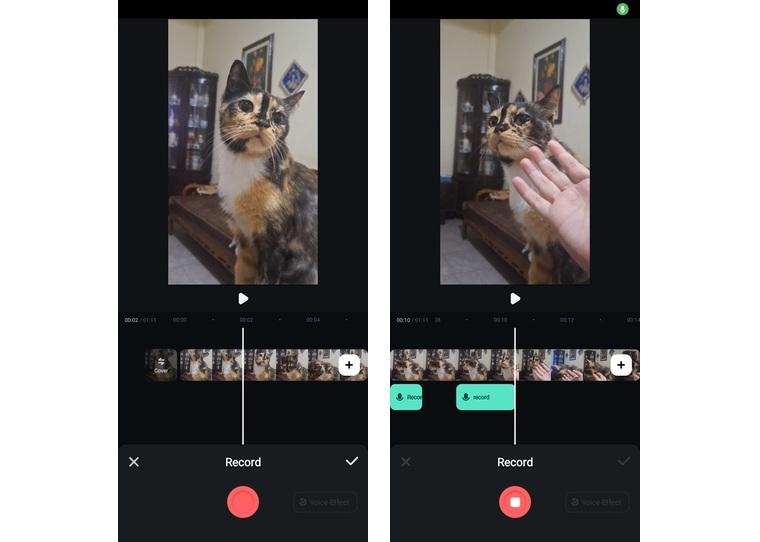
Step 3. Record the Voice Over
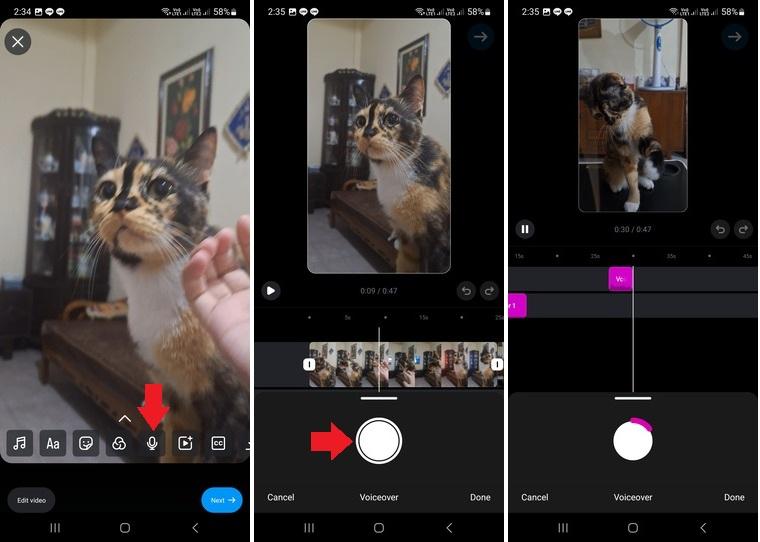
- Tap the Microphone icon to open the voice over tool.
- Slide the clip track on the timeline to move the Playhead to specific parts of the video.
- Hold the Record button to capture your voice over.
- You can do this step multiple times, then tap Done once you're finished.
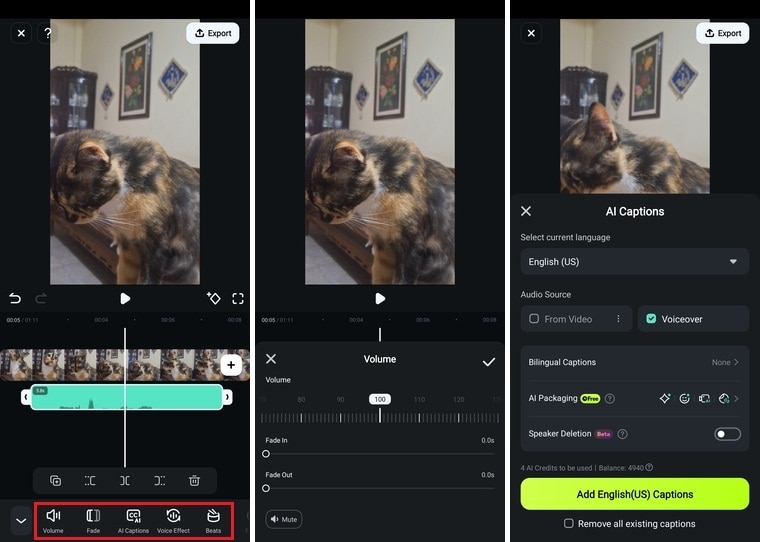
Step 4. Customize the Voice Over You Recorded
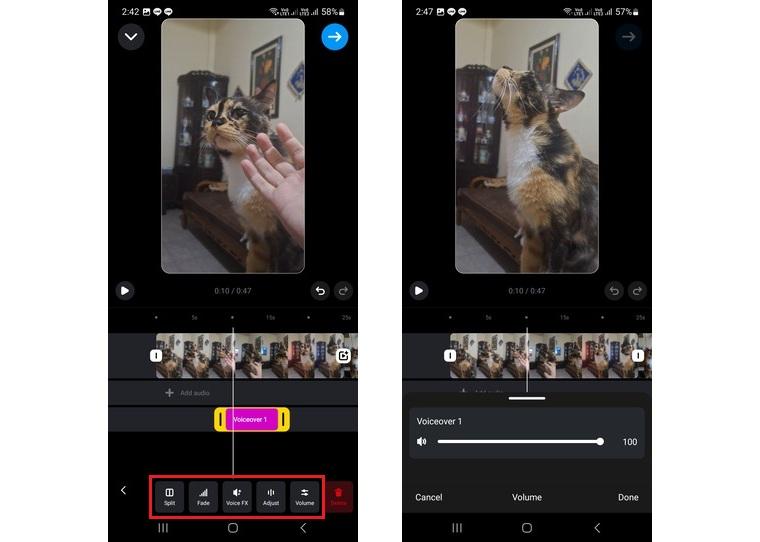
- Tap on the voice over clip on the timeline to open the voice editing tools.
- Split, apply Fade In/Out effects, use Voice Effects, and adjust the Volume.
- Tap Done to save your edits.
Step 5. Post Your Reels
- Tap the Blue Right Arrow at the top of the screen.
- Add a caption, hashtags, or tag friends to increase reach.
- Tap Next > Share to post your Reel.

Method 2. How to Add a Voice Over to Instagram Stories
For Instagram Story, keep in mind that Stories doesn't have a post-recording voiceover tool like Reels. Since Stories are made for quick updates, you'll have to speak while filming if you want to add your voice directly in the app.
Here's how to do a voice over on Instagram Story:
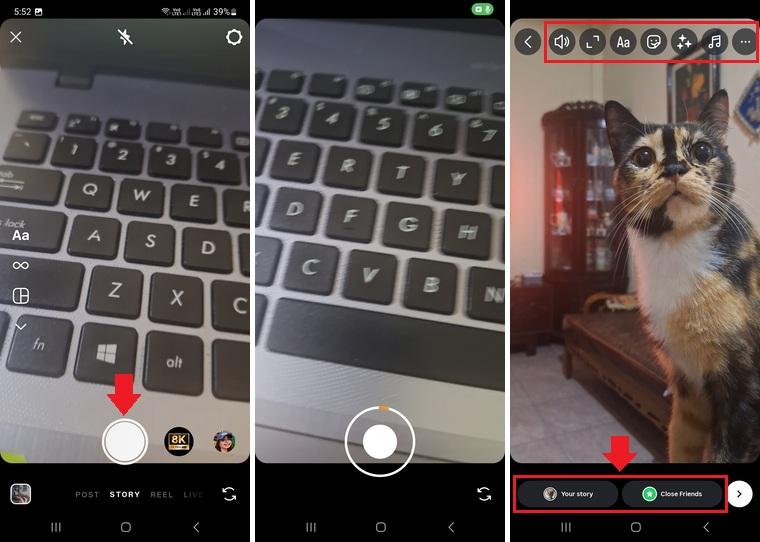
Step 1. Go to the Instagram Story Section
- On the top screen of the homepage, you'll see a row of Stories posted by you and your followers.
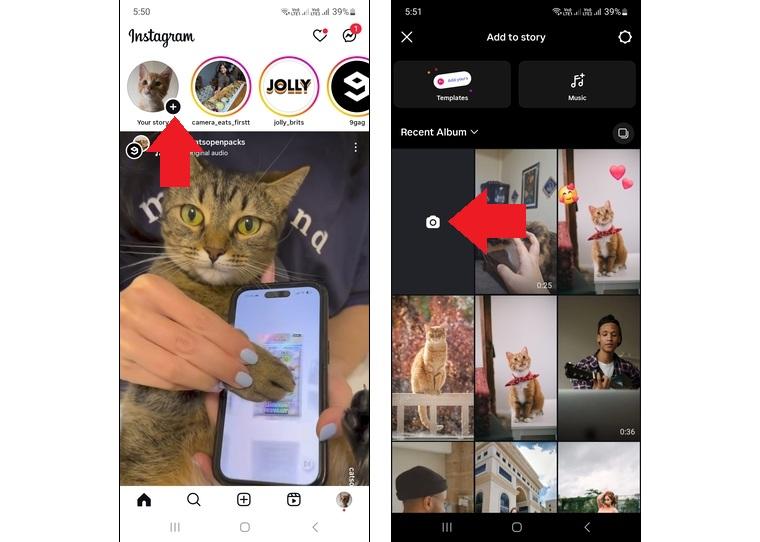
- Tap on the Plus (+) icon in your Story profile picture.
Step 2. Record a New Instagram Story
- To record a new video, tap the Camera icon to open the Story recorder.
- Hold down the Record button while speaking to capture real-time voice.
- Release your finger to stop recording.
- Note: Each Story clip can be up to 15 seconds. If longer, Instagram will split it automatically.
Step 3. Add Effects, Text, or Stickers
- After recording, personalize your Story using stickers, text, filters, or drawings.
- When you're satisfied, tap Your Story or Close Friends to share it.
Stories vs. Reels: What's the Real Difference for Voiceovers?
When it comes to how to do a voiceover on Instagram, knowing the difference between Reels and Stories is important.
Instagram Reels
Reels give you more control. You can record a voiceover after filming, adjust the volume of your voice and background audio, and even apply voice effects. They're great for tutorials, vlogs, skits, or any video where audio plays a key role.
Instagram Stories
Instagram Stories, on the other hand, are meant for quick daily updates. You can only record your voice while filming. To add a voiceover to an Instagram Story, you'll need to edit the video in a third-party app and then upload it as a Story.
Part 2. From Basic to Professional: Fix Voice Over Limits Outside Instagram
After learning how to do voiceovers on Instagram, we knew that Instagram Stories has its limit when it comes to adding voiceovers. And while Reels offer more tools, there are still moments when you'll want greater control over sound and timing.
Here are a few voiceover limitations you might run into while using the Instagram Story tool alone:
- No post-recording voiceovers in Stories: You have to speak live while filming.
- No audio cleanup options: Background noise or echo can ruin your footage.
- No separate audio layers: You can't adjust the volume of your music, original video sound, and narration separately.
That's why many creators turn to external editing apps like Wondershare Filmora for Mobile. Not only does it give you full control over your voiceovers, but it also comes with powerful AI tools. These AI tools can help make editing faster, cleaner, and more creative.
Here are some Filmora for Mobile features that can help you step up your voiceovers:
- Voiceover Recorder: Easily record voiceovers directly in the app. You can record multiple takes and add them exactly where you want in your video.
- Precise Audio Timing Tools: You can split, trim, adjust speed, and align your voiceover clips easily with your visuals, even on mobile.
- Noise Reduction: Clean up background noise with one tap, so your voice sounds clearer, even when you record in a noisy space.
- AI Speech to Text (Auto Captions): Auto-generate subtitles from your voiceover. It's fast, accurate, and a great way to boost viewer engagement, especially for Stories and Reels.
- AI Text to Speech (TTS): Don't feel like recording with your voice? Just type your script and let Filmora's AI generate a voiceover for your videos.
- Voice Effects: Change your voice with built-in effects like a robot, deep voice, or chipmunk to match your content's tone or add humor.

 secure download

Step-by-Step: Add a Voice Over Using Filmora
Follow the steps below to add a voice over on Android or iPhone using Filmora Mobile:
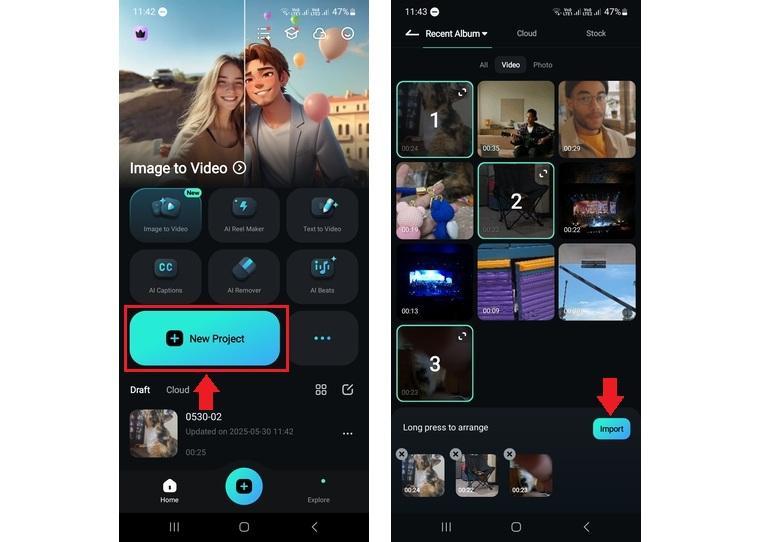
Step 1. Create a New Project After Launching Filmora
Open the Filmora Mobile app on your phone. On the main screen, tap New Project to begin editing.
Step 2. Import Your Video Clips to the Timeline
Browse your media library and select the videos or images you want to edit. Then, tap Import to bring it onto the Timeline.
Step 3. Add a Voice Over to Your Video
On the toolbar, tap on the Audio > Record button.
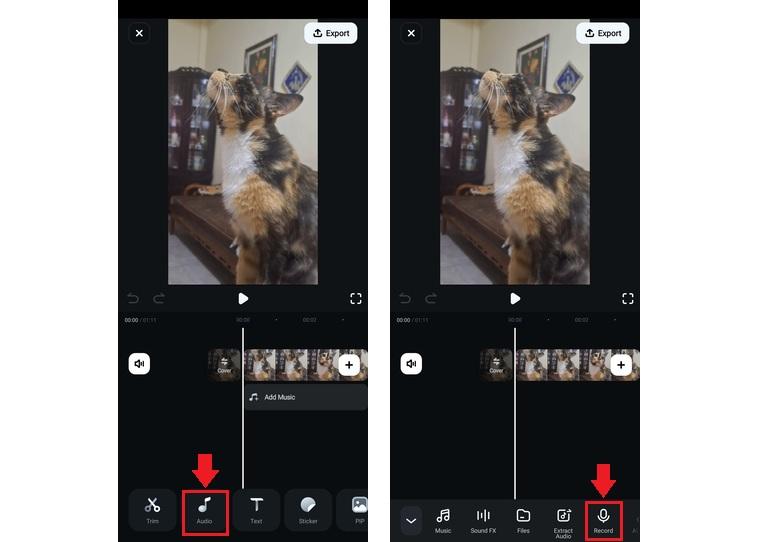
Move the playhead on your video track to the exact spot where the voiceover should begin.
Press the Red Record button and start speaking into your phone's microphone. When you're done, tap the red button again to stop recording.
You can add voice overs with this step for multiple spots. Then, tap the Checkmark icon to save the voice overs.
Step 4. Enhance Your Voice Over (Optional)
Tap on the voiceover clip in the timeline to access editing options:
- Trim/Split: Adjust the length or divide the clip as needed.
- Adjust Volume + Add Fade In/Out: Make sure your voice doesn't overpower or get buried under background music.
- Add Auto Subtitles (AI Captions): Instantly generate captions from your voiceover to boost engagement and accessibility.
- Noise Reduction: Use AI-powered tools to clean up background sound and make your voice clearer.
- Change Speed: Slow down or speed up your voiceover to match your visuals or add comedic timing.
- Auto Beats: Generate beats to sync with your audio for rhythm-based edits.
Don't be afraid to experiment, these tools are built to help you tell your story in your own unique way.
 secure download
 Bonus: Make It Fun - Change Your Voice Over Style with Effects
Once you've recorded and saved your voiceover, it doesn't have to stop there. Filmora for Mobile lets you transform your voice using built-in voice effects that add humor, drama, or personality to your Instagram Reels and Stories.
There are two ways to access the voice effect tool:
- After recording the voice over, the Voice Effect tool will show right beside the Record button.
- Or, by tapping on the voice over clip on the timeline and go to the Voice Effect tool.

Here are some of the fun and creative effects you can try:
- Man / Woman / Child: Change your voice to sound older, younger, or switch tones completely.
- Chipmunk: High-pitched and playful, perfect for comedy or lighthearted clips.
- Transformer: A gritty, robotic tone for dramatic or sci-fi-style edits.
- Phone: Add a muffled, retro vibe like you're calling from the '90s.
- Radio: Classic broadcast feel for narration or storytelling.
- Robot: Futuristic and monotone, great for gaming or tech content.
Conclusion
Learning how to do voice overs on Instagram can unlock new ways to make your Reels and Stories more expressive. While Instagram Reels offers basic voiceover tools, Instagram Stories are more limited.
This guide has shown you how to add voiceover to Instagram Reels and Stories. But if you're working with content that needs cleaner audio or more editing control, a third-party app like Filmora is the way to go. From noise reduction to voice effects, it gives you everything in one place.
Ready to upgrade your videos? Download Filmora and start creating today!
secure download