


 ChatGPT
 Perplexity
 Gemini
 Claude
 Grok
Grok
What is your end goal as a video creator? Surely, most of you would answer,"Engaging my target audience and creating a strong brand voice." But often, we overlook the importance of voice-overs and text-to-speech, which help build a connection with users.
Voice-overs aren't just limited to having someone speak over a video but also create a lasting impact on your viewer and take action. Therefore, tools like Camtasia come with sophisticated voice-over features that can help you enhance audio clarity, eliminate noise, and present a well-refined video to the viewers.
Are you wondering how to get started with Camtasia voice-over? Don't fret—this article will explain it in detail.
Table of Content
How To Record Voice-over in Camtasia
Camtasia allows you to record high-quality voice-over flexibly. This means you can add voice-over while capturing your video or even after recording it. You can do it any way you feel comfortable. Let's now discuss how you can do this:
Way 1. Record Voice-over During Screen Capture
This kind of voice recording is ideal for pre-recorded tutorials and instruction videos. So, here's how you do it.
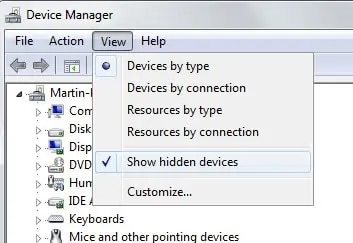
Step 1. Selecting the appropriate recording settings
First, you have to make sure that every tool required in the recording is there with you and connected correctly. For instance, your external microphone has to be connected, and your overhead headphones must be connected.
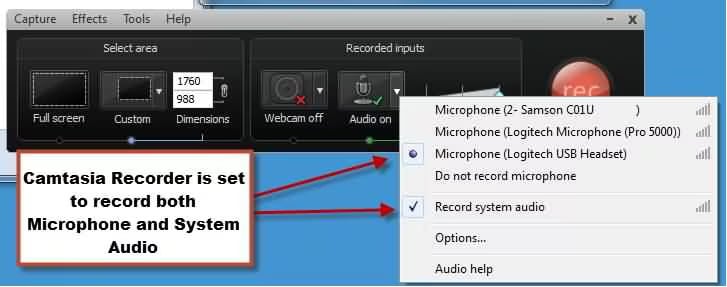
Step 2. Choosing the audio source
- Press"V" or Head over to the interface's left side and click on the"Find the Voice Narration" option. There you can find the listed audio devices in the drop-down menu.
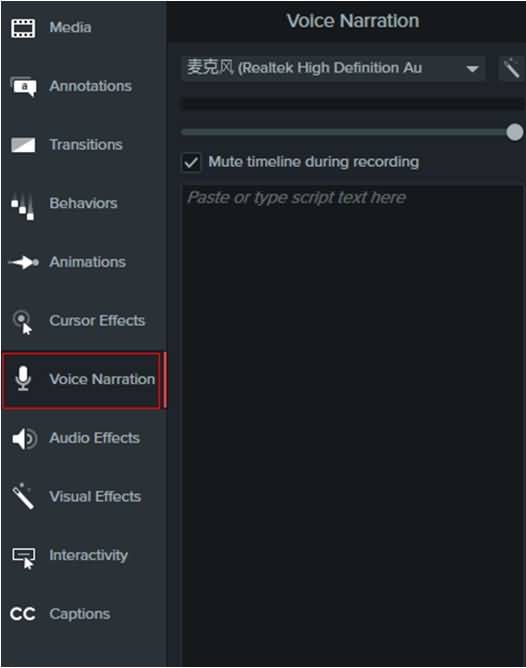
- Select the audio source there. For instance, your microphone is listed as"Audio 2.0." Click on that to proceed.
Step 3. Auto-leveling the sound
Now that you have decided on your audio source, you can select the auto level option on the right of the drop-down menu to set a specific level for the mic.

Here, you can also mute the timeline sound to avoid distractions.
Step 4. Adding script
Below these settings, you will also find a text editor where you can add your script to narrate easily while you capture your screen.
Step 5. Start Recording
Once you have your script ready, simply tap on"Start Voice Recording." The timer will start ticking, which means that everything you say will be recorded.
Between your recording sessions, you may stop recording at an interval and edit it later.
Finally, finalize your export settings, and the file will be exported quickly.
Way 2. Add Voice-over After Recording Video
This could be a great option for some documentaries or other kinds of informational videos. The simple steps can get you started with this:
Step 1. Accessing the video editor in Camtasia
Click the"Import Media" button to add your recorded video to the Camtasia media bin. Once it is done, you may proceed with the following steps: select your mic in the drop-down menu.

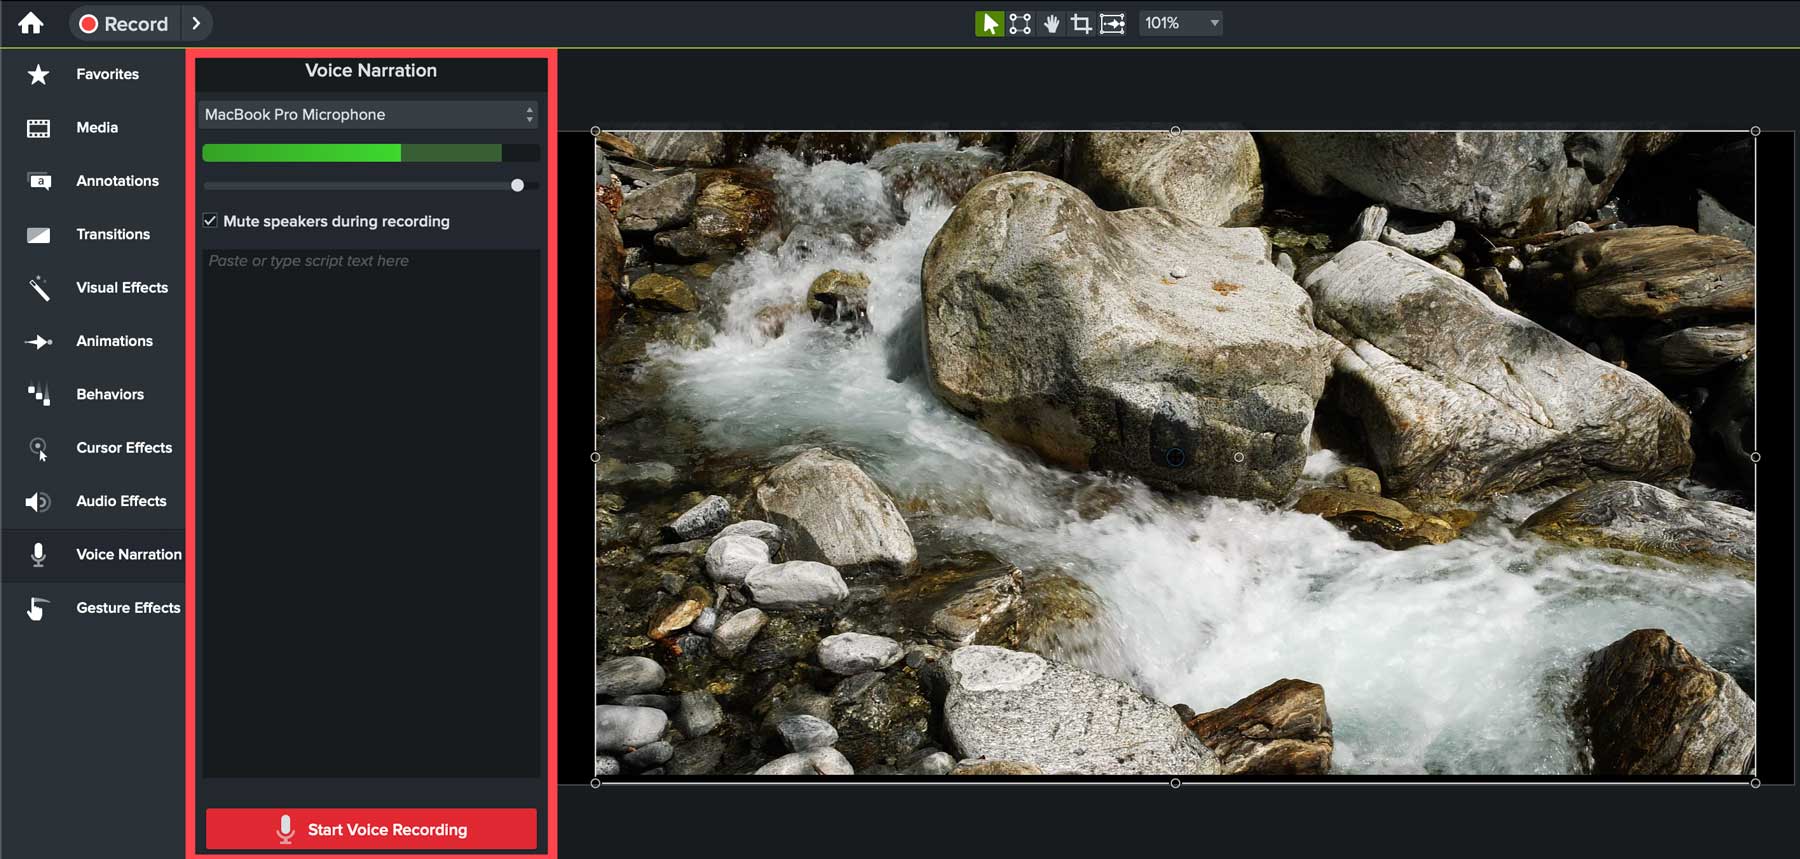
Step 2. Initiating the voice narration feature
Click on the Camtasia voice narration feature, where you can add your script text or even an outline to ensure a good flow throughout the video.
Step 3. Muting speakers to eliminate background noise
Simply click on the mute timeline to cut the background noise, ensuring proper script delivery and high-quality video delivery.
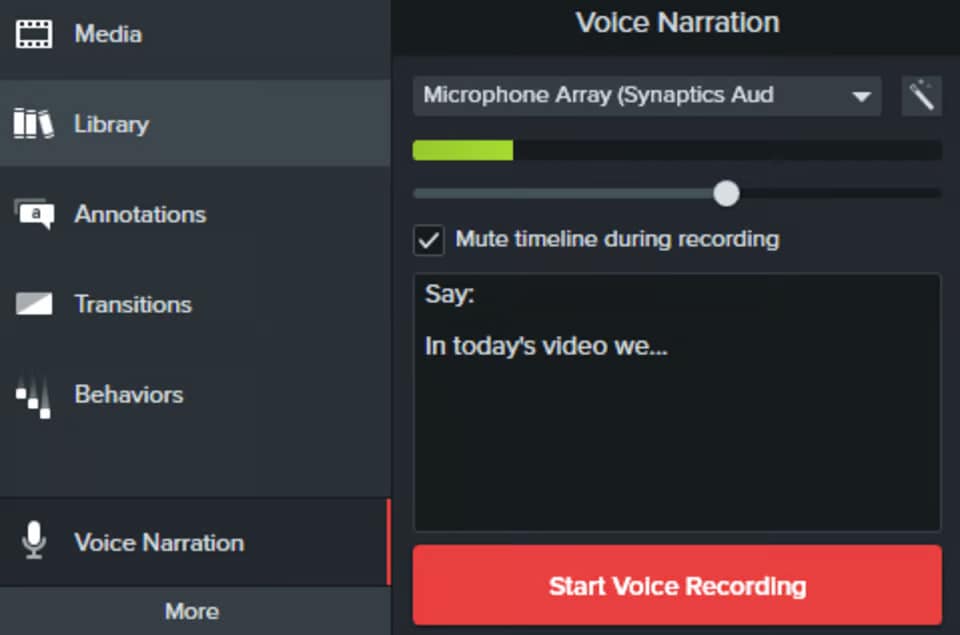
Step 4. Starting the recording process
- Now select the"Start Voice Recording" option to get started with the voice-over. You can do some 10-second voice tests to ensure the quality of your voice is up to the mark.
- Begin narrating your script and watching the video playback in real time to match your voice-over with the visual content.
Step 5. Adding WAV files
- Listen to your audio files (WAV) and select the one you want to add to the video.
- You can now drag and drop the WAV files into the timeline. After that, ensure that the track aligns appropriately with the video.

Editing options for the voice-over track
- Trim or split the audio to remove the unwanted noise in the timeline.
- Right-click on the audio track and tap"Edit Audio" to adjust the volume levels, ensuring a consistent and clear audio output. You can also add effects if required.

Preview and save this project to export your video by clicking on the"Share" button and choosing your desired export settings.
How To Add Voice-over Using Camtasia's Text-to-speech
Does Camtasia have Text-to-Speech as well?
Yes, it does. Now, let's take a quick look at how you can use this feature. Camtasia's tool,"Audiate," can be very helpful for this. Simply follow the steps, and you will be there.
- Audiate, a companion of Camtasia, allows you to type or paste text into the Script field. Depending on your comfort, you may either type the text from scratch or upload the SRT file to Audiate.

- Click the"Import a file" button to import a script. Once done, click the"Create" button next to the text section.

- Now, go to the"Generate Audio" tab. Choose a preset from the dropdown or customize settings (language, voice, style, speed, pitch).

- For instance, you get a number of characters or avatars for the text. You may tweak the style and speed the way you like. Click the"Preview" button to listen to the selected settings.

- Now, to apply settings to the entire project, enable the"Apply to entire project" toggle and click the"Generate Audio" button.
Bonus tips for Using Camtasia's Text-to-Speech
Removing audio:
- In case you want to remove or edit any part of the audio. Double-click any text section to enter Scripting mode.

- And then, you can make your edits.
- After that, the new or edited text will appear in white. Tap the"Done Scripting" button to regenerate audio.

Adding different styles for sections
- Enter the script mode (by double-clicking).
- Press enter twice to make a new section. Proceed with the edits.
That's all. You see how easy it is to use Text-to-Speech and Camtasia to record voice-over for your video.
Though both features can make an excellent video, why not go the extra mile to achieve perfection?
Tips to Enhance Voice-over Recording in Camtasia
Audio can invoke emotions and establish a proper communication channel with the viewer. Here's how you can improve it.
- High-quality microphones: Always use quality microphones to record your voice. You can also rely on an over-the-ear headset with automated noise cancellation.
- Conduct test recordings: Before recording, conduct some voice tests to find your best shot or get in the right mood. Make sure you don't sound monotonous or overly enthusiastic.
- Use audio effects and adjustments: Ensure that the voice slider takes the input between 50-70% every time you speak. Going too high or too low would not help engage the audience. Try adding some voice effects to your recording that convey your message correctly, but do not overdo it.
- Mute timeline or speakers during recording: Lastly, use the Muting Timeline on Camtasia to ensure that no unnecessary sound or speaker disrupts the video.
Consider an Affordable and Powerful Alternative to Camtasia's Text-to-Speech
Camtasia's Text-to-Speech feature is included in the Camtasia Create plan, which combines Camtasia and Audiate and costs $249/year. This price can be pretty steep for personal users. Moreover, users need to switch between Camtasia and Audiate to add voice-overs generated from Text-to-Speech, which can be inconvenient. Therefore, consider Filmora, an affordable and easy-to-use alternative to Camtasia's text-to-speech for your video editing needs.
Filmora offers a more affordable pricing structure than Camtasia. Filmora provides several pricing options, including a quarterly plan for $29.99.yearly plan for $49.99/year, and a perpetual plan for a one-time payment of $79.99. This budget-friendly pricing makes Filmora an attractive option for individuals and small businesses who require a robust video editing solution without spending a fortune.
Furthermore, you can choose from 40 natural voice-overs in 33 languages and even clone your own voice in Filmora's Text-to-Speech voice library for consistent branding across all your videos. It can generate voice from subtitles or by copying and pasting text.
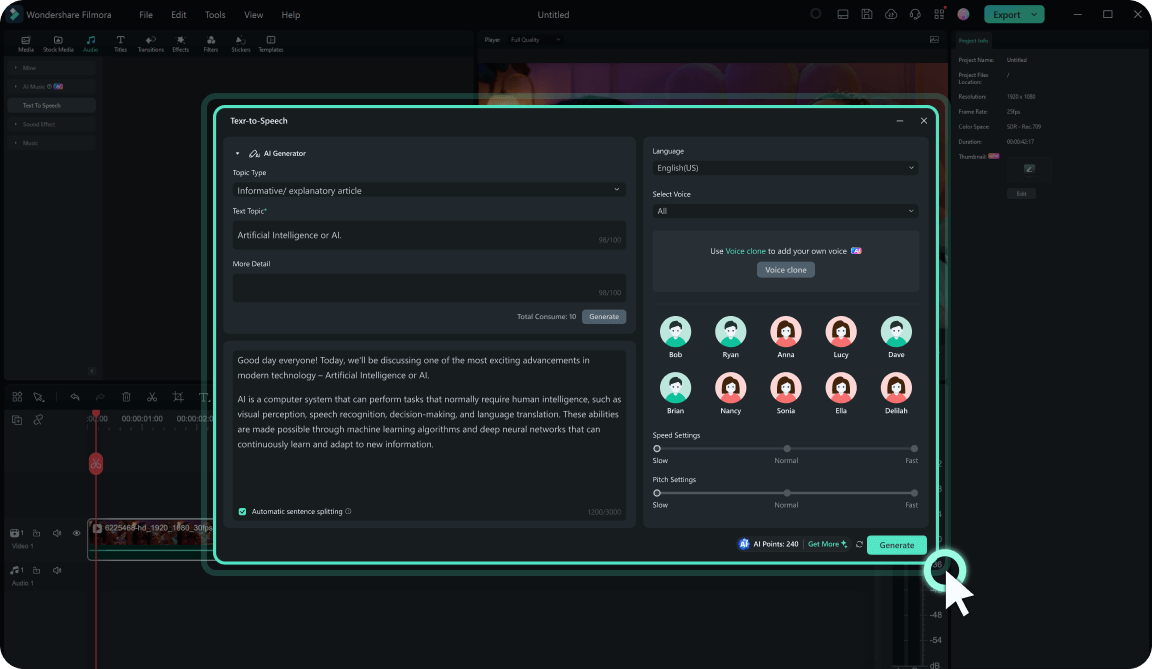
In addition to TTS, Filmora offers over 30 AI editing tools, such as Speech-to-Text, AI Copywriting, AI video translation with lip-sync, AI Portrait Cutout, AI Audio Denoise, and more to significantly improve your video creation efficiency. Filmora's extensive library of effects, transitions, royalty-free music, and titles enables users to create visually appealing videos with ease. The software also includes video editing features like keyframe animation, planer tracking, color matching, and audio editing, which are essential for producing high-quality content.
Filmora offers a 3-day free trial for new users. So, download and try it now!
Record your screen and webcam, then create pro-level videos easily and quickly with AI tools, stylish templates, effects, music, and other creative assets.

Wrapping Up
Now that you know how to add a voice-over in Camtasia, you can create engaging videos that can potentially boost your conversions. Further, we discussed using Text-to-Speech in Camtasia, which can be a game-changer for your videos.
However, it is important to recognize the importance of quality voice-over and ensure high-quality output for viewers. To ensure quality, you must adhere to the best practices listed in the article.
Also, for better quality and budget, consider using reliable voice recorders like Wondershare Filmora to see the real change in overall video quality.
Camtasia Voice-over FAQs
-
Does Camtasia have speech-to-text?
Yes, it does. It will auto-transcribe spoken words into text captions that you can add to your video. -
How do I use voice narration in Camtasia?
Using voice narration in Camtasia is quite easy. All you need to do is follow simple steps as follows:- Click the Voice Narration tab and choose your audio device from the drop-down menu.
- Add your script to the text box on the left side of the main interface.
- If you are using a Windows system, Select Mute timeline during recording. Otherwise, you can choose Mute speakers for Mac devices during recording.
- Drag the play head to the position on the timeline to start recording audio.
- Click the Start Voice Recording button.
-
Can I do voice-over in Camtasia?
Yes, you can. You can either record your voice into the software while working on your project or import pre-recorded audio files and sync them with your video. -
How do I record my voice in Camtasia?
Just use the built-in recording feature. Start a new recording project, select the audio input source (usually your microphone) and hit Record. Camtasia will capture your voice and any other audio from your computer. -
Can I record audio only in Camtasia?
Yes, you can. When you begin a new recording project, you can choose to record audio only and not capture your screen. Here's how you can do it:- Open Camtasia and start a new recording project.
- Uncheck the screen capture option and ensure the audio option is selected.
- Click"Record" to start recording audio only.
- Click"Stop" when you're done to save your audio recording.
