Whether during school years or in your adult working life, there were most likely multiple situations when you needed to capture what was displayed on your monitor.
In today's review, we'll delve deeper into the IObit Screen Recorder with its features, performance, use cases, benefits, and drawbacks, and we'll compare it to the alternative Filmora, helping you find a reliable tool for all your screen capture needs.
In this article
Overview of the IObit Screen Recorder
IObit Screen Recorder, also known as the iTop Screen Recorder due to the company's recent name change, is a simple yet powerful screen capture tool designed to record online lessons and business meetings, create straightforward video tutorials, capture your favorite gaming moments, and more.
This Windows-focused screen recorder offers multiple recording modes and includes some of the most widely used editing tools, giving users complete freedom over their creative processes. Moreover, its user interface is also remarkably intuitive, making the IObit/iTop Screen Recorder one of today's most beginner-friendly screen capture tools.
IObit Screen Recorder Tech Specs
Finding an excellent tool that fits all your needs only to realize it's incompatible with your device can be incredibly frustrating. That's why we have to mention the IObit Screen Recorder's technical specifications.
Before you go any further, it's important to note that the IObit/iTop Screen Recorder is a Windows-only tool. You can smoothly run it on most Windows 7, 8, 8.1, 10, and 11 PCs from the last decade or more.
Key Features of IObit Screen Recorder
Whether you need to record video tutorials, Zoom meetings, or streaming videos, IObit Screen Recorder's vast array of excellent features will make the process a breeze. They include the following:
- 4K Screen Recording – It offers unlimited 4K screen recordings, making your videos crisp and professional-looking.
- Customizable Recording Areas – It can create videos from fullscreen, specific windows, and custom area recordings, giving you control over what's being captured.
- Audio Capture – It can also record system sounds and microphone audio or capture both simultaneously, bringing their recordings to life and adding a layer of engagement.
- Webcam Recording – It supports capturing your webcam footage, allowing you to add facial expressions to your content to make your videos more dynamic and exciting.
- Hardware Acceleration – It harnesses the power of your graphics card and provides smoother recording sessions without FPS drops or lagging.
- Multi Format Support – It supports various audio, video, and image export formats, including MP3, AAC, AC3, FLAC, and WMAV2 for audio files, MP4, AVI, FLV, MKV, MOV, TS, and GIF for video files, and JPG, PNG, BP, and TIF for screenshots.
- Lossless Video Compression – One of the most significant export options in the IObit recorder is the ability to compress your videos and reduce their file size without affecting their quality.
- Watermark Customization – The free IObit Screen Recorder version has a default watermark, and there's no way around it. However, upgrading to the pro version lets you remove or customize the watermark to protect your videos, with text and image adjustment support.
- Basic Editing Tools: It also supports a trimmer, filters, stickers, text, background music, subtitles, text, effects, and transitions.
Usability and Performance of IObit Screen Recorder
Despite its wide array of features, the IObit Screen Recorder excels in usability, as this Windows screen recorder offers an intuitive user interface and effortless navigation.
Apart from the straightforward design and minimal learning curve, the IObit/iTop Screen Recorder offers smooth performance thanks to its GPU acceleration. This feature allows the app to capture 4K videos effortlessly.
Who Is IObit Recorder For?
- Gamers - It records game clips in 4K UHD, 1080p 90fps FHD with no fps drops and no lags.
- Students and Teachers – It can record with a virtual background, and adjust the webcam overlay and size, which makes it a good option for online lessons.
- Business Professionals – From recording Zoom meetings and interviews to capturing business conferences to saving webinars, the IObit Screen Recorder excels in various business use cases.
These use cases are only a few examples, as the IObit/iTop Screen Recorder's robust app can be used in various other circumstances, making it an excellent choice for nearly all types of screen recordings.
How to Use IObit Recorder?
- Head to the official iTop Screen Recorder website and download the app.
- Follow the installation instructions to install and launch IObit/iTop Screen Recorder on your Windows computer.
- Pick between Full Screen, Select Region, Select Window, Lock Window, and Fixed Ratio options to customize the recording area and capture what you want to record.

- Turn the Speaker, Mic, Webcam, and Mouse options on or off, depending on whether you want to capture system sounds, microphone audio, webcam footage, or mouse gestures.

- Once ready, hit the large red REC button to start recording your screen.

- Click the Pause or Done buttons in the floating menu bar to stop the recording session.
- After recording, double-click the video to play it or right-click the file and head to Edit > Quick Editor or Advanced Editor to customize the recording before exporting it.

Pros and Cons of IObit Screen Recorder
While it packs some fantastic features that make it beneficial in multiple situations, the IObit Screen Recorder also has certain drawbacks that users should be aware of.
The Best IObit Screen Recorder Alternative
Overall, the IObit Video Recorder has many great selling points, and if the drawbacks are too much for you, there are various alternatives to this tool, one of which you can learn more about below is Wondershare Filmora. Let's first compare the IObit screen recorder and Filmora.
IObit vs. Filmora
| Software | IObit/iTop Screen Recorder | Filmora |
| System compatibility | – Windows only (7 – 11) | – Windows (7 – 11) – macOS (10.1.V15) – Android (7.0 and up) – iOS (12.0 or later) Record voiceover for mobile |
| Unlimited recording and exporting time | The free version is limited to 10 minutes | ✅ |
| Compress videos | ✅ | ✅ |
| Noise removal | ❌ | ✅ |
| Customize recordings | ✅ | ✅ |
Unique Features of Filmora
- Generate background music intelligently according to your video content.
- Create various sound effects by prompts.
- Convert texts into various accents and voices in 33 languages.
- Remove background noise and enhance audio recordings with simple clicks.
- Unblur videos to enhance visual quality.
- Split long recordings into short videos and deliver them on different social media platforms.
- Have a rich library with 2.9M+ visual assets.
How to Use Filmora Screen Recorder?
As a beginner-first recording and editing tool, Filmora is remarkably straightforward to use. That's why recording with Filmora is a piece of cake and looks like this:
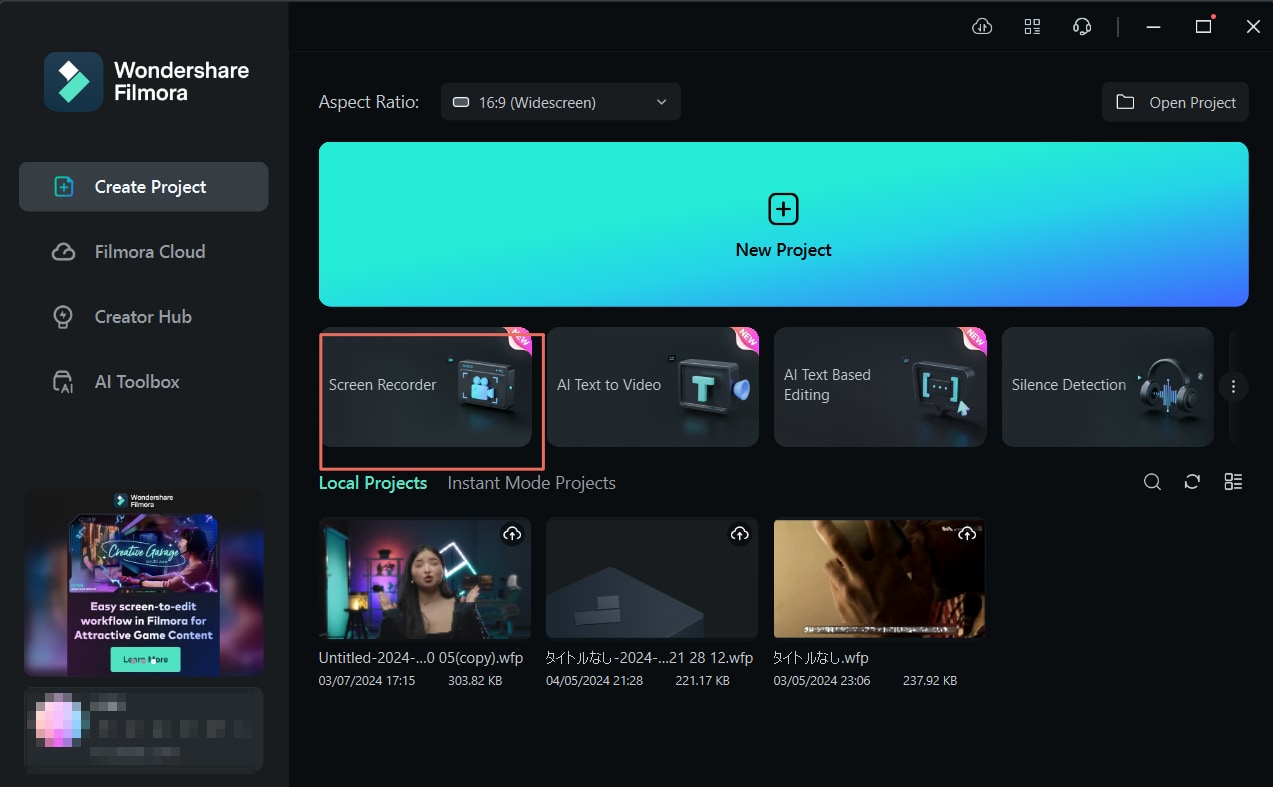
- Launch Filmora and click on the Screen Recorder option.

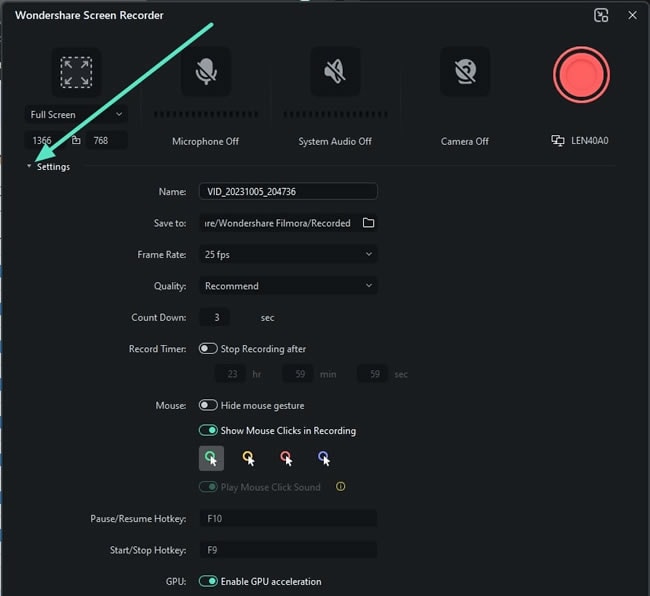
- Choose between Full Screen, Target Window, and Custom options to adjust the capture area.

- Adjust the Microphone, System Audio, and Camera recording settings based on what you want to record.

- Expand the Settings menu to change the file's name, export folder, and hotkeys, adjust the frame rate and recording quality, or turn mouse gestures and scheduled recording on or off.

- When ready, tap the Red button or hit the F9 key to start recording.

- Once done, click the Pause or Stop Recording buttons in the floating menu bar.
Conclusion
In this article, we've discussed the key features, usability, pros and cons, and steps to use the IObit screen recorder. Considering its cons, we've also recommended a powerful alternative with unlimited screen recording time and AI-powered features for your reference. Download Wondershare Filmora today and start recording immediately.


