Capturing lectures has become an essential asset to students, professors, and lecturers. For instance, a Mac can make a big difference for a student preparing for an exam or a teacher who wishes to give their students reference material in the form of a recorded lecture. Macs are well-equipped with robust hardware and user-friendly software environments, which is why there are numerous simple ways to record lectures. In this guide, you will learn the five most effective ways to record lectures on your Mac using the most outstanding screen capture software.
In this article
Part 1: Why Do You Need to Record Lectures on Mac?
Lecture recording offers several benefits for teachers, trainers, and even students:
- Review and Retention: It is flexible in that students can go over some areas, which may be tedious, and then go for some time before revisiting those areas for explanation and re-explanation.
- Remote Learning: Teachers can deliver lectures to students who cannot attend class in person, considering learning styles and other factors that affect learning.
- Accessibility: Lectures can be recorded with closed captions or modified to accommodate learners with specific learning difficulties.
- Improved Teaching: It also enables the teachers to assess their teaching methods by watching the lectures and making improvements.
Whether in an online class test or a typical classroom setting, recording a lecture is a handy tool that makes the learning process even more effective and interesting. Let's explore the top five methods for recording class lectures on a Mac.
Part 2: 5 Best Ways To Record Lectures on Mac
1. Filmora Screen Recorder
Wondershare Filmora is an all-rounder screen recording software reputed for offering robust and intuitive features. It's perfect for capturing lectures because it records high-definition videos and enables easy editing of the captured videos, making it a one-package deal for recording and producing high-quality lecture videos. It supports all Mac systems and can also be used to capture high-quality screen videos. Concerning the free Mac recorders, some advantages that Filmora comes with include mouse click effects with sound, high video quality, a recording area of your choice and at a preferred time, and the inbuilt powerful video editing tools.
Key Features:
- Record Timer: Allows users to schedule and automate their lecture recordings, ensuring no content is missed. It is perfect for setting a start and stop time, so your lectures are captured effortlessly.
- High-Quality Recording: It supports HD screen recording, with the frame rate and resolution option.
- Multi-Device Capture: Enables recording of both the screen, the webcam, and the microphone, so if there is a need to record both the lecture slides and your face simultaneously, this feature will be handy.
- Built-In Video Editor: It has video editing tools that enable cropping, trimming, adding annotations, and many others.
- Flexible Export Options: You can download your file in MP4, MOV, and GIF qualities, making it possible to work on any platform.
- Easy sharing: Burn to TikTok or YouTube, or drag dropped to any of the most common portable gadgets.
How to Record Lectures on a Mac with Filmora:
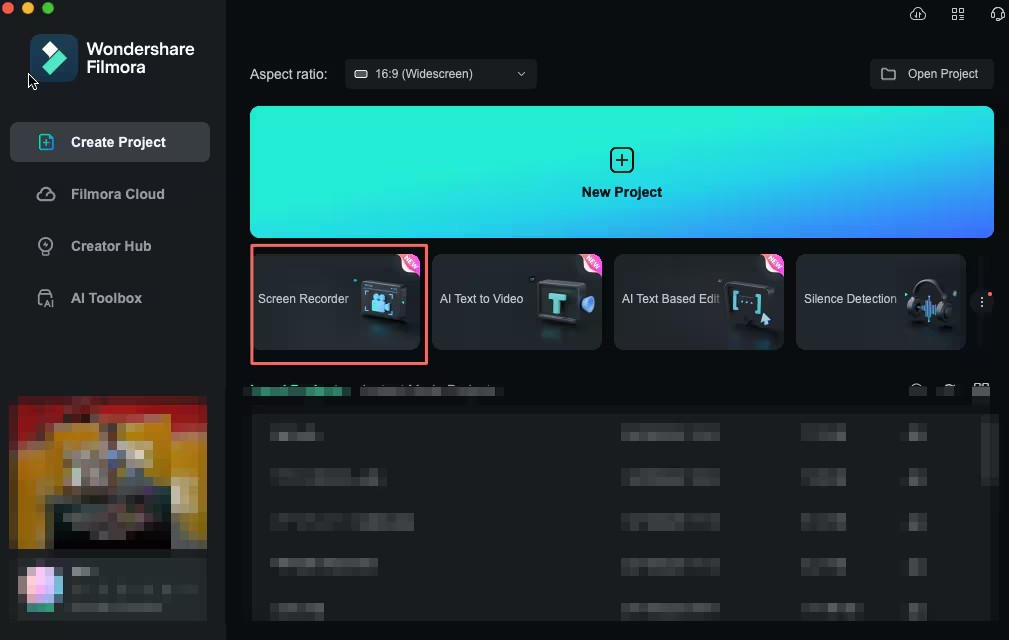
- Step 1: Open Filmora and go to Screen Recorder Mode
Open the Filmora on your Mac computer for editing the videos. On the main interface of Filmora, from the options displayed on the main screen, select the "Screen Recorder" option. A new window of the screen recorder will be opened on your computer screen.
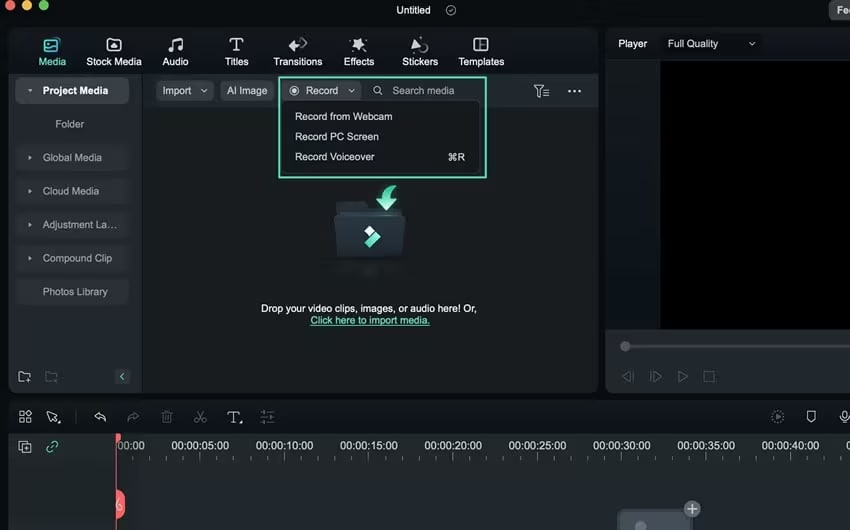
Go to the "Record" menu and choose from a variety of options that appear.
- Step 3: Adjust Settings:
Set the recording area, frame rate, and audio sources (system audio, microphone, or both).

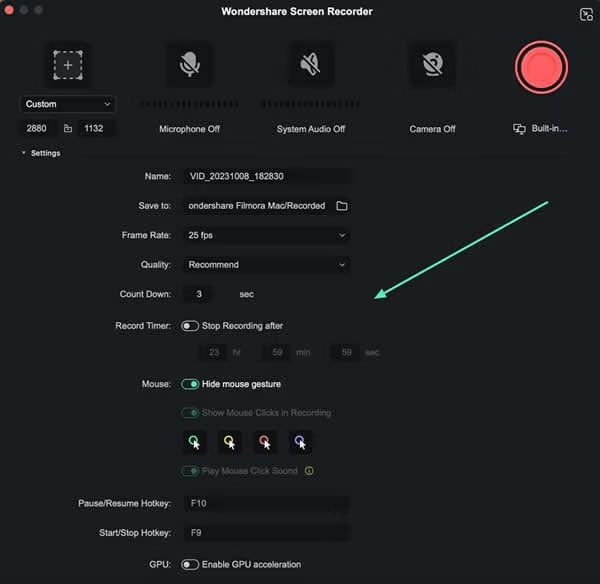
- Step 4: Customize Settings For Recording
On the lower left corner of the recording window right click on "Settings". The user can set other preferences, as per the consumption patterns of content on his/her device.
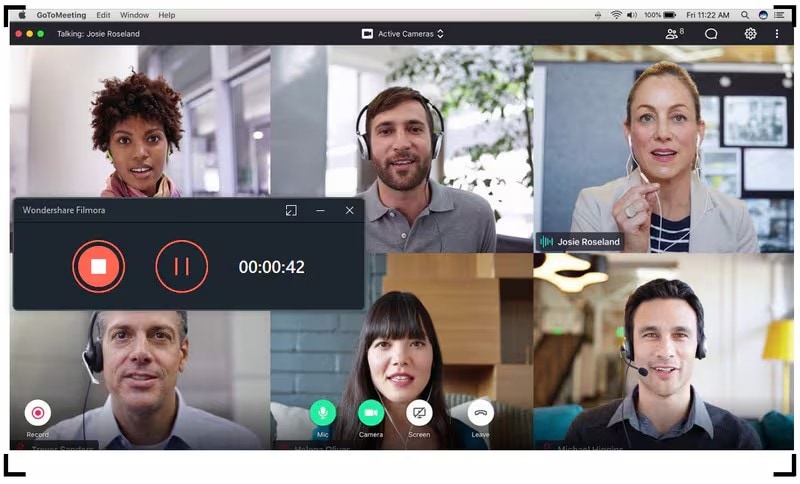
- Step 5: Keep Recording the lectures
You can continue attending lectures during recording by clicking on the "REC" button on the right side of the application. Using the options given on the screen one can pause or even stop the recording session.
- Step 6: Edit and Export
By the end of the recording session, you can also edit the video using Filmora's editor tab. After this, export it in the format that you prefer.
2. QuickTime Player
QuickTime Player is a pre-installed application that can be found on every Mac and it lets you capture a screen and sound. This one is basic, cost-free, and does not need any installation of additional tools, which makes it perfect for a rapid lecture capture that doesn’t call for unique characteristics.
Features:
- Built-In Functionality: QuickTime Player is also already installed in each Mac since it is part of Mac's operating system software.
- Basic Editing Tools: Contains basic features for formatting the materials such as splitting and cutting your recordings.
- Audio and Screen Recording: It has the feature of recording both screens and the audio at the same time.
- Unlimited Recording: There is also no time limit on recordings, this is perfect for recordings of long lectures or speeches.
How To Record Lectures On QuickTime :
- Step 1: Go to QuickTime
Get yourself to the QuickTime Player application. Choose File/New Screen Recording.
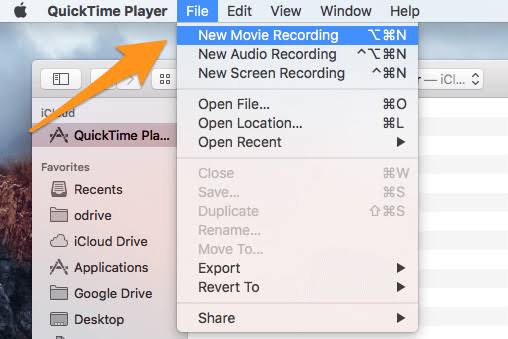
If you wish to capture audio (for instance if you want to do voiceover while capturing your desktop) then click on the small icon beside the record button and choose the right Microphone source. Otherwise, the recording of the audio form will not be possible..
- Step 2: Choose the recording area
You can decide whether to record the entire activity on your computer screen or just a specific section of the screen (as is depicted in red below) and then record by clicking on Record.

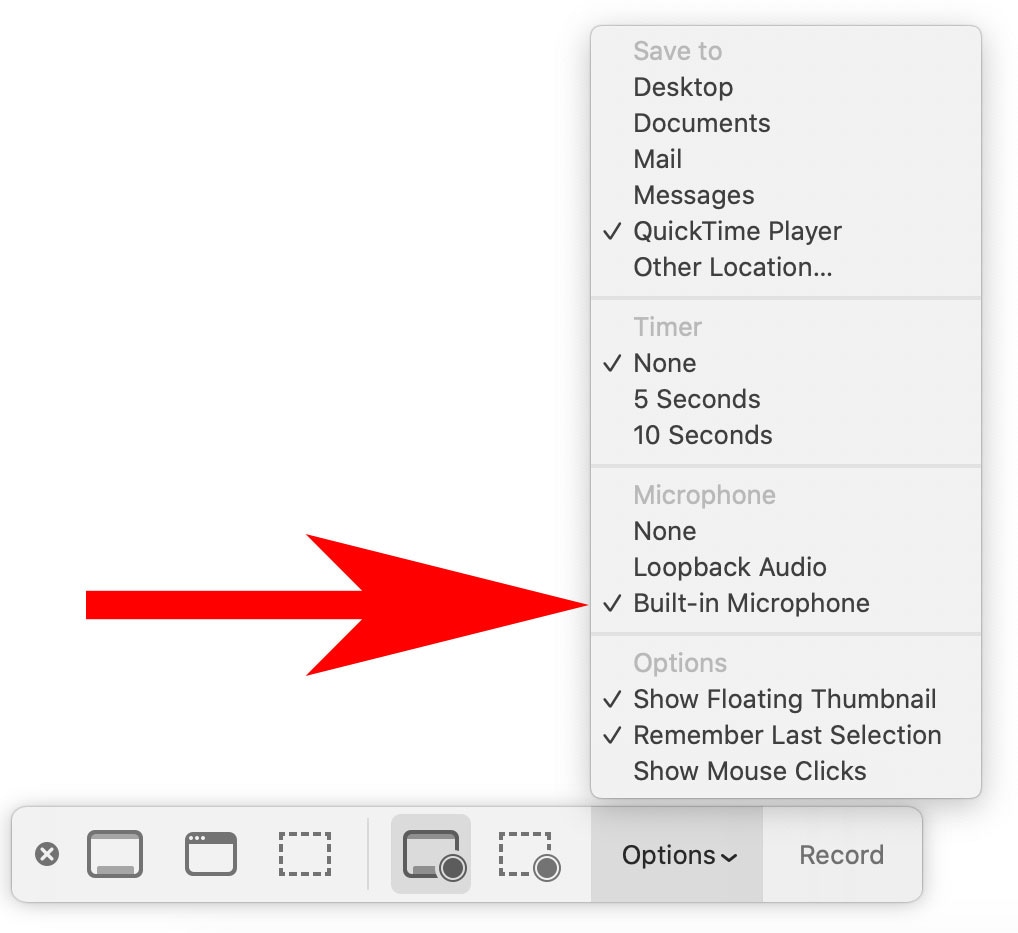
- Step 3: Click on the Options menu
Select the right audio source and input device. It should be by default your integrated microphone if you do not use a usb external microphone.
- Step 4: Open recording interface
Navigate yourself to the application where you want to record the screen activities.
At the top of your screen click on a black square which is located to the right of Finder menu items, it is a button to stop the QuickTime recording.
- Step 5: Export the recorded lecture
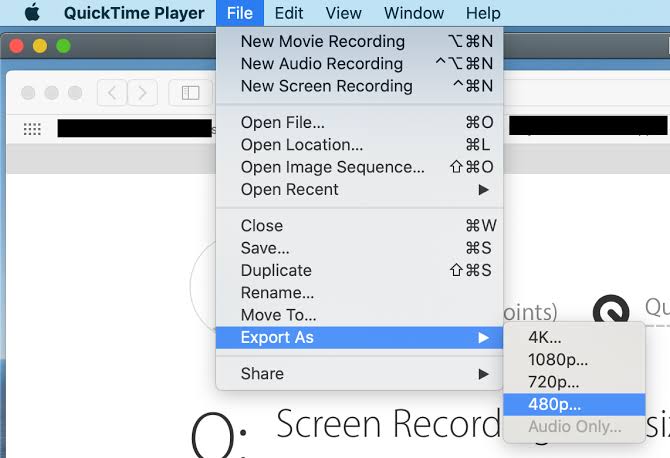
Click on "File" and export in high quality. You will see the option, "Export As" in the list of options. This is where you should export and save your video file in the desired quality.
3. OBS Studio (Open Broadcaster Software)
OBS Studio is a very functional screen capture program with a set of enhanced tools for recording and broadcasting. While it may be more complicated than the other choices, it offers much more opportunities for the recordings, various input sources and settings, that will be very useful for recordings of lectures.
Key Features:
- Customizable Recording Settings: Provides flexible options to set up a display resolution, frame rates, and the choice of the audio mode.
- Multi-Source Recording: Enables you to capture streams from the screen, face through the webcam and other devices such as microphones.
- Streaming Capabilities: Supports broadcasting to such services as YouTube or Twitch.
How To Do Class Recording with OBS On Mac:
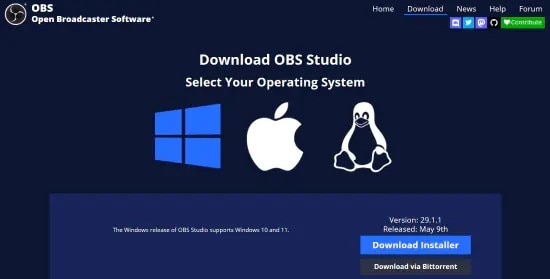
To screen record with OBS, first, you'll have to download the Mac version from the official OBS site.
- Step 1. Install OBS Studio
Download the program and install it on your Mac device.
- Step 2. Launch the program
Launch and open OBS application, there should be an addition of default Scene in OBS Interface. However, if it does not load automatically, then all you have to do is click on the + icon. It's located in the box that has the label Scenes on the lower left area of the screen.
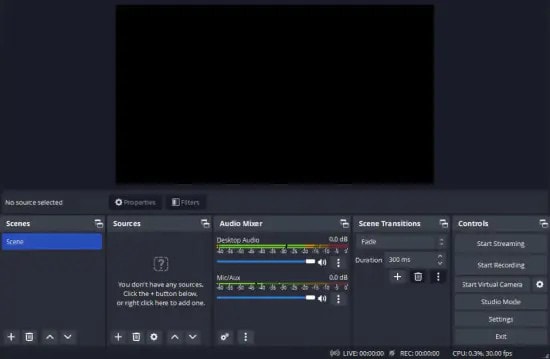
- Step 3. Specify the settings
The Sources box should be located to the right of the Scenes box. Put the cursor on the Sources box and press the + at the bottom left of the Sources box. It should be presented as a list of options in the form of a menu that is accessible. Click Display Capture. In the pop-window, set the title, then click on "OK".
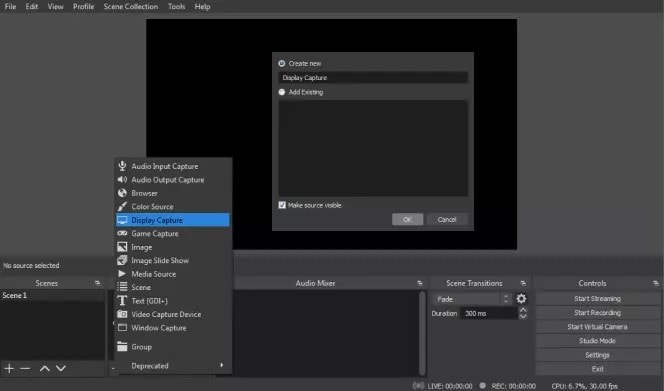
- Step 4. Choose the capture method
Select your display method and your capture method from the dropdowns in the next pop-up window and click on the check-box if you want your cursor to appear on your recording. For those who have multiple monitors, you'll have to click the down-arrow and choose the right screen from the list. Finally, when you are done select OK from the toolbar.
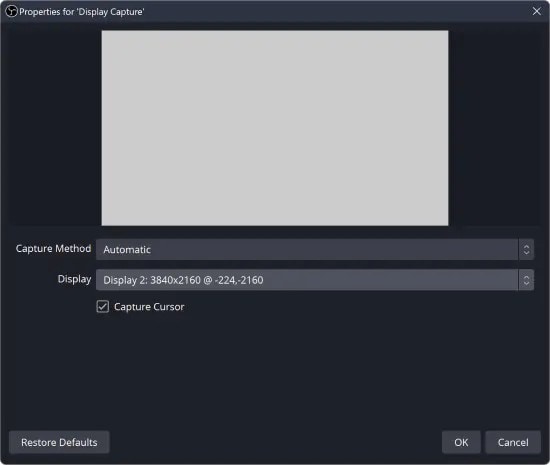
- Step 5. Select the output folder
In the right bottom corner please click Settings. Next select the Output icon situated in the menu that drops down on the left side of the opened new Window. Recording box requires you to select your destination file in the Recording Path. To do this, click Browse and select a destination.
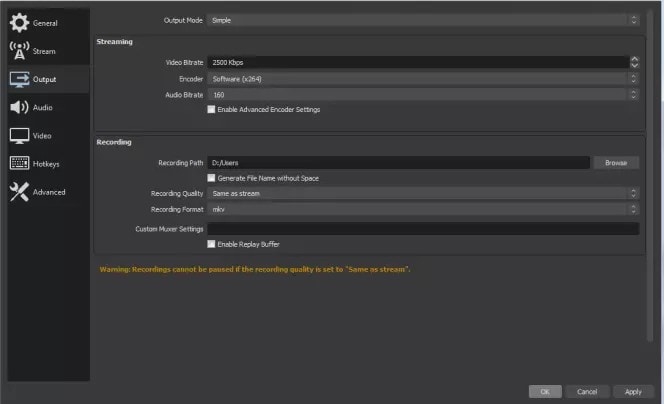
- Step 6. Start and stop recording
By following the mentioned steps above, select all your choices and after that, buy clicking the Start Recording button of the OBS Studio record. The green and blue spade like icon is usually located on the lower right hand corner of your screen as you click start streaming.
You can stop recording by clicking on the same button you pressed to start.
4. Camtasia
Camtasia is a great tool for the creation of professional and highly appealing lecture videos since it is a screen recorder and a video editor for professionals. It has the functionality of annotations, transitions, and effects allowing an instructor choosing this method of delivering learning to provide interactive content in the captured videos.
Features:
- Screen and Webcam Recording: Can record both the screen, and the webcam at the same time Can record your screen alongside your webcam.
- Professional-Grade Editing: As for the common features, it comprises a rich video editing kit for producing professionally looking lecture videos.
- Annotations and Effects: Has numerous choices to improve your videos; transition, animations and text over your recorded videos.
- Quizzing and Interactivity: Enables you to include quizzes and other things that are fun and enjoyable to the students in the course of teaching them.
How To Record Lectures With Camtasia On Mac
- Step 1: Choose your recording options
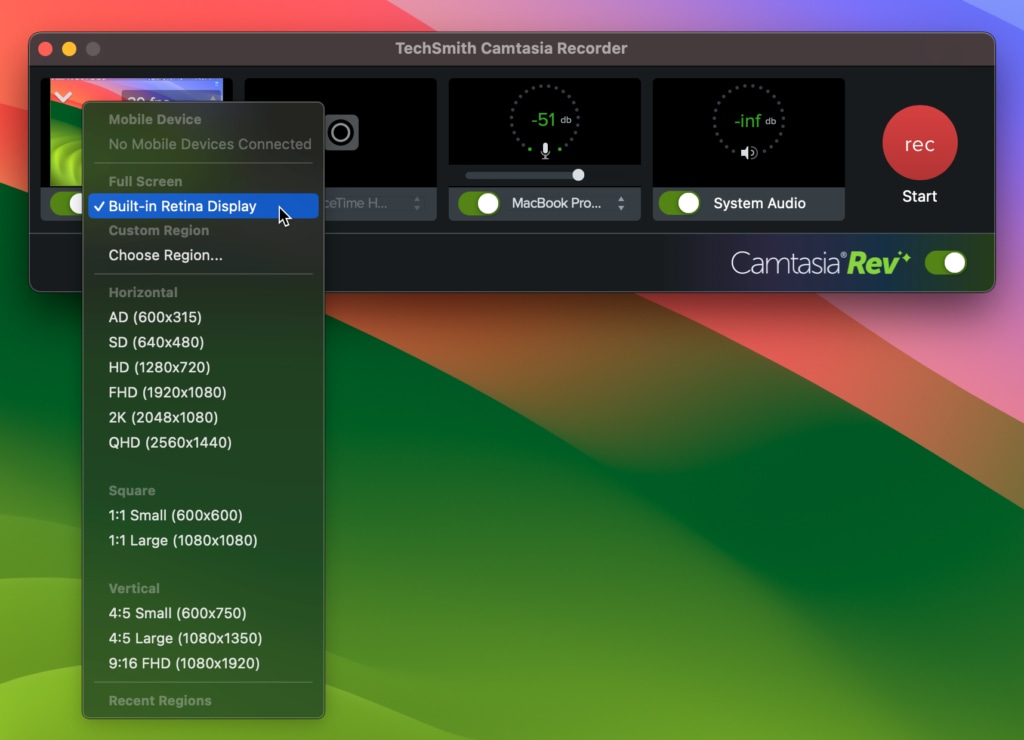
First, launch Camtasia and then in the Tools Panel, locate the Record button and click on it. It will still open the Camtasia Recorder. This is in essence the control center for your screen and audio recordings and will by default be set to record all activities on the screen.

- Step 2: Select what you want to record
Begin by choosing which part of the screen you want to capture while making a screencast. Sometimes, what you may want to capture is your entire desktop, other times it could be a single window or even just a portion of the window.
- Step 3: Record your audio
If you are going to be speaking in your recording, it might be helpful to write out an outline, at least, so you don't forget what information you want to get across. Before starting recording, you can choose the source for recording and decide if you want to record your Mac system audio at the same time.

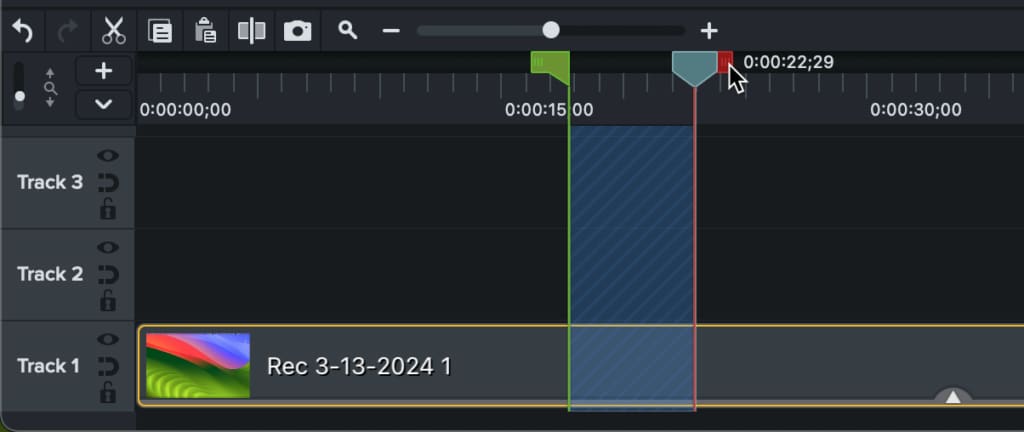
- Step 4: Edit your video
Camtasia has an integrated video editor, and even if you know almost nothing about video editing, it will take mere steps to finalize the appearance of your video and make it look professional.
- Step 5: Produce and share
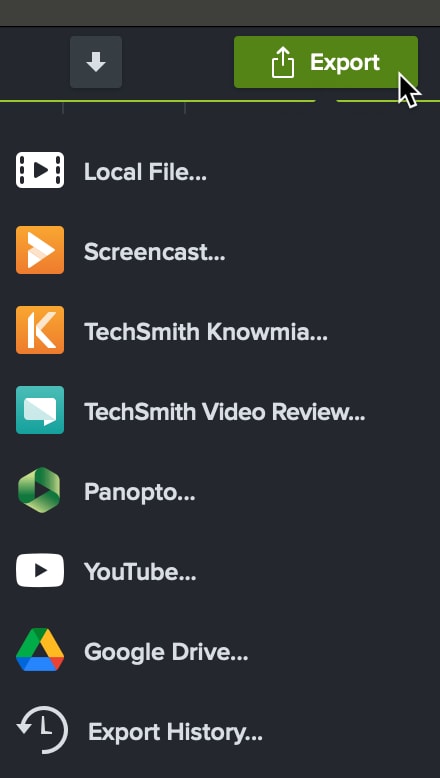
The last of the process is a finalization of the video and then sharing the video file to the hosting platform of the user. When you are done with the Camtasia production of the video, it is easy to upload the video to, for example on YouTube, Vimeo, or Screencast or to download the video file to your Mac computer.
5. Hitpaw
Hitpaw is a tool that students use to record lectures on their Mac devices. Among all the screen recording software that are available, it provides high quality recording and high-level editing tools making it ideal for professors to create polished lecture capture videos. It is a better recording solution called the HitPaw Screen Recorder that will assist teachers create engaging video classes and help students record the lessons for distant learning with good quality.
Features:
- High-Quality Screen Recording: It supports retina display recording which means it is a good option when you are recording lectures with detailed slides on the background.
- Powerful Video Editor: In ScreenFlow, users have extra tools for editing, and one can add animations, transitions, and text overlay.
- Media Library: It gives you access to stock media such as the ability to search for music, images and videos.
- Closed Caption Support: Enables one to place captions and subtitles of the videos which would benefit all the students in their learning process.
How To Record Lecture On Mac Using HitPaw
- Step 1: Launch HitPaw Edimaker for Mac
To start, you have to make sure that you download and install the HitPaw Screen Recorder on the device.
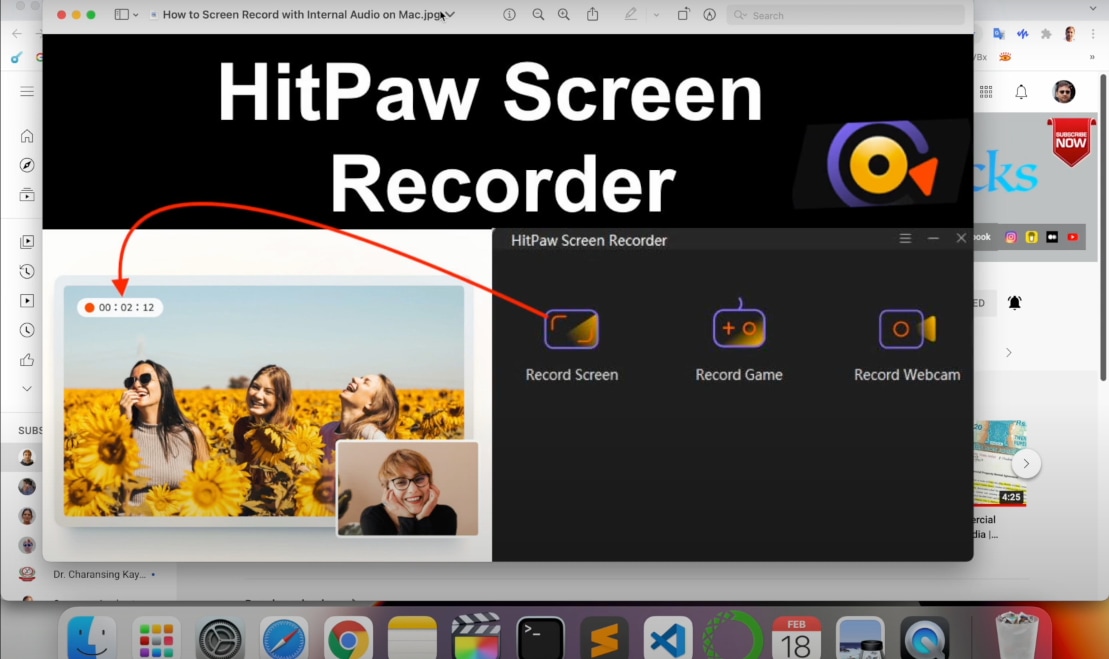
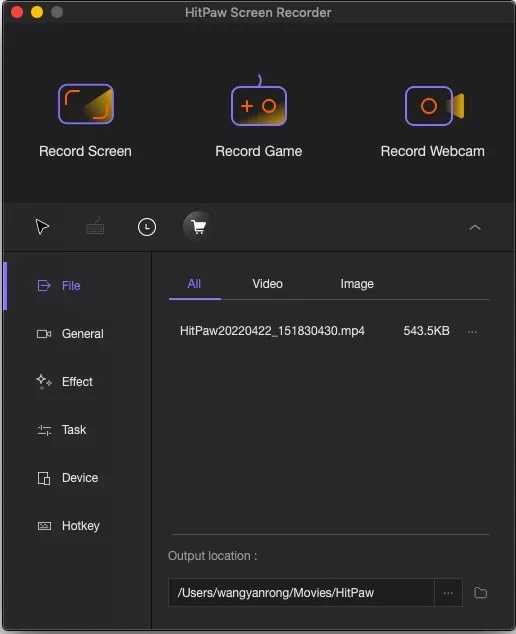
- Step 2: Go to recording interface
Select the "recording" option on the main interface and one will be moved to the screen interface as shown below asking you to choose the type of recording.
- Step 3: Choose templates for class recording
Input the source which needs to be recorded and you have the choice to apply templates that can bring interest and a better teaching result.
- Step 4: Adjust the recording area
Now begin the lecture, then change the screen area to be captured by zooming and click on the Record button on the screen showing a red circle.

- Step 5: Stop and save the recording
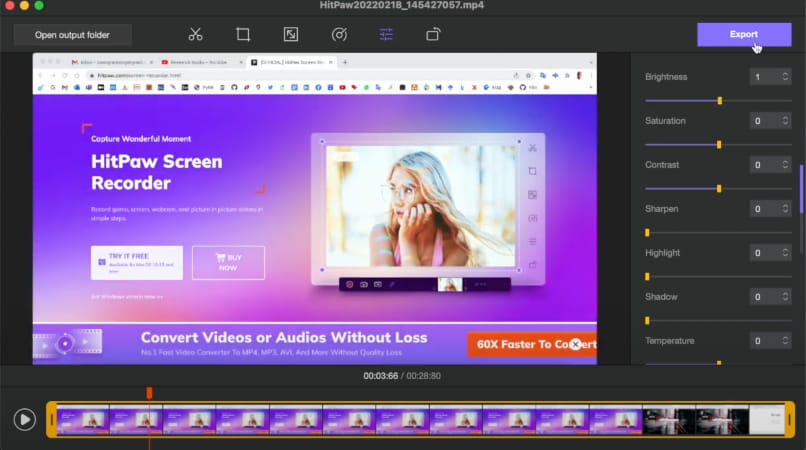
If the users want to stop the recording, they simply tap on the stop button. You can then export the recorded lectures by clicking on the "Export" option on the top right.
5 Best Mac Lecture Recording Software Comparison
Below is an updated comparison of five popular Mac lecture recording solutions. The best for column now details the primary audience for each tool, and other evaluation dimensions have been refreshed for clarity and alignment with real user needs.
| Software | Best For | Ease of Use | Export Options | Limitations |
| Filmora Screen Recorder | Beginners & educators | Easy | MP4, MOV, GIF | Watermark in free version |
| QuickTime Player | Quick/basic users | Easy | Mac native formats | No advanced features |
| OBS Studio | Advanced users/streamers | Complex | Custom formats, streaming | Steep learning curve |
| Camtasia | Professionals, trainers | Moderate | Multiple formats | Paid, some complexity |
| Hitpaw | Casual users & marketers | Easy | Various formats | Paid features, less known |
Conclusion
Capturing lectures on Mac has never been so difficult as there are so many screen capture applications. For instant and cost-free needs, you can choose tools like QuickTime Player, while for other professional needs with features like video editing, you have to go for tools like Filmora and Camtasia. If the recordings are simple and not much editing is required, then the right tool can make the lecture videos more attractive to the learners.


 100% Security Verified | No Subscription Required | No Malware


