Screenshots have changed the overall ways of communication, education, and information in the world. With the help of these elements, users can convey messages without iterating anything. Tutorials have been made accessible through screenshots. From mobile phones to laptops, every device comes with different ways of taking screenshots. This article covers information on how to screenshot an HP laptop in the best ways.
In this article
- Part 1. How to Screenshot in HP Using Win + PrtSc? (For Windows 8 and Later)
- Part 2. How to Screenshot in HP Using Win + G? (For Windows 10 and Later)
- Part 3. How to Screenshot in HP Using PrtSc? (For All Versions)
- Part 4. How to Screenshot in HP With a Snipping Tool? (For Vista and Later)
- Part 5. How to Screenshot in HP With Snip & Sketch? (For Windows 10 and Later)
- Part 6. [Desktop Alternatives] Guide To Taking Screenshots in HP Tablet
Part 1. How to Screenshot in HP Using Win + PrtSc? (For Windows 8 and Later)
Third-party screenshot tools can be buggy at times, calling for the use of keyboard shortcuts. These shortcuts are best for users who want quick results because of a lack of time. When pressing the keys, the screenshot is captured within microseconds. They can either be shared or edited using the built-in editors within your HP laptop. Look ahead into the steps below to learn how to screenshot with an HP laptop:
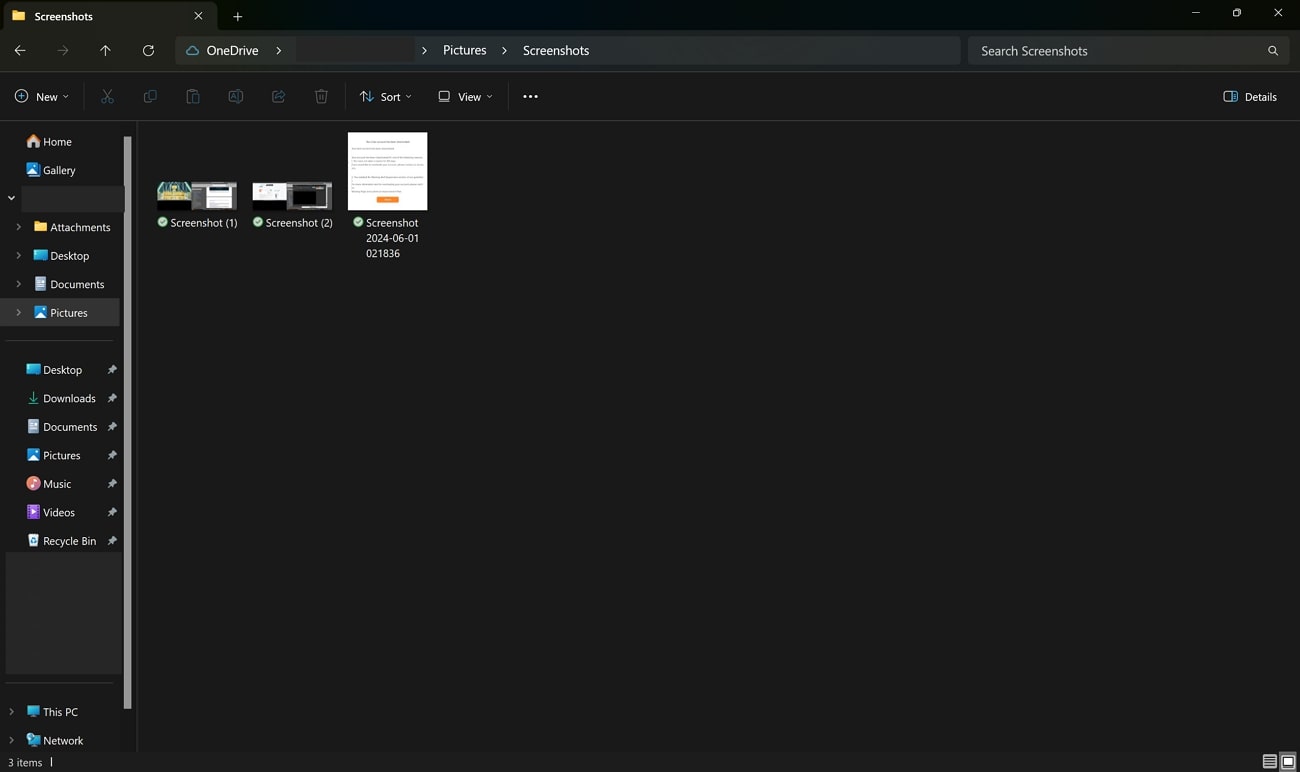
Step 1.Firstly, open the window you want to capture and press the "Win+PrtSc" keys at the same time. Now, your screen will fade, indicating that the screenshot has been captured. Access this image in the "Screenshots" folder on your HP device. You can now share this screenshot where needed, with or without editing.
Part 2. How to Screenshot in HP Using Win + G? (For Windows 10 and Later)
Using the keyboard shortcuts, you can easily take a screenshot and use it as you wish. You can add lines and drawings to the captured screenshot before sharing it. To capture a partial screen, you can crop out the unwanted parts of the picture and save the desired portions. Read the steps below to learn how to screenshot on an HP device:
Step 1.Open the screen and press the "Win + G" keys. This action will enable the Xbox Game Bar, where you will see a "Camera" icon in the top left corner of the panel.
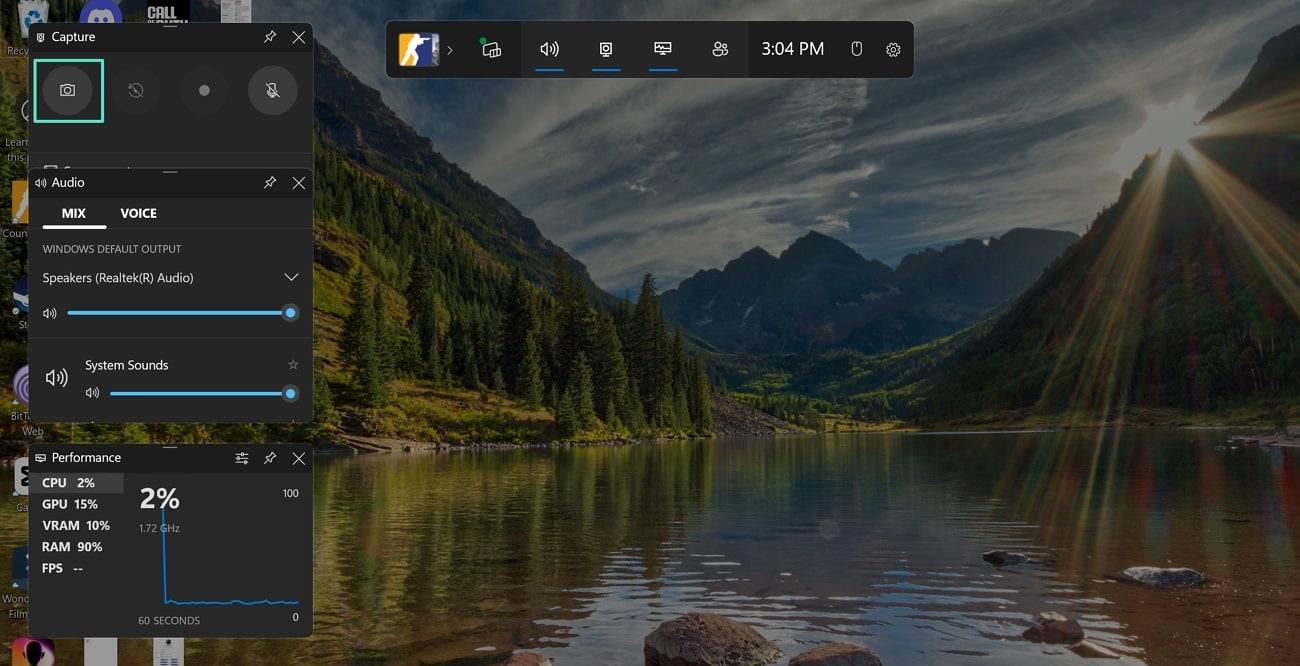
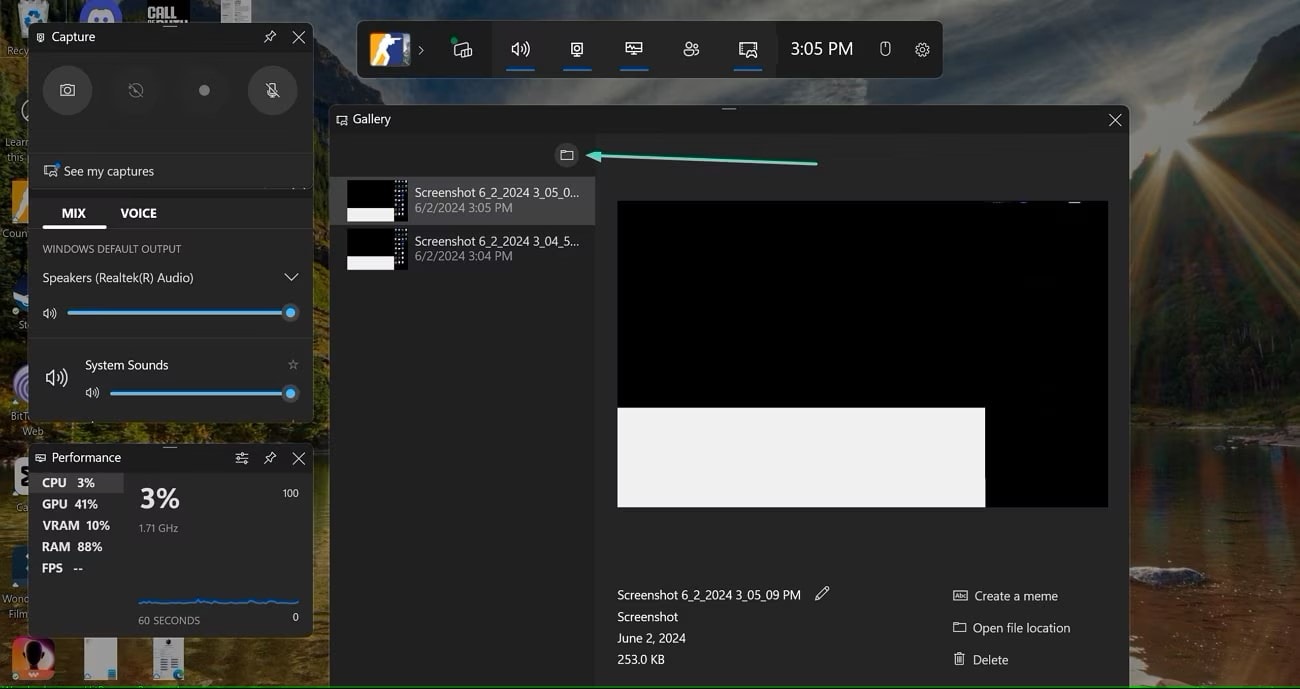
Step 2.Press the "Camera" icon and your screenshot will be captured. You will find this image in the "Captures" folder in the "Videos" file.
Part 3. How to Screenshot in HP Using PrtSc? (For All Versions)
You must try this method if you want a convenient way of screenshotting using your HP device. You can also edit the captured image in whichever way you like. Editing the screenshot will help you convey your message more accurately without having to say much. Read the following guide to learn another method of how to screenshot HP:
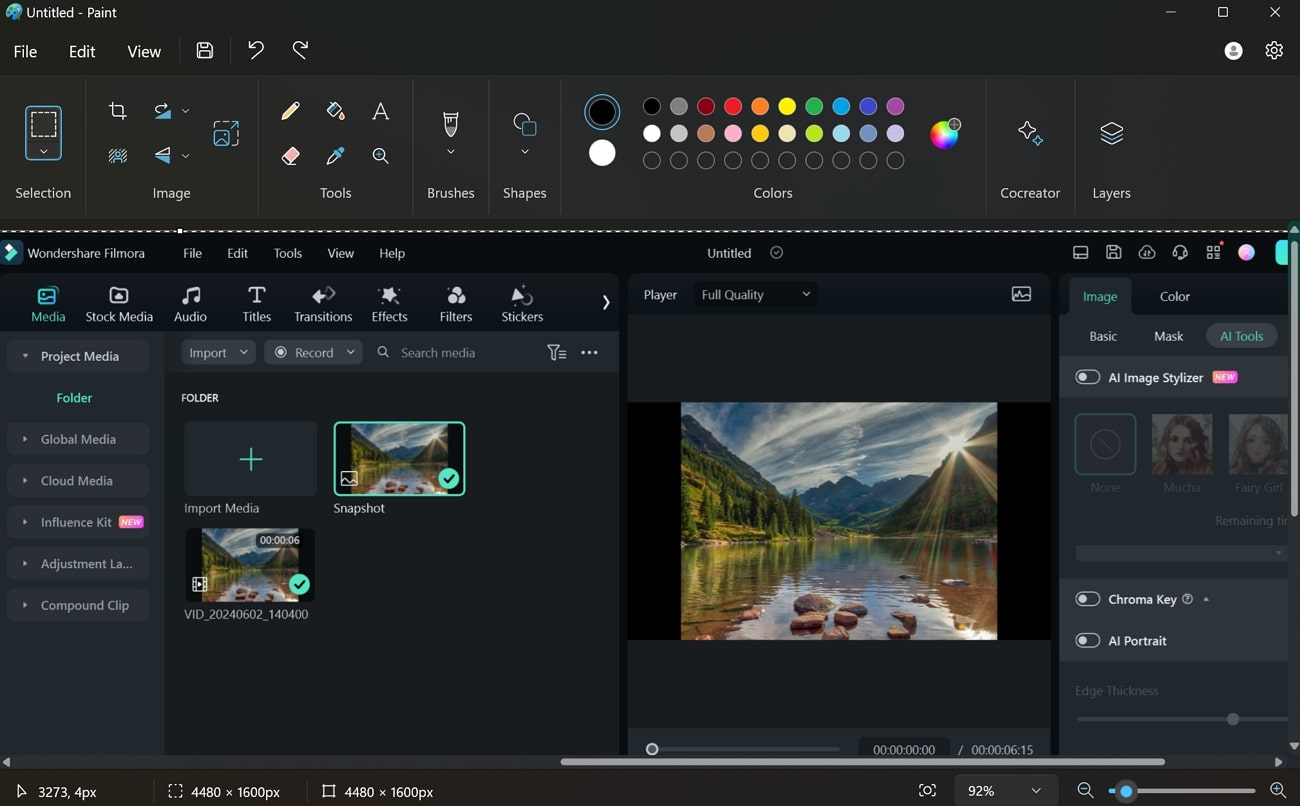
Step 1.After opening the window that you need to capture, press the "PrtSc" key in the top right corner of your keyboard. Open the "Paint" app on your laptop and press "Ctrl+V" on the Paint window. Your captured screenshot will instantly appear on your screen, ready to undergo further editing.
Part 4. How to Screenshot in HP With a Snipping Tool? (For Vista and Later)
Users who prefer advanced screenshot settings may not like the keyboard shortcuts. The built-in Snipping Tool will help them choose the screen size and shape. Using this tool, you can customize the screenshot by making drawings and markings. Continue reading to find out how to take a screenshot on an HP laptop.
Step 1. First, select the screen you want to capture and search for and open "Snipping Tool" in the search bar of your HP laptop. As a new window opens, select the "Mode" of your screenshot; choose full screen or window snip. To draw a rectangle around the desired area, select "Rectangular Snip" or click "Free-form Snip" to draw freehand around the area you want to capture.
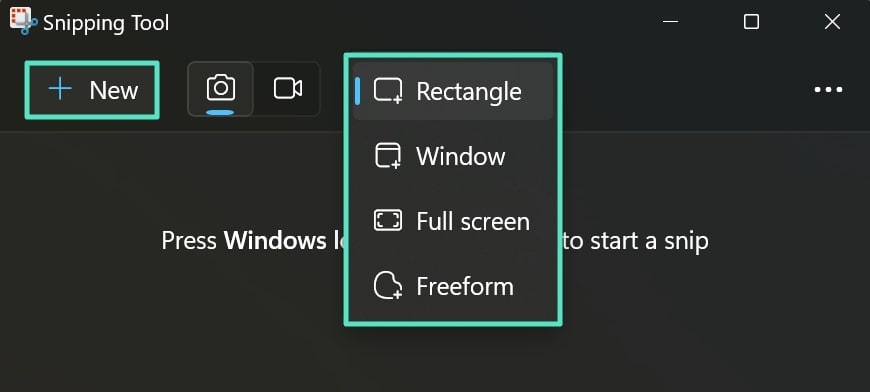
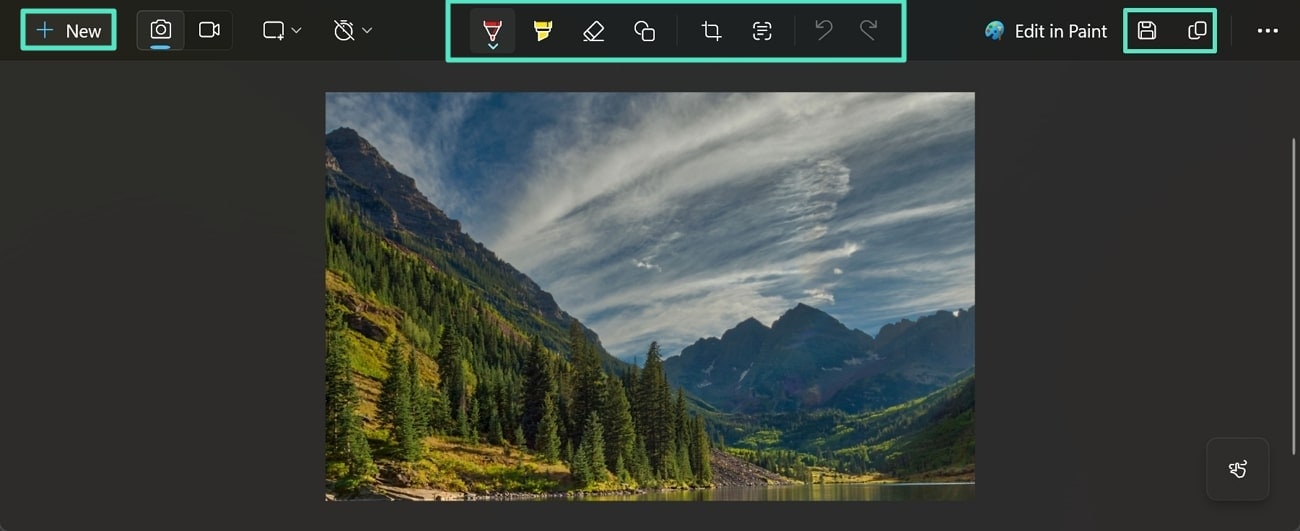
Step 2. Now, click "New" and draw the shape, covering the area you want to capture. Next, an editing window will open, offering advanced customization options. Here, you can draw by pressing the "Pen" icon and highlight by clicking the "Highlighter" icon. Lastly, click the "Copy" icon or save it directly across your computer.
Part 5. How to Screenshot in HP With Snip & Sketch? (For Windows 10 and Later)
If you are a user of Windows 10 or later, Snip & Sketch is an advanced feature offered in HP laptops for editing screenshots with customization. While these screenshots can be easily used for various purposes, the tool turns out to be a convenient option. You can find optimal results by following quick steps explaining how to take a screenshot with an HP laptop:
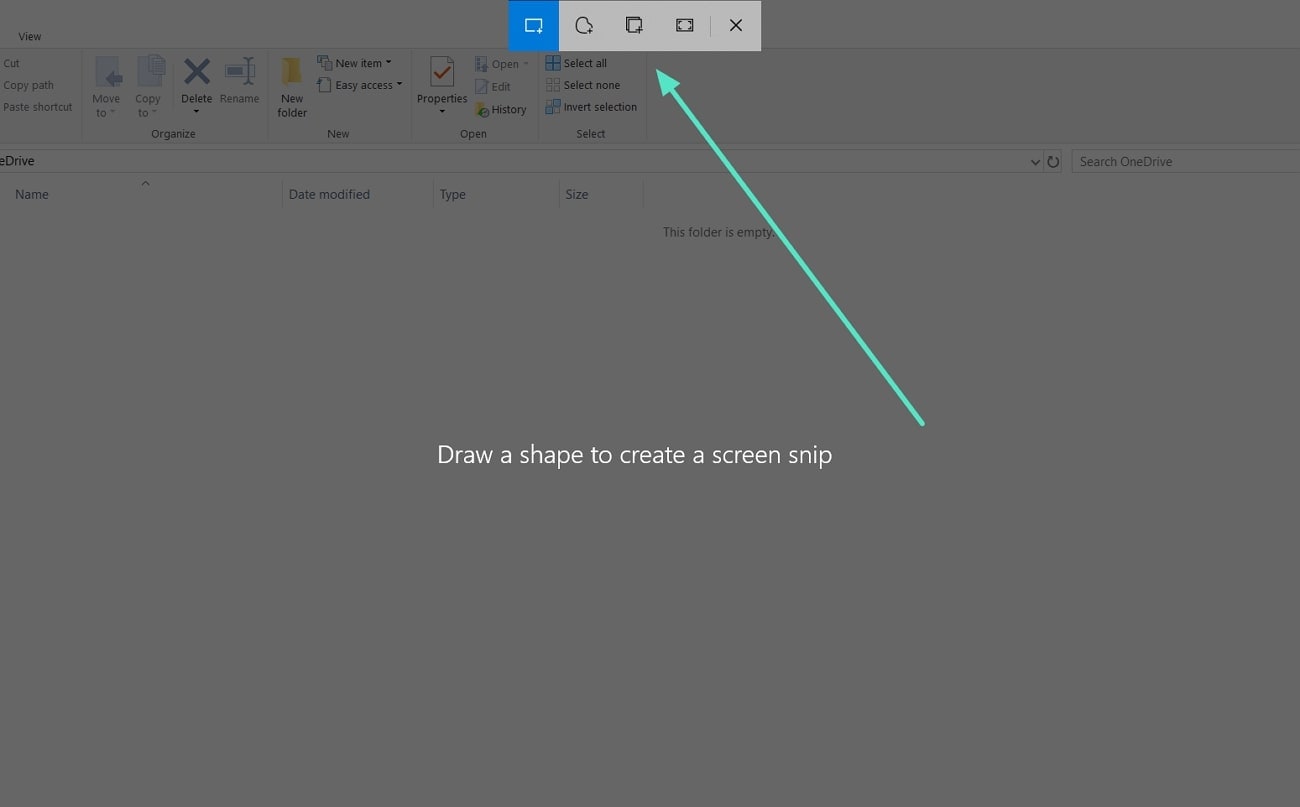
Step 1.First, press the "Windows + Shift + S" keys simultaneously, and your screen will fade into an overlay. Explore the toolbar at the top and select the shape you want to make for the screenshot. Then, click the "Window Snip" or "Full Screen Snip" icons to capture the entire screen or window.
Step 2. Next, you will see a notification to open the screenshot in the "Snip and Sketch" software. Click that notification, and you will be directed to the software with your screenshot in the editing window.
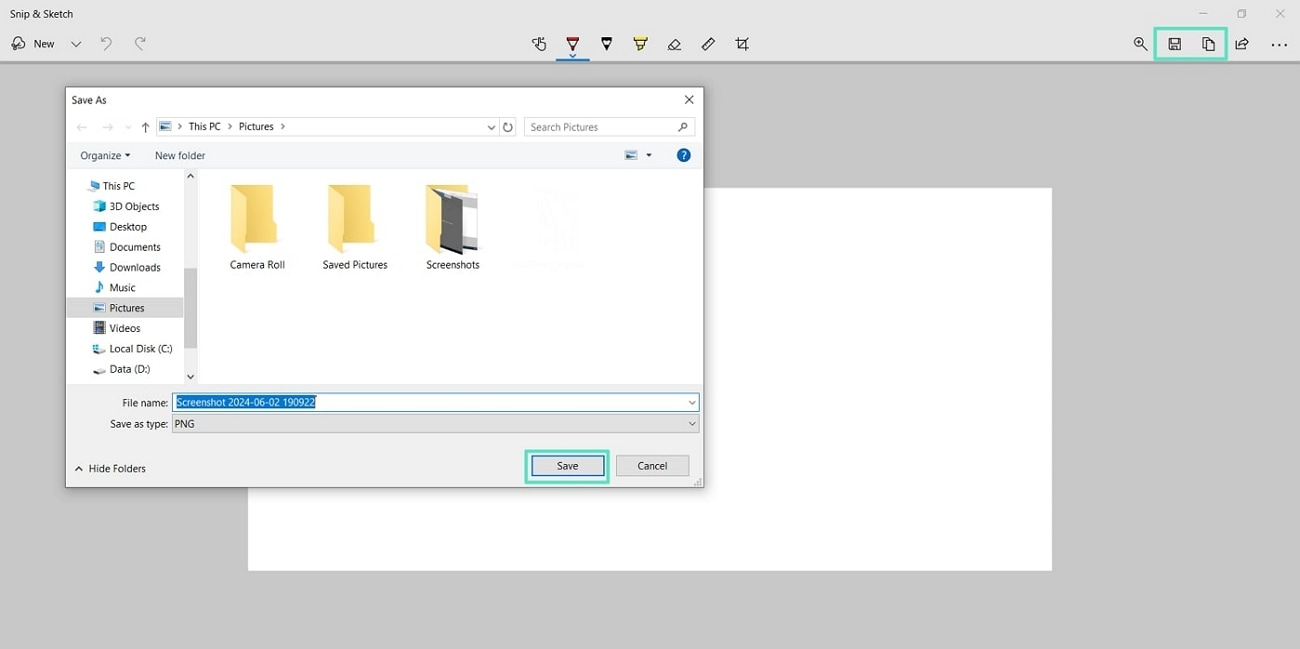
To make freehand drawings using your mouse or finger touch, click the "Touch Writing" button. You can also draw using a pen, pencil, or highlighter by clicking their respective icons. Press the "Eraser" icon to eradicate any mistakes during the drawing. Pressing the "Crop" icon will help you crop out the unwanted parts of your screenshot.
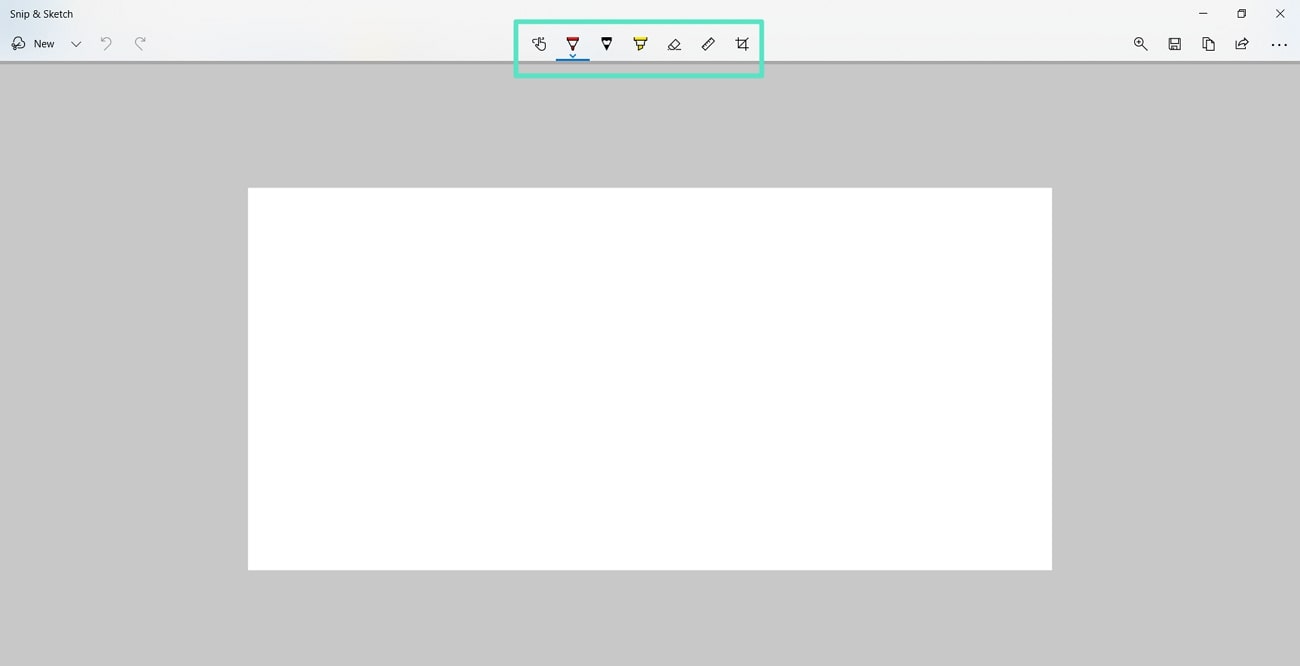
Step 3. To save the screenshot to your device, press the "Save" button or copy it by clicking the "Copy" icon. You can also share the image by pressing the "Share" button, and you are done.
Part 6. [Desktop Alternatives] Guide To Taking Screenshots in HP Tablet
Capturing screenshots on a laptop can be a little complex, as it can sometimes be confusing where to find the captured image. However, screenshotting through a mobile phone or a computer is convenient and delivers instant results. You can easily access the captured screenshot and use it where you want. Read the steps below to learn how to screenshot on an HP tablet:
Step 1. Before taking the screenshot, first, open the app or the page you want to capture. Next, press and hold the "Volume Down" and "Power" buttons on the side of your HP tablet.
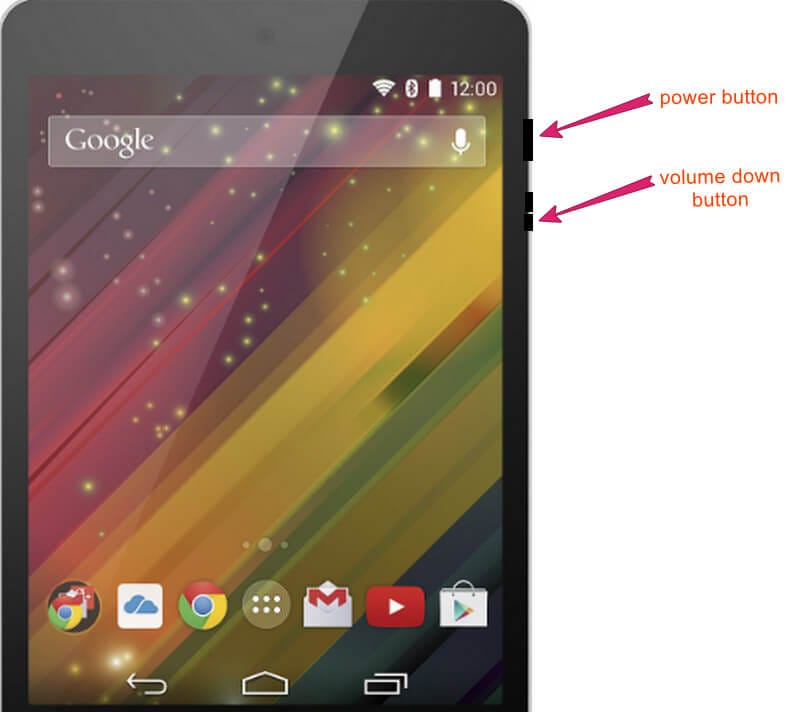
Step 2. This action will result in a flash, meaning the screenshot has been captured. Now, access the screenshot in the "Screenshots" folder in your gallery and use it where you want.
Top Bonus Recommendation. Taking Snapshots During Video Editing on Wondershare Filmora
Snapshots are a convenient and accurate way of sharing information with the world. They are also an excellent way for business owners to build trust among potential customers. Sometimes, a lot gets lost in translation, which can be saved by simply sharing a screenshot. People add screenshots to their business videos or presentations to create conviction in their words.
Wondershare Filmora perfectly captures and edits a snapshot and then adds it to your video. Using Filmora, you can add stickers, drawings, and filters to your screenshot. You can then export the screenshot as it is or add it to your video. To add a snapshot to your video, Filmora allows you to capture it without using a third-party tool.
Easy-to-use screenshot tool for everyone

Guide To Capture a Snapshot Using Wondershare Filmora
This video editing tool captures and edits snapshots, too. Read the steps below to learn how to screenshot in an HP laptop with this video editing solution.
Step1. Start a New Video Project and Import Media Content
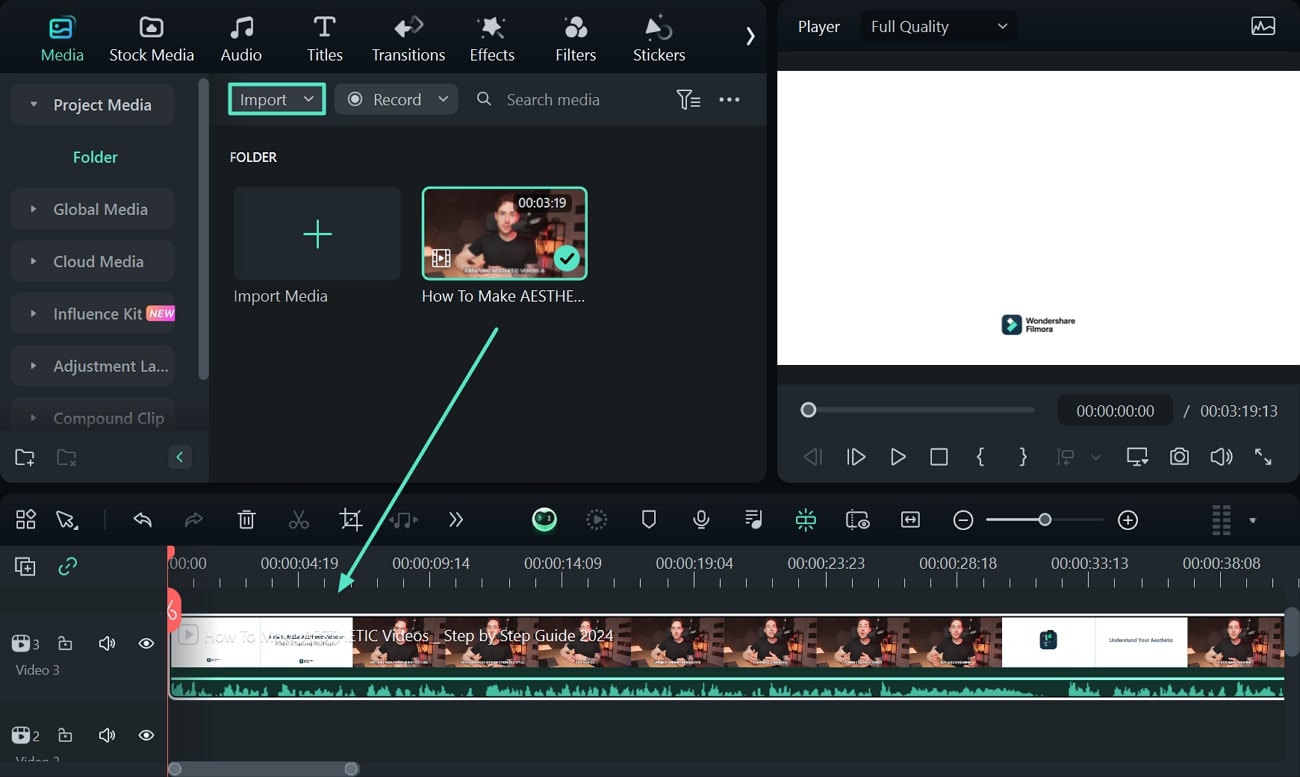
Firstly, launch the Filmora software and wait for the main window to open. Here, click the "New Project" option, and an editing window will show up. On the next window, click the "Import" button and bring the desired video to the media window. Now, drag your media to the timeline and do some basic editing.
Step2. Take a Snapshot and Edit it
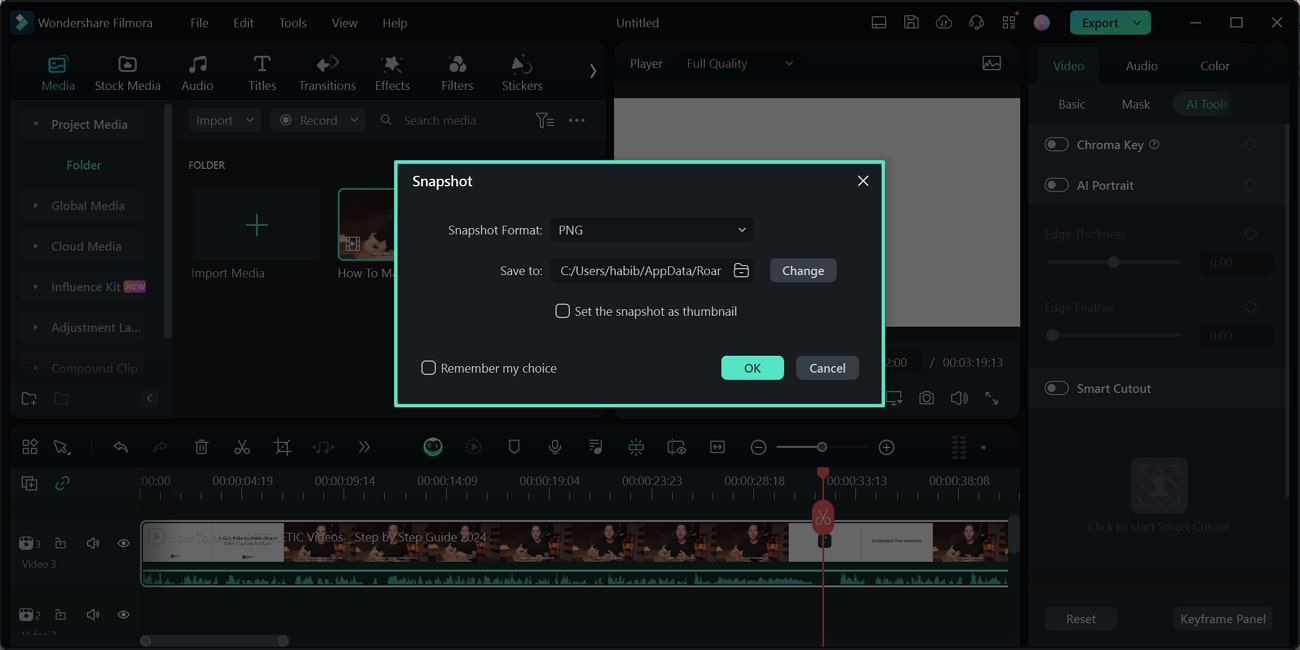
Next, your video will automatically show in the interface's preview window. Notice the toolbar at the bottom of the preview window and click the "Snapshot" icon in the taskbar. A pop-up window opens up where you can define the format and location of the captured snapshot.
Step3. Add the Snapshot to the Video and Export File
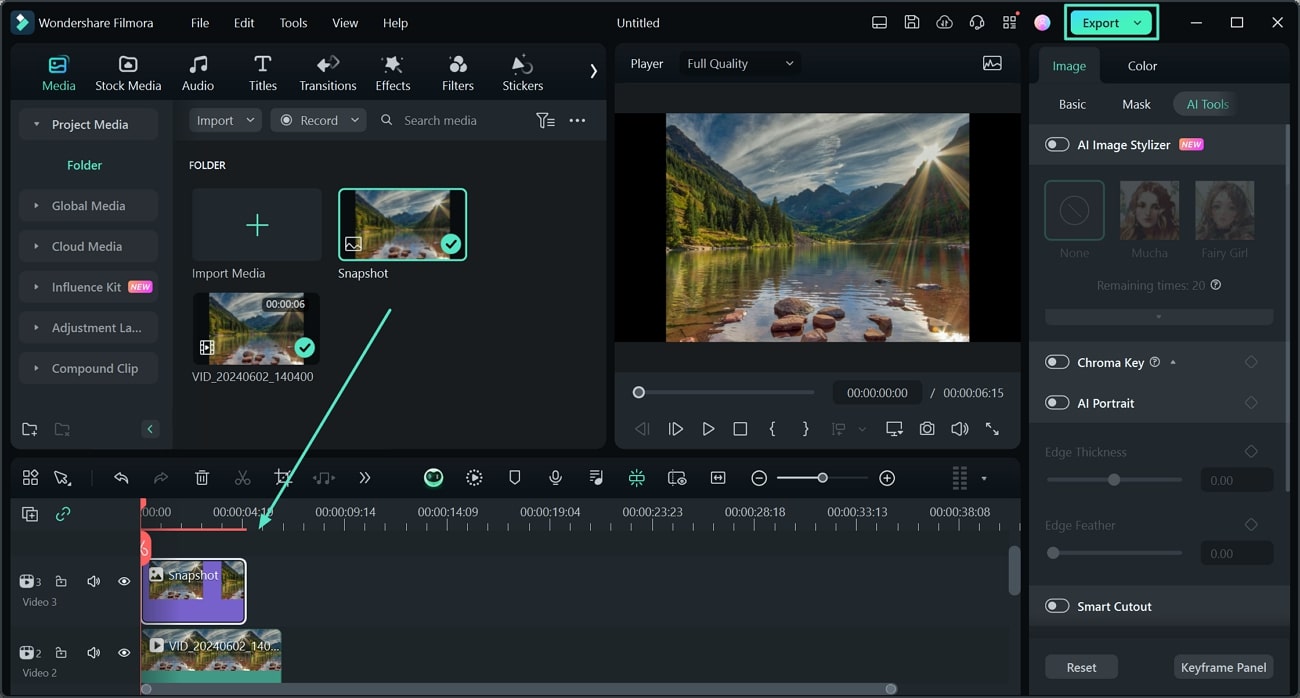
Now, after editing the snapshot, drag it to the timeline and add it to the region where you want it. Next, click the "Export" button at the top right corner of your screen, and a configuration window will open. Here, enter the file name, format, and other settings and press "Export," and you are done.
Conclusion
This article presented a detailed overview on how to screenshot laptop HP using various methods. With tools like Snipping Tool and Snip & Sketch, you can edit and crop screenshots before sharing them. Wondershare Filmora turns out to be a great alternative when it comes to capturing snapshots without using any third-party tools.


 100% Security Verified | No Subscription Required | No Malware

