To ensure a smooth user experience, synchronizing audio with the video is essential. Perfect audio and video alignment reflects professionalism of the video maker and engages the audience in the best way. In a well-synced video, the sound effects are well-timed, and the message gets across in an effective way. Due to lack of technology and technical knowledge, people overlook the need to align the music with visuals.
This process, if done manually, takes a long time and cannot ensure precision. Syncaila is an auto-sync software that serves as a handy solution for accessing a well-aligned video. In this article, we will discuss the best options to synchronize audio by offering easy-to-use and time-saving abilities.
In this article
Part 1.Review of Syncaila: Making Audio Synchronization Possible
When you must incorporate multiple music tracks into a video, it is viable to use Syncaila . This platform can handle multiple video files and align as many soundtracks with them as needed. You can process multi-hour footage shots taken from various cameras of different models and formats on this tool. Syncaila offers an intuitive user interface that lets users navigate from one timeline track to the other with ease.
Advantages of Adopting Syncaila for Audio Synchronization
From the above discussion, you might have some idea of the adaptability of Syncaila and why it is preferred. Go through the following discussion to learn some advantages of inheriting this tool for syncing purposes:
- Syncs your audio like a human brain, as Syncaila includes algorithms that simulate human logic in the process.
- Ensures maximum accuracy in the results by offering 4 chronology types to choose from.
- Saves the hassle of restarting through the Auto Re-Sync feature that lets you align the audio after any adjustments made to the media.
- Ensure only the desired sound syncs with the visuals by setting the sound threshold manually to filter out the undesired noise.
A Guide on Synchronizing Audio Using Syncaila
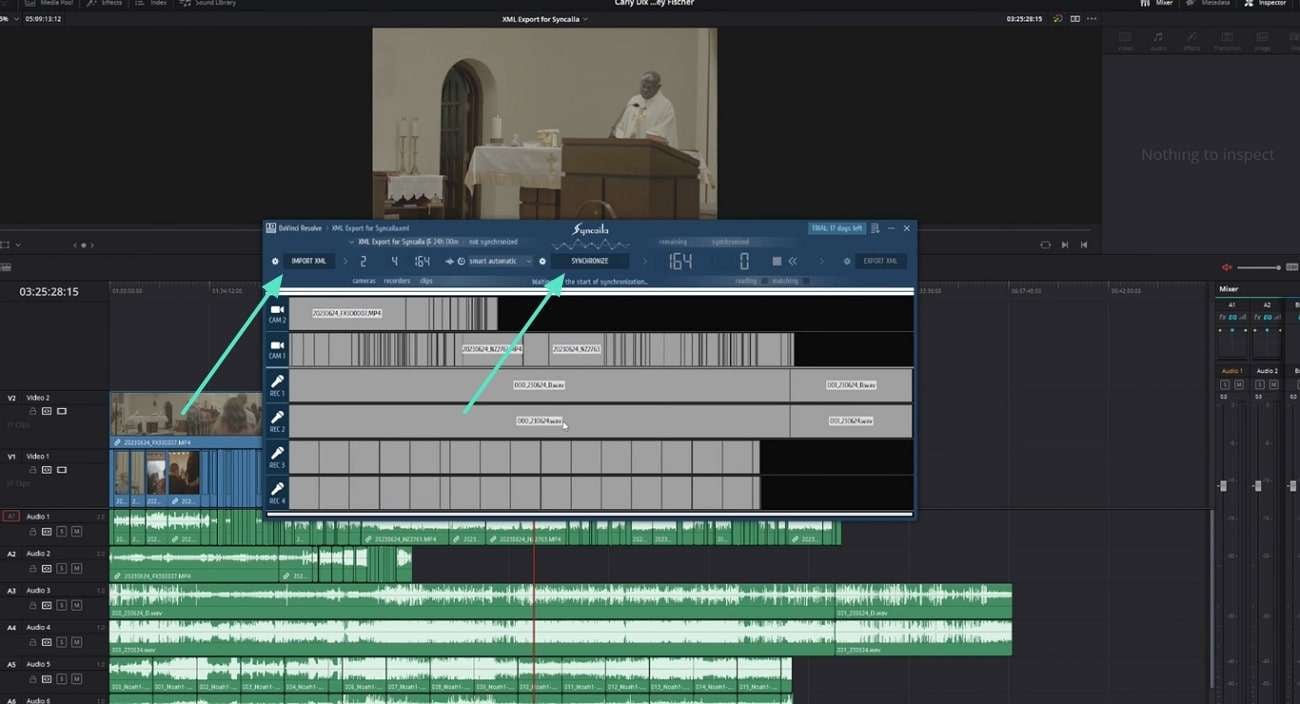
Step 1. Use the "Import XML" option to export the FCPXML audio track from DaVinci Resolve to the Syncaila interface. As the file appears in the timeline, click the “Synchronize” button to speed up the process.
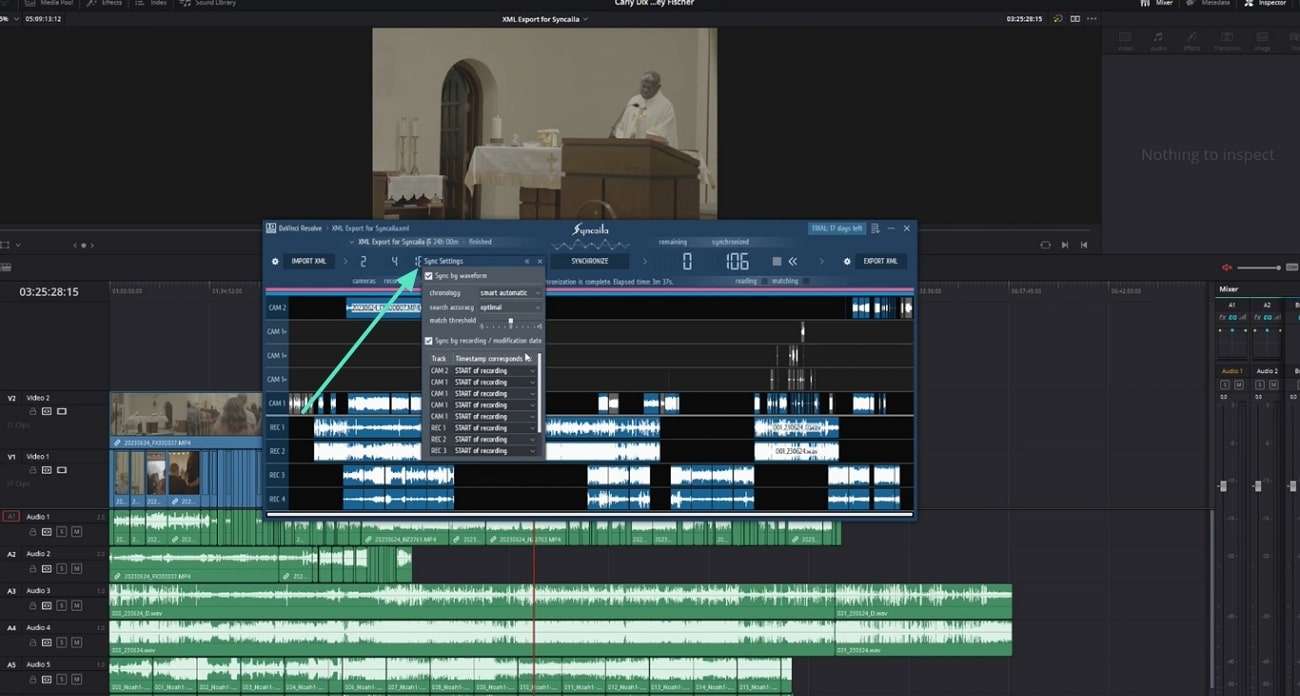
Step 2. Once the synchronization is finalized, click the "Sync Settings" button from the toolbar to open a pop-up. Here, you can adjust the "Search Accuracy" and "Chronology" settings by clicking the respective options.
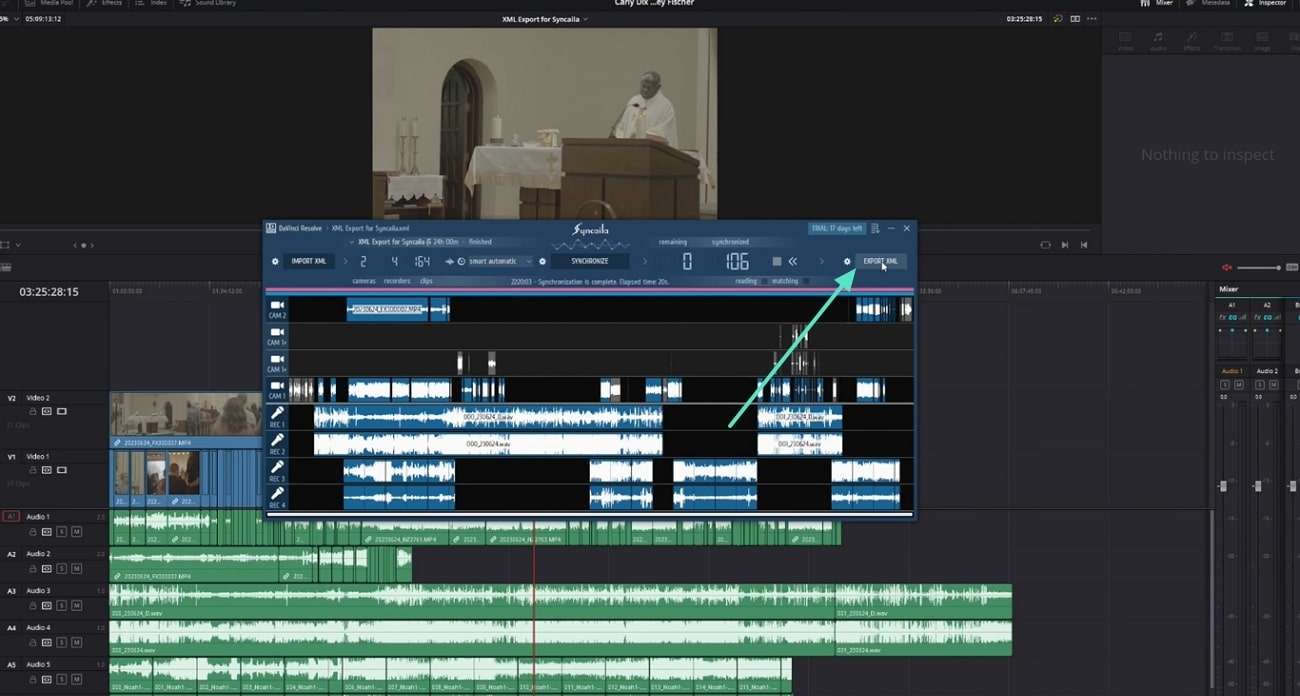
Step 3. When synchronization is completed, use the toolbar to click the "Export XML" option. From the "File Explorer" window, select the file destination folder, and it will be automatically saved.
Limitations of Using Syncaila
Although Syncaila is widely preferred among videographers, there are many negative aspects you need to keep an eye on. Read the following section to learn the limitations of synchronizing audio using this platform:
- To align audio with the visuals, this tool only accepts FCPXML files. If a user has soundtracks in some other format, they cannot use Syncaila unless they acquire a file in the format mentioned above.
- If you have bad fidelity audio, you cannot denoise it or enhance the quality to provide a better experience to your audience. This is a major limitation of this platform which could end a user up looking for better alternatives.
- Syncaila has a very unique form of adjusting audio with videos, which is why you need to have a dedicated video editor. All edits made through synchronization needs to be reviewed across a video editor and effectively converted into some readily available video format.
Part 2. Wondershare Filmora: A Better Solution to Audio Synchronization
While working with diverse audio formats, Syncaila’s versatility can be easily challenged. The file format limitation calls for a better alternative with open doors for all files. Users also prefer a tool with diverse audio enhancement options that refine the quality for a better experience. Wondershare Filmora is an all-in-one video editor that edits a video while offering the above-mentioned features.
Filmora offers a single video and audio synchronization interface, giving it an advantage over other audio sync tools. With its unmatched Audio Synchronization feature, align your audio with the visuals while enhancing the sound quality. It improves the sound quality by removing the wind or breath sounds from your file.
A Tutorial on Audio Synchronization Using Wondershare Filmora
Unlike Syncaila, the audio synchronization in this tool takes just a few steps to complete. To learn how this feature can be executed using Filmora, follow the steps below:
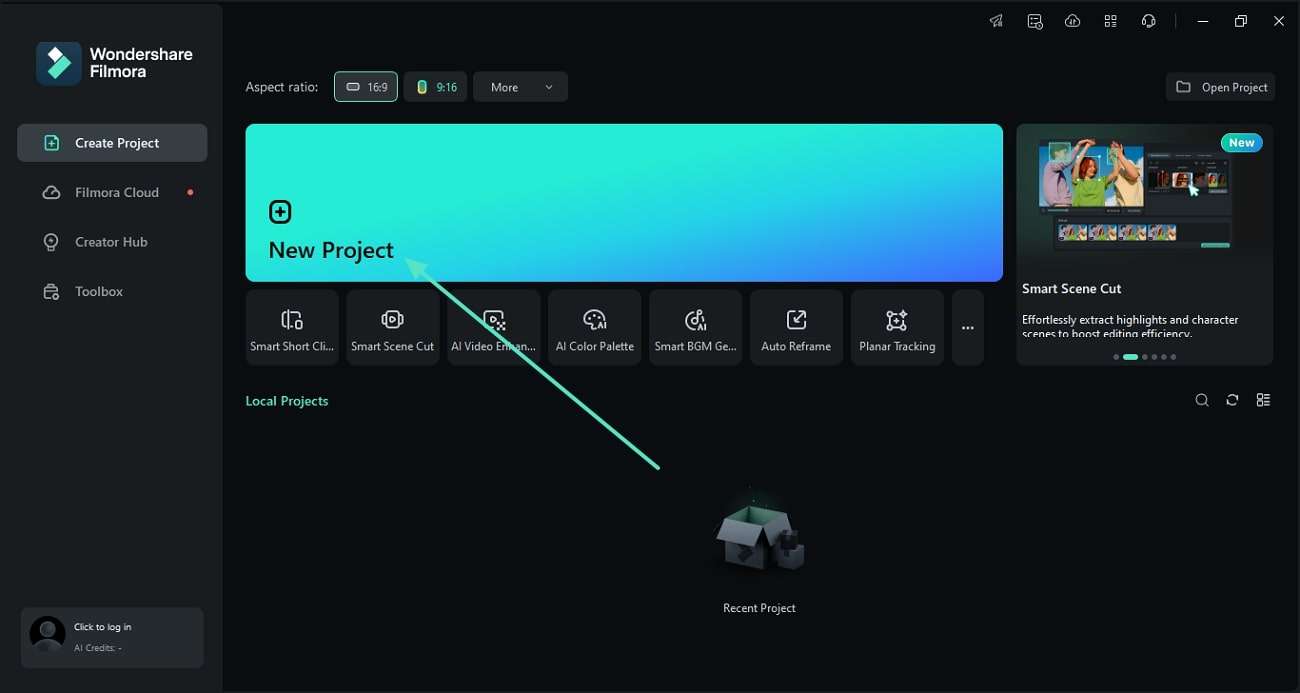
Step 1. Initiate a New Filmora Project
After launching Filmora's main interface, explore the main page and use the "New Project" button to enter the tool's editing interface.
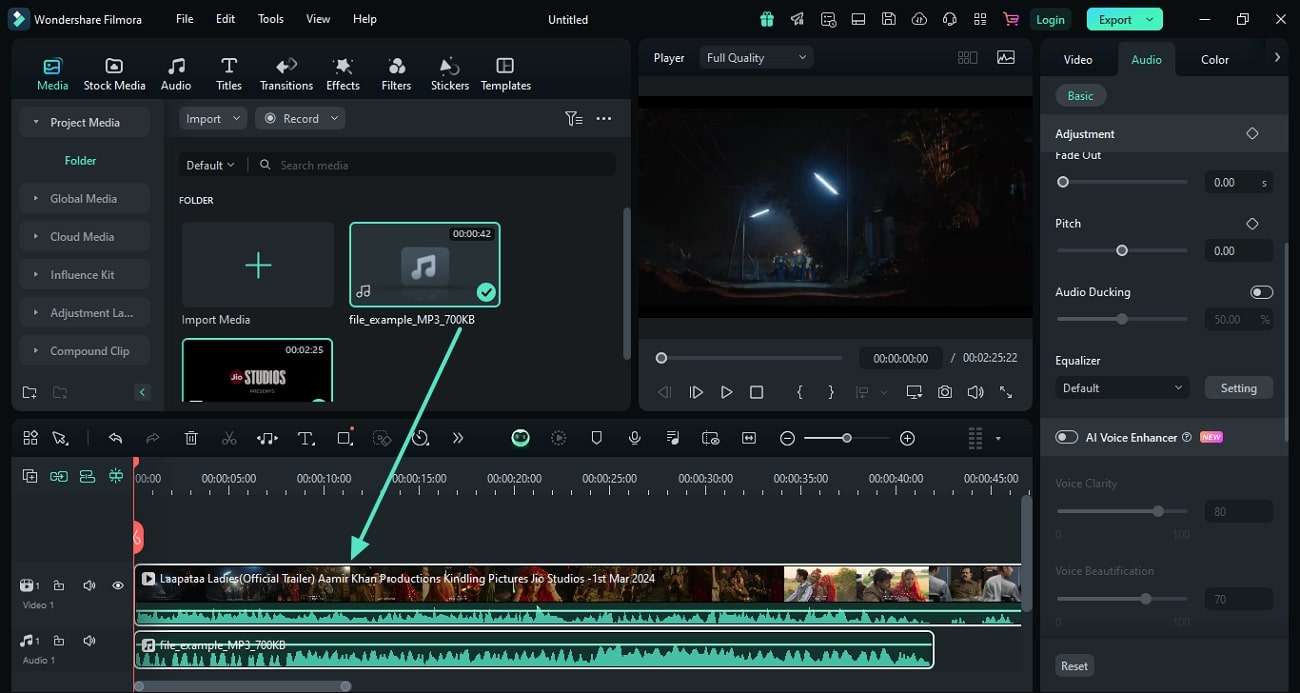
Step 2. Import the Media to the Timeline for Synchronization
From the next window, click "Import" to add the media you need to synchronize. The media will then appear in the media window, where you must drag and drop the files to the timeline.
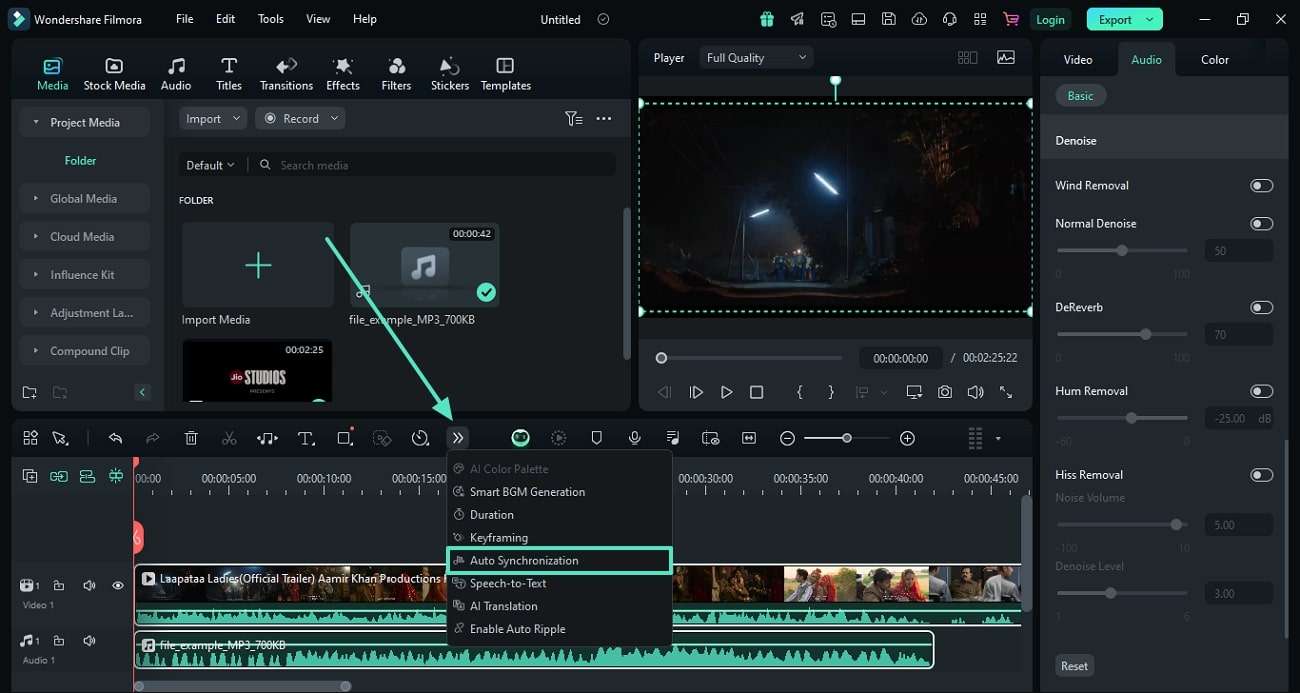
Step 3. Apply the Auto Synchronization Effect
Using the timeline, select the audio and video tracks and navigate to the bar above the timeline. There, click the "Arrow" button and use the pop-up to select the "Auto Synchronization" button.
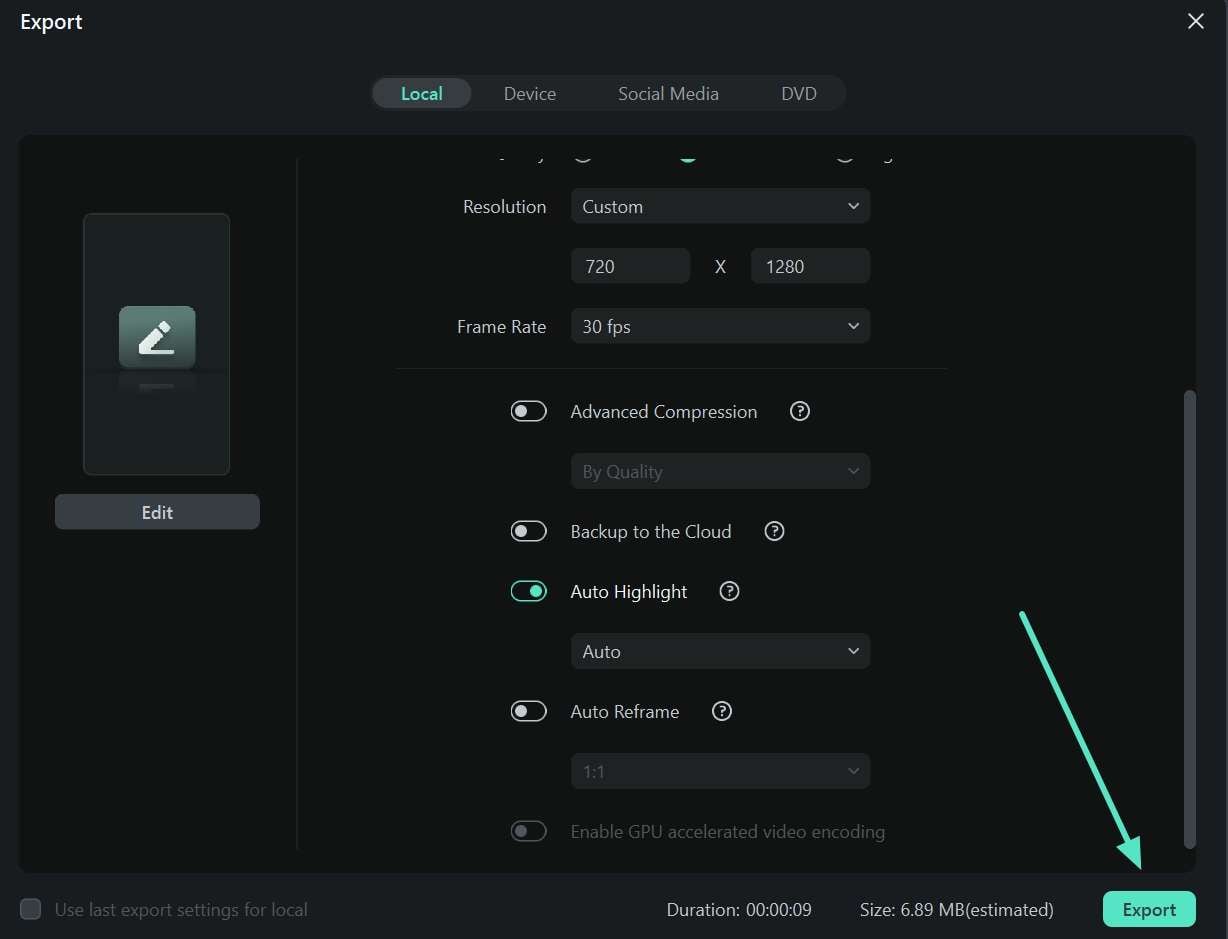
Step 4. Preview and Export the Synchronized File
Once the auto-sync completes, go to the top-right corner of the screen to select the "Export" button. In the next window, add the video settings like resolution, frame rate, and click the "Export" button to save the file.
How Does Filmora Improve Video Outlook Unlike Syncaila?
Unlike Syncaila, Filmora offers many features that can help a user achieve the perfect video outlook. Using the following utilities, you can polish a video once the audio is synced:
- AI Audio Stretch: After synchronizing music to your video, use the Audio Stretch feature to make the music last till the end of the video. The AI understands the patterns and dynamics of your track and automatically remixes it to match your video clip.
- Silence Detection: This feature automatically detects the silence and removes it from the video. It helps you display professionalism through your content and keeps the audience fully engaged.
- Add Text to Video: If you are working on a lyrical video, you can add text to the frame after syncing the music. Leverage the collection of exciting text templates and add a visual appeal to your video.
- AI Video Enhancer: After audio synchronization, you should elevate the visuals using AI video enhancement. Using this one-click auto enhancer, you can upscale the videos to 4K by refining details.
Part 3. How Does Filmora's Audio Synchronization Hold Precedence Than Syncaila?
Although Syncaila and Filmora can both be used for effective audio synchronization, the user experience has a clear difference. Look into the following points to find out how Filmora is the superior choice for this function:
- File Support: Syncaila only supports FCPXML format, a rare video type that can only be obtained by exporting files using Final Cut Pro or DaVinci Resolve. Being a versatile option, Filmora supports numerous media formats for audio synchronization, offering simplified processing.
- User Experience: Filmora uses a single interface to perform the audio-to-video auto-sync function, whereas Syncaila requires a third-party tool to align the video with the audio. Therefore, the former serves as a better option when it comes to user experience and accuracy.
- Post-Synchronization Utilities: The functionality of Syncaila is limited to audio synchronization, and there are no features to polish the result. In comparison, Filmora offers audio synchronization and enhancement under a single roof.
Conclusion
Wrapping up, audio synchronization is an essential step of video editing to achieve a professional video. Syncaila is a popular tool used for this purpose, but its limitations impact the auto-synchronization process. Wondershare Filmora is an adequate substitute for this tool, catering to Syncaila's limitations. Besides perfectly aligning your audio, it enhances the sound quality, resulting in a high-quality file.


 100% Security Verified | No Subscription Required | No Malware


