


 100% Security Verified | No Subscription Required | No Malware

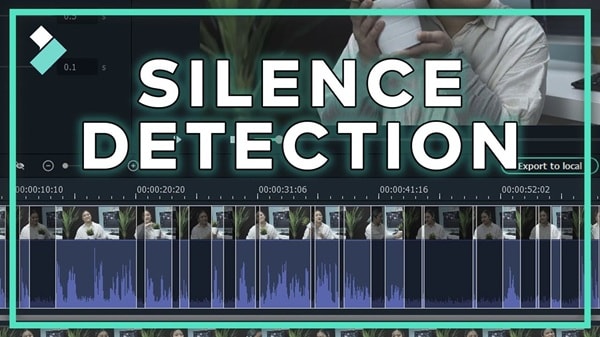
Ever feel like your video has too many awkward pauses or moments of dead silence? You’re not alone. Knowing how to remove silence from video can make your content feel smoother and more professional.
Long gaps or quiet sections can drag your video and lose the viewer’s interest. A video silence remover helps fix that fast. Instead of trimming each silent part manually, you can use smart tools that automatically detect and cut silent parts for you.
Today, it’s easy to auto-remove silence in video using AI-powered editors or simple online tools. Let’s break down the best ways to do it.

Part 1. Why You Should Automatically Remove Silence from Video
Cutting out silent parts takes time and patience, especially if your video is too long or includes many pauses. That’s why it’s better to auto-remove silence from the video instead. It’s faster, more accurate, and helps you stay focused on the creative parts of editing.

Leaving too much silence in your final cut can hurt how people experience your content. This is especially true in situations like podcasts, tutorials, online courses, and product demos. Viewers may get bored or confused waiting for the important part if there are too many pauses.
Removing silence from a video helps you in several ways:
- Keep your audience hooked - Shorter videos with tight pacing perform better and hold attention longer.
- Improves the overall quality - Clean edits give your video a more professional and intentional feel.
- Reduces watch time - You can save time for your viewers without losing the core message of your content.
- Speeds up editing - Letting AI detect and cut silence means you don’t have to trim each section by hand.
Instead of scrubbing through timelines for every pause, use AI video silence remover to automatically remove silence from a video. In the next section, let’s see how to cut those silent parts using smart editing tools built to speed up the process.
Part 2. How to Remove Silent Parts from Video Using AI
If you want to auto-remove silence in a video, AI tools make the job much easier. One powerful feature you can try is Silence Detection in Wondershare Filmora. This feature scans your footage, finds silent sections, and trims them out in just a few clicks. It saves time without losing important content.
Before we dive into the steps, here are some helpful features of Filmora’s Silence Detection tool that make it ideal for quick edits:
- Smart Audio Analysis: It scans your entire clip and spots all low-volume sections based on your custom settings.
- Custom Silence Settings: You can fine-tune how silence is detected by adjusting volume threshold, duration, and softening time.
- Visual Timeline Markers: Silent parts appear clearly on the timeline, so you can review them before making any cuts.
- Non-destructive Editing: The tool trims silence without affecting your original footage, giving you full control to undo or adjust.
- Quick Apply and Replace: Once you’re satisfied with the preview, you can apply the changes with one click and return to your timeline.
How to Use Filmora’s Silence Detection Feature
Here’s how you can use Filmora’s Silence Detection feature to cut silence from video:
Step1Open the Silence Detection Feature
After dragging your video clip into the timeline, you can access the Silence Detection tool in two ways:
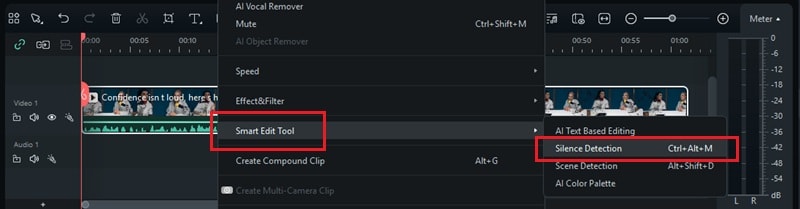
- Click the video clip and go to Tools > Audio > Silence Detection.
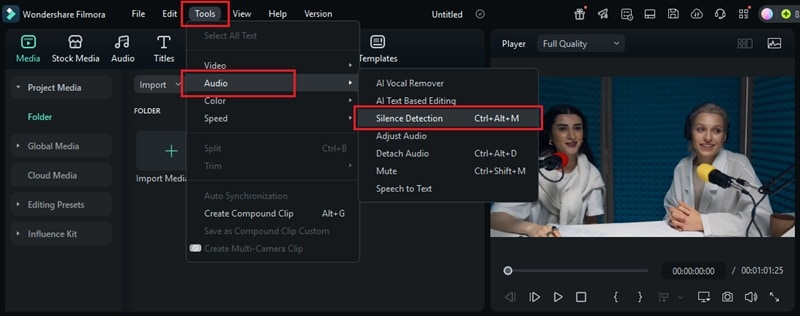
- Or, right-click on the clip and select Smart Edit Tool > Silence Detection from the menu.
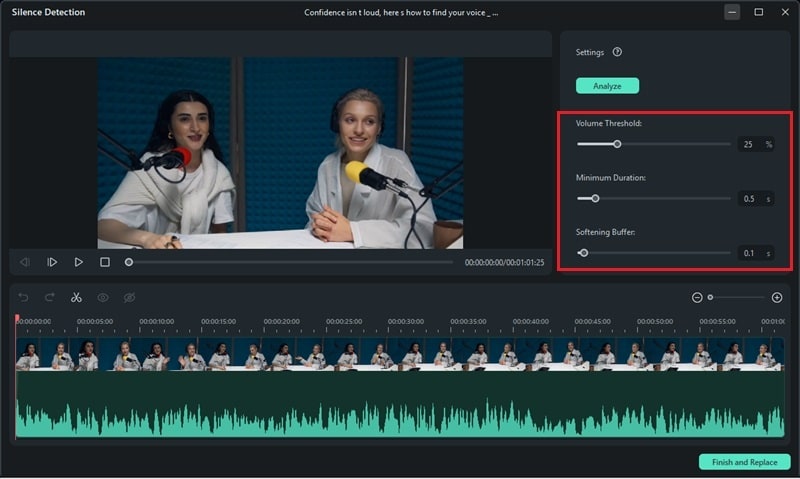
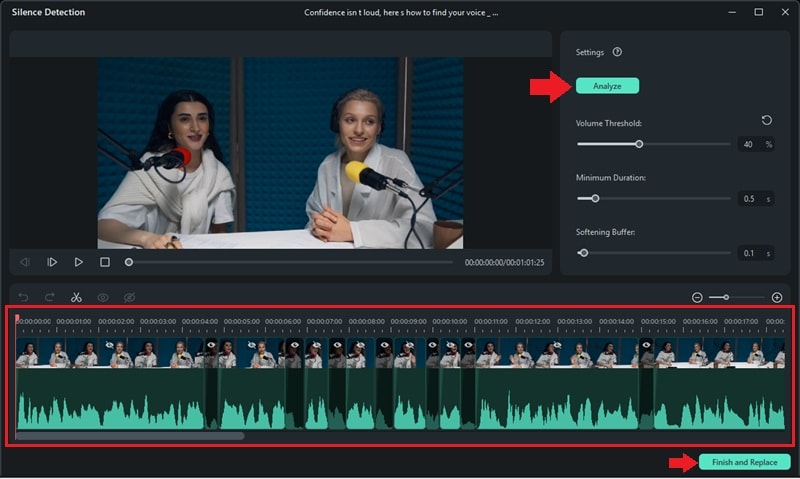
Step2Adjust the Detection Settings
In the Silence Detection window, you can customize three key settings to control how silence is trimmed:
- Volume Threshold: Set the level where sound is considered silence. The default is 25%, meaning any audio below this level gets flagged as silent.
- Minimum Duration: This setting defines how long the silence must last to get removed. The default is 0.5 seconds or more.
- Softening Buffer: Add a short buffer before and after each audible segment. The default gives 0.1 seconds on each side.
Tweak these settings to fine-tune how aggressive or gentle the silence removal should be based on your content style.
Step3Start Detecting Silence Automatically
Once you’ve set your preferences, click Analyze to begin detecting silence in your video.
On the timeline, you’ll notice two things:
- Black sections mark the parts with no sound.
- Highlighted sections show where audio is present.
This visual layout helps you quickly review and adjust before trimming.
Step4Preview Detected Sections
Play the video to see how the edits look. Check if the silent parts were removed correctly. If something feels off, adjust the volume threshold, minimum duration, or softening buffer. Then hit Analyze again to update the cuts.
Step5Remove Silence from the Video
Once you’re happy with the result, click Finish and Replace to save the edits.
Now that you’ve seen how AI tools simplify the editing process, what if you don’t want to install software? Let’s look at some free and online options that can help you remove silence from a video just as easily.
Part 3. Online and Free Options: Do They Work?
Want to remove silence from a video online without installing any software? Platforms like Media.io, Clipchamp, and JumpCutter offer browser-based solutions for trimming out silent parts. While they offer convenience, it’s important to understand their strengths and limitations.

Here’s a closer look at the advantages and limitations of using online or free silence removal tools.
While removing silence from video with online free tools can get the job done quickly, they’re better suited for casual use. For larger projects, frequent edits, or more polished results, desktop software like Filmora gives you more flexibility.
Filmora’s Silence Detection tool also works offline and can handle longer files easily. It provides full control over how silence is detected and removed, without sacrificing ease of use.
Conclusion
Learning how to remove silence from a video helps you improve pacing, reduce length, and keep your audience engaged. Instead of cutting silent parts manually, using a video silence remover can save time and create a cleaner final result.
To speed up your workflow, try tools that auto-remove silence in video using the AI tool in Filmora. Or, you can try online tools for quick fixes. You’ll spend less time trimming and more time focusing on your content.
Ready to clean up your content? Try using silence detection today!
FAQs
-
Does removing silence reduce the size of a video file?
Yes, it often does. Trimming silent parts shortens the overall video duration, which can slightly reduce file size depending on the format and compression. -
Can I remove silence from multiple videos at once?
Most tools only support one video at a time. However, some desktop editors may let you batch process clips by applying the same silence settings to each one manually. -
Will silence removal affect background music or sound effects?
It depends on how the audio is layered. If your background music is on the same track as the dialogue, it might get trimmed. To avoid this, place music and sound effects on separate audio tracks. -
Is silence removal good for all types of videos?
Not always. It works well for tutorials, vlogs, and interviews. But, it may not be ideal for cinematic videos, dramatic pauses, or anything that relies on natural pacing and timing.
