Clear sound in video is one of the things that reflect professional video editing. No one likes periods of silence, it messes up the video's flow, and viewers get confused. That's why Adobe added a new audio editing option for silence detection to its video editor and refined its features selection with Premiere Pro silence remover.
Identify and eliminate the moments of silence in your videos and say goodbye to awkward pauses that are not helpful to your video creation process with the assistance of Silence Remover Premiere Pro. For an extra silence-erasing solution, we will introduce you to one more alternative, so keep reading.
In this article
What is Silence Detection?
Silence detection is an audio editing feature that can recognize and remove boring silence or quiet unwelcome sounds manually or automatically. This useful tool helps you locate unwanted silence and quiet noises in the sound of your video, removes or reduces these parts, and improves the flow and clarity of your video.
With improved features, you can now, except manually, cut the silence automatically in a few simple steps. Powerful audio silence tool quickly finds all audio defects, so you don't have to listen, catch them manually, and solve them one way or another.
You can just imagine how much people in video production and podcasters value this feature, and you will like it for sure.
How to Remove Silence in Premiere Pro
In the past, you had to use plugins to remove unwanted silence in Premiere Pro, but now it is much easier with the help of the automatic tool. Clean your video sound in a few easy steps, and we will show you how:
Step 1: Launch Premiere Pro, import the video file you want to edit, then drag it to the timeline.
Step 2: Highlight your audio and go to the Text tab.
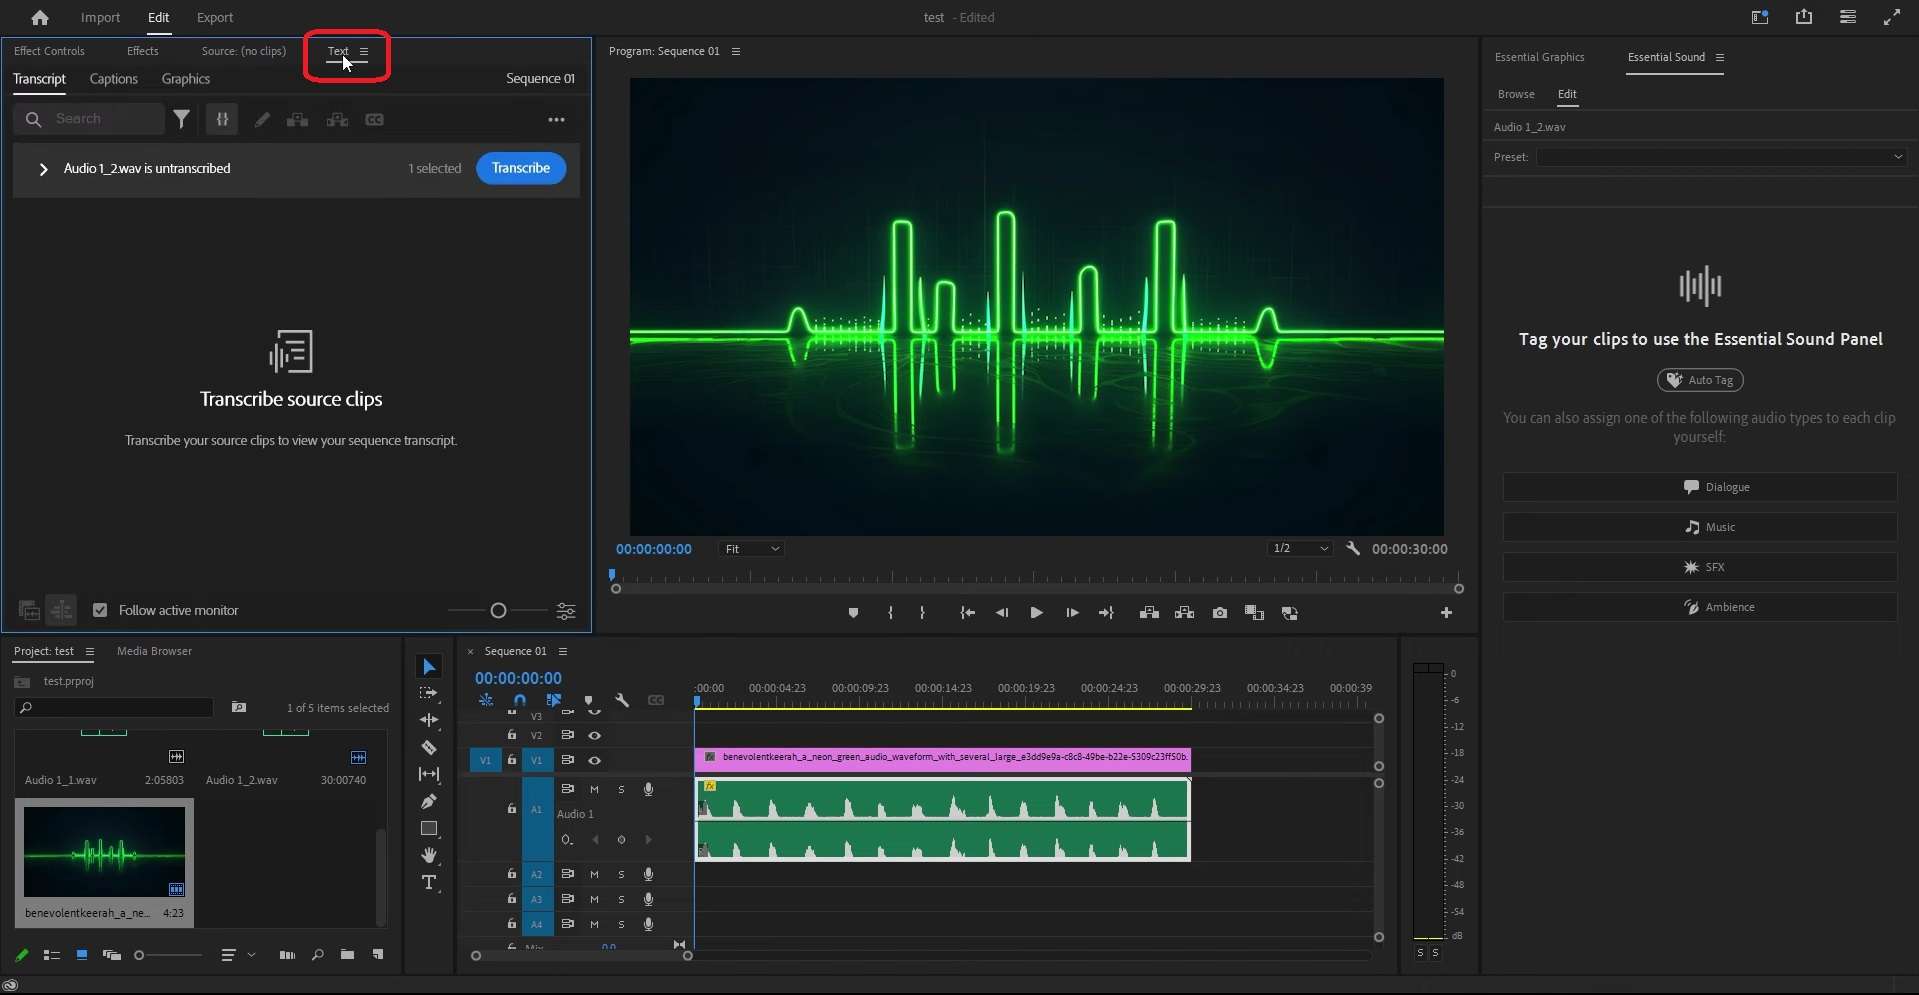
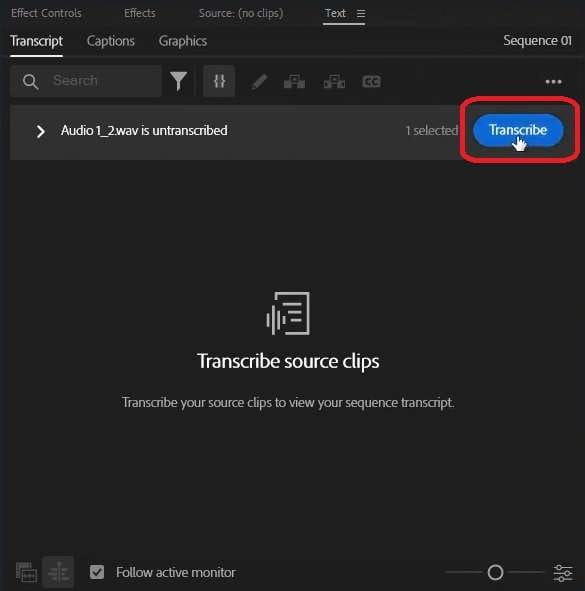
Step 3: Under the Text menu, click Transcribe, and Premier will transcribe your clip.
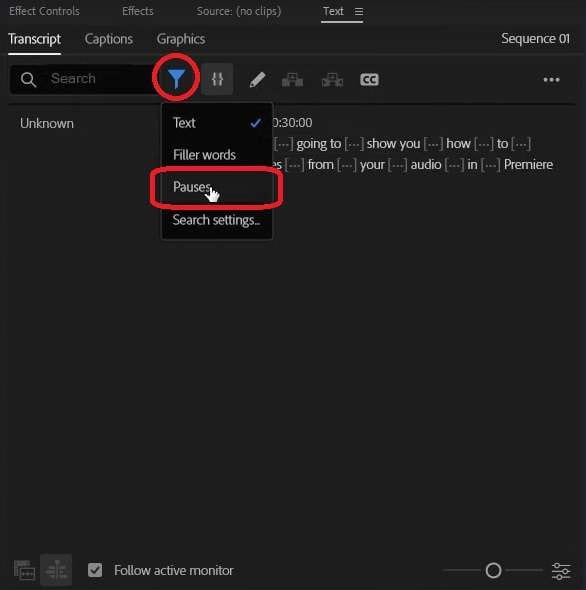
Step 4: Then, go to the Filter icon and select Pauses and all silent segments will be highlighted.
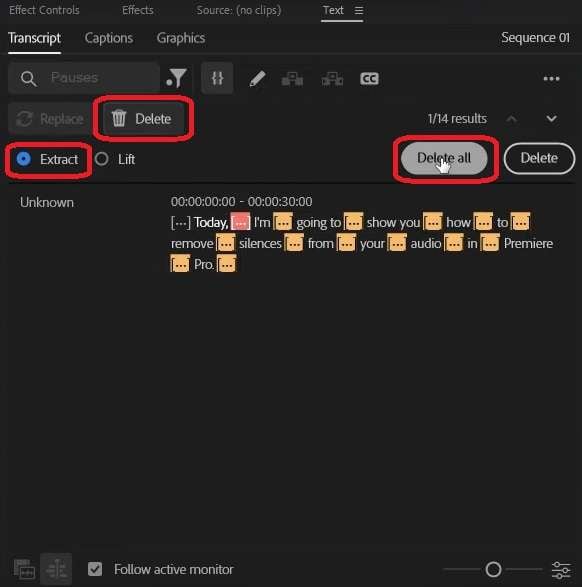
Step 5: Then click the Delete button, select Extract, and click on Delete All. All the pauses will be removed from your clip with no additional re-listening and pause-by-pause catching and deleting.
- Efficient silence removal with seamless audio continuity.
- Vast video/audio effects and creative assets.
- Powerful AI for effortless content creation.
- Intuitive, professional, yet beginner-friendly.
- Works on Mac, Windows, iOS, and Android.

How to Remove Silence in Filmora
You saw how easy it is to remove silence from your video with Premiere Pro, but wait until you see an even easier tool to do it. Let us introduce you to Filmora, an extremely easy-to-use video editor that will seduce you in a second with its tremendous possibilities.
This Wondershare product has an intuitive interface, perfect for beginners and all other skill levels in video editing, and it has all the basic and advanced, AI-powered features to make your video editing life easier.
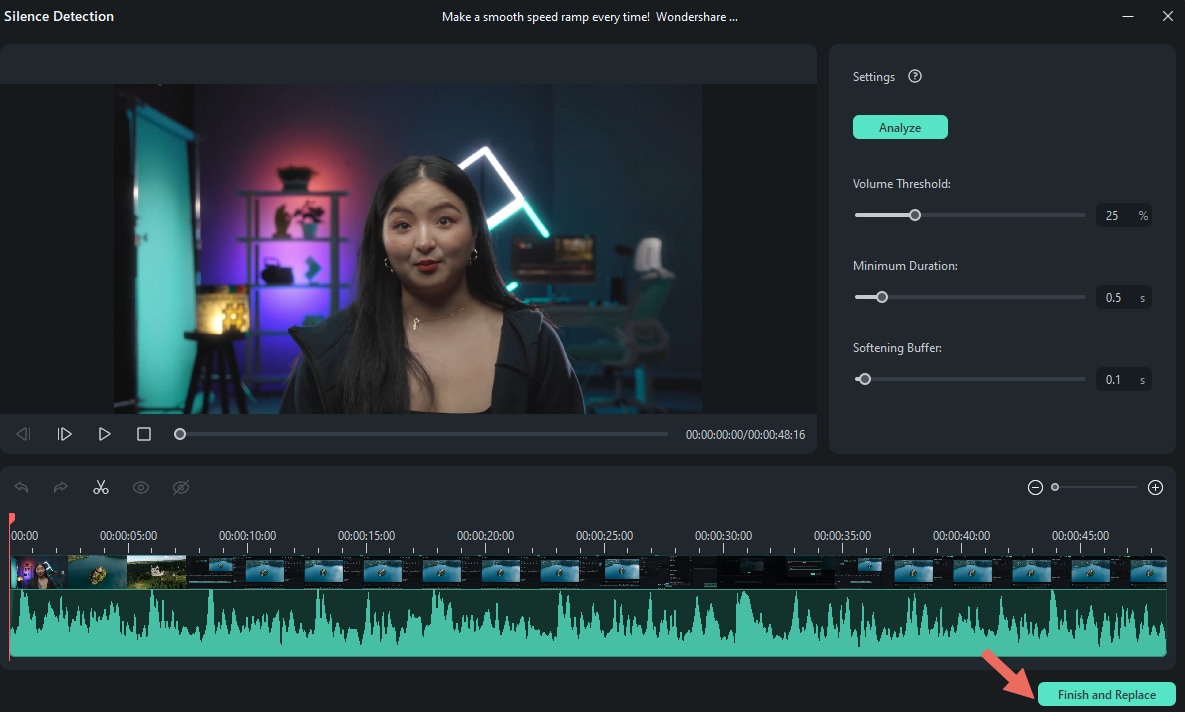
With the Filmora Silence Detection tool, you can say goodbye to annoying pauses and effortlessly cut them from your video, and this is how that happens:
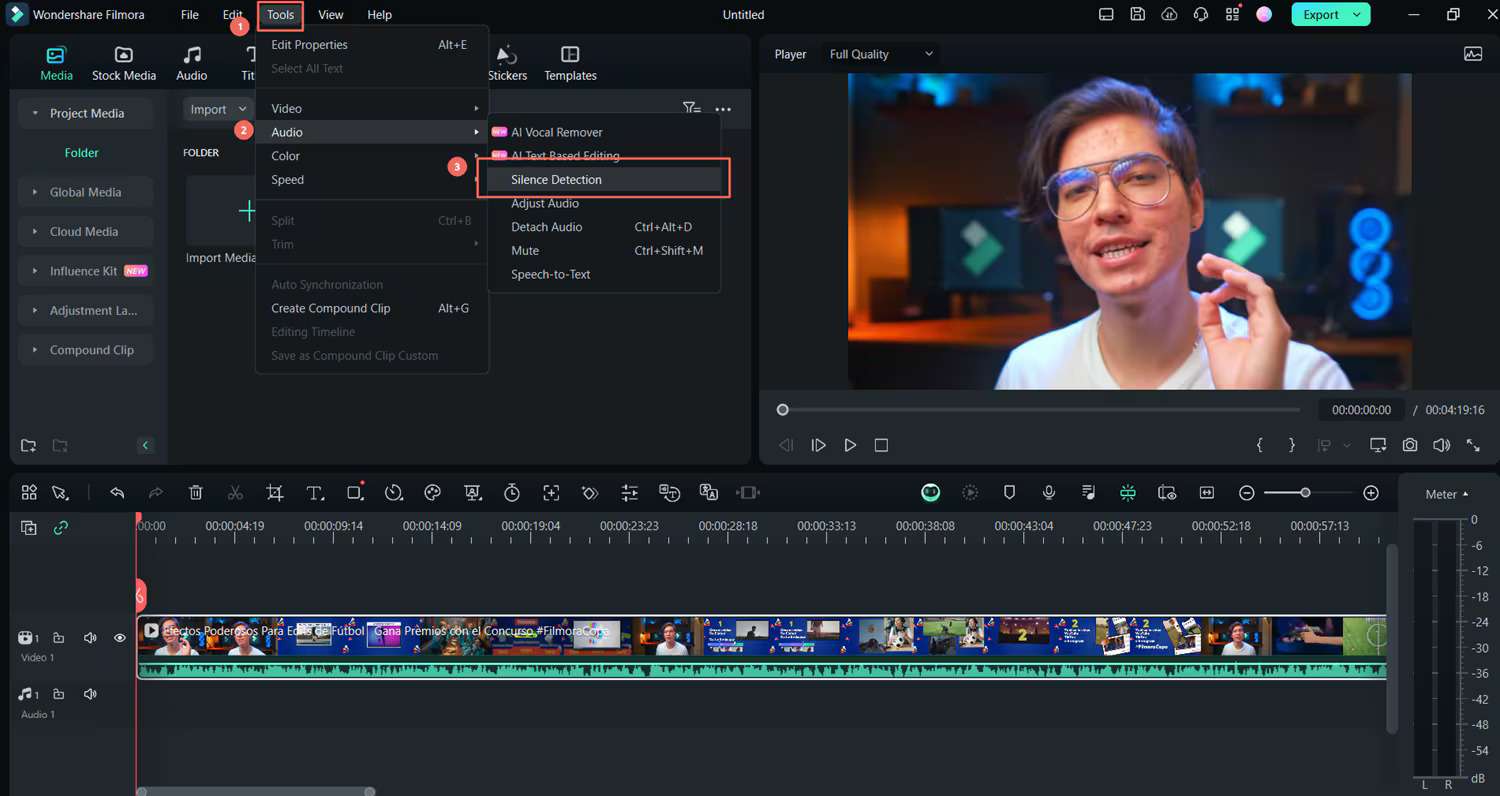
Step 1: Download Filmora from their official website and proceed with the installation process. Launch it and import the video you want to edit, drag and drop the video to the timeline, choose the Tools tab, select Audio, and there you will find an option for Silence Detection.
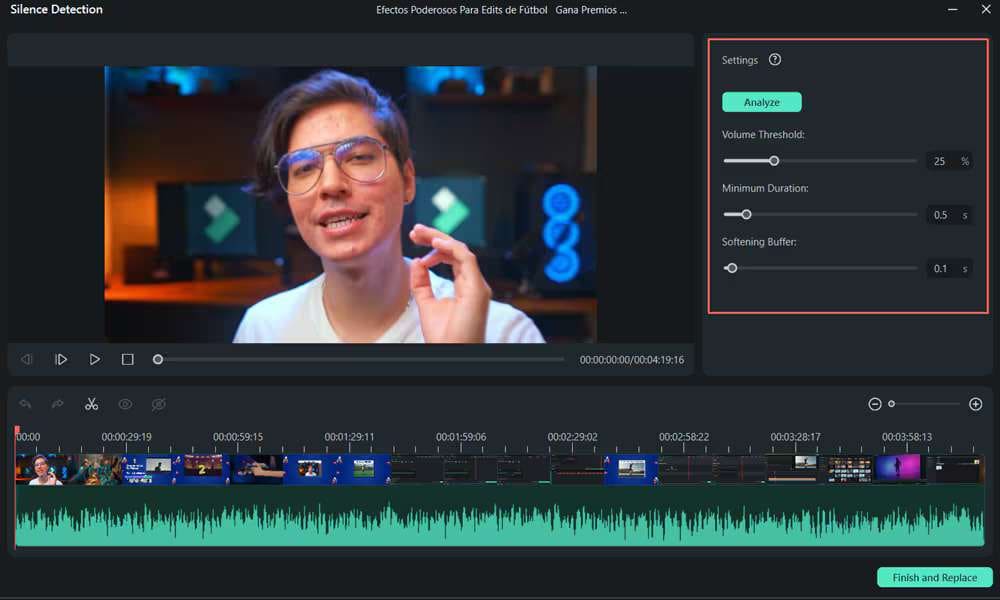
Step 2: Here, you can adjust audio parameters: Volume Threshold, Minimum Duration, and Softening Buffer.
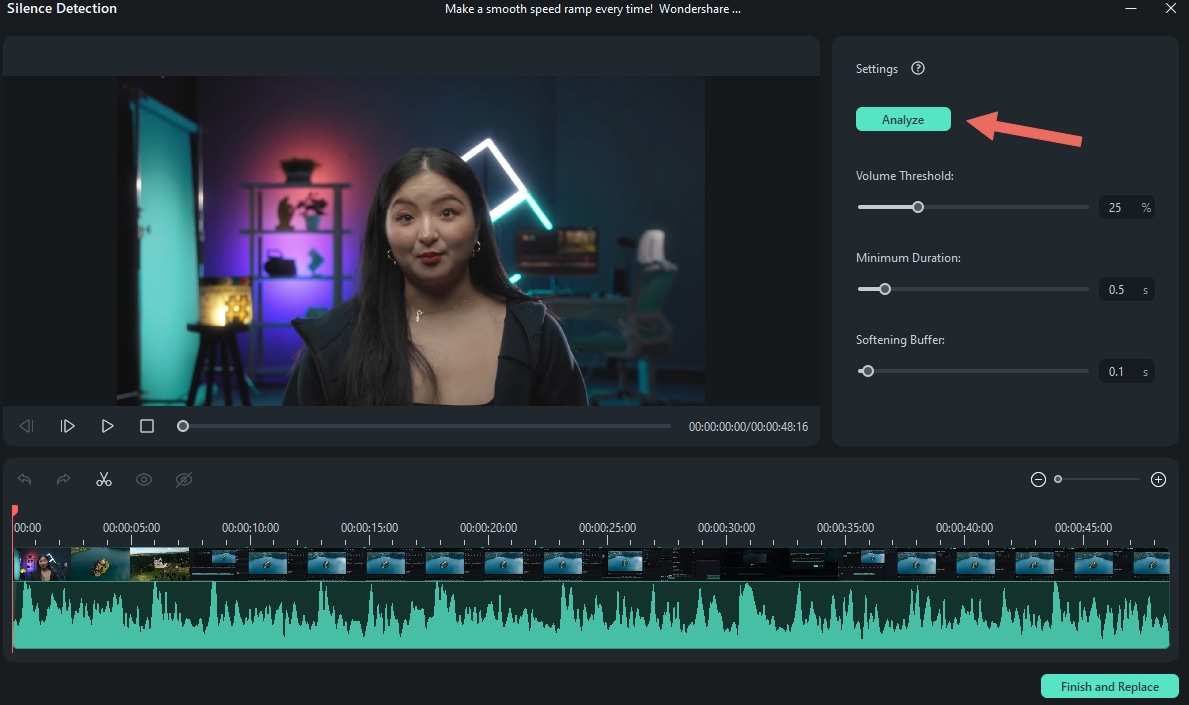
Step 3: After you adjusted the detection parameters, click Analyze and start the automatic silence detection process. In the timeline, you will see black parts for silent segments and highlight parts for audible segments.
Step 4: If you are unsatisfied with the results, adjust the parameters again and click Analyze to delete the silent parts.
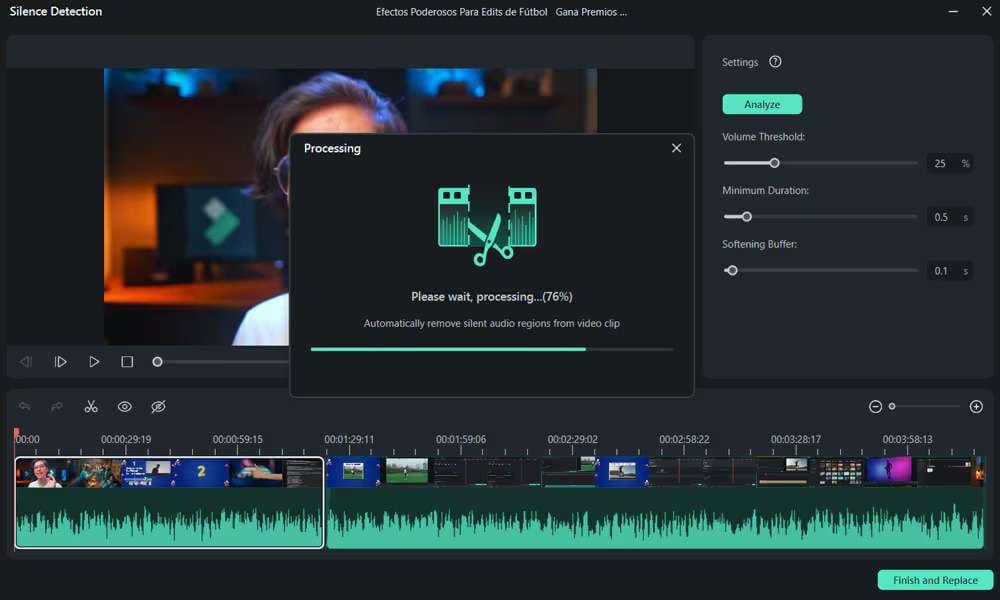
Step 5: When your clip is ready, press Finish and Replace to Filmora's timeline to continue editing.
Premiere Pro vs. Filmora for Silence Removal
Now is the time to face Premiere Pro and Filmora and compare them so you can decide what suits you better.
| Feature | Premiere Pro | Filmora |
| Ease of Use | Difficult to learn, perfect for advanced skill users | User-friendly interface, perfect for beginners and other skill levels |
| Silence Removal Tool | Advanced silent removal features | Basic silent removal features |
| Manual Adjustment | Extensive manual adjustment options | Advanced manual adjustment options with easy, drag-and-drop functionality |
| Audio Editing Tools | Extensive (keyframing, effects) | Advanced audio editing feature |
| Costs | Subscription-based | Free with limited option; Paid plans starting at $5,99/month |
| Customization | High level of customization | Moderate customization options |
| Target Audience | Professional editors | Beginners and casual users |
| Support and Tutorials | Extensive online resources | Extensive community support and tutorials |
Overall, Premier Pro is the perfect choice for professionals and Adobe users since it seamlessly integrates with other Adobe products. It is perfect for advanced features and professional projects that require detailed audio editing.
Filmora, on the other hand, is perfect for beginners and all other skill-set users, with an extremely user-friendly interface and simple and efficient silence removal tool. It is a more affordable solution with advanced AI features, more approachable and easy to use, whether you are a pro, amateur, or tabula rasa in video and audio editing.
Discover the power of AI features
Benefits of Using Silence Detection Tools
Here are the key benefits of using silent remover and accomplishing smooth sound in your videos:
- Time Efficiency: Automatic silent remover saves time, it locates the parts in the audio of your video where you have unwanted quiet, so you don't have to listen and catch those segments by yourself.
- Improved Video Quality: With easy, automatic silence cut, no dead air, and awkward pauses in your videos, the quality of the video is increased overall, and viewers will have a smooth listening experience.
- Highlights the Content: With the detection and removal of unwanted silence, clean audio highlights the content and minimizes the distraction of listeners with audio errors.
- Bring out Professionalism: With a silence detector, you will stand out with professional content without any interruptions.
- Easiness of use: This automatic feature is easy to apply, even for those with limited editing experience.
- Error Reduction: With silent remover, you minimize the chances of overlooking the parts with audio inconsistency.
Tips for Removing Silence in Premiere Pro & Filmora
Dead air and inconsistency in audio with silent moments can have a negative impact on your final output, so we prepared some extra tips you can apply in Premiere Pro and Filmora:
- Use Audio Editor: In Filmora, you can access the audio editing panel. You will find useful tools to trim silence easily. In Premiere Pro, this is more advanced with Audio Waveform, so you can zoom in on the audio track and spot silent sections.
- Utilize Silence Remover: Use built-in silence detection features in Filmora and Premiere Pro and remove silence in a few simple clicks.
- Razor Tool for Precision: Cut out the silence manually with the Razor Tool in Premiere Pro or the Cut tool in Filmora, but listen carefully so you don't apply the cuts wrong and make a mess in the audio.
- Adjust Audio Levels: When you manually remove silence, adjust the remaining audio levels to ensure consistent volume in Premiere Pro, and you can do the same action in Filmora with ease.
- Preview Changes: Always check your edits, especially if you applied them manually, but it's no trouble to check the results of the automatic tool either.
- Export and Preview: At the end of editing, always export and listen once again to check for gaps if they exist.
Main Uses of Silence Removal in Premiere Pro & Filmora
The Silence Removal tool is widely applicable because no one wants dead air and weird silence in their content that has sound. Here are the main uses of these amazing features in Premiere Pro and Filmora:
- Podcast Editing – This is an extremely useful tool for podcasts when during the live conversation, these errors can happen. Premier Pro cleans up dialogue and eliminates unnecessary pauses, and Filmora applies quick clean-up of podcast audio.
Improved Audio Tools and Subtitle Features
- Video Production – In the post-production process, both Premiere Pro and Filmora smooth the transition between segments by removing the dead air to create the final product.
- Interview Editing – Same as with podcast editing, in recorded conversations, dead air often happens, so with silence remover, this is minimized.
- Content Creation for Social Media – For short, social media clips, where the main point is to engage viewers in a few seconds, there is no place for dead air. Premier Pro can solve this, but Filmora is even more suitable for this type of problem because of its user-friendliness and quick silence removal options.
- Webinars and Presentations – After recording this type of material, the silence remover can enhance professionalism by removing unwanted silence, which can create an image of insufficient knowledge and unprofessionalism of the lecturer. And with Filmora and Premiere Pro, that is easily achievable.
- Music Production – Removing unwanted silence is crucial in music tracks, and while Filmora offers basic tools and can successfully remove these unwanted segments, Premiere Pro is better for advanced audio corrections.
Unlock Premium Music: Filmora's Collaboration with Universal Music for Creators!
Conclusion
Achieving a polished and professional sound in your video has never been easier. With automatic silence remover, there is no need for endless checks and listening, and catching the dead air segments.
For advanced users and professionals, Premier Pro will solve everything when it comes to audio errors, with precise audio editing options and detailed control over them. On the other hand, Filmora is the go-to tool for both beginners and advanced users because easiness that will get you polished and smooth audio in your video is close to magic.
Try it today and say no more to unwanted silence segments in your content.


 100% Security Verified | No Subscription Required | No Malware


