
 100% Security Verified | No Subscription Required | No Malware


 ChatGPT
 Perplexity
 Gemini
 Claude
 Grok
Grok
In this article
Since colors can create mood in a story, modern editors now rely on tools like Color Match Premiere to analyze a reference frame and apply its tones across footage. Some options emphasize precision and detailed control, while others focus on speed and simplicity, giving creators more than one path to achieve seamless, cinematic consistency.
This article compares two powerful editors today, Wondershare Color MatchFilmora color match vs Premiere Pro color match, guiding you toward consistent, cinematic results.
Part 1. What is Color Match in Video Editing
Color match in video editing means applying the same color style across different clips. It ensures all shots look uniform, helping the final video feel smooth and professional.
In the past, editors had to do this manually. You need to adjust brightness, tone, and saturation for each clip one by one. It was a slow process that often produced uneven results. Even small mismatches between clips could easily throw off the overall look of a project.
Automated Color-Match Effect in Editing Software
Most modern editors, however, now include a built-in color-match tool. This feature automates the process and applies one clip's settings to others in just a few clicks. Instead of long manual adjustments, editors get fast and precise results.

Key Benefits of Color Match
- Consistency Across Clips
Color match makes footage look uniform from start to finish. A consistent style improves visual quality and also makes adding other effects easier. - Support for Cinematic Scenes
Films often need dramatic or stylized looks. Color match helps maintain the same atmosphere across every frame, whether it's a bright outdoor shot or a dark indoor scene.
Tools Offering Color Match
Two popular video editing programs that deliver fast, reliable color balance are Filmora and Premiere Pro. One is built for simplicity, and the other for full professional control.
- Wondershare Filmora Color Match: A simple yet powerful option. It lets beginners and pros match tones across clips instantly.
- Adobe Premiere Pro Color Match: Another widely used feature that helps editors apply uniform color settings and maintain visual harmony.
 secure download

Part 2. Premiere Pro Color Match Explained
The auto color match Premiere Pro feature can work inside the Lumetri Color panel! It allows editors to quickly align one clip to a reference frame while keeping all of the controls adjustable.
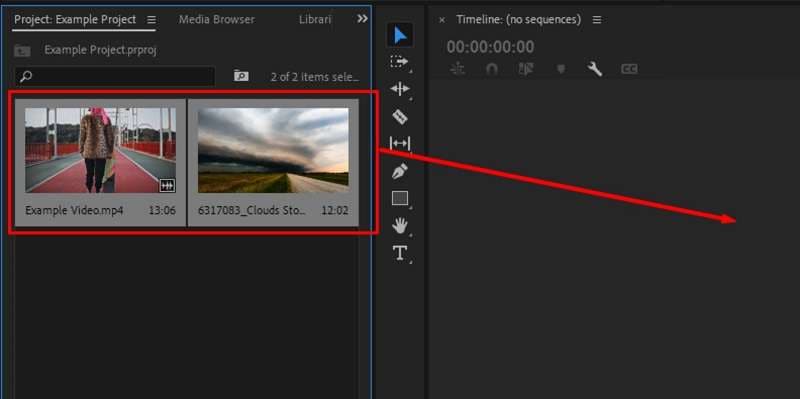
Step 1: Create a Project and Import Media
Open up Premiere Pro and create a new project. Import those video clips you want to edit! Drag them into the timeline to create a sequence.
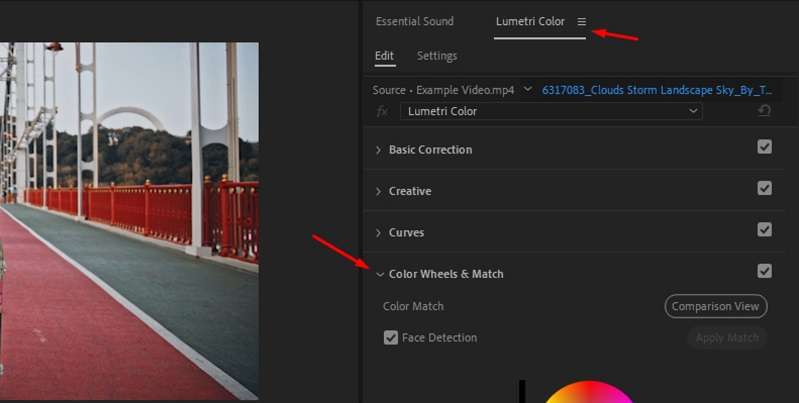
Step 2: Enter the second tab with Lumetri Color Panel
From the top menu, select Window and then Lumetri Color. The panel is located on the right-hand side of the interface.

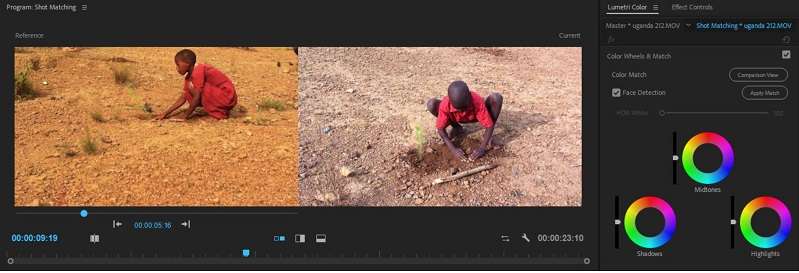
Step 3: Reference and Apply the Match
Select a clip on your timeline. In the Lumetri Color panel, open the Color Wheels & Match area.
Use Comparison View to look at the current and reference clips alongside one another. Select a frame that matches the general mood you have in mind, and then click Apply Match.

Premiere examines the shadows, midtones and highlights to match the clip.
Step 4: Face Detection Option
Activate Face Detection if you want to prioritise skin tones. This means natural and balanced images of people standing within the frame.
Step 5: Fine-Tune the Look
After the automatic correction, all settings can still be edited. Tweak exposure, contrast, saturation or use LUTs. Creative tabs provide further options like vibrance or sharpness. Curves and RGB control offer still more versatility.
Practical value
- Time-Saving: Cuts hours of manual grading in multi-camera edits.
- Cinematic Look: Keeps tone and mood consistent across all clips.
- Flexible Workflow: Auto match provides a base; editors refine with Lumetri controls.
Pros and Cons of Using Premiere Pro
Part 3. See Filmora Color Match in Action
After exploring how Adobe Premiere color match works, it's clear that professionals value depth and precision. But not every project needs complex steps or hours of grading. Many creators want the same consistency with less effort. In this case, you may want to consider Filmora.
Filmora offers an AI-powered color palette that can auto-color match faster than anything else out there for applying the look of a reference clip to your footage. The workflow is straightforward and fast, perfect for editors who want a timely quality result without spending time on the learning curve.
 secure download
Key Features of Filmora Color Match
Filmora's color matching is built to be powerful yet approachable. Here are its standout features:
- Automatic Color Analysis
Filmora's AI engine examines the reference clip and detects its tone, contrast, and saturation. Then it auto-generates a matching effect for your clips. (Source: Filmora official
- Adjustable Intensity
You control how strong the match should be via a slider. Dial it up or tone it down based on your taste or clip differences.
- Device-Independent Accuracy
Whether footage comes from a smartphone, DSLR, or other camera, Filmora can still align the look across these sources.
Extra Filmora color tools:
Filmora offers additional color tools to refine or customize the matched look:
- HSL Adjustments: Tweak Hue, Saturation, and Luminance for individual color ranges.
- Curves & RGB: Use the curves and RGB controls to finesse contrast and channel balance.
- Color Wheels: Adjust shadows, midtones, and highlights after matching.
- Color Comparison View: See side-by-side comparisons between your clip and reference for more accurate matching.
- Skin Tone Protection: Safeguard the natural appearance of faces, preventing harsh shifts in skin color.
How to Use Filmora Color Match
Step 1: Import and Add Clips
Launch Filmora and start a new project. Bring in the color reference clip or image along with the footage you want to adjust. Place both on the timeline.
Step 2: Enable AI Color Palette
Double-click the clip you want to edit. In the editing panel, go to Color > Basic and switch on the AI Color Palette option.
Step 3: Select the Reference Frame
Choose your reference source. From the timeline, highlight the media file, scrub to the desired frame, and click Generate to set it as your guide.
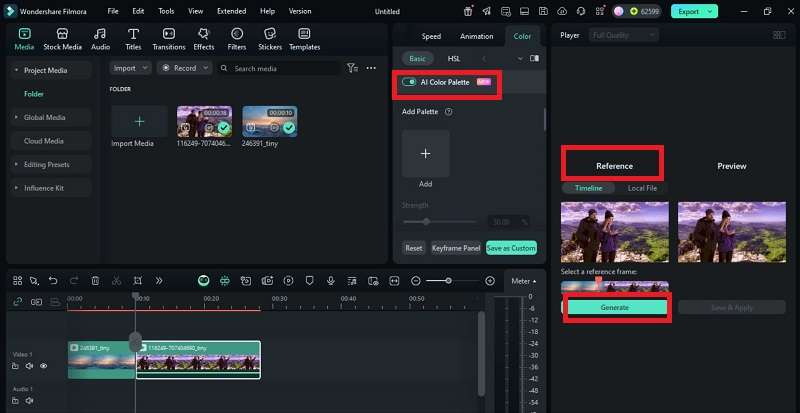
Step 4: Preview and Adjust Settings
Check the preview on the right panel. Use the strength slider (0–100) to control how closely the tones match. Enable Protect Skin Tones if faces are present, ensuring natural results.
Step 5: Save and Apply Palette
Click Save and Apply when satisfied. Filmora creates a custom palette template for reuse, which can also be stored in the cloud.


Step 6: Export and Share
Once finished, click Export. Pick your preferred format and save the edited video. Your Filmora color match adjustments are now applied and ready to share.
Pros and Cons of Using Filmora
Part 4. Filmora vs Premiere Pro Color Match Direct Comparison
When comparing Filmora's color match and Premiere Pro's match color, each tool takes a distinct approach. Filmora emphasizes AI automation, ease, and speed. Premiere Pro leans into depth, precision, and control through the Lumetri system.
Below is a detailed side-by-side comparison, with sources validating each claim.
| Factor | Filmora (AI Color Palette) | Premiere Pro (Lumetri Tools) |
| Automation | One-click AI match, slider control | Auto match via Color Wheels, editable |
| Comparison View | Side-by-side preview for accuracy | Comparison View in Program Monitor |
| Adjustability | Slider + HSL, Curves, RGB, Wheels | Full Lumetri: scopes, LUTs, curves |
| Skin Tones | Protect Skin Tones option | Face Detection prioritizes faces |
| Learning Curve | Beginner-friendly, minimal steps | Steep, requires color grading skills |
| Batch Use | Match multiple clips at once | Copy/paste Lumetri needs tweaks |
| Footage Handling | Works across devices & lighting | Pro support: HDR, Log, RAW |
| Integration | Part of the Filmora suite, AI tools | Adobe Creative Cloud ecosystem |
| Trade-offs | Less granular control than a full grading suite, but much faster and simpler for many users. | Greater power and precision, but a longer learning curve and more manual work in complex cases. |
Conclusion
This article traced the role of color matching from manual struggles to the ease of automation. Auto color match Premiere Pro offers depth, precision, and professional integration, but it also brings complexity and heavier demands. In contrast, Filmora Color Match delivers quick results with AI support and an interface built for creators who value efficiency.
Comparing Filmora color match vs Premiere Pro color match shows two approaches: one prioritizes advanced grading, the other prioritizes speed. For many editors, Filmora's balance of accuracy and simplicity makes it a practical companion for producing consistent, cinematic videos.
