Images alone often lack the impact to hold the attention of your audience. The reason? They're static, so turning images into videos helps make your content livelier. This method works well for social media, presentations, and creative projects, which means your message can reach people better. Kapwing's image-to-video online tool makes this process quick, even without editing experience.
In this article, you’ll learn how to convert an image to a video using Kapwing, along with other free online tools you can try. Keep reading, as each option offers a different way to convert an image to video.
In this article
Part 1. What is Kapwing?
Kapwing is an online video editor that helps you put images, videos, and audio together in one project. Everything happens on the cloud, so there’s no need to download software or transfer files between devices. Edits save automatically, which means no progress gets lost when switching computers or working on the go.
Kapwing Image to Video Converter
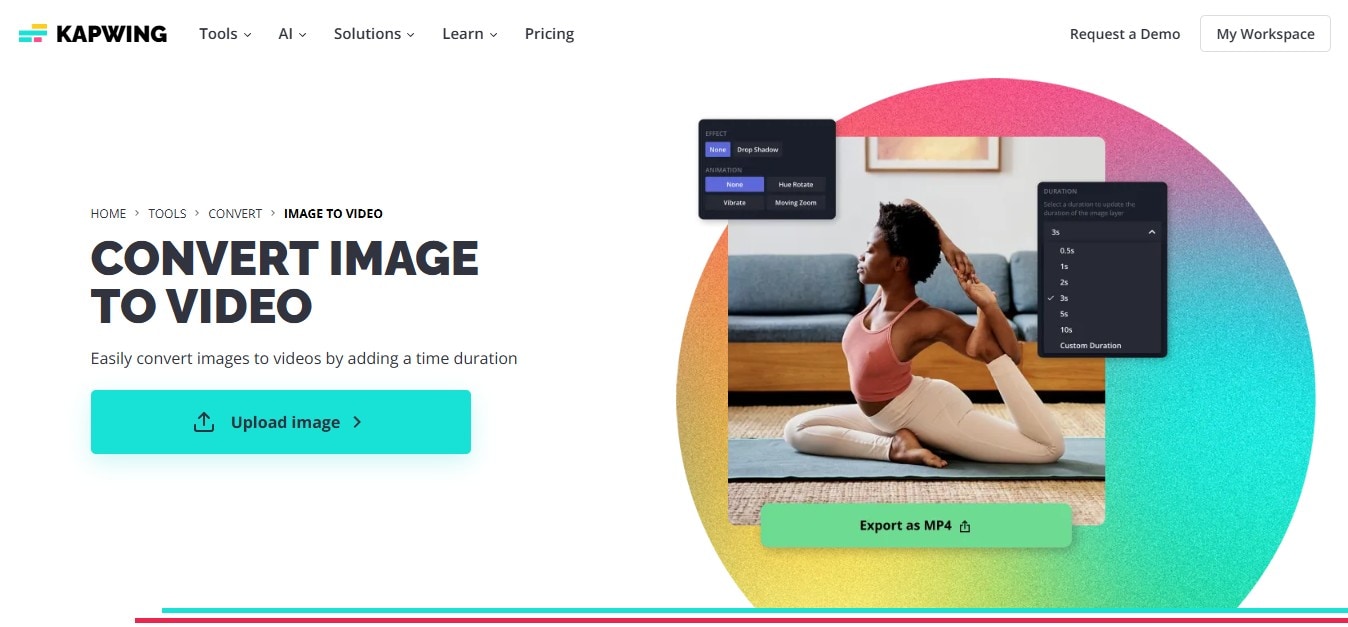
Kapwing's image-to-video tool helps turn images into short videos with just a few clicks. Start with a single photo or a set of images. Set the time duration for each scene, then export the video. If you want to keep editing your project, add text, music, or transitions to match your content. Each scene appears on the timeline, which makes it easy to adjust the duration or reorder clips.
Even without editing experience, it’s easy to understand the tool. The end result of your projects in Kapwing works well for social media posts, slideshows, and simple video projects. It makes the process feel simple and rewarding, even for beginners.
Up next, see how to make a video from your photos by adding a time duration using Kapwing.
Part 2. How To Convert an Image to Video With Kapwing
Sometimes, the easiest way to turn photos into videos is by using a simple online tool. There's no need to download apps or worry about whether your device has enough space or meets certain specs. As long as you have an internet connection and a browser, you’re all set.
This part will focus on Kapwing’s image-to-video converter. It’s an easy tool you can use on desktop or mobile, and it doesn’t matter if you’re using Windows, Mac, or something else.
Here’s how to convert an image to a video on Kapwing by setting a desired time duration:
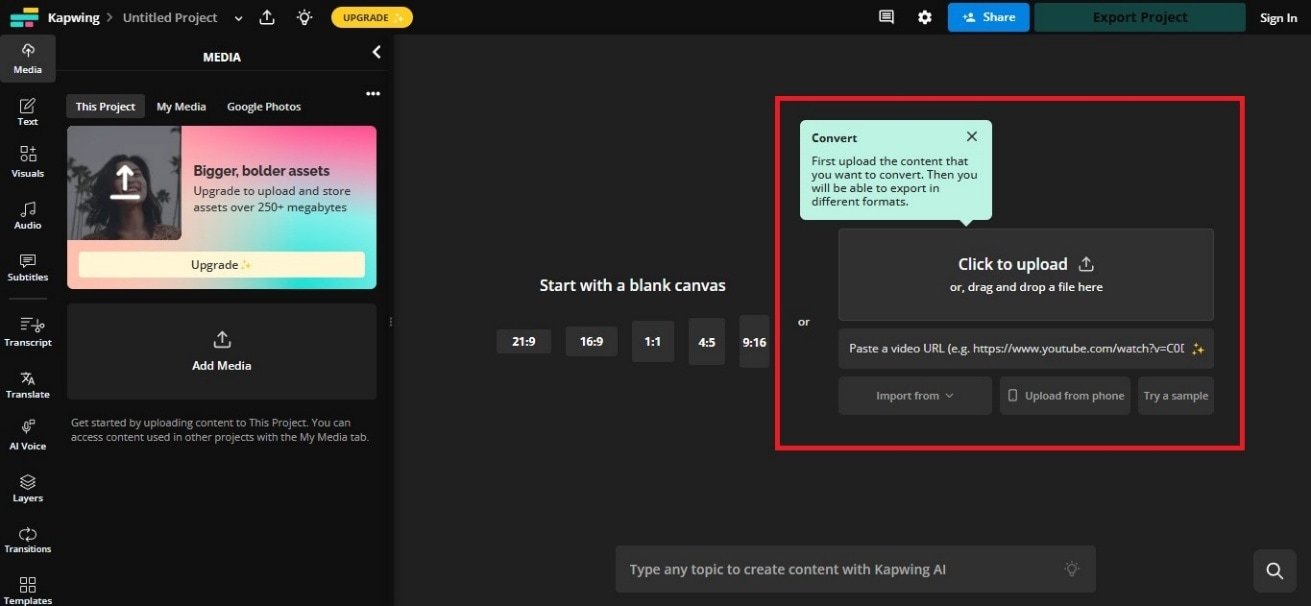
Step 1: Upload Your Image
Go to Kapwing and start a new project. Upload the image or images you want to turn into a video. Alternatively, paste a YouTube video link or pull one from your Google Photos. Want to make a slideshow? Just upload all your pictures at once.
Step 2: Set the Duration
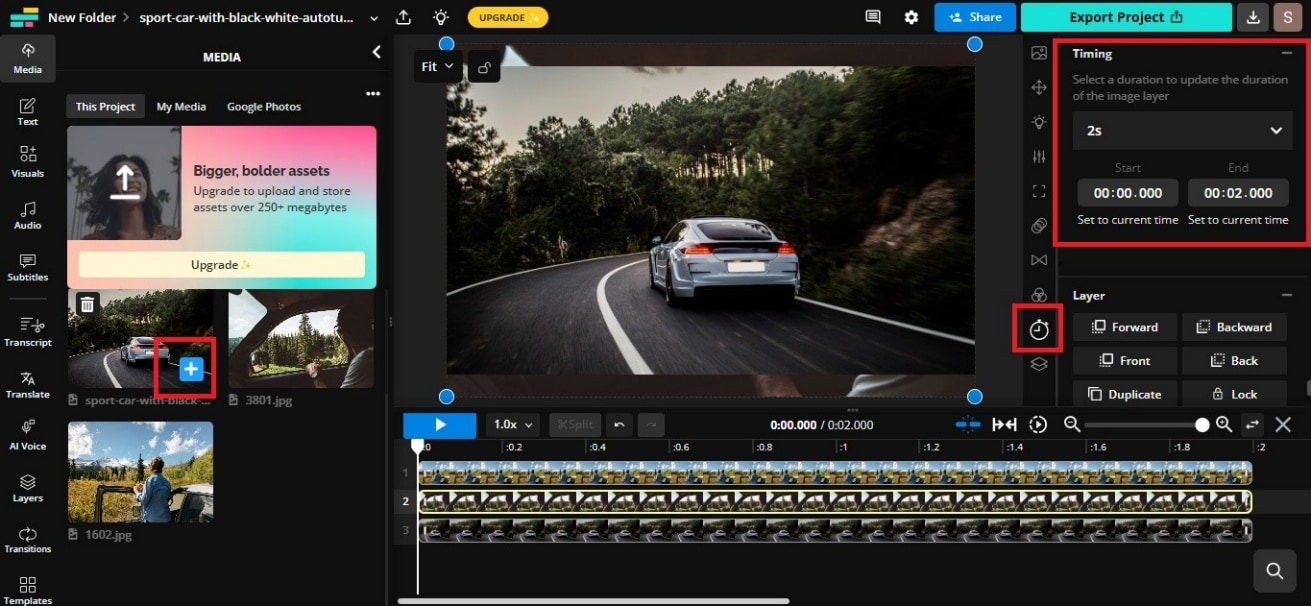
Click the Plus symbol on the image you want as your video opens from the Media panel on the left.
On the right side, open the Timing settings. Next, choose a preset from Project Duration. You can also click Custom Duration and enter how many seconds you want the image to show.
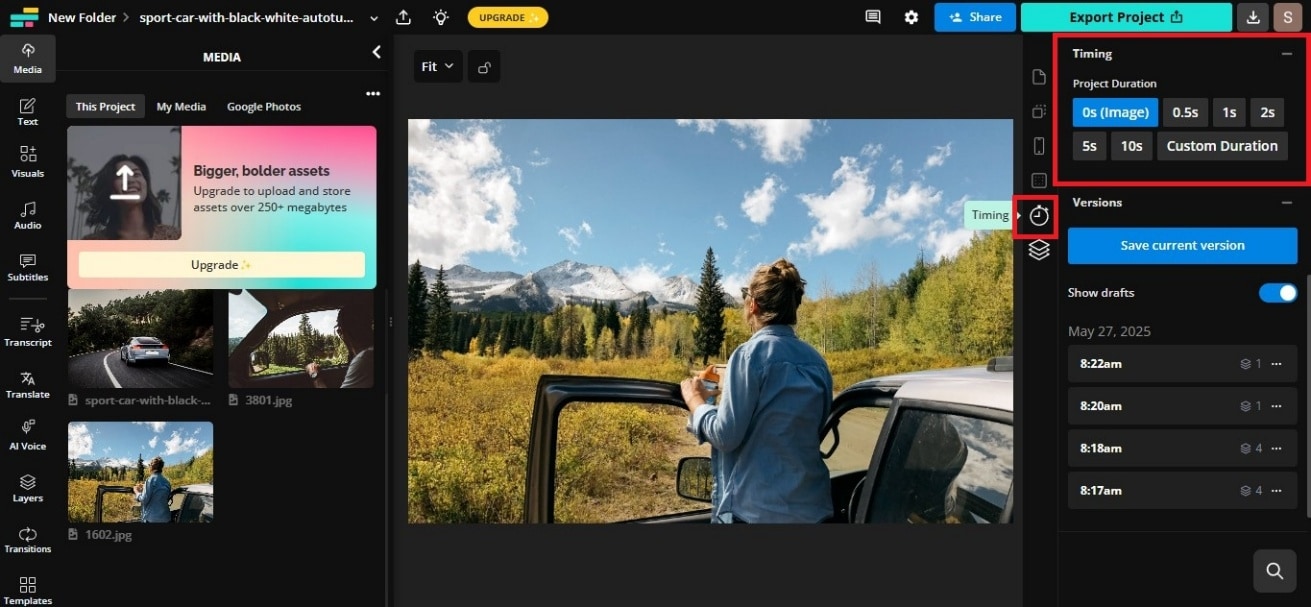
This is how long the image will stay on screen in your video. The image will appear in the editing timeline.
Select other photos on the left panel if you have more than one. Drag and drop them into the order you want in the timeline. Then, set the image layer's playback duration in the right-side panel.
Step 3: Edit and Export
After that, you can arrange the images, add background music, or throw in text. When you’re happy with how it looks, click Export Project on the top right side and choose MP4 as your file format. Kapwing will handle the processing and get your video ready for download.
Scroll down for more ways to convert an image to a video with other online tools.
Part 3. Other 3 Ways To Convert Image to Video Online
Kapwing lets you create videos from photos, controlling how long each image appears. But if you want more advanced options, there are other online tools you can explore. Some can take a text prompt and generate a video using AI. Others can arrange photos in a visual editor or let you choose a video model to create different video styles. Read on!
Invideo: Best for Prototyping Video Concepts
Invideo AI image to video maker online turns your ideas into videos using artificial intelligence (AI). Enter a prompt, like what you want your video to be about, and it will generate a draft using stock footage and images. You can swap out the stock visuals for your photos and fine-tune the video to match your style.

It’s a fast way to go from concept to video without starting from scratch. This is great for creators who want to repurpose content or save time.
Key Features
Here’s what Invideo offers:
- Over 16 million stock photos and video clips
- AI tools like a video generator, image generator, voiceover creator, subtitle maker, and more
- Real-time multiplayer editing so you can work with your team
Canva: Best for Quick Content Production
The photo-to-video converter in Canva is ideal if you like working with templates as a non-designer. You can add animations, text, and effects, then convert your image sequence to a video. It’s great for creating montages, tutorials, or social media content. Canva’s simple interface and large library of templates make it easy to design polished videos, even if you’re not a pro.

Key Features
Here’s what you’ll find in Canva:
- Large media library with tons of stock images and clips
- Pre-made templates and custom branding tools
- Crop, trim, and resize for any platform
- AI features like text-to-video and voice generator
- Team access for real-time edits and sharing
Vidnoz AI: Best for Video Quality and Effects
Vidnoz AI lets you turn an image into a video by choosing different AI models. Upload your reference image, add a description, and let AI generate the video. It has effects, smooth transitions, and clear, high-quality visuals. This tool works well if you need something more dynamic than a basic slideshow.

Key Features
Here’s what Vidnoz AI brings to the table:
- 1500+ AI avatars with natural lip sync
- Over 1800 AI voices for narration
- 2000+ templates to customize
- AI tools like image-to-video, text-to-video, voice cloning, and translation
These online tools work well for quick tasks. They can convert your images to videos, but the features might feel limited if you're working on content for social media. You might want more control over how your video turns out. In that case, it helps to use a beginner-friendly video editor that has everything in one place, like AI tools, templates, and editing features.
Keep reading and check out how you can turn images into videos on a desktop.
Part 4. How To Convert Image to Video on Desktop Using Filmora
Wondershare Filmora is one of the best alternatives to Kapwing for turning image(s) into video. It’s great for content creators, small business owners, or anyone who wants their photo-to-video projects to go viral.
Filmora has an AI image to video generator that’s great for creating fun, short videos. It can convert images into videos with trending AI effects or from your text prompt. You can mix and match effects to create up to 10-second clips that look professional. These videos are ideal for TikTok, Instagram Reels, and YouTube Shorts.
Here are the key features:
- Hundreds of ready-to-use AI video effects, like AI Kiss, AI Hug, AI Fight, and Disintegration Effect
- Tools to fine-tune layout and details—stitch images, center subjects, or crop easily
- AI Character Animation that makes static images move with personality
- Old photo restoration and animation that enhances and animates vintage pictures
One more thing: Filmora has an AI text to video generator, too. You can enter your keywords, and it creates a video script, characters, and visuals—all in one go.
Now, you can go through the steps. Here’s how to convert images to video on Filmora for desktop.
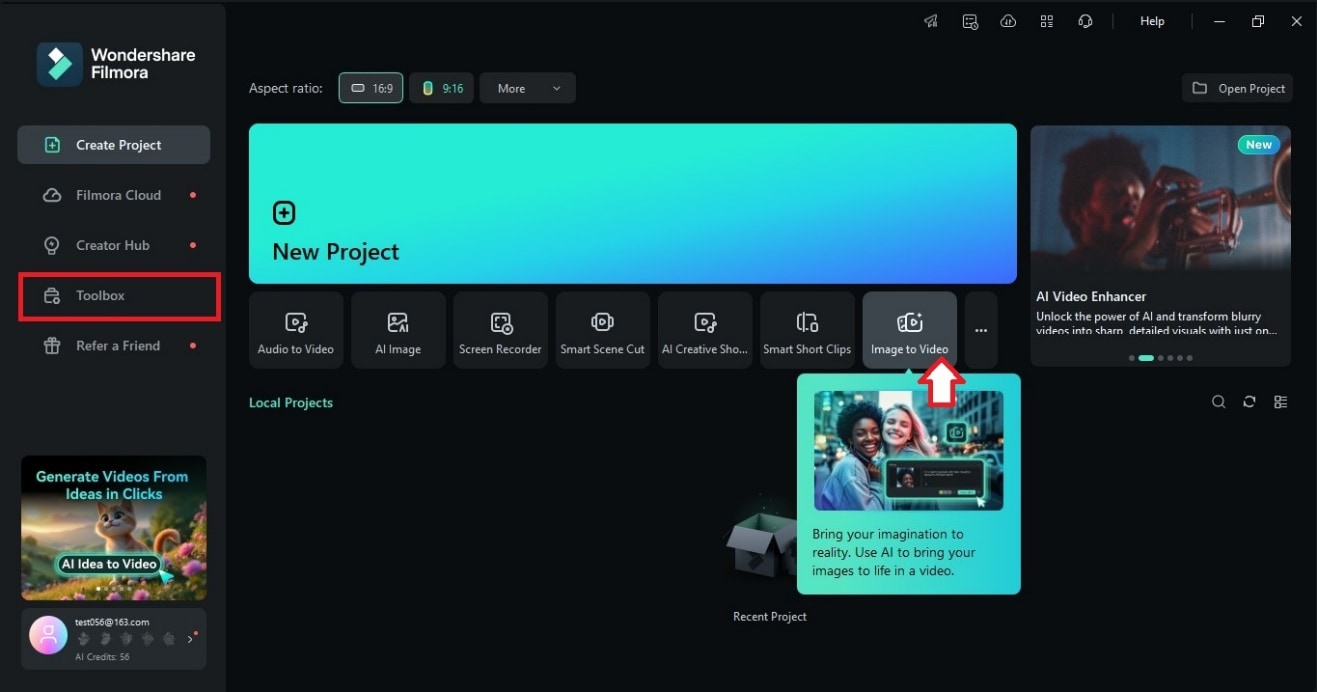
Step1Download and install Filmora on your computer. From the startup window, click the Image to Video option. Alternatively, find it in the Toolbox on the left sidebar.
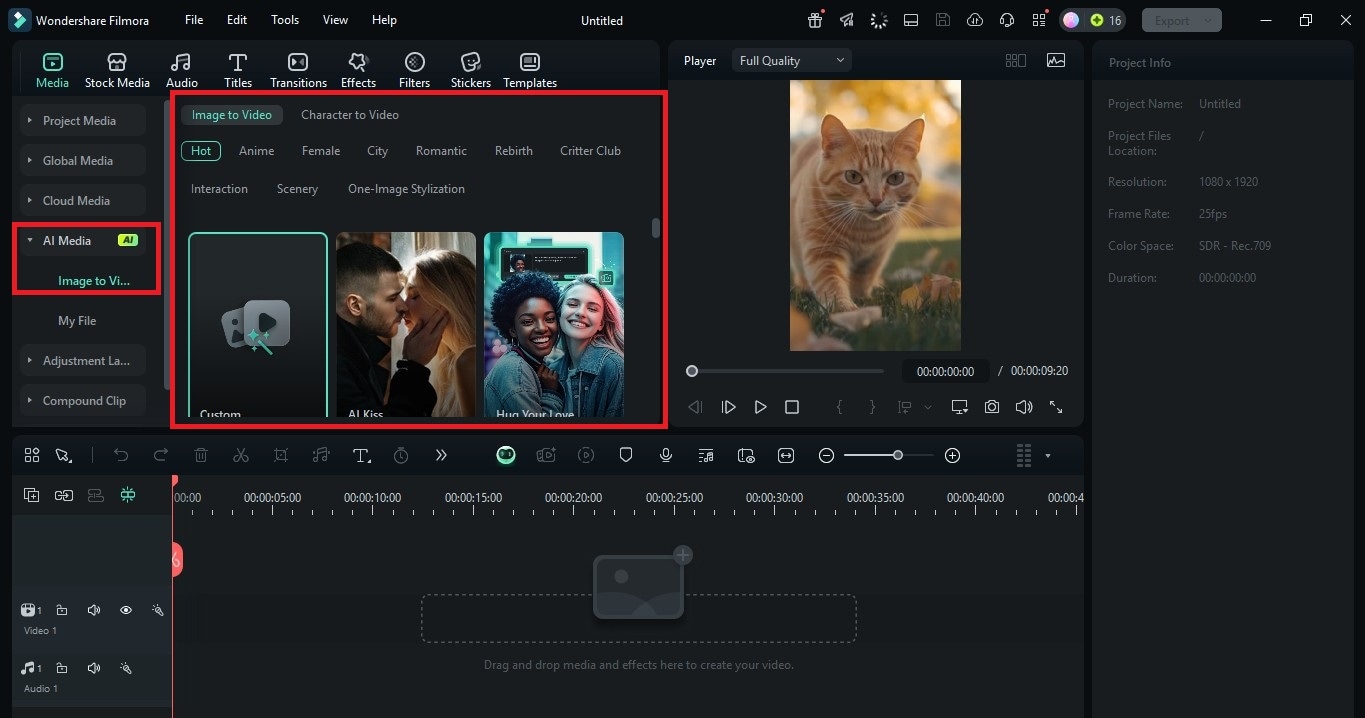
Step2Select an AI effect from the Image to Video tab on the left. You can also select Custom to generate a video from a reference image and a text description of your desired animation.
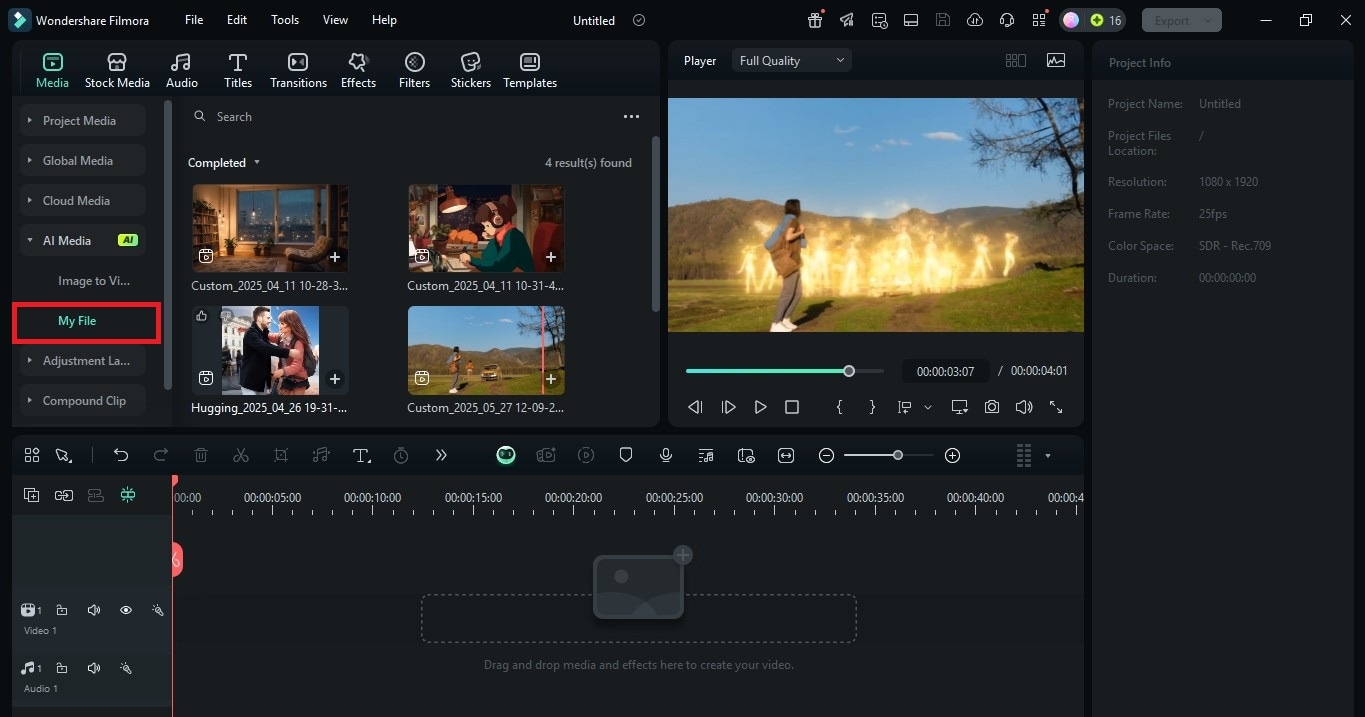
Step3Once you’re happy with the preview, click Export. Save your video in MP4, and you’re ready to upload it anywhere.
Conclusion
Each tool has its strengths. Kapwing's image to video converter makes it easy to create quick slideshows. For more features, you can try an alternative to Kapwing, such as Invideo or Canva. These let you turn images into videos with more AI options or design tools.
Filmora, though, gives you extra video editing control. It lets you provide descriptions for customized effects, add animations, and create videos with a script. So, if you want to level up your content, Filmora is a good software to explore. It’s a simple, flexible way to turn images into videos that have the potential to go trending.


 100% Security Verified | No Subscription Required | No Malware

