

 ChatGPT
 Perplexity
 Gemini
 Claude
 Grok
Grok
Capturing the perfect moment is great, but shaky footage can ruin the vibe. If you are a Windows user, you might ask: Does Clipchamp have a video stabilizer? While Clipchamp is a versatile online editor, it currently lacks a dedicated "one-click" stabilization button. However, there are workarounds to improve your footage or better alternatives like Wondershare Filmora for professional results.
In this article
Key Takeaways:
- Clipchamp provides basic browser-based manual stabilization through speed adjustment and color correction.
- Wondershare Filmora offers an advanced AI-powered automatic stabilization tool for professional results.
- Using a tripod or physical stabilizer is the most effective way to prevent shaky footage during filming.
Part 1.Comprehensive Handbook of Clipchamp
Clipchamp has grown into a widely used online video editor since its launch. Known for its ease of use and intuitive interface, Clipchamp offers an array of editing tools. It caters to beginners and content creators who need quick and effective solutions for video production. Below are some of its standout features:

- Video editing capabilities. Clipchamp includes trimming, cutting, and adding effects, allowing users to create polished videos.
- Integration to popular social media platforms. Clipchamp integrates with popular platforms like YouTube, TikTok, LinkedIn, and more.
- Screen recording and webcam capture. The tool is ideal for content creators and educators who need screen capture for tutorials or presentations.
- Audio editing tools. It offers basic audio controls that enhance the production quality.
Clipchamp is tailored to the following user profiles:
- Beginner content creators. Those just starting with video editing who need a simple, browser-based tool.
- Social media enthusiasts. People creating quick videos for platforms like TikTok or Instagram.
- Small business owners. Entrepreneurs creating promotional videos without needing complex editing software.
- Educators and trainers. Professionals who need screen recording for courses or tutorials.
Here are the pricing plans for those who want to stabilize videos using Clipchamp:
- Free Version. Includes essential editing tools but with a maximum resolution of 1080p.
- Essentials Plan. Priced at $11.99/month, offering premium assets, unlimited cloud storage, and high-quality exports.
- Superb video stabilization with low distortion.
- Vast video/audio effects and creative assets.
- Powerful AI for effortless content creation.
- Intuitive, professional yet beginner-friendly.
- Works on Mac, Windows, iOS, and Android.


Part 2. How to Fix Shaky Videos in Clipchamp (Workarounds)
It's important to note that Clipchamp doesn't have an automatic stabilization tool as of August 2024. Nonetheless, you can still improve your video's quality for a sleek finish. Here's how to manually stabilize videos in Clipchamp to help you get started on your creative journey:
Step 1: Start by signing up for Clipchamp online or downloading the desktop app. Once you're in, upload your shaky video by going to Your media > Import media. Drag and drop your video onto the timeline.

Step 2: Smooth Shaky Footage via Speed & Cropping Adjustments
Go to the right panel to adjust the Exposure, Contrast, Temperature, and Transparency. Use the corresponding sliders to enhance the quality of your video. If you want to restart, click on the Reset button to return your video to its original state.

Step 3: Use the Speed selector to slow down or speed up your clip from 0.1x to up to 16x the speed. Repeat the steps to stabilize the graphics, audio, and GIFs (if any).

Step 4: If you've changed the speed of your video, there will be some gaps in your timeline. Click on the Gap removal button to stabilize and merge your clip for a consistent flow.

Step 5: Click the Play button to preview your video. When you're satisfied with the result, click on the Export button and choose your preferred resolution.

Pros and Cons of Using Clipchamp for Video Stabilization
Here are the pros and cons of using Clipchamp when stabilizing your videos:
Final Verdict: Hands-On Testing Insights
After testing Clipchamp's stabilizer, it's a good option for those needing quick stabilization. The stabilization works as intended, but it struggles in areas where more precise tools are needed. The browser-based setup is both a strength and a weakness. It's great for accessibility, but it can feel sluggish when handling longer videos.
The export limitations are also something to consider, as creatives may find the 1080p cap restrictive. Overall, Clipchamp is best suited for simple edits rather than high-end professional results. For those wanting more robust stabilization, using an alternative like Filmora would be wise.
Part 3. Best Clipchamp Alternative – Wondershare Filmora
If Clipchamp's limitations don't quite meet your video editing needs, Filmora offers a more powerful alternative. The platform is known for its professional features and intuitive interface. Filmora caters to users seeking enhanced control over video stabilization and editing. Let's discuss its key features:
- Advanced video stabilization tools. Filmora offers more precise stabilization options that allow you to fine-tune the level of correction.
- Wide range of editing features. Includes transitions, effects, color correction, and more to make your videos stand out.
- Intuitive interface. Drag-and-drop functionality simplifies the editing process, making it easy even for beginners.
- AI-powered tools. Features like AI scene detection and auto reframing help create polished results.
- Access to the vast template library. Filmora provides an extensive collection of presets and templates for creative video projects.

How To Stabilize Videos Using Filmora
Filmora's stabilization tool is user-friendly yet powerful, giving you full control over the outcome. Below is a comprehensive guide to stabilizing your footage using Filmora:
Step 1: First, visit the Wondershare Filmora website to download the software. Once installed, either log in to your existing Wondershare account or create a new one. Launch the platform.
Step 2: Start a new project. Import your footage by dragging it into the media library and then onto the timeline. You can also use the Import button to select your video file.
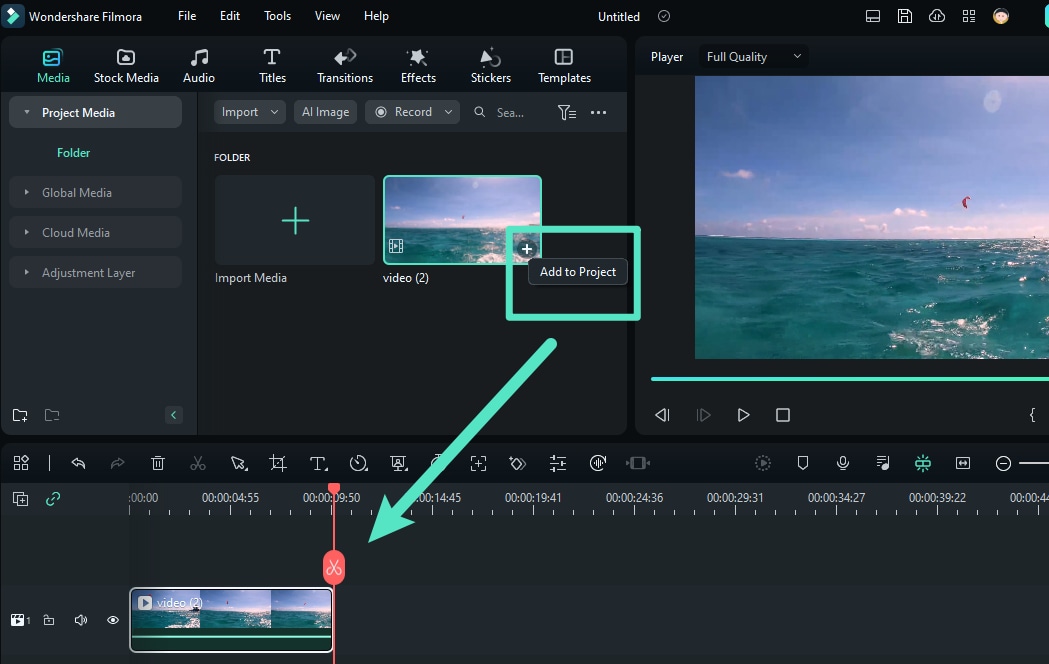
Step 3: Access the Stabilization Feature
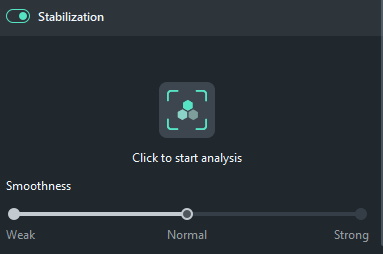
With your video clip selected, go to the right panel. Click Video > Basic, and turn on the Stabilization option. Click the Stabilization icon to start the analysis. You'll see a progress bar indicating the analysis process.
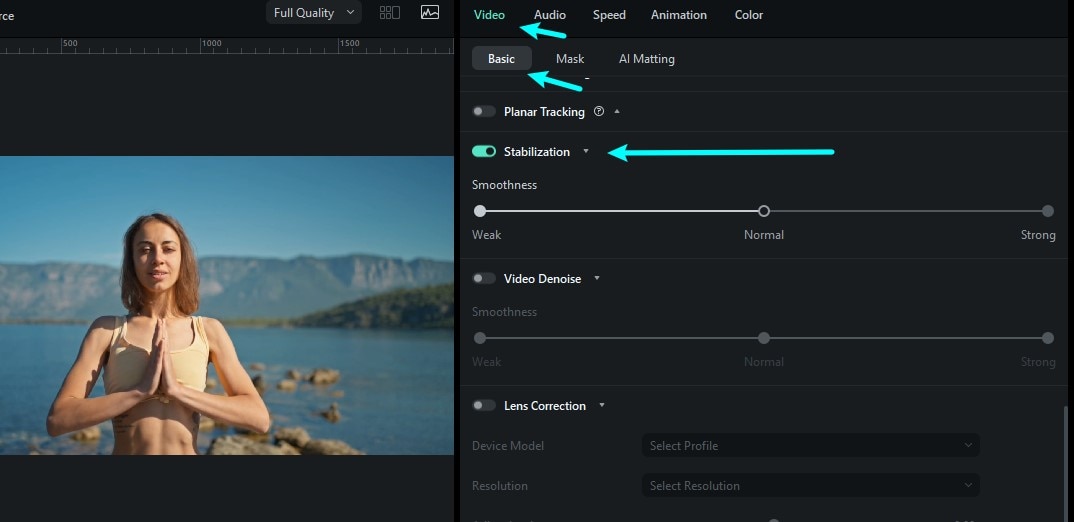
Step 4: Once the stabilization is applied, use the sliders to refine the smooth level. You can preview the stabilized footage in real-time and make changes until you get the desired result.
Step 5: Further enhance your video by using color correction, transitions, effects, or adjusting the speed of the clip. Take advantage of the editing toolbar on the timeline panel as well to personalize your video.

Step 6: Once you're satisfied with the stabilization and editing, choose your export settings. Set the resolution, format, and device compatibility. When done, save and share your work.

Comparison Between Filmora and Clipchamp
Here's how Filmora's stabilization capabilities compare with Clipchamp:
- Stabilization. Filmora's stabilization tool offers more control and flexibility compared to Clipchamp's.
- Editing capabilities. Filmora provides a more comprehensive suite of editing tools. It includes advanced effects and AI-powered features.
- User experience. Clipchamp and Filmora are both user-friendly. However, Filmora's polished interface is better suited for both beginners and professionals.
Part 4. Tips To Prevent Shaky Footage
Preventing shaky footage at the source is always better than fixing it in post-production. Here are practical tips to help you capture stable videos:

- Use a tripod or stabilizer: Investing in a tripod or handheld stabilizer can drastically reduce shake. They provide steady support whether filming stationary shots or moving scenes.
- Practice proper camera handling techniques: Hold your camera with both hands, keeping your elbows close to your body. For extra stability, lean against a solid surface or keep your movements smooth and deliberate.
- Use the camera's built-in stabilization: Most modern cameras and smartphones have optical or digital image stabilization. Enable this feature to reduce minor shakes during filming.
- Plan Your Shots: Carefully planning your movements and shots reduces the risk of unsteady footage. Try rehearsing your movements before recording to ensure smoother transitions.
- Post-production Tips: Even if you capture some shakes, using tools like Filmora's or Clipchamp's can refine your footage. Combine these with minor cropping or speed adjustments for even more polished results.
Conclusion
Clipchamp provides a solid entry-level option for stabilizing shaky footage. It's a suitable choice for casual creators and beginners looking to try video editing for the first time. However, its limitations in resolution and editing may prompt users to seek alternatives.
Filmora is a better choice thanks to its advanced tools. It also uses an intuitive interface and offers superior stabilization capabilities. Whether you choose Clipchamp or Filmora depends on your specific needs. But for those seeking a more versatile solution, Filmora is the clear winner. Give both tools a try and decide which best fits your video editing goals.
