 ChatGPT
 Perplexity
 Gemini
 Claude
 Grok
Grok

- Advanced lens correction with minimal distortion.
- Vast video/audio effects and creative assets.
- Powerful AI for effortless content creation.
- Intuitive, professional yet beginner-friendly.
- Works on Mac, Windows.


 TL;DR:
You can correct camera-induced optical deformations, such as barrel, pincushion, and fisheye effects, using Wondershare Filmora's AI Lens Correction tool to straighten warped lines based on your specific device profile.
● Lens distortion stems directly from the physical camera optics, which fundamentally differs from perspective distortion caused entirely by incorrect subject positioning and distance.
● To execute the fix in Filmora (requires Windows 7+ 64-bit or macOS 10.14+), access Video > AI Tools > Lens Correction to input your exact device model and capture mode resolution.
● Increasing the adjustment level slider during the lens correction process will inherently zoom out your resulting video footage to compensate for the realigned straight lines.
Ask AI for a summary
To enhance your photos and videos, choosing the right camera lens is crucial. While talent plays a significant role, the lens often has the ultimate impact on the quality of your work. Lens distortion, which causes image deformations, can affect your creativity.
In this guide, we’ll delve into optical, image, and lens distortions caused by camera lenses and how to fix them.
While a camera lens can help you capture stunning images and video clips, it can also distort and deform your images, breaking their composition and lowering quality. Lens distortions are any optical distortions, deformations, irregularities, abbreviations, and visual imperfections caused by a camera lens.
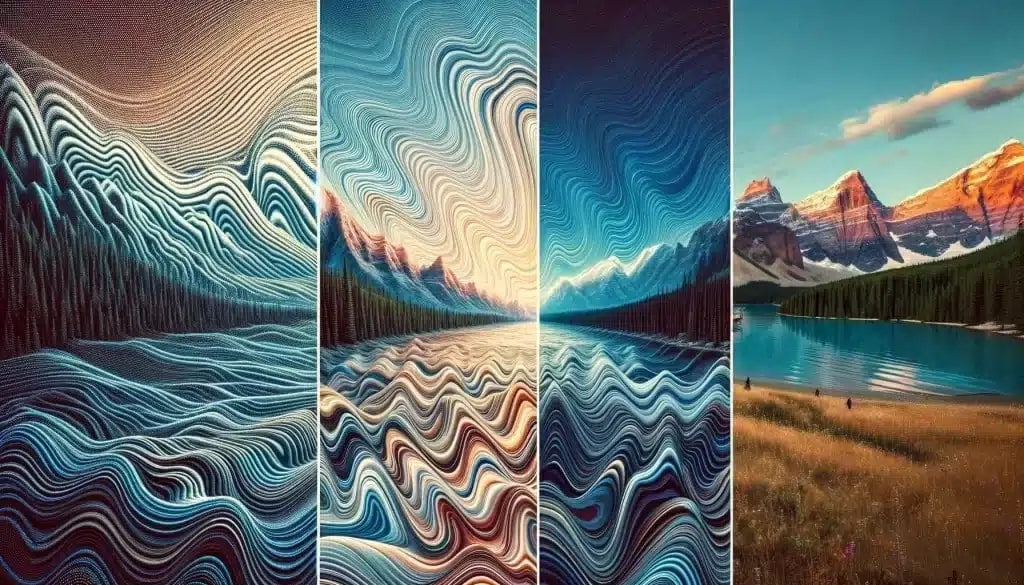
Almost all camera lenses are subject to some form of optical (visual) distortion. Put simply, a lens distortion causes the straight lines to appear distorted, deviating the image projection from the photorealistic representation.
When your camera lens distorts a photo, the straight lines in the scene appear to curve inwards (barrel distortion) or outwards (pincushion distortion). How much a camera distorts the captured images depends on many factors, including subject position and distance, focal length, the length of the lens, etc.
The most common lens distortion examples include barrel distortion, pincushion distortion, and fisheye lens distortion. Let’s delve deeper into these main types of lens distortion to help understand how they alter the original visual appearance and representation of subjects, objects, and scenes in your photos and videos.

Barrel distortion creates an outward bulge in your camera-captured visuals. This type of optical distortion is common in photos and videos captured with a wide-angle camera lens.
It causes the straight lines to bend inwards in your images and video clips, giving your visuals a barrel-like appearance. Barrel-like photos are common for landscape and architectural photography and videography.

Pincushion distortion is the opposite phenomenon of barrel distortion. Instead of curving the straight lines inward, pincushion distortion causes the lines to bend outward from the center of the image.
It’s commonly caused by telephoto camera lenses that use exaggerated optics, shorter focal lengths, and overly increased magnification, causing the edges of the image frame to warp outward. This type of optical distortion is commonly found in wildlife and portrait photography.

Fisheye cameras use curvilinear lenses to create the fisheye effect by forcing the straight lines to bend and curve, thus stretching the final image. Though this can be a good thing, especially when taking wide-angle photos, the curvilinear lenses are subject to heavy visual distortion.
Aside from over-stretching the image by dragging the frame edges to the opposite ends in all directions, fisheye lens distortion can blur all subjects and objects in a photo.
The most significant difference between lens distortion, barrel distortion, and perspective distortion is the cause. The first two visual anomalies are caused by a camera lens. Lens distortion refers to all image deformations caused by a camera lens.
Barrel distortion is one of the main types of lens distortion, causing the straight lines to curve inwards, resembling the walls of a barrel. On the other hand, perspective distortion has nothing to do with a camera lens. Instead, the image deformation comes from subject misplacement.
This type of optical distortion results from incorrect subject positioning in relation to your angle of view and camera. Subject misplacement can cause two types of perspective distortion:
Though they appear similar to the untrained eye, these three types of optical distortion are pretty different regarding visual appearance and the overall distorting effect they cause in camera-captured photos and videos.
If you’ve captured a whole bunch of camera footage only to find it completely warped, curved, and distorted, don’t lose your head just yet. You can quickly fix all types of lens distortions by using professional image and video editing software. Enter Wondershare Filmora.
Filmora is a top-class, all-encompassing audio/video editor with immense AI editing capabilities. Filmora’s AI-enabled lens distortion correction techniques can help you fix video clips with distorted wide-angle scenes.
It’s a perfect tool for enhancing video footage and imagery captured by action cameras such as Sonny and GoPro models. Aside from reducing and correcting image distortion, Filmora uses smart AI algorithms to detect distorted lines in your photos, straightening them out until they become straight again.
That’s how it unwarps fisheye and wide-angle distortions, allowing you to transform distorted visuals into natural-looking footage.
Correcting lens distortions in Filmora is as straightforward as possible. All it takes is a few clicks, and you’re done.
Download and install Filmora on your computer, then follow the steps below to remove fisheye distortion using AI Lens Correction:
Step 1: Launch Filmora and select Create Project > New Project;
Step 2: Import your video with distorted imagery and drag it to the timeline;
Step 3: Select the clip in the timeline, go to the editing panel, and click Video > AI Tools > Lens Correction;

Step 4: Toggle the Lens Correction switch on, navigate to the Device Model section, and select your camera model;
Step 5: In the Resolution section, select the capture mode resolution of your video;
Step 6: Use the Adjust level slider to adjust the lens correction level.

Step 7: Click OK > Export to save the optically corrected video on your computer.
In addition to lens distortion correction, Filmora empowers you to enhance your video using basic and advanced editing features, tools, techniques, and creative assets.You can boost the visual appeal of your video footage with keyframe animations, enhanced audio effects, advanced color correction, stickers, transitions, titles, and more.

Since most camera lenses produce some form of image, optical, or lens distortion by design, you can use lens distortions by transforming them into fantastic visual effects.
Here are the top ways to use lens distortion to your advantage:

Whether you intentionally work with distorted images to unleash your creative potential or your visuals suffer from pincushion and barrel distortion, this guide can help you address lens distortions according to your needs.
We’ve discussed how lens distortion affects your visuals and its leading causes and given examples to help you understand how this type of optical deformation works. We also mentioned the best video editing software, Wondershare Filmora, that you can use to fix lens distortion issues such as fisheye image warping.
Though most content creators see lens distortions as problems, you can use visual deformations in your images and videos to your advantage to create unique visual effects that can make your footage more immersive and engaging.
