How To Reverse a Video in Windows Movie Maker
Jul 14, 2025• Proven solutions
There are occasions where you are building a video project and you realize you want to play a part of your footage backwards. Though this is a common occurrence, and there are many video reverse software allow you to do that, but Windows Movie Maker does not feature the video reverse feature which you can play the video footage backwards automatically with one click of a button.
That is not to say that you cannot reverse your footage in Windows Movie Maker, it just means the process is a little more difficult than just clicking a button. You may need to take snapshots of the video frame by frame and then re-order it to make a reverse video in Windows Movie Maker again. In this article, we will show you all the steps of reversing a video with Windows Movie Maker and also a better way to reverse the whole or a part of it with just one click.
- Part 1: Reverse videos in One Click with Filmora on Windows
- Part 2: Windows Movie Maker Video Reverse [Step by Step]
Part 1: A Better Way to Reverse Video Automatically in Windows 7/8/10
In case that you are in a rush to make a reverse video in Windows, we recommend you to try Wondershare Filmora , which is one of the easiest way to reverse video and gives beginners the tools of a professional, and presents them in an easy to use and simple to understand way, and also a much better way to create a video with backwards playing footage.
While the Windows Movie Maker way involves many steps, creating photos and importing them, Wondershare Filmora can be as simple as clicking one button. As you can see the details of making a video play in reverse from the above video, I will show you the step by step information of creating a reverse video.
1. How to play the Entire Video in Reverse with Filmora on Windows

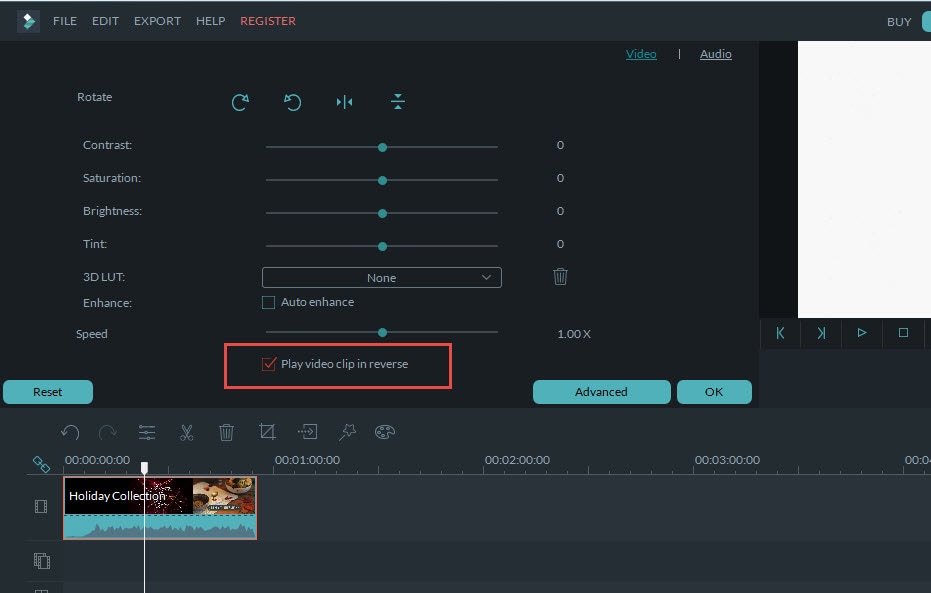
If you are looking to play the entire footage in reverse, just load the footage into your timeline, double click on the file and in the new window that pops up check the Play Video Clip in Reverse option. Your video will now be playing in reverse.
For detailed information about play the whole video in reverse in Filmora, you can check our guide How to Reverse Video.
2. Playing Only a Portion of the video backwards

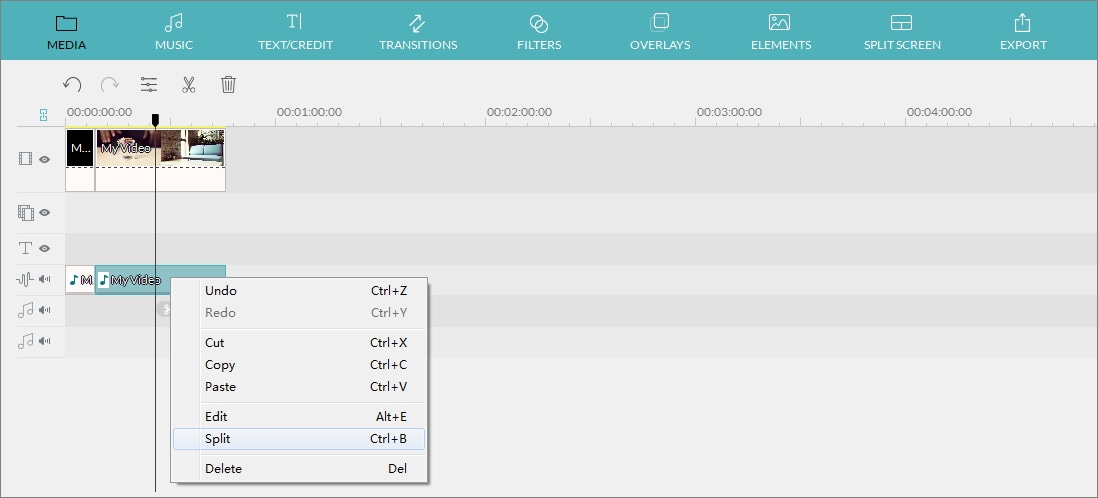
If you only want to play a certain portion of your clip in reverse, you can zoom in the timeline to find the frames more precisely, and then use the Splitter tool to split the video into smaller parts. Once you have the portion you would like reversed splited and selected, double click it to enter the edit panel, and then select Play Video Clip in Reverse option under Speed section.
For the detailed steps of how to using Filmora Video Splitter to cut videos, you can check How to Split A Large Movie into Small Parts Seamlessly.
Playing videos backwards will make your videos with more creativity. You can check the video about how to use reverse video ideas to make videos with magic.
Part 2: Reversing Video in Windows Movie Maker
In case that you don’t want to download any third party software from the Internet, you can make a reverse video in Windows Movie Maker by following the steps below.
Step 1 Import Video and Find Starting Point of the Reverse Video
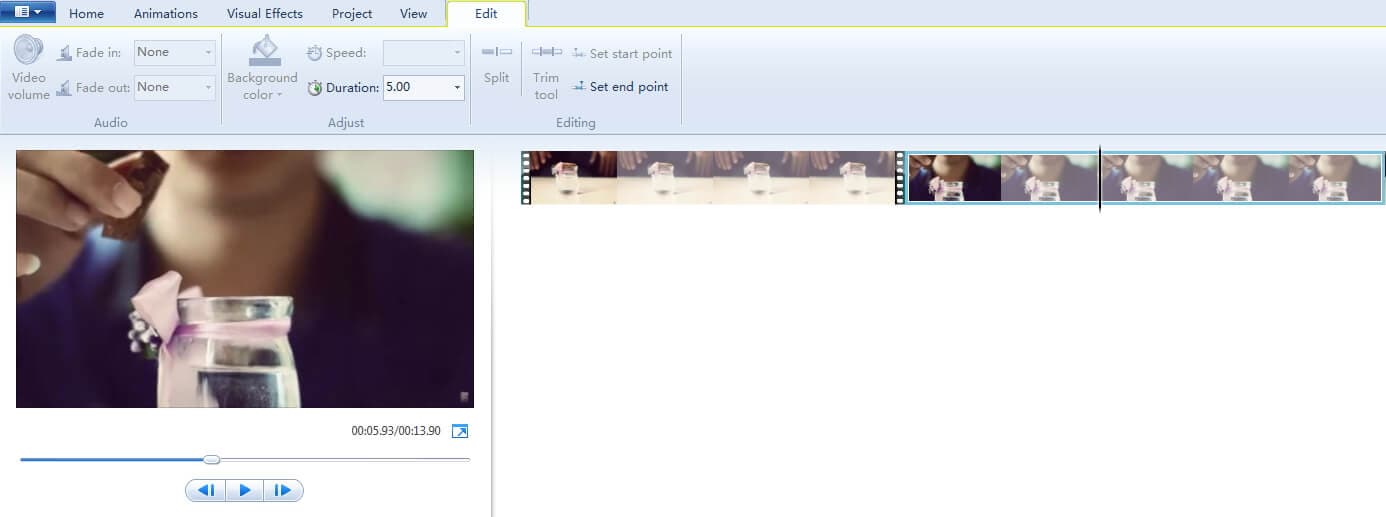
Drag and drop the video clips to Windows Movie Maker or click Add Videos and Photos to select the target the clip. Once you have the footage you would like to reverse selected, you will need to find the first frame of the video which you will use as the starting point of your reverse video by moving your slider all the way to the left and preview it. Pause and take a note of the time code here (the first number you see is the location of your slider in the movie, and the second number is the total length of your currently selected video clip.)

You can also preview the clip frame by frame by clicking the Previous Frame or Next Frame button.
Step 2 Take Snapshot and Save it
Create a folder where you will be able to save the reverse video material, and once you do take a snapshot using the Snapshot button on your Home tab, and save the photo to the file you made. Make sure there is room in the file, because you will be saving a lot of photos. After you take the snapshot, click Save and the snapshot will be added to your timeline and your slider will be bumped to the position right before the new snapshot.
Move your cursor over to the next frame and repeat the snapshot process to get all the frames of making a reverse video. Continue this process until you reach the end of the footage you want to reverse. Note: The next frame will be inserted in the previous screenshot.
Step 3 Set up Duration of reverse photos
Select all of the photos you just saved and click the Video Tools Edit tab. In the Duration field, enter the target duration of your photos for the reverse video.

Step 4 Compose the Reverse video
Delete the original video from your video timeline, leaving only the photos. You can now play your video to make sure you got the time ratios right, and if you did it correctly, you will have a perfectly reversed video.
Note: making a reverse video in this way with Windows Movie Maker will take plenty of time. We really recommend you to reverse a video with 2-4 seconds in this way.
Conclusion
While the frame-by-frame reversal system that needs to be used in Windows Movie Maker can be time consuming, the end product will be worth it if you insist on using the free Windows Movie Maker. But, to improve the efficiency of video editing, we really recommend you to try Wondershare Filmora. to reverse the video clip. Besides playing back the video backwards, you can also change the video speed such as make a slow motion video for YouTube . Watch the video below to learn how to use Filmora to empower your story.
Learn how to reduce video file size in Windows Movie Maker (Win 7/8) & get the best alternative for Windows 10 users: Wondershare Filmora.
by Liza Brown Jan 06, 2026 11:04 AM
This free video voice over software will help you add voice over to video with ease.
by Liza Brown Oct 28, 2025 10:29 AM
Learn how to combine & merge MP4 video files into one using Windows Movie Maker (WMM) or its best alternative, Filmora, perfect for beginners on Windows 11/10/7.
by Liza Brown Nov 18, 2025 17:25 PM


