How to Reduce Video File Size in Windows Movie Maker (2026 Guide)

Jan 06, 2026• Proven solutions
 TL;DR:
To reduce video file sizes, Windows 7 and 8 users can utilize legacy Windows Movie Maker custom settings, while Windows 10, 11, and macOS users should transition to Wondershare Filmora since Microsoft officially discontinued the original software in 2017.
● In Wondershare Filmora, shrink files by selecting the MP4 format in the Export window and manually lowering the video resolution and bitrate, keeping in mind that setting the bitrate too low will cause visual quality loss.
● For Windows Movie Maker 2012, downsize videos by navigating to File, choosing Save Movie File, and using Create custom setting to manually adjust bit rates or apply built-in presets like "For email" before saving the result as an MP4.
● Before using Windows Movie Maker, verify that your original video file format is natively supported to avoid required pre-conversions, a limitation bypassed by Filmora's broader format compatibility and precise codec control.
Ask AI for a summary
 ChatGPT
 Perplexity
 Gemini
 Claude
 Grok
Grok
Video compression is vital for sharing on platforms like YouTube, Instagram, and Facebook. While Windows Movie Maker was once a popular free option to reduce video file size, Microsoft officially discontinued it in 2017. This article provides a comprehensive guide on how to reduce video size using the old Windows Movie Maker tool (for older Windows 7/8 systems) and introduces the best modern alternative, Wondershare Filmora, perfect for Windows 10/11 users seeking a powerful yet easy-to-use video editor.
- Part 1: How to Reduce Video File Size on Windows 11/10/8/7 using Wondershare Filmora (The Best Microsoft Video Editor Alternative)
- Part 2: Reduce Video Size with Windows Movie Maker
Part 1: How to Reduce Video File Size on Windows 11/10/8/7 using Wondershare Filmora (The Best Microsoft Video Editor Alternative)
As you may know that Windows Movie Maker is not available to download from Microsoft now since it had been discontinued in January 2017. So, if you are a Windows 10 user or there is no Windows Movie Maker on your computer, you need to download it from somewhere else. And the best copy that you can get is Windows Movie Maker 2.6.
We recommend you to try Wondershare Filmora to reduce video file because it is available for both Windows 7, Windows 8 and Windows 10 systems, as well as Mac OS. Filmora can perform a similar task and some other advanced editing tasks, especially for Mac users who do not have access to this Windows video editing software. With Filmora, you can reduce the video size to change the video look visually or change the actual video file size in terms of megabytes or gigabytes.


To resize the video file size in Filmora is easy, just Import the video files to the timeline and then change the Export settings. Here is the how to reduce video file size with Filmora movie maker on Windows.
Step 1: Import videos to Media Library
Import videos into the Media Library first and then check the Properties of the original video including video file size, video format, and audio format. Video resolution and bitrate are the two most important indicators to change the size of the video file.
Step 2: Loading Video to Timeline and Do Basic Editing
Drag and drop the video to timeline and preview it. You can remove unwanted parts from the video, or add texts to the video and do some basic editing as well as rotating and cropping.
Step 3: Export and Change Settings
Click Export tab in the toolbar to enter the Export window. While you can see the video size of the video.
Since saving videos to different video formats will have different video size, you can choose a format which will save the video in a smaller size. Yet, the most common video format is MP4.
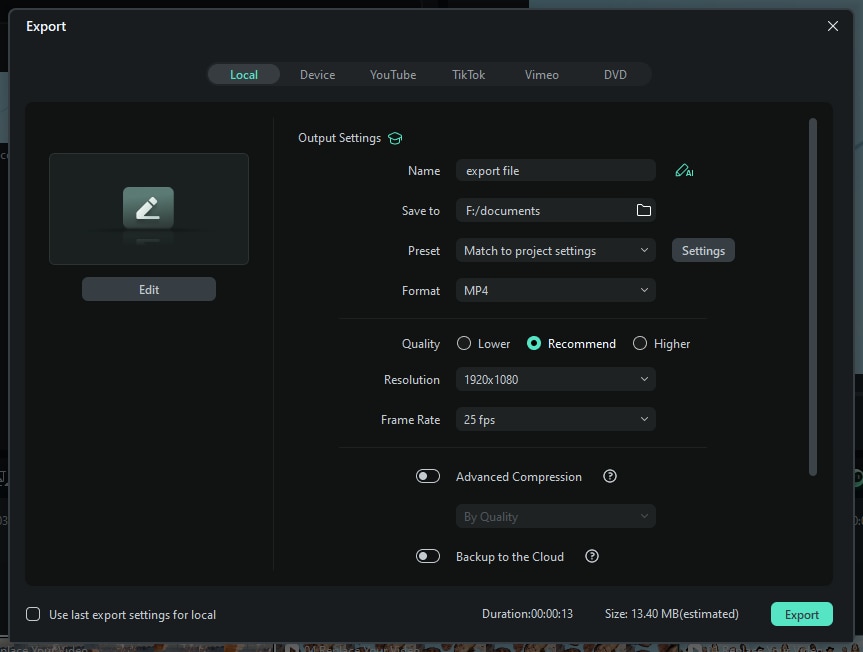
To resize the video size further, you need to change the resolution, the video bitrate and the audio bitrate as well in the Export Settings windows.
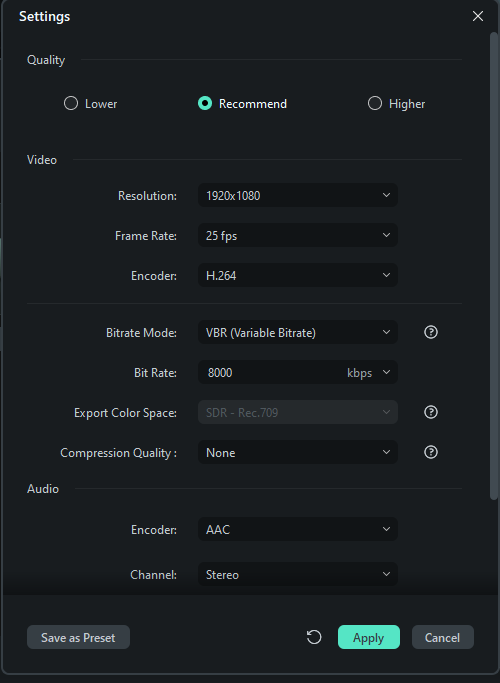
To reduce the video file size, you can lower the resolution and bit rate. Lowering resolution will decrease the number of pixels in the video, and setting bit rate lower may cause video quality loss.
Click OK to apply these changes and go ahead to export the video.
Besides reducing video size, you can edit the video with some more advanced features such as compositing chroma key videos and stabilizing shaky videos. Some of the benefits associated with using this software include:
- It is versatile and yet easy to use.
- You can perform multiple overlays and transitions.
- You have access to a built-in audio mixer as well as an equalizer.
- Availability of Green Screen Effects and PIP
- Color correction features such as White Balance, 3D LUTs, Vignette.
- Support all commonly used video, audio, image formats.
- Compatible to Mac and Windows users
Learn the ultimate guide of How to Edit Videos with Filmora
Part 2: How to Reduce Video File Size in Windows Movie Maker
Before we get started to reducing video files in Windows Movie Maker, please check your video size and the format as well. Windows Movie Maker doesn’t support all video file types. If you file is not supported, you may need to convert it first.
The steps and screenshots below are taken from Windows Movie Maker 2012. If you are using a different version such as Windows Movie Maker 2.6, you may find they share different user interfaces. But, the function of reducing video files is virtually identical.
Step 1 Import Video Files
Launch the Windows Movie Maker software from your computer. Once the software opens, look for the Add Videos and Photos icon on the left pane and select it to select the video you want to resize. It will be automatically uploaded onto the Windows Movie Maker.

Step 2 Edit the video
Here you can edit the video such as trimming, splitting, adding music, transitions, etc.
Related article: How to edit videos in Windows Movie Maker
Step 3 Save the video
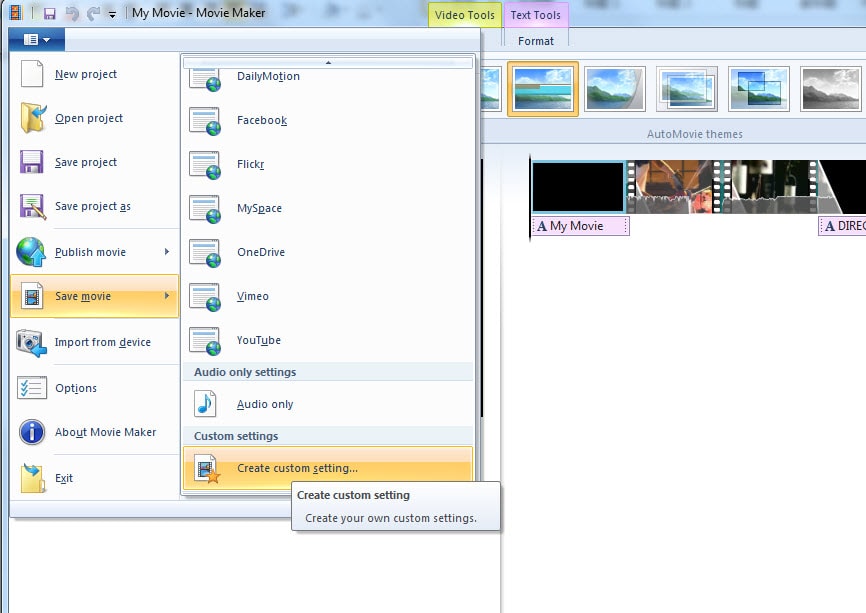
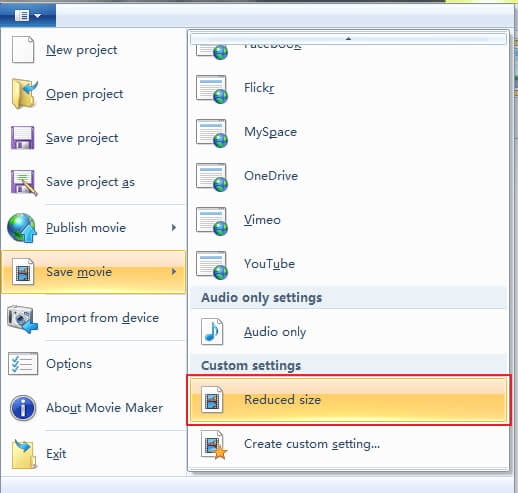
After you are done with the edits – if any, on the upper left pane, select the File option and then on the drop-down menu, select the Save Movie File option, then Create custom setting.
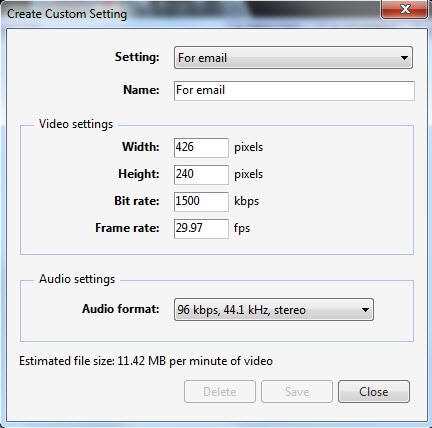
Step 4 Customize Video Size Properties
On the pop-up window, you can custom the setting to reduce video size. Take my video file as an example: if I choose For email, the video file will be 11.42MB:
If I choose For high-definition display, the video file will be 173.03MB:
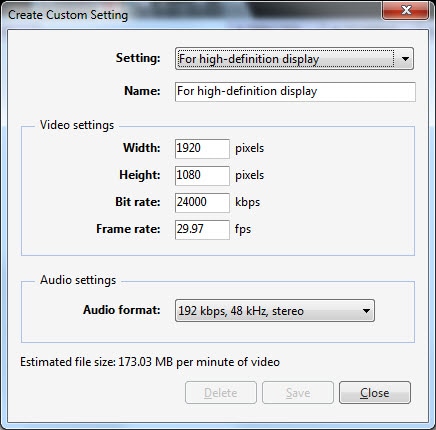
Or you can directly adjust the bit rates in the Video settings to reduce video size. In the Create Custom Setting window, enter a new name for the Setting and it will be saved with .wlvs format.

Then go to Save Movie option again and then click the file in Custom Settings. In my case, I just named it as Reduced Size. Click it and save the video into MP4.
Click Save to start the compression of the video file. It will take some time to compress and save the video file.
Conclusion
Above are the two movie makers that you can use on Windows to reduce the video size by saving with different bitrates or resolutions. If you are not familiar with Windows Movie Maker yet, you can check our guide of zoom in videos or combine two or more clips into one. While Windows Movie Maker offers basic size reduction, Filmora provides precise control over bitrate, resolution, and codec, ensuring a better quality-to-size ratio. If you are on Windows 10/11 and need a reliable, feature-rich video editor, we highly recommend Filmora.
Learn how to add, edit, and adjust music to your video project easily in Windows Movie Maker. Simple steps for adding background music and adjusting volume.
by Liza Brown Jul 17, 2026 15:27 PM
Liza Brown
chief Editor
