
 100% Security Verified | No Subscription Required | No Malware


Timestamps are a crucial part of YouTube content creation. They can help the users navigate your videos better and jump over to the parts they're interested in the most.
Moreover, such elements can organize your content better, making it more comprehensive and easier to chew, especially if you're dealing with longer video files.
We've created a complete guide to adding timestamps to YouTube videos to help you reach the desired results and boost your productivity. Stay tuned for bonus tips that can help you further enhance your content.
In this article
Complete Guide: How to Add Timestamps to YouTube Videos
Here's a step-by-step guide to adding timestamps to YouTube videos for beginners. We'll present all the different YouTube methods and you can then choose the one that fits your preferences.
Method 1: Adding Timestamps Using YouTube Studio Manually
YouTube Studio provides an option you can use to adjust and set timestamps in your videos to make it easier for viewers to follow along. Here are all the steps you need to take:
- Step 1: Sign into your YouTube Studio account using the proper credentials.

- Step 2: Click the Content option from the left menu to access your videos. Then, select the video you want to timestamp.

- Step 3: Head to the Description section and start adding your timestamps manually. You should ensure the first timestamp is at 0:00. The minimum space between two timestamps is 10 seconds.

Method 2: Add Timestamps Automatically Using YouTube Studio
YouTube Studio wanted to make things a bit more efficient, so you can use the advanced automatic timestamping feature to save yourself some time and nerves in the process.
The feature is easy to use, but we advise you to check the timestamps before clicking the Save button to ensure they're accurate. Here's how to enable the automatic timestamping option on YouTube Studio:
- Step 1: Open YouTube Studio and sign into your account with the proper credentials.

- Step 2: Open the Content section and select the desired video from the available options.

- Step 3: Scroll down and tick the Allow automatic chapters and key moments box, as presented in the image below.

Method 3: Using YouTube's Share Feature From Browser
If you don't own the video and want to show specific parts to your friends or family, you can use the share feature to “timestamp” the video and get the desired results. This option is easy to use, and you can create a special link with the timestamp. Here's how to use it:
- Step 1: Open the YouTube video you want to share in your browser of choice.
- Step 2: Pause the video where you want to create the timestamp.

- Step 3: Click the Share button from the bottom of the video to start the process.

- Step 4: Tick the Start At box to create a timestamp before sharing your video.

Ready Your YouTube Video for Timestamps with This Solution
Although timestamps can be a true game-changer, your content should be easy to follow to begin with. Before you dive into timestamping, you should use video editing solutions to create professional and attractive videos.
However, editing your videos manually can be a pain in the neck, especially if you're a beginner, which is why we've prepared a tool that will fit everyone's needs. Wondershare Filmora is an advanced video editing solution with an extensive AI feature library.
Aside from all the obvious video editing solutions, such as trimming, cutting, cropping, background removal, and others, it provides advanced solutions to cut your production time and help you reach professional results.
For instance, you can enhance the quality of your videos, use smart cutout features, remove unwanted objects, match the colors, create YouTube shorts, and more, all with the power of AI.
Once you master your Filmora skills, you'll become unstoppable. It will help you reach your target audience, organize your videos better, and prepare them for the finishing touch: timestamping.
Additional Strategies to Enhance YouTube Video Engagement
To make the timestamping easier and get comprehensive content, access some of the following Filmora's features and watch your videos transform.
We'll discuss some of the most beneficial tools you can easily access, but the list continues. You can enter the world of advanced and beginner-friendly editing once you download Filmora on your desktop device.


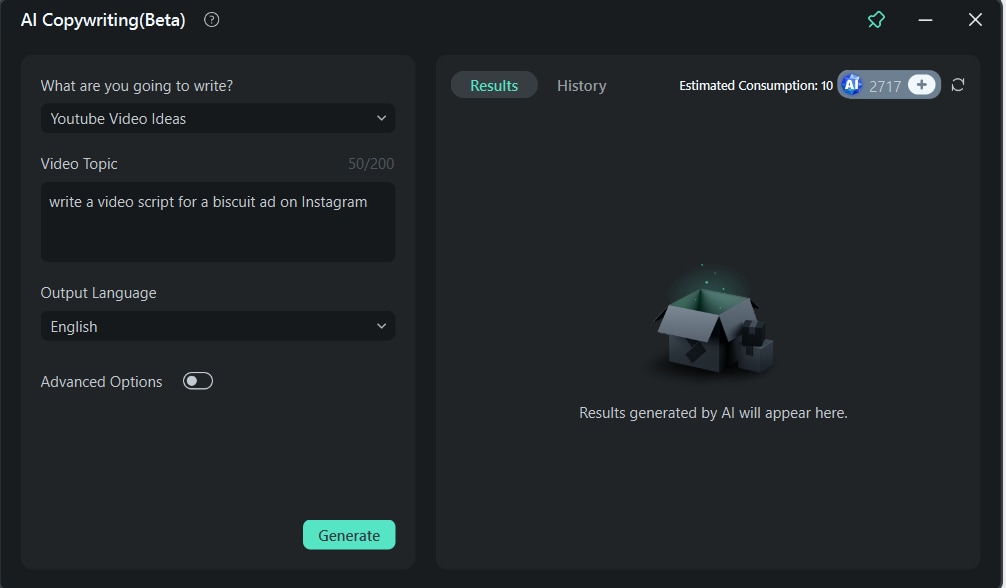
Get Ready-to-Use YouTube Scripts
If you're out of ideas for your next YouTube project, don't fret. Wondershare Filmora has paired up with the world's most renowned AI tool: ChatGPT. You can simply input the topic you want, add a language, and click the Generate button to start making your visions come to life.
The platform will provide you with a comprehensive script you can process or record. The best part is that this feature will include everything you need to attract the audience, so you can use it as a template for your future projects.
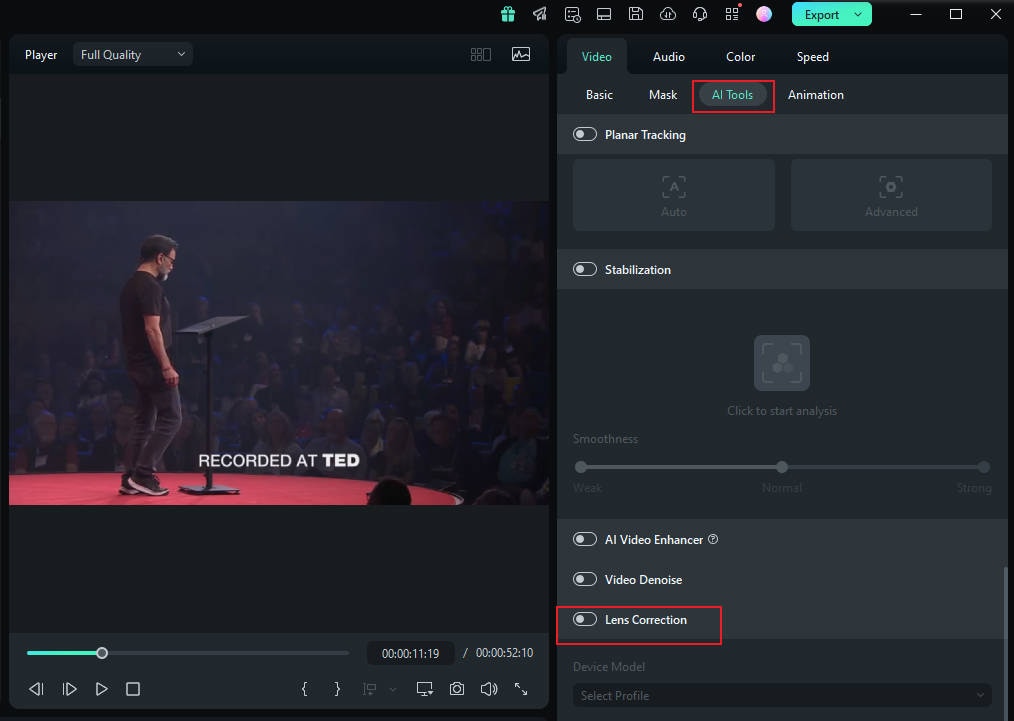
Correct the Angles
Sometimes, while recording your YouTube videos, you may not notice that the video is distorted, leading to issues during post-production editing. However, you don't need to re-record the distorted parts – there's an easier solution.
Wondershare Filmora has a specialized lens correction tool that will make everything right with the click of a button. All you need to do is toggle the Lens Correction option and watch the magic happen.
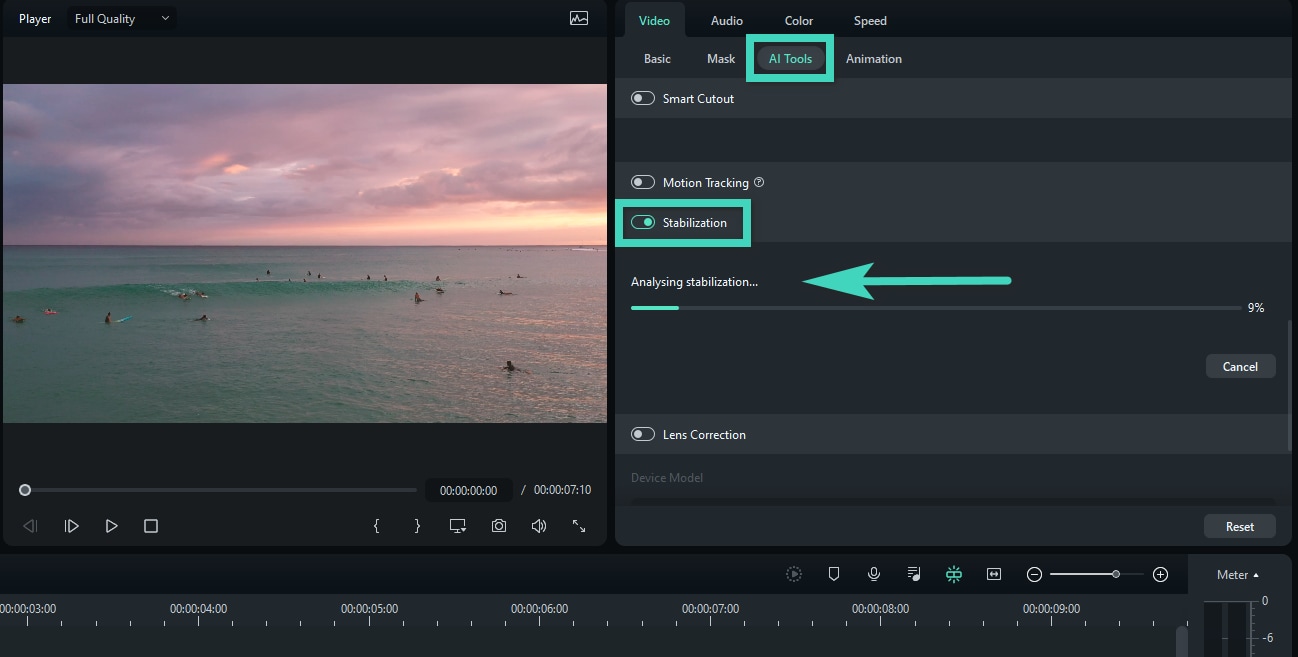
Get Rid Of Shaky Videos
Shaky videos can ruin someone's viewing experience. They'll appear unprofessional, not trustworthy, and simply not worth the viewers' time. If your camera doesn't have stabilization options, you can use Filmora as your tripod.
The advanced AI stabilization feature will make your videos look as if you've recorded them with professional video cameras. The best part is that the process will only take a few minutes.
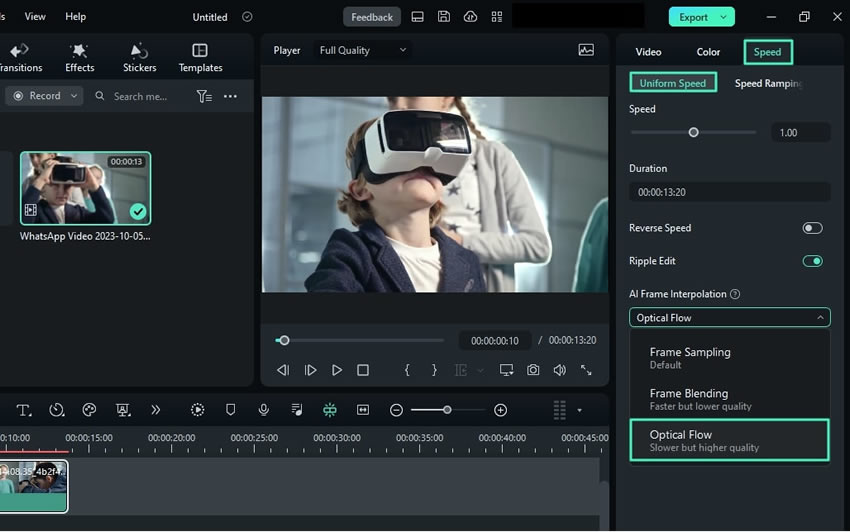
Slow Motion But Better
You may also want to create the slow-motion effect and get a specific message across. You'll need this feature to create equal timestamps.
Wondershare Filmora wanted to make sure you get the most out of this option, so you have complete control. For instance, you can improve the quality, get rid of lags, and create smooth, slow-motion transitions.
Conclusion
Timestamps can truly improve your YouTube game by attracting a larger viewer audience. It will make your videos more organized, easier to understand, and simply better. If you want to try it, check out all the time stamping methods we've provided in this guide and master the art of YouTube content creation. However, to get the most out of each video and create professional content, we advise you to use the most universal video editing solution on the market: Wondershare Filmora. You can use the power of AI to create timestamp-worthy videos, enhance the quality of your content, and much more.
