


"How to resize videos in Premiere Pro?" is a question that many new video editors grapple with. When you are working on videos, ensuring they fit the required dimensions for different platforms can be as crucial as the content itself. If you are using Adobe Premiere Pro, you can resize videos using Auto Reframe.
The Auto Reframe feature automatically adjusts your video's aspect ratio to suit various media formats without losing important elements. This way, your videos always look great no matter where they're played! And if you're interested in other tools with simpler interfaces, we'll also explore an alternative with Auto Reframe to resize your video.

In this article
Part 1: How to Use Auto Reframe in Premiere Pro to Resize Videos
The Auto Reframe feature in Premiere Pro is super handy for quickly prepping your videos for different platforms. It saves you the headache of manually tweaking each video for every new format—a real timesaver for creators who love sharing their work far and wide.
With Auto Reframe in Premiere Pro, you can change your video size to fit square, vertical, or cinematic 16:9 formats. You have the flexibility to automatically reframe either individual clips or an entire sequence. Below, we'll walk you through a step-by-step guide on how to resize the video in Adobe Premiere on Mac.
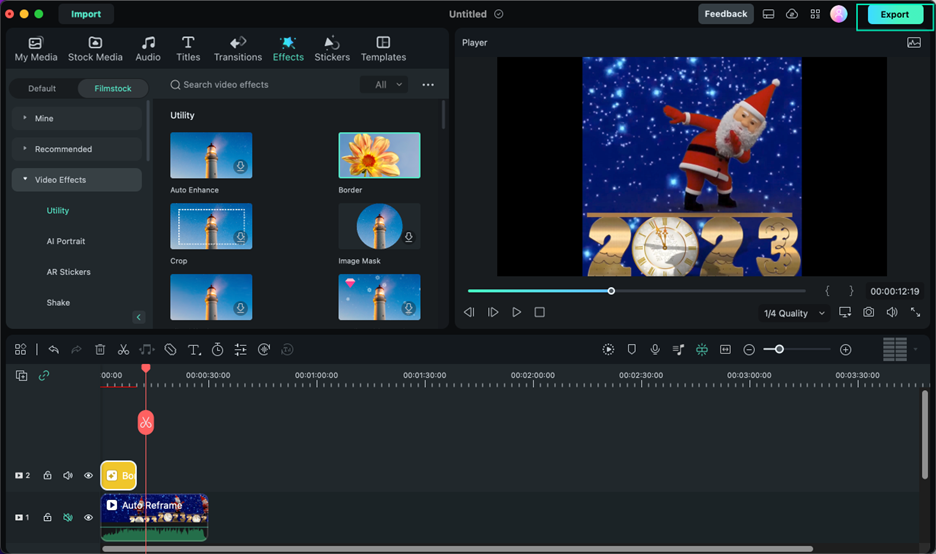
Step 1: Go to Video Effects > Transform and drag the Auto Reframe effect onto the clip you'd like to resize. Click Analyze.
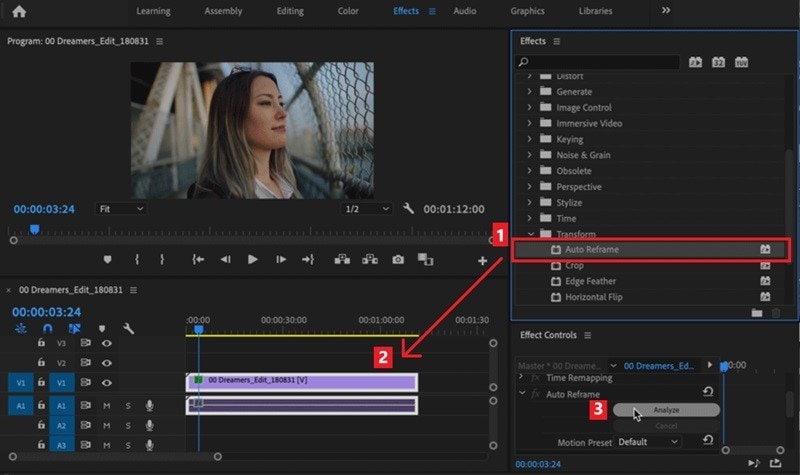
Step 2: In the Effect Controls panel, refine the Auto Reframe effect by selecting a suitable Motion Tracking option. As the effect is applied, Premiere Pro creates motion keyframes to track the action in your footage. Here are the details for each option:
- Slower Motion: Best for content with minimal movement, like talking head videos. This setting produces a steady result with fewer keyframes.
- Default: Ideal for most videos. This option tracks the action well but may struggle with very fast motion.
- Faster Motion: Perfect for footage with a lot of activity, like sports clips. It keeps fast-moving subjects centered, adding more keyframes to the clip to maintain focus.
If you want, you can also adjust settings such as Position, Reframe Offset, Scale, or Rotation to further refine the framing.
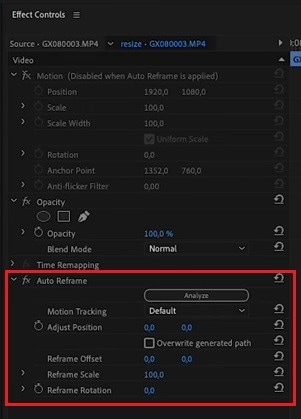
Step 3: Once the effect is applied, review the clip. If you need further adjustments, you can modify keyframes in the Effect Controls panel. Then, you're done! That's how you resize a video in Adobe Premiere.
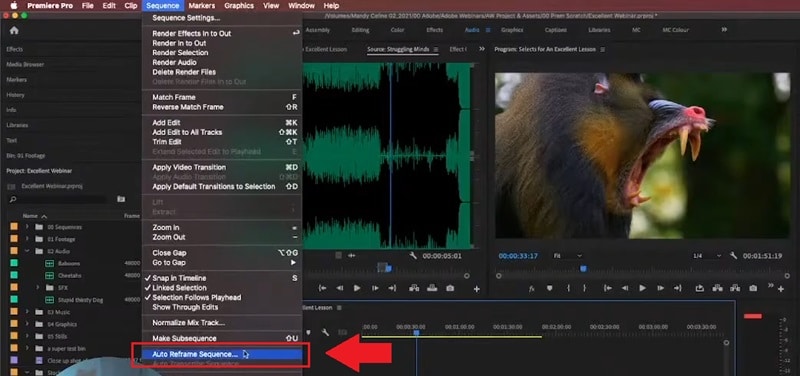
If you want to change the video size of the entire sequence with Auto Reframe, you can click Sequence > Auto Reframe Sequence.
In the pop-up dialog box, choose a Target Aspect Ratio from the preset options or enter a custom aspect ratio to fit your needs.
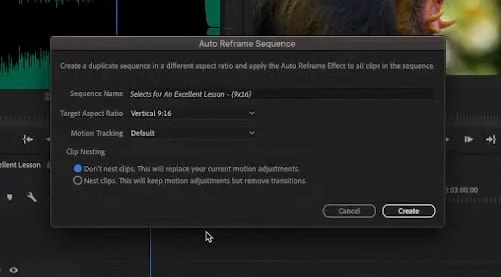
Premiere Pro will then create a duplicate sequence with the updated dimensions. It automatically applies the Auto Reframe effect to each clip in the new sequence. This new sequence will be saved in the Auto Reframe Sequences folder in the Project panel for easy access.
From here, you can make additional adjustments just as before. Check out this helpful tutorial video on how to use Adobe Premiere to resize video.
Part 2: Faster and Easier: How to Resize Videos Automatically Using Filmora for Mac🤓
If you think that using Adobe Premiere Pro to change video size is a bit complicated due to its complex interface, Wondershare Filmora might be a better fit for you. Aside from Premiere Pro, Filmora is another powerful tool that includes the Auto Reframe feature to resize videos automatically.
Filmora Auto Reframe uses AI to automatically detect the main subject in a video and adjust the framing to fit various aspect ratios seamlessly. It ensures that key elements stay in focus across platforms like Instagram, YouTube, and TikTok.
Filmora's straightforward design, faster processing speeds, and simplified options are perfect for creators who want professional results without the learning curve of Premiere Pro. You won't need to navigate through complex menus or settings.
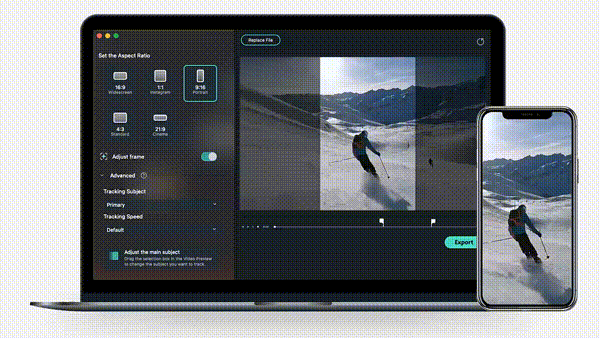
How To Use Auto Reframe in Filmora
Step1Launch Filmora and Upload Your Video
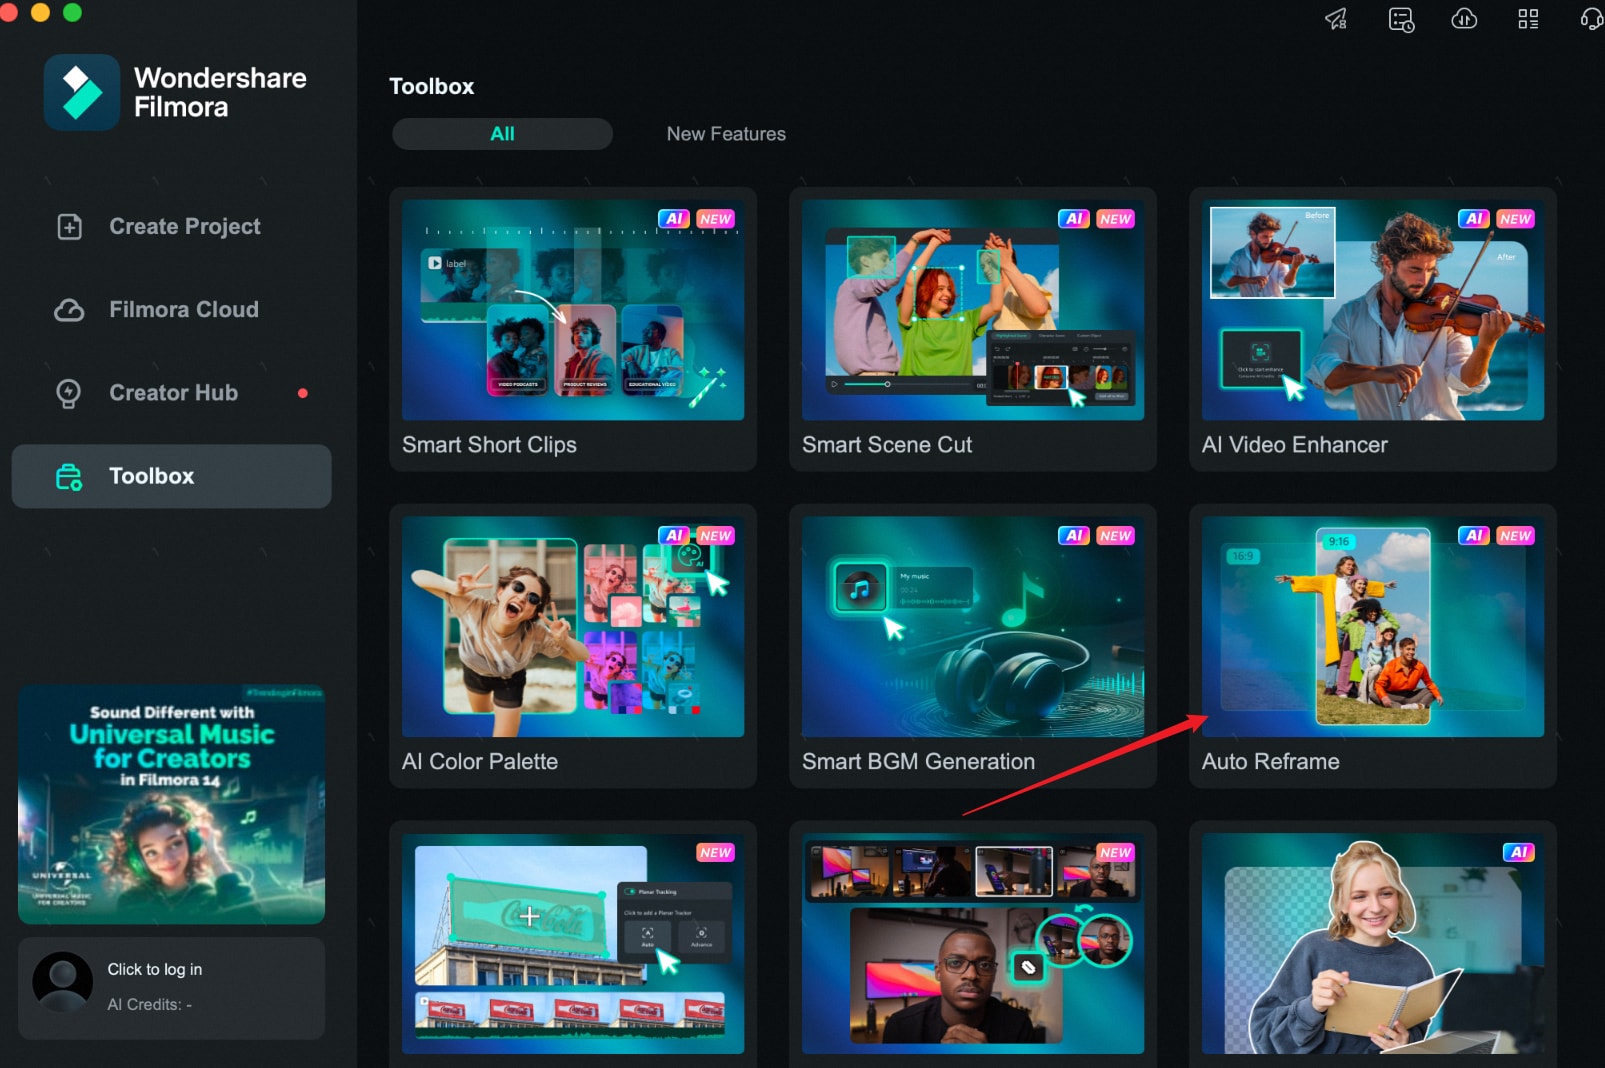
Begin by opening Filmora on your Mac. Click on the three dots in the menu to open the AI Toolbox.
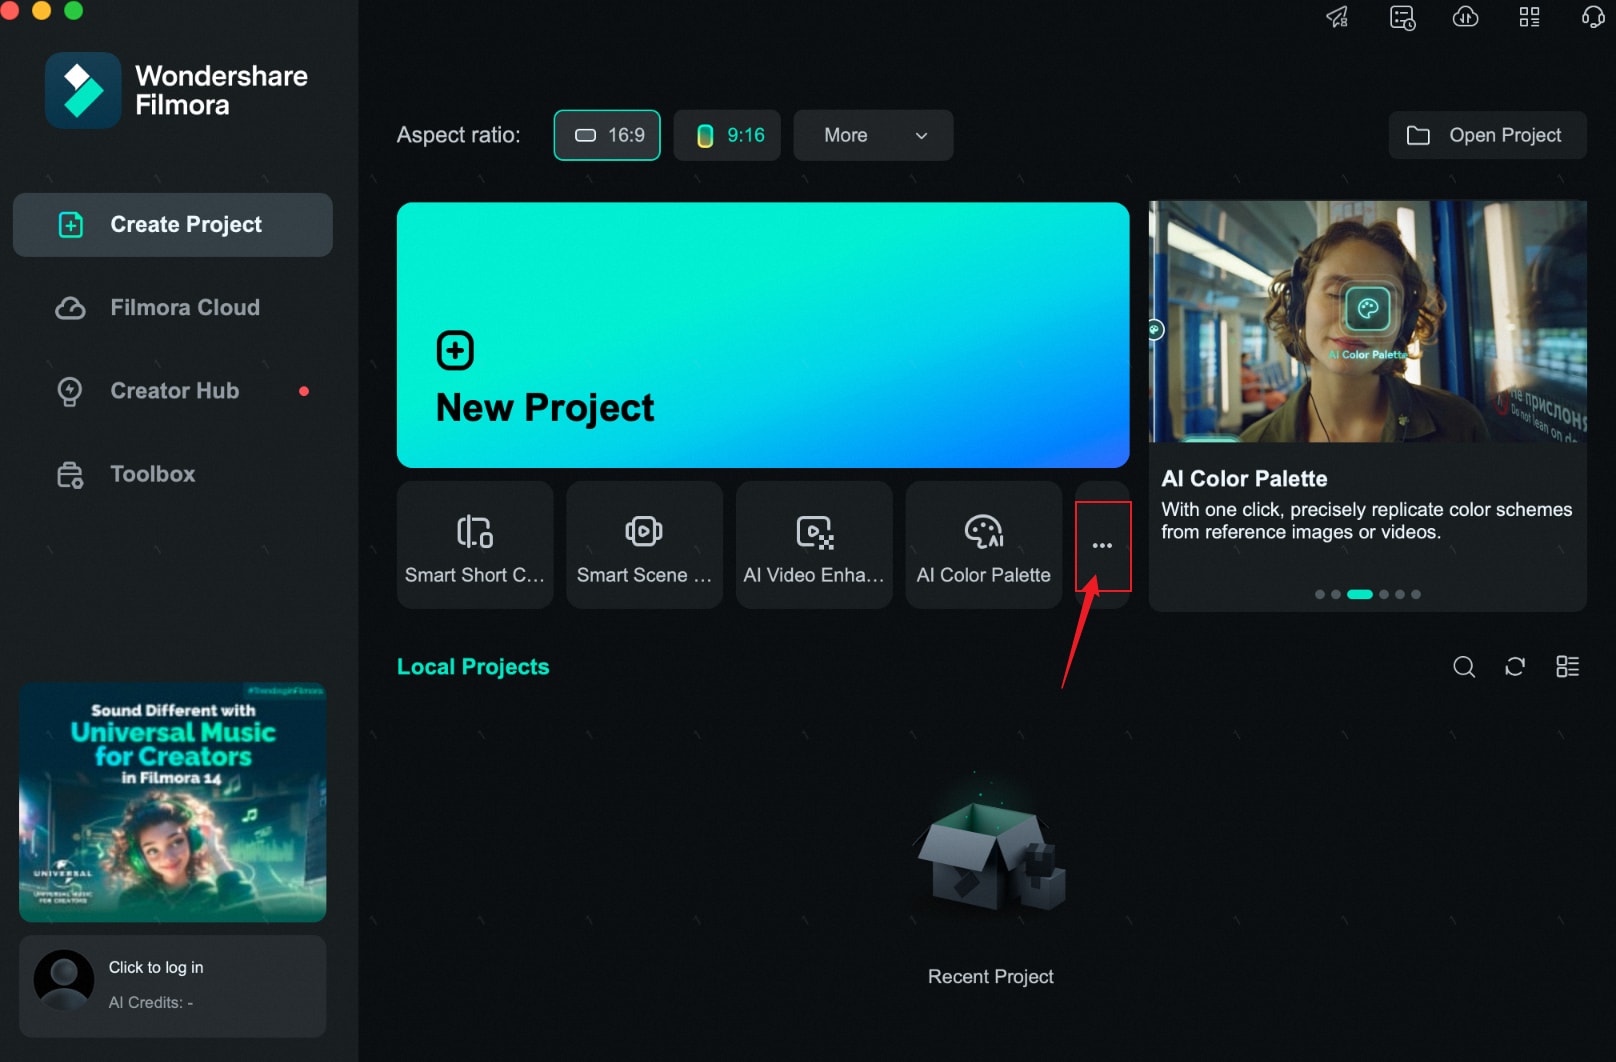
Then, select Auto Reframe. From there, you can upload your video.
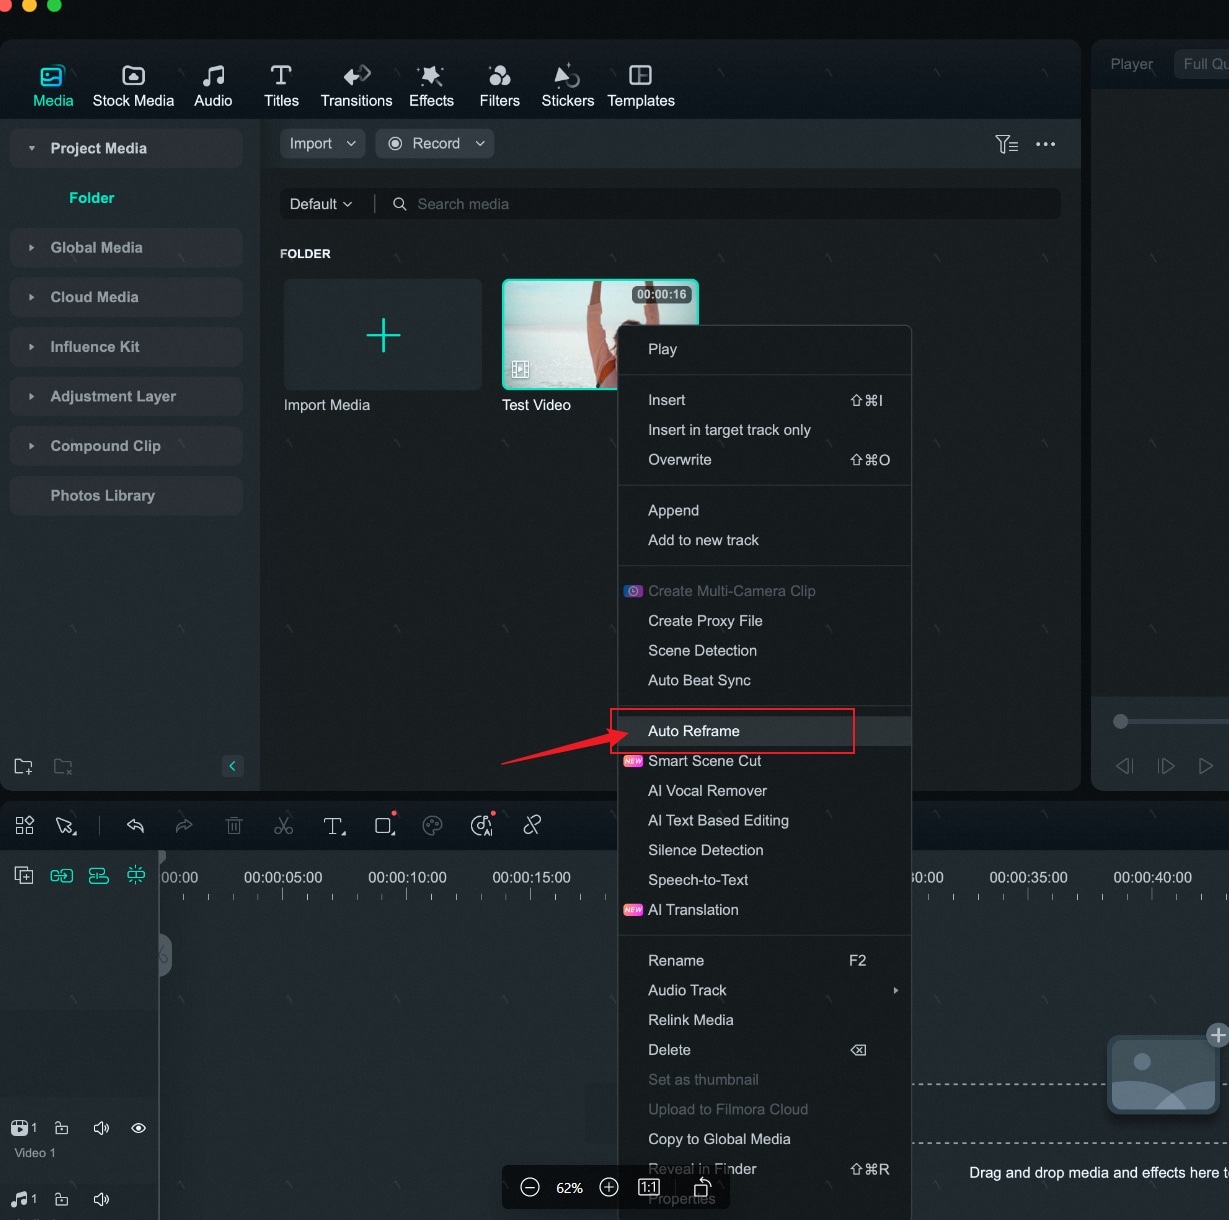
Alternatively, you can start a new project by clicking on New Project. After creating the project, import your video file. Right-click on the video in the media library and choose Auto Reframe from the menu.
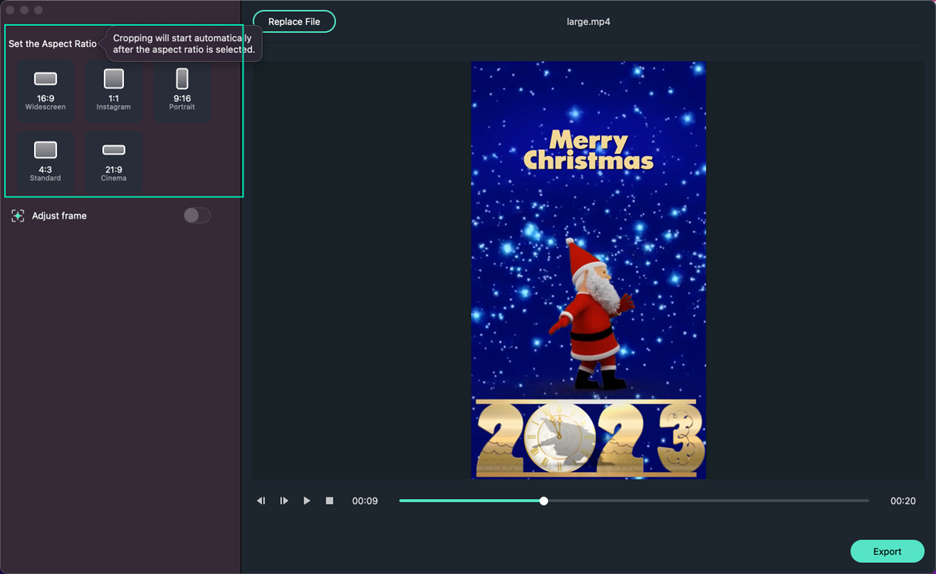
Step2Select Your Aspect Ratio
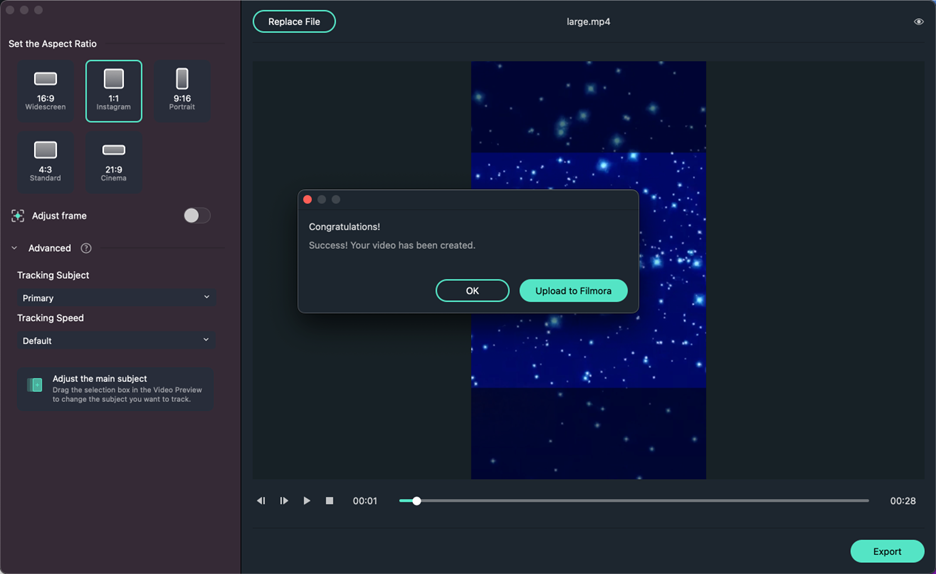
Once your clip is imported, you will need to choose the desired aspect ratio for your video. Filmora offers five options:
- Widescreen (16:9)
- Instagram (1:1)
- Portrait (9:16)
- Standard (4:3)
- Cinema (21:9)
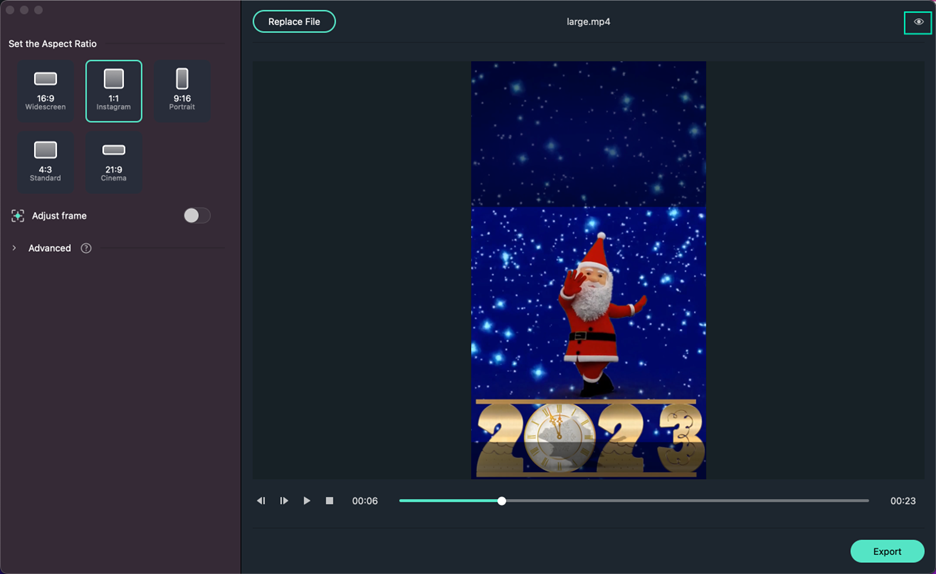
After selecting the aspect ratio, the reframing process will begin automatically. You can view the changes in the preview window, where the parts of the video outside the frame will be concealed. To see the entire video, click the eye icon in the upper right corner.
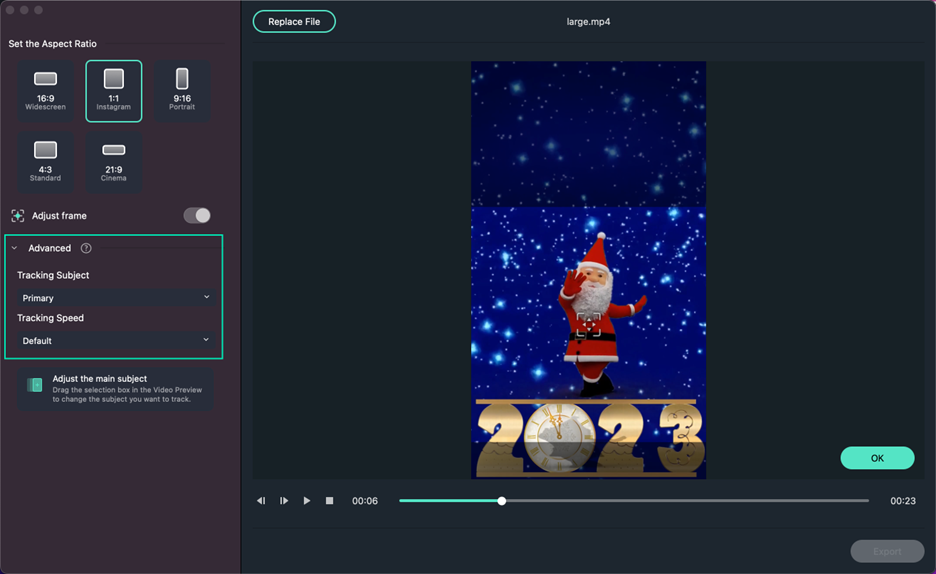
Step3Adjust Tracking Subject and Speed
If you want to modify the tracking subject or adjust the tracking speed, click the Advanced tab under Adjust Frame.
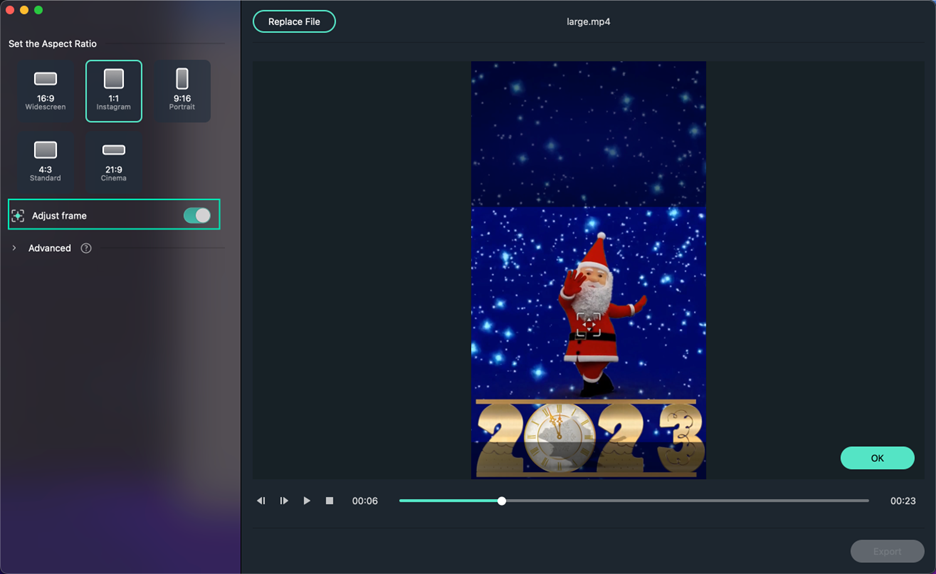
Here, you can choose to track a secondary subject or change the tracking speed as needed.
Step4Save or Make Further Adjustments
After you finish adjusting the settings and reframing the video, click the Export button to save your project. If you wish to make additional edits to the reframed video, select the Upload to Filmora button. This will automatically import the video into the Media window.
Now you can drag the clip onto the timeline to perform further edits. Enhance your video by adding music, titles, effects, or transitions.
Once your editing is complete, hit the Export button to save and share your final video.
Part 3: Additional Methods to Resize Video for Different Aspect Ratio
Now that you've learned how to use the Auto Reframe feature in Filmora and Premiere Pro to change the size of a video, there are additional methods available in Filmora for resizing videos to different aspect ratios: cropping and manually changing the aspect ratio.
3.1. How To Resize Video by Cropping
Cropping is effective when you want to focus on a particular part of the video or remove unwanted elements from the edges. This method is particularly useful if the key subject of the video remains consistent throughout the clip. Otherwise, you may unintentionally cut away important content. Here's how to resize video by cropping on Filmora:
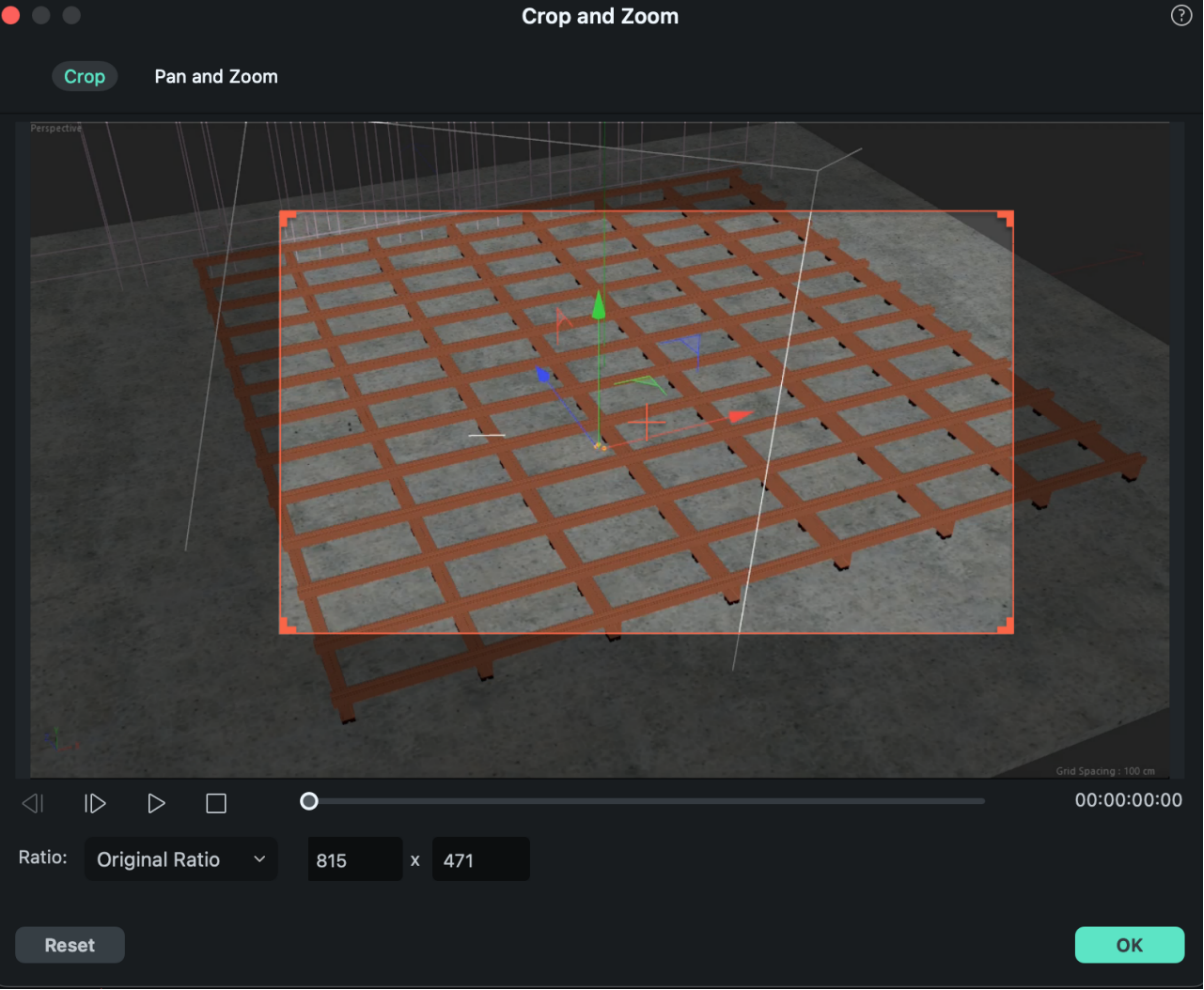
Step 1: Select the video clip in the timeline, then click the "Crop" icon.
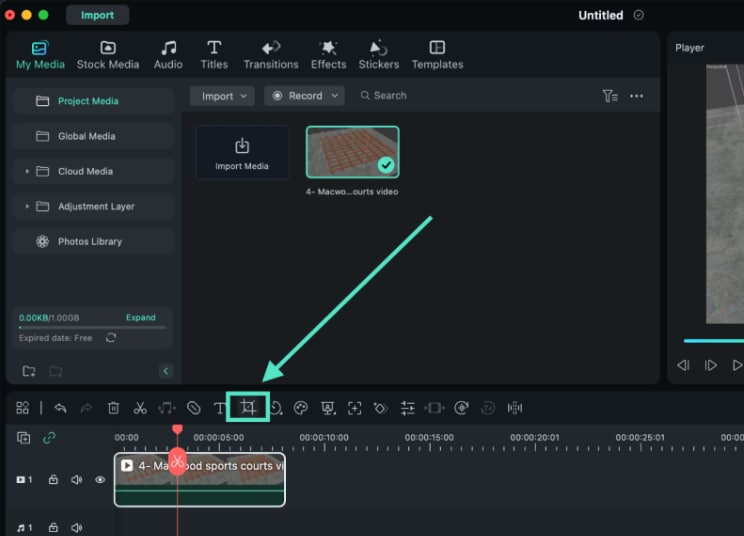
Step 2: A new window will appear. You can adjust the aspect ratio with preset dimensions (16:9, 4:3, 1:1, or 9:16) and customize the cropping area. Once you're satisfied with your adjustments, click "OK" to apply the changes.
You can also crop and resize video in Premiere Pro. Follow the steps below for the tutorial:
3.2 Resize Video by Changing the Project Aspect Ratio
Changing the project aspect ratio is ideal when you need to adapt your video for specific platforms or devices that require certain dimensions. This method allows you to maintain the entire frame of your video while adjusting the proportions. Follow the steps below.
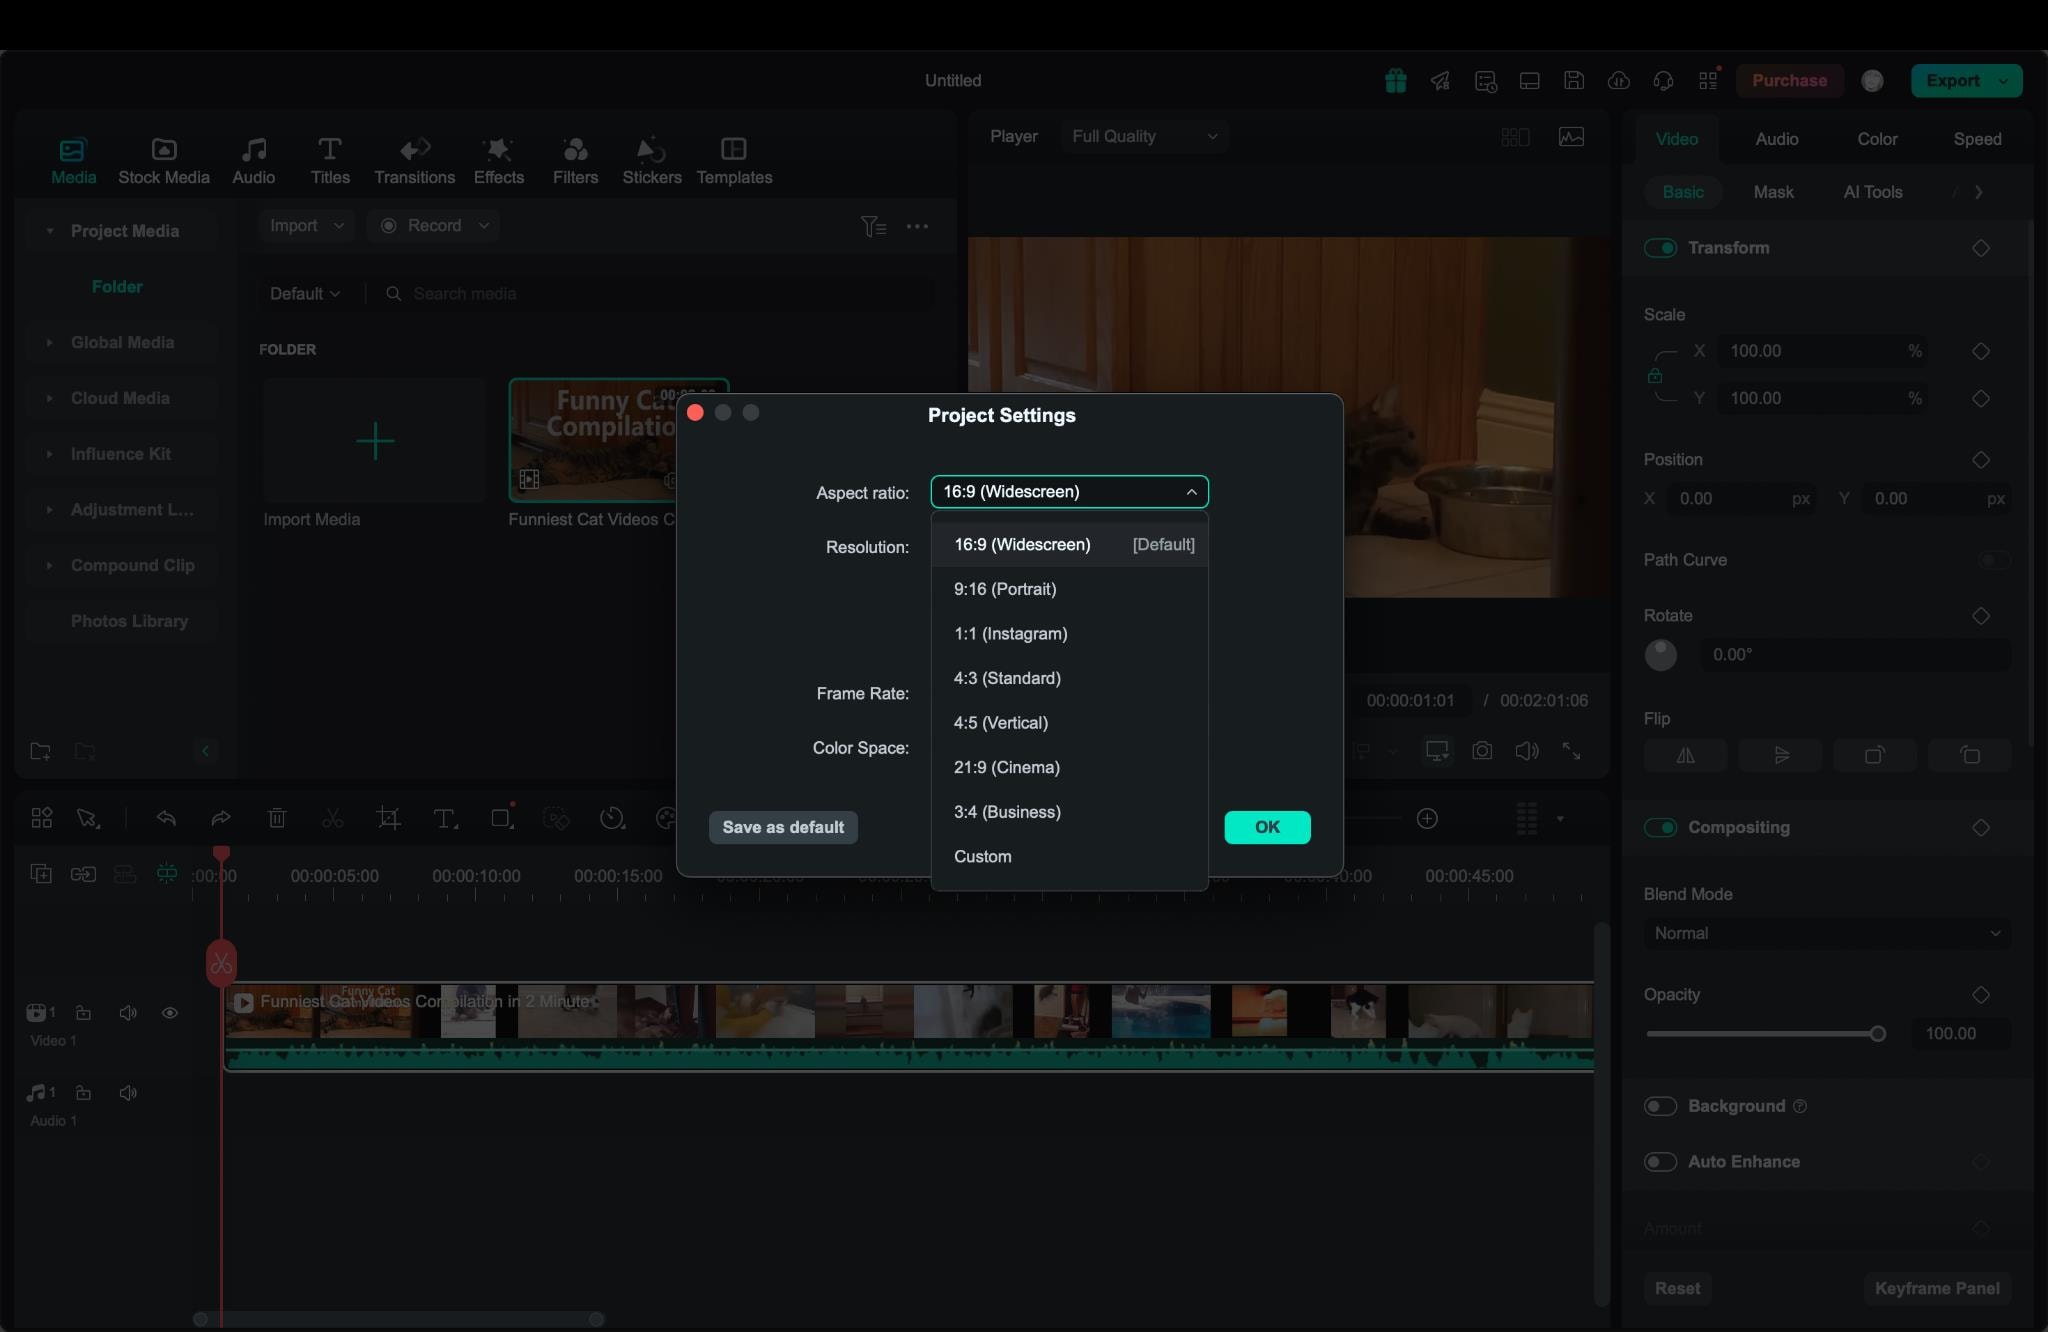
Step 1: Click the Settings button and select Change Project Aspect Ratio.

Step 2: Choose the aspect ratio like 1:1 (square), 9:16 (vertical), 16:9 (landscape), and more. You can also modify the video's resolution and frame rate in these settings.
Part 4: Addressing Common Challenges When Resizing Videos
Resizing videos, either in Premiere Pro or Filmora, is a valuable skill that enhances content adaptability for various platforms, but it can also present a range of challenges. Some of them are large file sizes, loss of quality, and playback problems on different devices.
Now, we'll tackle these common challenges together and arm you with practical solutions to ensure your videos look fantastic no matter where they're shared!
- Video File Size Still Too Large for Uploading
Resizing videos to different aspect ratios doesn't mean it also reduces the file size significantly. So even after resizing, videos can sometimes exceed the file size limits of social media platforms. To resolve this issue, consider using the Advanced Compression feature in Filmora. This tool helps reduce the file size while maintaining high quality during export.

- Loss of Quality When Resizing or Compressing Videos
A common problem encountered during resizing video is noticeable quality loss. To minimize this, select high-quality export settings and avoid excessive compression. If supported, opting for a high-efficiency video codec, such as H.265, can also help preserve video quality while reducing file size.

- Playback Issues on Different Devices
Resized videos may experience playback issues on various devices, especially if the resolution is too high or the codec is unsupported. To address this, ensure that the video is exported in a widely compatible format (e.g., MP4) and resolution that suits the target platform and device specifications. Testing the video on different devices before sharing can help identify any potential playback problems!
Conclusion
Now you know how to resize videos in Adobe Premiere Pro, especially using the Auto Reframe feature. We've walked through every step together, from basic adjustments to more advanced tweaks, making sure your videos always fit just right on any platform you choose.
And for those times when you want a bit of a shortcut, Filmora might be a better fit. It also offers an Auto Reframe feature, powered by AI, and other methods that make resizing videos just as effective but with less complexity. Don't hesitate to experiment and always keep your audience's viewing experience in mind to achieve the best results!
