
 100% Security Verified | No Subscription Required | No Malware


 ChatGPT
 Perplexity
 Gemini
 Claude
 Grok
Grok
Have you ever recorded something in your camera and got grainy footage? This grainy texture in your video is often mentioned as a noise in a video. Having these noises in your video can affect the viewer’s experience and the overall quality of the content.
Are you looking for a way to remove these noises and want to know why they appear in your footage? Thankfully, there is a feature for noise reduction in Final Cut Pro. This feature can help you reduce noise in your videos.
In this guide, we will talk all about noise in a video and share some useful tips to minimize it during the recording process. Keep reading to learn how to remove noise in Final Cut Pro and enhance your video’s quality.

In this article
Part 1. What Is Noise in a Video and Why Do Your Videos Have It?
Video noise refers to the random specks or graininess you sometimes see in videos. Noise in a video can significantly impact the viewer’s experience. Because it makes the footage look unclear, lowers the overall quality, and makes your video look less professional.
Noise is a big problem for videos where clear visuals are important, such as YouTube videos. Because, as technology improves, people expect to watch high-quality video on their latest devices. With 4K and even 8K resolution becoming more common, any noise in your video becomes more noticeable.
Here are some common reasons why video noise occurs:
- Sensor Size: Cameras with smaller sensors often produce more noise because they do not capture as much light.
- High ISO Settings: Increasing the ISO setting on a camera boosts its sensitivity to light, but it also increases the noise.
- Compressing the Video: Reducing the file size of a video through compression can add noise, especially if the compression is too aggressive.
- Lighting Conditions: Poor lighting conditions force the camera to work harder when capturing footage, which can result in more noticeable noise.
Fortunately, there are several strategies you can use to reduce noise while recording. In the next section, we will discuss the tips for minimizing noise during the recording process. These tips can help you achieve the best possible video quality.
Part 2. Tips for Minimizing Noise During the Recording Process
To ensure your videos look polished and professional, follow these tips to minimize noise during the recording process:
- Use Proper Lighting: Using good lighting is essential for reducing noise. Avoid shooting in low-light conditions, as this will force your camera to use higher ISO settings.
- Adjust ISO Settings: Keeping your camera’s ISO setting low can help reduce noise in your video. Adjust them based on available light to maintain video clarity.
- Choose the Right Camera: Cameras with larger sensors perform better in low-light conditions and produce cleaner footage with less noise. Consider this when selecting your camera.
- Control Exposure Settings: Maintain proper exposure through aperture and shutter speed settings. Exposure that is too high or too low can lead to more noticeable noise in your footage.
If the footage you took still has some noise, you can make up for it during the video editing process. You can use noise reduction effects to denoise in Final Cut Pro, as it can analyze and intelligently reduce noise without sacrificing video detail.
Part 3. How to Reduce Video Noise in Final Cut Pro
To remove background noise in Final Cut Pro, you can apply noise reduction effects. This effect can help you to smooth out grainy footage by analyzing your video to identify and reduce noise. You can apply this effect without losing important details. It uses smart algorithms to keep your video clear and detailed while minimizing unwanted graininess.
Here is the step-by-step guide to reduce video noise in Final Cut Pro:
Step1Select the Clip
Open Final Cut Pro and choose the clip with noise on the timeline. Ensure the play head is positioned over the clip so it appears in the viewer.
Step2Open the Effects Browser
Click the Effects button in the top-right corner of the timeline or you can press Command-5 on your keyboard.

Step3Find the Noise Reduction Effect
In the Effects browser, look under the Basics category on the left and choose the Noise Reduction effect. Alternatively, you can quickly find these effects by typing "noise reduction" in the search bar.
Step4Apply the Effect
Drag the Noise Reduction effect onto your clip in the timeline or double-click the effect thumbnail to apply it to the selected clip.
Step5Wait for Analysis
Final Cut Pro will analyze the clip for noise, wait for this analysis to complete. Once the analysis is complete, you will see the improved results.
Part 4. Alternative Method: How To Use AI To Reduce Video Noise
For people looking for a more automated process for reducing video noise, Wondershare Filmora is one of the most reliable solutions. The tool uses advanced AI to generate high-quality audio and visual content for its users. The AI Audio DenoiseAI Denoise function of this platform automatically detects the noise in your video and eliminates it. Furthermore, the Normal denoise feature of Filmora provides you with real-time noise removal while recording a voiceover.
Users get the ability to remove unwanted hums and hisses from their video by simply adjusting the slider as per their choice. The platform also provides functionality on your smartphone as a mobile application. This is ideal for people who are looking for solutions to remove noise while they are on the go.
Audio Enhancement Features Offered by Filmora
- Auto Normalization: Filmora’s audio normalization automatically analyzes the volume levels of selected audio or video clips and adjusts them to a consistent standard loudness level. This ensures balanced, professional sound across your entire project.
- Multiple Audio Channels: It supports multiple audio channels to provide a surround sound effect. You can select from different sound variations, such as left to right or right to left.
- AI Audio EnhancerAI Voice Enhancer: This feature automatically detects the flaws in your voice or spoken dialogue in the video and provides a clearer version. This gives your spoken words a studio-quality effect by removing distractions without manual tweaking.
- Recording Voiceover: Filmora provides an integrated voiceover recording tool that lets users record audio directly within the app and place it precisely on the timeline. You can configure different recording settings according to your preference before starting the process.
- Fade In/Out: With Filmora, you can smoothly apply fade-in and fade-out effects to audio clips to create natural, seamless transitions. This softens the start and end of audio tracks, avoiding abrupt changes in sound.
Learn How to Reduce Video Noise In Filmora Desktop
To enhance your video's audio clarity using Filmora's denoise features, follow these steps on the desktop version:
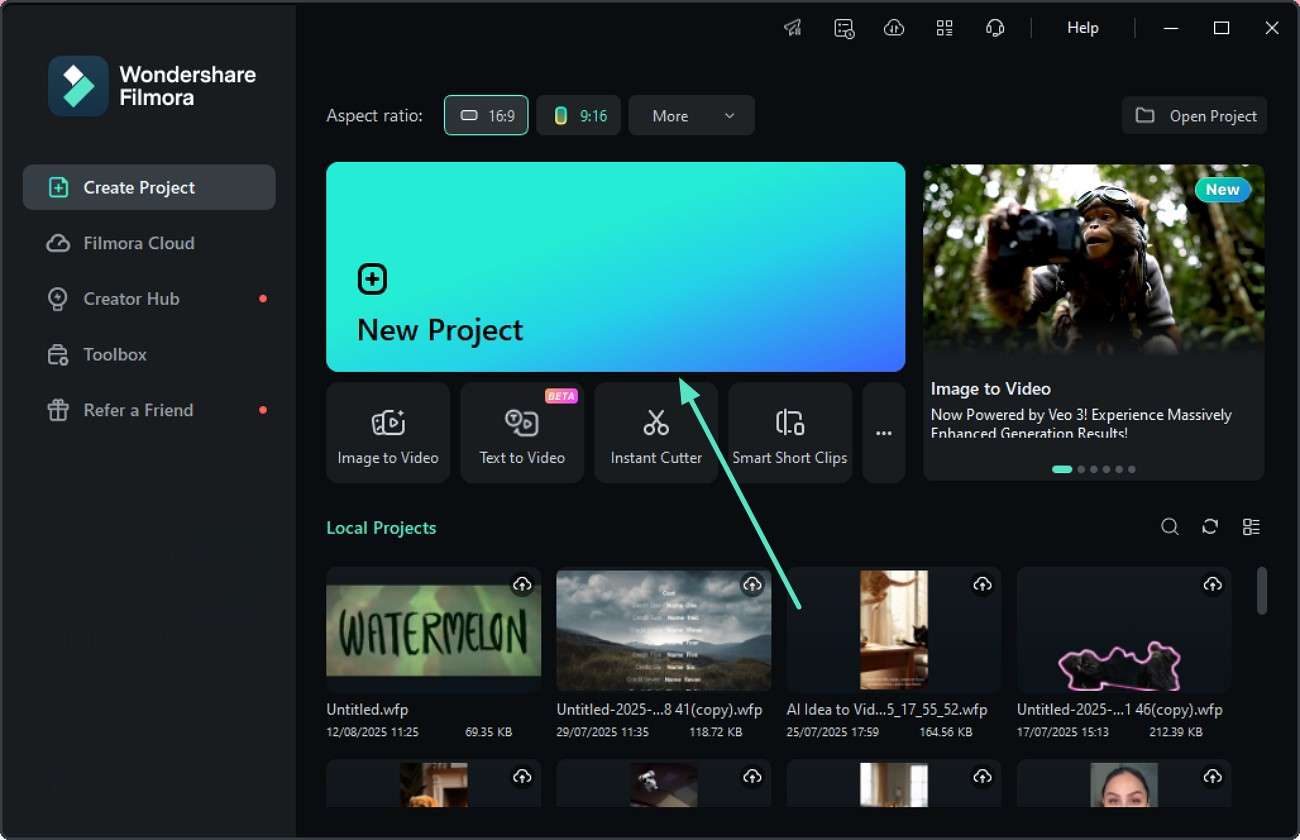
Step1Create a New Project and Import Your Video.
Launch Filmora and select the "New Project" option. Then, import the video file you want to work on and drag it onto the timeline to get started.
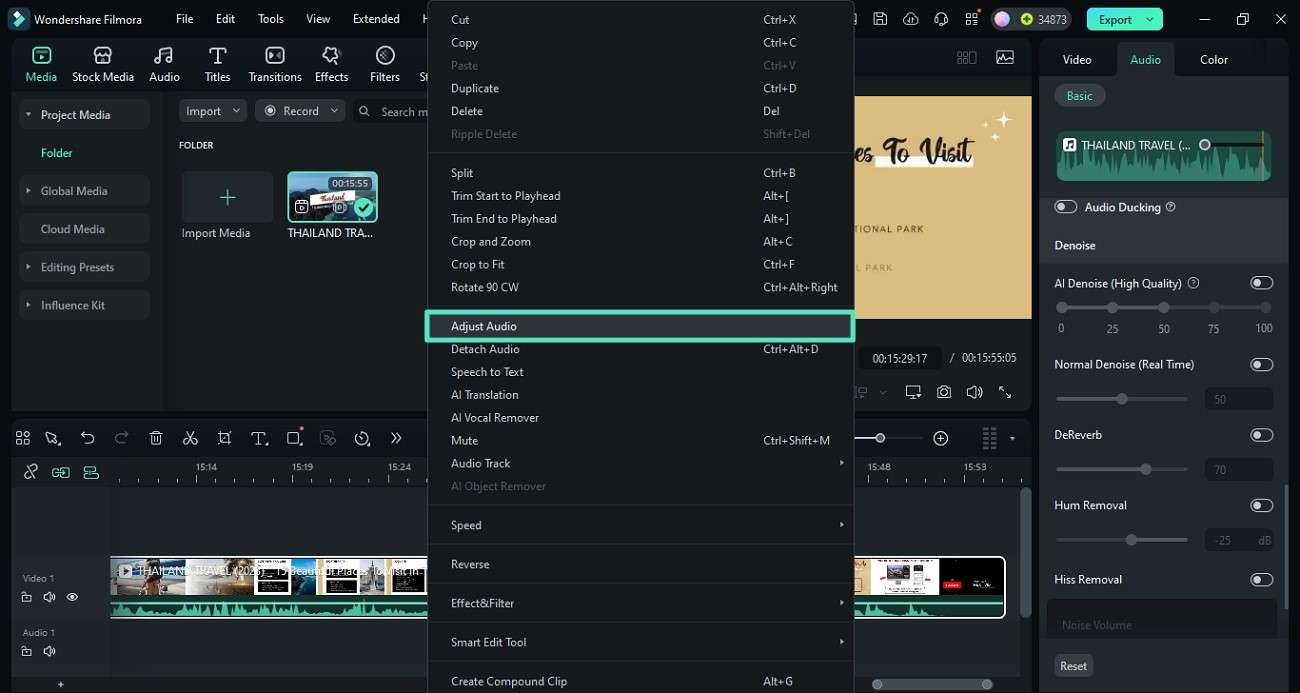
Step2Access the Audio Adjustment Settings.
On the timeline, right-click your video track to bring up a menu. Choose "Adjust Audio" from the options; this will open the audio panel on the right side of the screen.
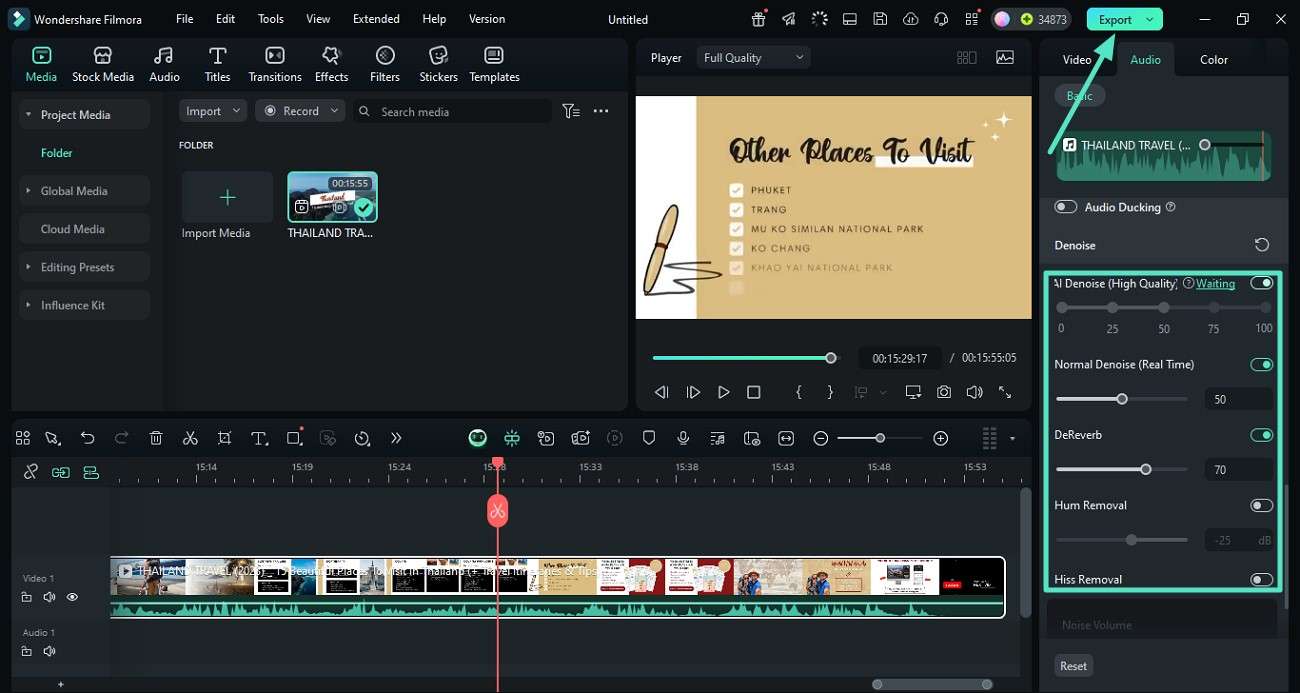
Step3Apply and Customize Denoising Effects.
Within the audio panel, locate the toggle for "AI Denoise" and enable it to improve sound quality using Filmora's smart noise reduction. Alternatively, use the "Normal Denoise" toggle for real-time noise reduction. Preview the changes by playing the video, and when you are satisfied with the results, press the "Export" button.
Steps for Reducing Noise using the Filmora App
If you are on the go, use the Filmora App [iOS/Android] on your smartphone to reduce noise in your video. Follow the steps mentioned below to learn how to denoise videos using this extensive application:
 secure download

Step1Import Video and Extract Audio.
Start the process by launching the application on your smartphone and pressing "New Project." Import the video and tap on the track to select "Extract Audio." Next, locate the "Noise Reduction" option and tap on it to instantly reduce the noise from the audio.
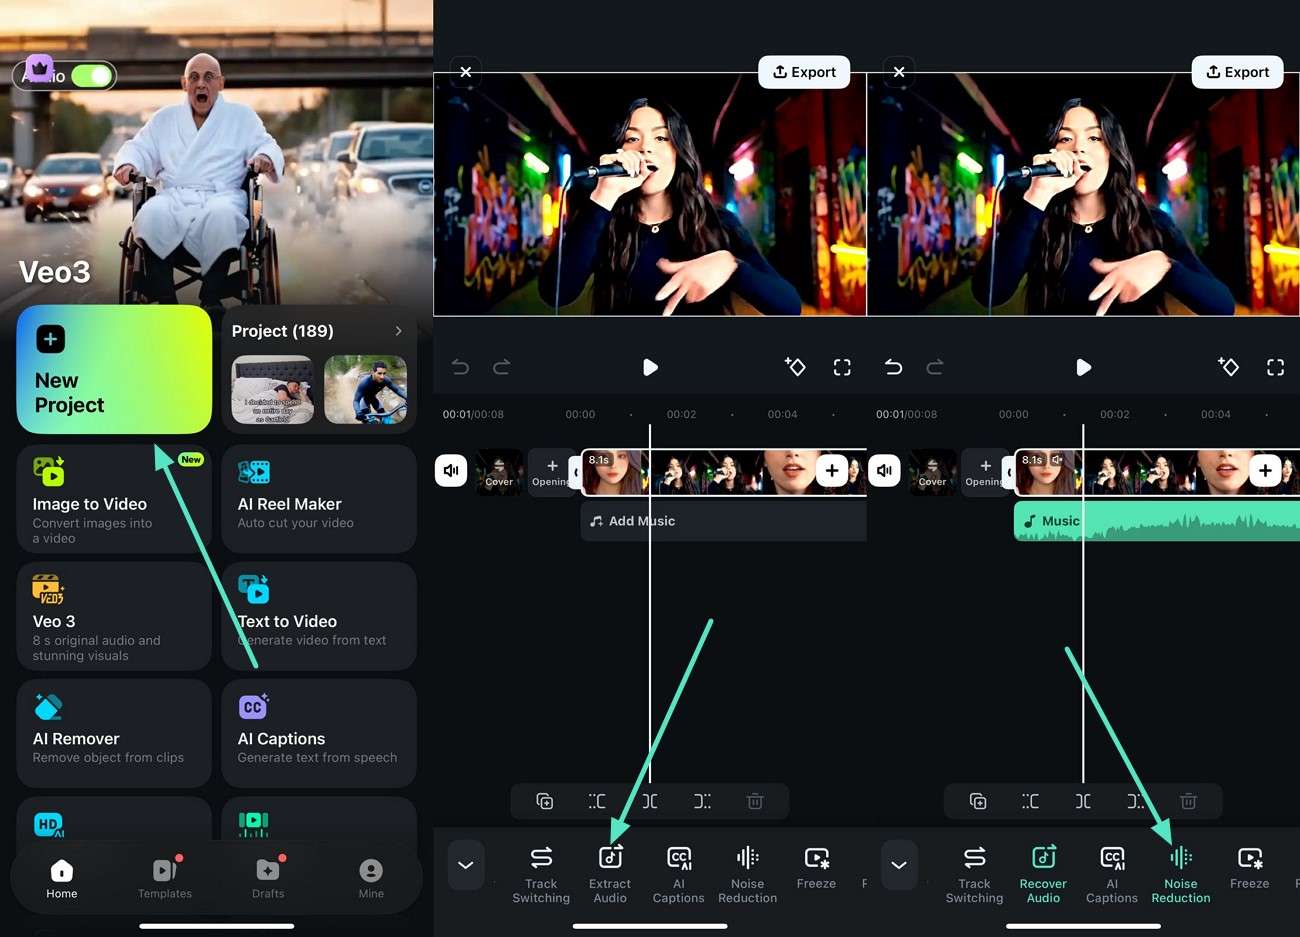
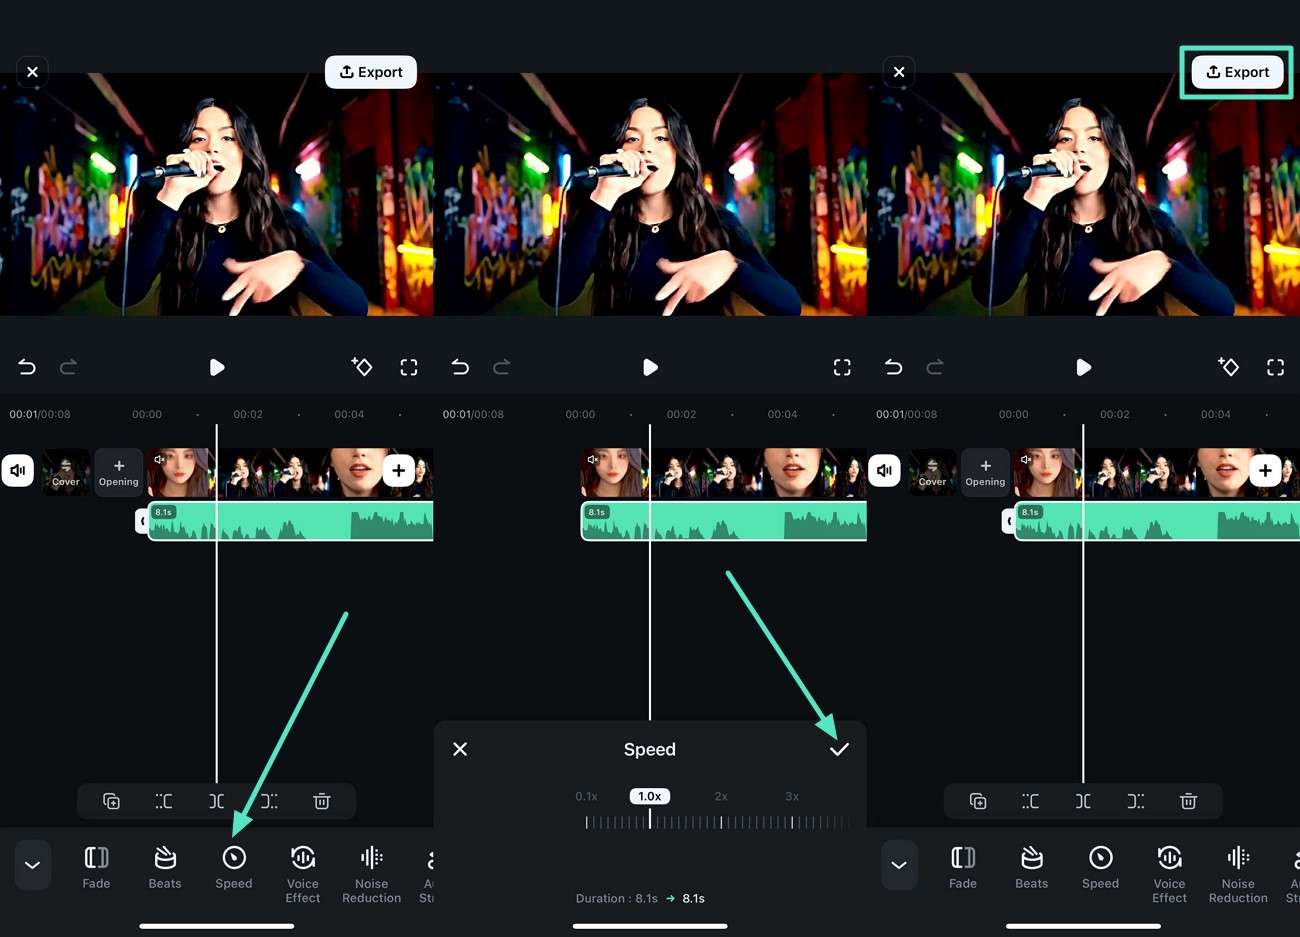
Step2Change Speed of Audio and Export.
Tap on the "Speed" option from the toolbar and drag its slider to adjust the speed according to your preferences. Once done, head to the top-right corner and press "Export" to save the results.
Conclusion
Video noise, like grainy textures in footage, can make videos look less clear and professional Especially if we watch them in high-resolution formats like 4K and 8K. Hence, in this guide, we have discussed how to improve video quality by reducing noise using Final Cut Pro.
We also list some of the common causes of video noise, along with practical tips to minimize noise while recording. Additionally, we introduced Wondershare Filmora's AI-powered Video Denoise feature as an alternative option. Use these guides to elevate your video and ensure your content stands out across platforms.
