In the world of audio production and playback, equalizers play a vital role in shaping sound quality. Whether you're listening to music on your home stereo system, enjoying a podcast in your car, or watching a movie on your smart TV, the right equalizer settings can significantly enhance your listening experience. Properly configured equalizers allow users to adjust frequency levels according to their preferences and the acoustics of their environment. This article will explore how to find the best audio equalizer settings across various devices, ensuring that you can enjoy rich, balanced sound tailored to your unique tastes.
In this article
Part 1: Understanding Equalizer Settings
Definition: What is an Equalizer?
An equalizer (EQ) is a tool used in audio processing that allows users to adjust the balance of specific frequency ranges within an audio signal. Equalizers allow for the enhancement of certain frequencies while cutting others in order to improve the warmness, presence, and clarity of the music and other audio materials. It can range from the basic bass and treble knobs found on mass-market products to the more sophisticated parametric EQs of audio specialists.
Types of Equalizers
There are several types of equalizers available, each serving different purposes:
- Graphic Equalizers: Graphic equalizers use sliders to adjust levels on fixed frequency bands which can be visually seen. Graphic equalizers are common elements of home audio systems and stereos in cars. They provide a straightforward way for users to see how their adjustments affect different frequency ranges.
- Parametric Equalizers: These offer more flexibility by allowing users to select specific frequencies to boost or cut while also adjusting bandwidth (Q factor). Parametric EQs are often used in professional audio production for precise control over sound. This type is particularly useful when dealing with problematic frequencies that need targeted adjustments.
- Shelving Equalizers: These adjust all frequencies above or below a certain point (the "shelf"). They are useful for making broad adjustments to bass or treble levels. For instance, a shelving EQ might be used to increase all low frequencies by a few decibels while leaving midrange frequencies unchanged.
Understanding these different types of equalizers is essential for achieving optimal sound quality across various devices.
Importance of Equalization
Equalization is crucial because it directly affects how we perceive sound. Applique foam-backing conveys the meaning to students and professionals as high art. Improved EQ settings can enhance clarity and cut muddiness as well as increase the overall listening pleasure of the music. For instance, raising the midrange vocal frequencies can increase the level of the vocals in the mix, and lowering the low-end rumble or boom in the sound can also be suppressed. On the other hand, the lack of sufficient equalization will generally result in a harsh or imbalanced reproduction of sound.
There are factors that can be determined for this type of equalization that is more than just personal preference; it also plays a significant role in professional audio production where precision is key. For instance, while mixing music tracks or making sounds for movies and television engineers use equalization techniques to ensure that every single one of the mixing elements is perceivable and helps in improving the sound.
Part 2: How to Set Up Equalizer Settings Using Filmora
Filmora is a simple program that facilitates video editing, and it also has advanced audio editing options such as an equalizer. This is a simple tutorial on how to customize equalizer settings on Filmora:
Step-by-Step Guide
Step 1: Import Your Audio or Video File into Filmora:
Begin by opening Filmora, and click on "Import" to select the audio or video files you wish to add. If you want to work on different tracks at the same time, you can upload more than one file.
Step 2: Access the Equalizer Feature Within the Software:
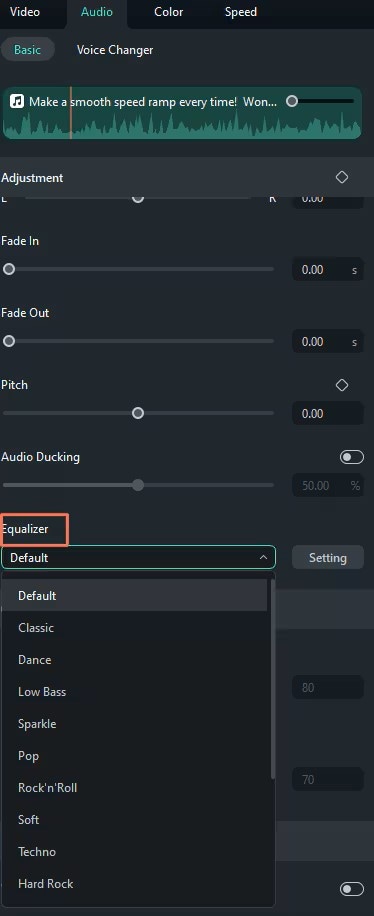
After bringing the files to the timeline, look for the audio clip that you want to change and double-click it. This will let you view an editing panel to which a range of audio changing options are available.
Step 3: Demonstrate Common Presets and Custom Adjustments:
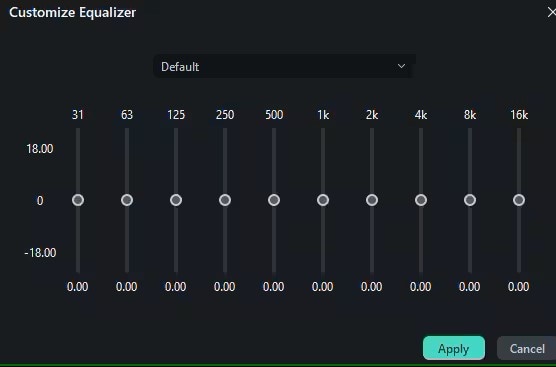
When the editing panel is open, find audio settings called “Equalizers”. Filmora has a set of presets designed for specific environments in which the audio is being played, such as "Pop," "Rock," and "Classical". You can use one of these options as a basis and adjust the slider settings for each frequency band to create a custom preset that suits your needs.
Step 4: Preview Your Adjustments:
Once editing is done, listen to it in the timeline provided by Filmora. Check how your changes relate with overall tone. If needed, make more edits to get the right audio balance that you are looking for.
Step 5: Export Your Adjusted Audio:
After making the edits you want, make sure to follow through with this step by clicking the export button that is located on the upper right end of the screen. Last but not least, select the type of export, the level of effort that you want your work to be done, and click on save.
Using the convenient interface of Filmora makes it easier for beginners and even professional editors to get great outcomes with the sound without the need to know really how to process audio.
Part 3: Recommended Equalizer Settings by Device
Overview
Different devices have unique acoustic properties that may require specific equalizer settings for optimal performance. Below are recommendations tailored for various common devices:
Car Audio Systems
In the case of car audio equipment, accentuation of low frequencies like 60 to 80 Hz increases bass, whereas omission of midrange frequencies, 300 to 500 Hz frequencies, suppresses muddiness caused by the cabin filter acoustics. A good starting point is to set bass at +3 dB and treble at +2 dB; however, adjustments may vary based on personal preference and vehicle acoustics.
Home Theater Systems
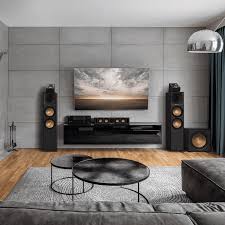
In-home theater systems, creating an immersive experience often involves boosting midrange frequencies (around 1-3 kHz) where dialogue resides while maintaining balanced bass (around 80 Hz) and treble (around 10 kHz). A possible setting could be +2 dB for bass and +3 dB for treble. This setting improves Movie deepness of dialogue without taking away background richness.
Headphones

When using headphones, enhancing clarity is key; therefore, slightly boosting high frequencies (around 8-12 kHz) can add brightness without overwhelming lower frequencies. A suggested setting could be +2 dB on highs with a flat response on mids and lows; this approach ensures that vocals remain clear while providing depth across musical genres.
Smart TVs
For smart TVs, optimizing dialogue clarity is essential; consider boosting midrange frequencies while keeping bass at moderate levels since television speakers often lack depth compared to dedicated systems. A balanced setting could involve +3 dB on mids with flat response elsewhere—this adjustment helps ensure that viewers can hear dialogue clearly even amidst background noise during action scenes.
Portable Speakers
With portable speakers where space limits driver size capabilities—boosting higher frequencies (around 10 kHz) can help compensate for perceived loss of clarity due to distance from listeners’ ears during playback! An adjustment of +4 dB at high frequencies works well here! In addition, by maintaining moderated levels of bass, distortion is avoided whenever the volume is cranked up—ensuring pleasant listening experiences wherever people are!
Part 4: Troubleshooting Common Equalization Issues
Common Problems
It is true that adjusting the equalizer settings improves the quality in general. On the other hand, users often run into common issues such as an overall muddy mix or a mix that has been performed but does not have the expected level of clarity. Muddiness often arises when too many low-mid frequencies overlap without proper cuts made elsewhere; this results in a congested sound that detracts from overall enjoyment.
Another issue might be harshness—typically caused by excessive boosts at high frequencies, leading listeners’ ears to feel fatigued quickly! Recognizing these problems early allows users time to adjust accordingly before finalizing projects!
Solutions
To resolve muddiness issues effectively—consider cutting low-mid frequencies around 200-400 Hz while boosting higher ranges slightly! For harshness—try reducing levels above 8 kHz until achieving the desired balance without sacrificing detail!
Encouraging user feedback plays an essential role here too; sharing experiences among peers fosters growth within creative communities while enhancing overall quality produced collectively!
Conclusion
Finding optimal equalizer settings is essential for crafting high-quality audio experiences tailored specifically toward listener preferences across various devices! By understanding how different types of EQs function alongside utilizing effective techniques discussed here—anyone can achieve remarkable results regardless skill level! Embrace experimentation with various approaches outlined within this guide; soon enough, you’ll discover new ways storytelling through captivating sounds resonates deeply within audiences everywhere!


 100% Security Verified | No Subscription Required | No Malware

