

 TL;DR:
Mastering camera exposure requires actively balancing aperture for depth of field, shutter speed for motion, and ISO for light sensitivity, while relying on Wondershare Filmora to correct remaining lighting or motion issues in post-production.
● Choose Aperture Priority mode to isolate subjects using low f-numbers or keep landscapes sharp with high f-numbers, whereas Shutter Priority mode is best for freezing fast subjects at speeds of 1/500s or higher, maintaining ISO between 100 and 400 to avoid visible grain.
● Video recording requires adhering to the 180-degree shutter rule by setting the shutter speed to exactly double the frame rate, such as using 1/50s for a 24fps video, to prevent the moving subjects from looking unnaturally choppy or laggy.
● To rescue flawed footage without reshooting, import clips into Filmora to manually adjust overexposure in the Colors tab or apply a motion blur effect from the Effects menu to soften overly crisp, robotic movements caused by excessively fast shutter speeds.
Ask AI for a summary
 ChatGPT
 Perplexity
 Gemini
 Claude
 Grok
Grok
Want to capture professional-grade photos and videos? Stop relying on Auto mode and start mastering the Exposure Triangle: aperture vs shutter speed vs ISO. These three essential camera settings work together to control light and motion. In this guide, we'll explain how to balance them for any lighting and how to use Filmora to refine your footage in post-production.
Part 1. What is the Difference Between Aperture vs Shutter Speed?
Before anything else, let's start by defining the two most visually impactful settings in photography: aperture and shutter speed.
Aperture is the opening inside your lens that lets light through to the sensor. It works like our pupil: widens in the dark and narrows in bright light. Meanwhile, shutter speed is how long your camera's shutter stays open.
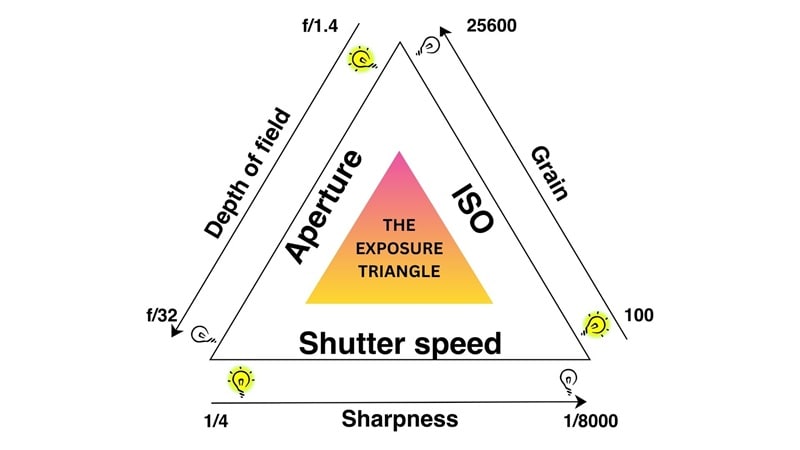
Aperture (F-stop) vs Shutter Speed Chart
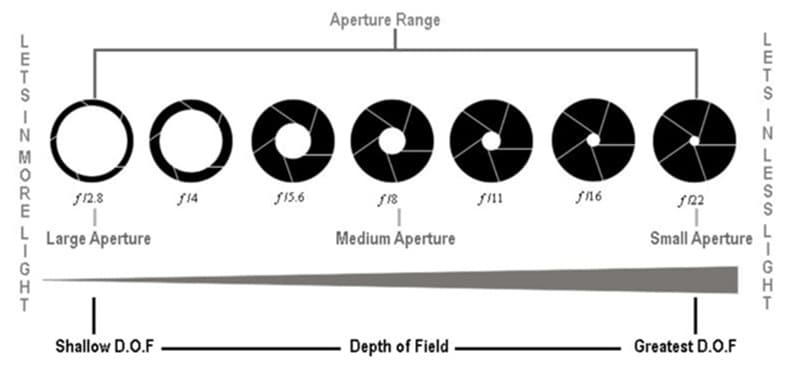
Image: Unscripted Photographer
Part 2. F-stop vs. Shutter Speed: How They Affect Your Visuals
Understanding aperture vs shutter speed is crucial for visual storytelling. Aperture is measured in f-stops (f/1.4, f/8, etc.) and controls depth of field. Conversely, shutter speed manages motion blur. When you add ISO to the mix, you complete the exposure triangle.
In photography terms, we call this depth of field:
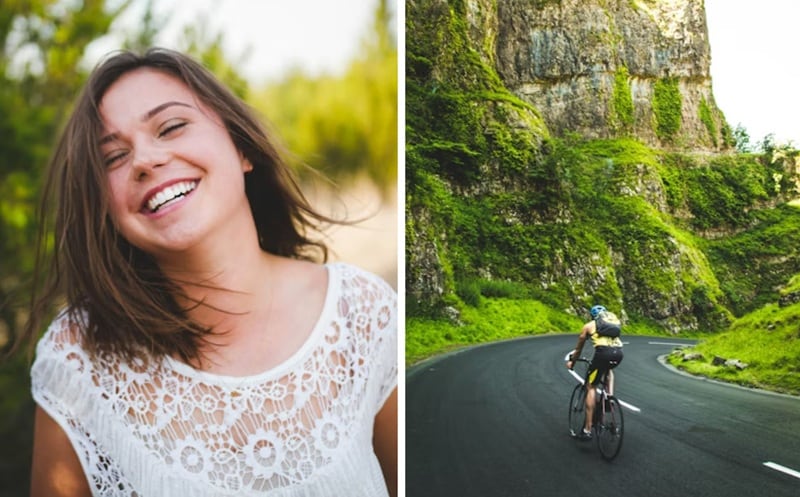
- Wide Aperture (Low f-number): Creates a shallow depth of field. Use this to isolate your subject and blur everything else.
- Narrow Aperture (High f-number): Creates a deep depth of field. Use this when you want every detail, from the foreground to the horizon, to be tack-sharp.
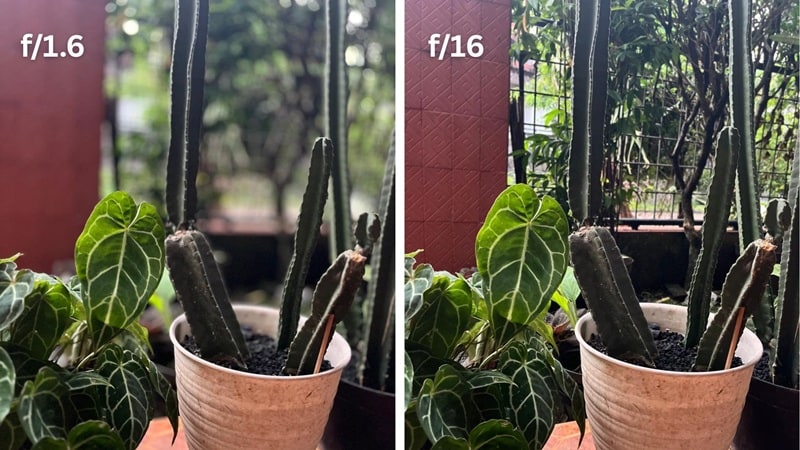
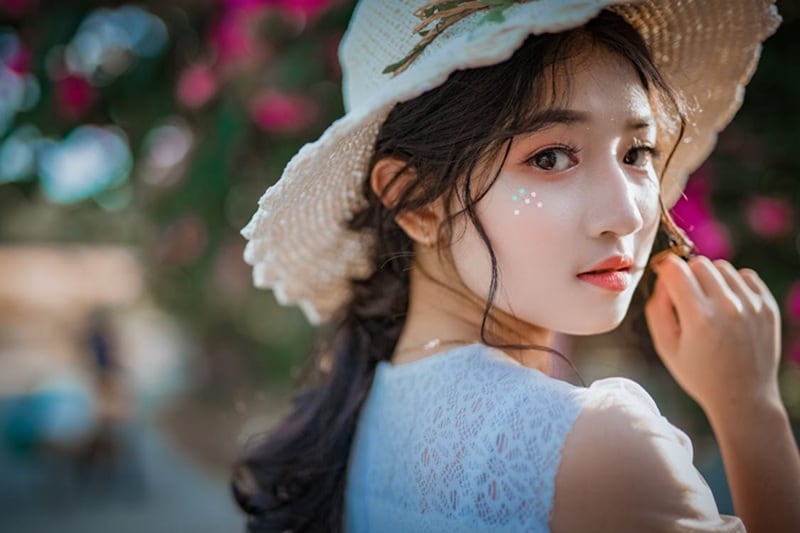
For example, if you shoot at f/1.8 with your subject a few feet in front of a background, that background will be beautifully blurred and completely out of focus. This effect is often called "Bokeh."
Bokeh is a soft, out-of-focus background you see in photos that comes from using a wide aperture. The wider your aperture and the longer your focal length, the more pronounced the effect. Usually, portrait lenses like the 50mm f/1.4 or 85mm f/1.8 are built for bokeh.
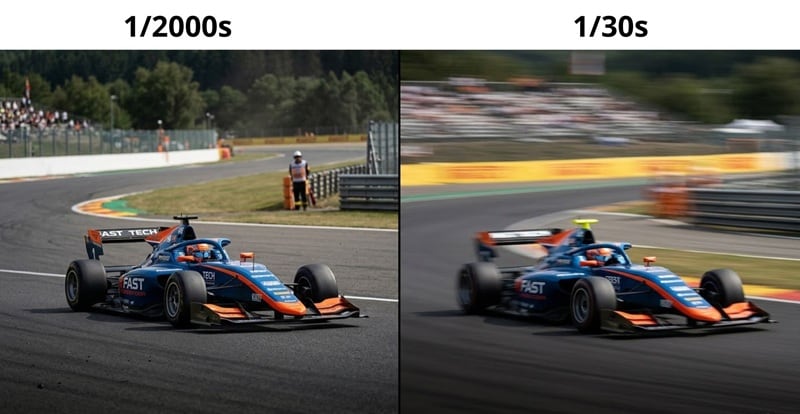
Shutter speed is measured in fractions of a second (e.g., 1/2000s, 1/500s, 1/60s), or in full seconds for low-light work. It controls two things simultaneously: light and motion.
- Light: The longer the exposure, the more light hits the sensor. Likewise, the shorter it is, the faster light gets cut off.
- Motion: Fast shutter speeds freeze movement, while slow ones blur it.
When you capture a racing car at 1/2000s, the photo result will be as sharp as glass. But if you are shooting it at 1/30s, it will become a motion blur. Motion blur is a direct result of the shutter staying open long enough to record movement across the frame.
In short:
- Fast shutter speed (1/500s and above): Freeze the motion. Best for sports, wildlife, or candid shots.
- Slow shutter speed (1/30s and below): Blurs the movement. Best for creative effects, like silky waterfalls or light trails, but you'll likely need a tripod to keep the rest of the image steady.
Part 3. The Exposure Triangle: Aperture vs. Shutter Speed vs. ISO
Now we bring in the third element of the exposure triangle: ISO. ISO simply controls and measures how sensitive your camera sensor is to light.
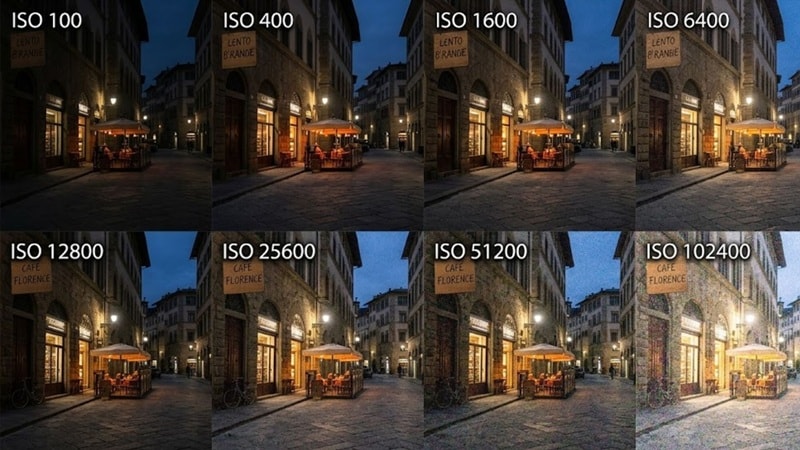
ISO 100 is the baseline; it has minimal sensitivity and maximum image quality. On the other hand, ISO 6400 is highly sensitive, which is useful in dark conditions. But it usually introduces noise that gives your picture a grainy texture, especially if you are using an old camera.
| ISO Range | Image Quality | Best Used When |
| 100–400 | Clean, no visible noise | Shooting in bright or well-lit conditions |
| 800–1600 | Slight noise | Light is limited |
| 3200+ | Visible noise | Dark conditions, or when aperture and shutter speed alone can't get a proper exposure |
How the Aperture vs Shutter Speed vs ISO Work Together
Aperture, shutter speed, and ISO all play a role in exposure. They function as a team to determine the final look and brightness of your image:
- Aperture controls depth.
- Shutter Speed controls motion and how long the sensor is exposed to light.
- ISO controls sensitivity.
While they each have a different job, they don't work in isolation. Every time you adjust one setting, it affects the other two. This "give and take" relationship is exactly why we call it the Exposure Triangle.
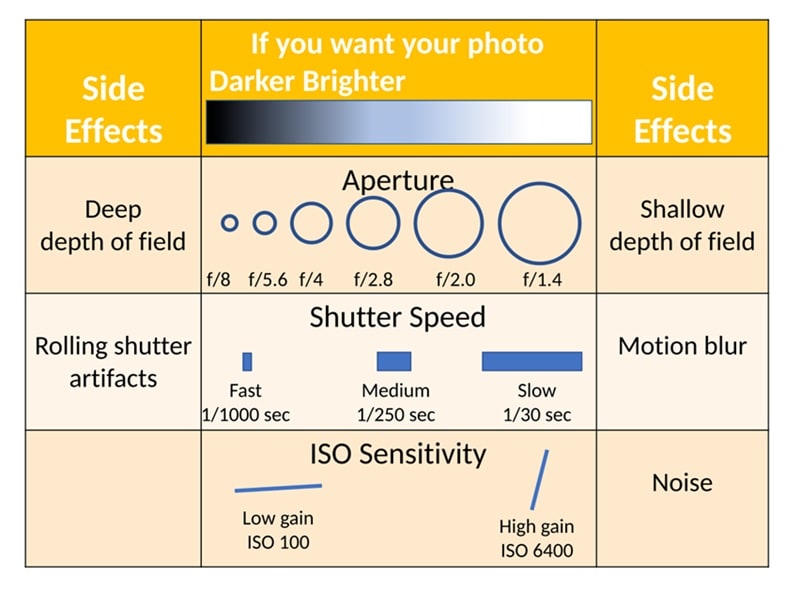
A dark indoor venue might push you to use a wide aperture, a slower shutter, and a higher ISO just to get a balanced exposure. On the other hand, a bright outdoor scene will have you closing down the aperture and speeding up the shutter to keep the image from overexposing.
Part 3. Choosing Your Mode: Aperture Priority vs. Shutter Priority
We've walked through how aperture, shutter speed, and ISO work together in Manual mode. And yes, managing all three at once can feel like a lot, especially when you're still new to photography.
To give you a little bit of a breather, you can also try other modes: Aperture Priority or Shutter Priority. They are semi-automatic modes in cameras that give you the control you want without the stress of balancing every single dial yourself, like in Manual mode.

What is Aperture Priority?
Aperture Priority (Av / A) lets you set the aperture while the camera automatically adjusts the shutter speed to match the exposure. You stay in control of the depth of field without having to think about shutter speed every time the light shifts.
Best for: Portraits, street photography, documentary work, or any situation where controlling depth of field is your priority, and the light is reasonably consistent.
What is Shutter Priority?
For Shutter Priority (Tv / S), you set the shutter speed, and the camera handles the aperture. This mode is for situations that prioritize motion, where missing the moment because you were adjusting settings isn't an option.
Best for: Sports, wildlife, events, or anything where freezing or controlling motion is the priority.
Aperture Priority vs. Shutter Priority: Which One Should You Choose?
Neither mode is a shortcut or a crutch. A good rule of thumb to use Aperture Priority when depth of field is your main concern, Shutter Priority when motion is. But keep one eye on what the camera is doing with the setting you've handed off.
In low light, Aperture Priority can quietly drag your shutter speed down to compensate; slow enough that moving subjects go blurry without you realizing it. Meanwhile, Shutter Priority can run out of aperture in dark conditions and underexpose. When it happens, it's advisable to adjust it in Manual mode.
Part 4. Shutter Speed vs. Frame Rate: The 180-Degree Shutter Rule for Video
Most of what we've covered so far applies to photography. If you shoot video, there's one more rule you need to know before you hit record: your shutter speed should be double your frame rate.
If you are shooting at 24fps, you need to set your shutter to 1/50s. At 30fps, use 1/60s. At 60fps, use 1/120s. This is called the 180-Degree Shutter Rule—a standard for natural-looking motion in videos.
Why Does This Matter Visually?
When you follow the 180-degree rule, moving objects have a slight, natural motion blur between frames—the same amount your eyes see in real life, even if you don't notice it. It looks cinematic because it feels like reality.
When you break it, your video will look off to the viewers:
- If the shutter is too fast, your video will look jittery or choppy. Because there is zero motion blur, the movement can look robotic and ultra-crisp.
- If the shutter is too slow, your video will look dreamy, smeared, or laggy. This is often used to portray a character who is disoriented, drugged, or in a deep "dream state."
Sometimes, the director intentionally breaks the rule to serve the story. The opening battle sequence in "Saving Private Ryan" (1998) is the most famous example. Steven Spielberg deliberately cranked the shutter speed up to make the footage feel chaotic and disorienting.
So, breaking the 180-degree shutter rule doesn't always mean bad, depending on the intention.
Part 5. Aperture vs. Shutter Speed vs. ISO Chart for Quick Reference
Talking about the Exposure Triangle, it's one thing to understand the theory and another to apply it. To help you make split-second decisions, here is a quick-reference chart that shows how ISO, aperture, and shutter speed can be adjusted together to maintain the same exposure.
ISO, Aperture, and Shutter Speed Balance Chart
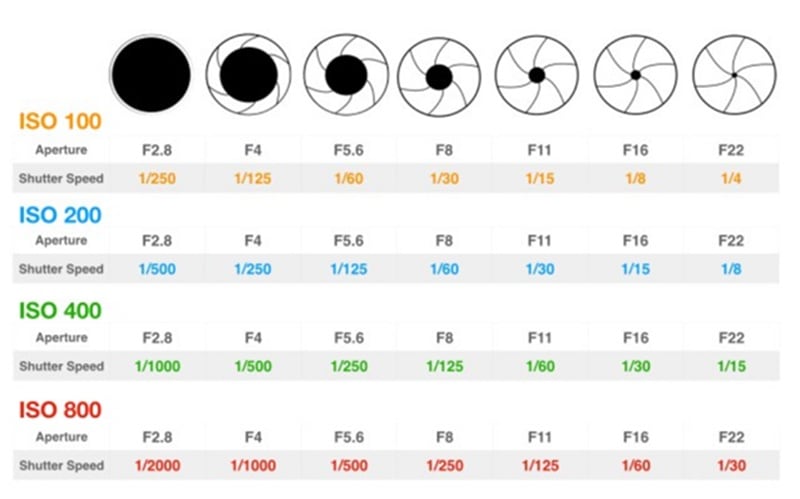
Image: The Photography Toolkit
Situation-Based Settings Recommendation
For different shooting scenarios, there are several baseline settings that usually work well as a starting point. However, note that this guide is intended only for reference, as there is no single "perfect" setting for every environment.
The camera you are using can also significantly affect the final result, as factors like sensor size, lens quality, and light processing vary between models.
| Shooting Scenario | Aperture | Shutter Speed | ISO |
| Outdoor portrait (blurry BG) | f/1.8–f/2.8 | 1/200s+ | 100–200 |
| Landscape (deep focus) | f/8–f/11 | 1/60s+ (use tripod) | 100 – 400 |
| Indoor event (no flash) | f/2–f/2.8 | 1/60s–1/125s | 1600–3200 |
| Sports / fast action | f/4–f/5.6 | 1/1000s+ | 800–3200 |
| Waterfall / long exposure | f/11–f/16 | 1s–30s | 100 |
| Night sky | f/1.4–f/2.8 | 15s–25s | 3200–6400 |
|
Show More
Show Less
|
|||
Part 6. How to Fix Exposure and Add Motion Blur in Filmora
Even with a perfect grasp of aperture vs shutter speed vs ISO, lighting mistakes happen. If your footage is overexposed or lacks motion blur, Wondershare Filmora offers advanced color correction and motion effects to rescue your project.
For these situations, we recommend using Wondershare Filmora to fix your shots during the post-production process. It's packed with tools that are powerful enough for experienced videographers, but laid out in a way that doesn't overwhelm beginners.
Fixing Exposure in Filmora
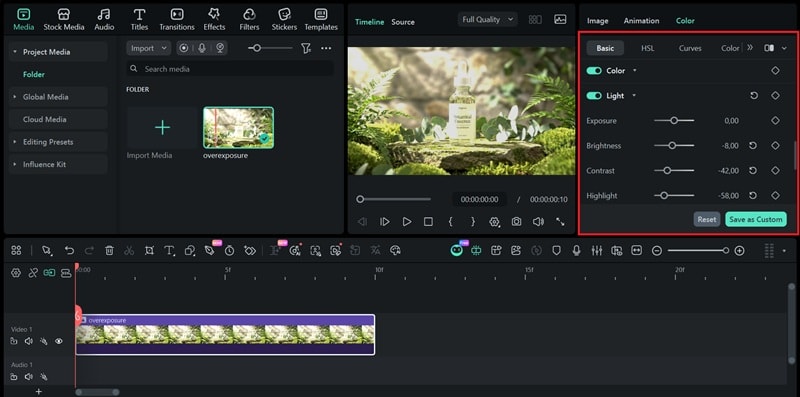
If your image turns out too bright or too dark, Filmora's color correction tools give you direct control over the most common exposure problems without overcomplicating things.
Step 1 Import the photo or video you want to edit to Filmora and add it to the timeline.

Step 2 Select the track and head to the Colors tab in the properties panel. You can adjust the basic parameters to fix your overall exposure, such as:
- Exposure: Adjusts the overall light levels.
- Brightness: Adjusts the overall light levels.
- Contrast: Controls how different the light and dark areas look from each other.
- Highlights: Only affects the bright parts of your image.
- Shadows: Only affects the dark parts of your image.
- Whites: Sets how bright the brightest areas can get.
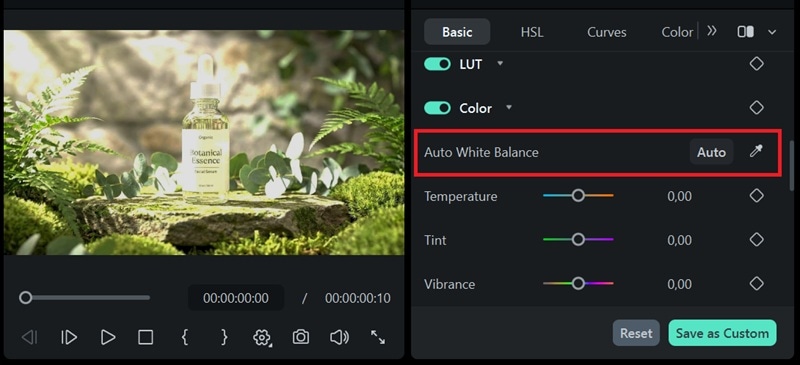
You can also enable Auto White Balance to automatically neutralize any color casts caused by mixed or inconsistent lighting.
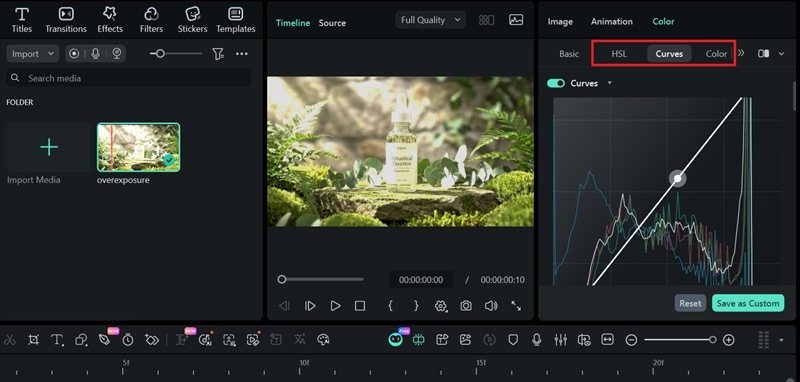
If the basic parameters aren't enough to fully recover your shot, you can also make more precise tonal adjustments using Curves or fine-tune individual color ranges using the HSL (Hue, Saturation, Luminance) panel.
Adding Motion Blur in Filmora
Filmora is also capable of adding motion blur to your footage intentionally. This comes in handy when you mistakenly shoot at a shutter speed that was too fast, and leave your footage looking unnaturally sharp. Rather than reshooting, you can add motion blur in Filmora.
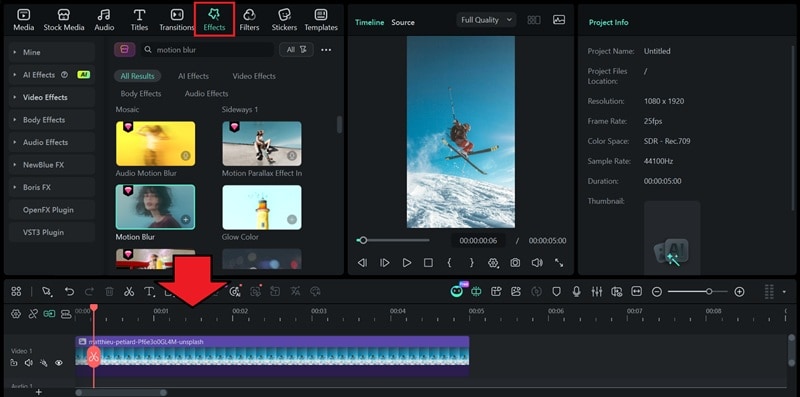
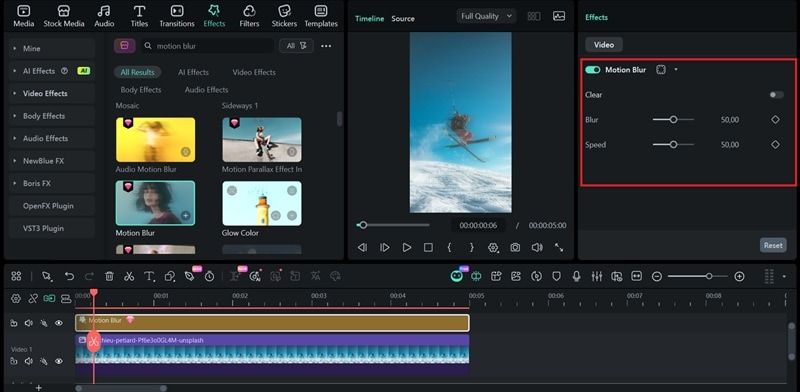
You can also browse the Effects menu for additional blur options. Filmora includes a range of directional and zoom blur effects that work well for many different situations. Try a few and see what fits the mood of your footage best.
Conclusion
Mastering the Exposure Triangle (aperture vs shutter speed vs ISO) is a skill that simply takes time and dedicated practice. So, keep shooting, keep adjusting, and trust the process. The more you experiment with your settings, the faster your instincts will sharpen, until balancing the three becomes second nature.
You don't have to be discouraged when a shot doesn't come out the way you envisioned, because you can always fix it in post-production with Filmora. Filmora's extensive editing tools give you a reliable safety net to recover and refine your shots, anytime.
FAQ
-
What is exposure compensation?
Exposure compensation lets you override your camera's automatic exposure in semi-auto modes (Av or Tv). If your shot comes out too bright or too dark, you can dial it up (+) to brighten or down (-) to darken without switching to full Manual. -
What is Auto ISO? Should I use it?
Auto ISO lets the camera automatically adjust ISO based on available light while you control aperture and shutter speed. It's useful in unpredictable lighting, but set a maximum ISO limit (e.g., 3200) to avoid excessive noise. -
Should I shoot in RAW or JPEG when learning manual exposure?
RAW, if your camera supports it. RAW format retains far more image data and gives you much more room to fix exposure mistakes in post-production. JPEG compresses the file and discards detail the moment it's captured, leaving you with less to recover if a shot goes wrong.
