

 TL;DR:
For optimal chroma key results, green screens are the modern default because they demand less lighting and suit digital sensors, whereas blue screens remain essential for minimizing color spill on detailed subjects and blending into dim environments.
● Green screens are the optimal choice for small studios and modern digital cameras equipped with CMOS sensors, which naturally capture a brighter and cleaner signal from the green color channel.
● Blue screens are strictly required when shooting with traditional film cameras, filming outdoor scenes with natural greenery, or working with subjects featuring reflective fabrics and blonde hair.
● The primary limitation of a blue screen is its darker luminance, which requires a significantly stronger and more balanced lighting setup to prevent shadows and background noise during post-production.
Ask AI for a summary
 ChatGPT
 Perplexity
 Gemini
 Claude
 Grok
Grok
Choosing between a blue screen vs green screen is a pivotal decision for any content creator. While both are used for chroma keying to replace backdrops in post-production, they offer distinct advantages depending on your lighting, camera, and subject. In this comprehensive guide, we'll break down the technical differences to help you choose the right setup for your next video project.

Part 1. Blue Screen vs Green Screen: Key Technical Differences Explained
Every color has its own properties, which is also what makes blue screen and green screen different. For chroma key work, the main factors that make them different are brightness levels, how cameras capture each color, and how the light reflects onto the subject, along with the amount of lighting needed to get a clean key.
Before we get into more details, watch a helpful explanation video below about the differences between blue screen vs green:
Brightness and Luminance
Green screens are significantly brighter than blue screens. If you see the color spectrum, green sits at the higher end of the brightness range. It also has higher luminance, which causes it to reflect more light onto the camera.
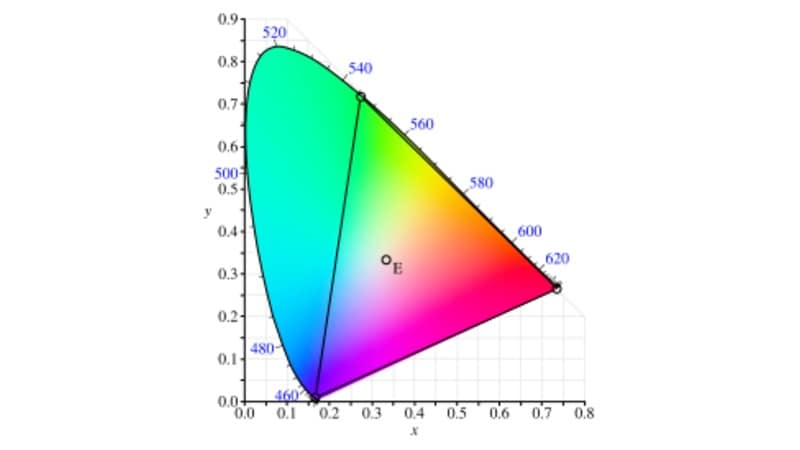
This stronger light intensity makes the color easier for digital cameras to recognize and capture with clearer detail. Since blue screens are darker, you'll usually need to add more exposure to keep the color evenly lit and strong enough for a clean key.
Color Spill
While the brightness of green screens helps with cleaner keying, their brighter and more reflective surface also means they tend to create stronger color spill. Color spill occurs when the background color reflects onto the subject and creates a slight color tint around the edges.
Meanwhile, blue screens create less noticeable spill since the color is darker and less intense. This makes blue a better choice when filming subjects that have reflective surfaces or fine details like hair.

Images: Andrey Lebrov (YouTube)
To avoid this issue, you may need to place the subject farther away from the background so the green light doesn't reflect onto the subject or interfere with the edges during keying.

Image: easy-peasy.ai
Lighting Setups
Because green is brighter and easier for cameras to detect, green screens usually need less lighting. This helps solve one of the biggest chroma key challenges: keeping the background evenly lit with minimal shadows.

Blue screens, on the other hand, usually require stronger and more even lighting to avoid shadows and noise. Since the color is darker, poor lighting can make the background harder to separate from the subject during the chroma key process.
Part 2. When Should You Use a Green Screen? (The Modern Standard)
Given the blue screen green screen difference we've discussed, green screen is generally the standard choice and more commonly used option for chroma key work, especially in the following situations.
1. Filming with Digital Cameras

Image: Andrey Lebrov (YouTube)
Most modern cameras use CMOS sensors, and these sensors are naturally more sensitive to the green channel. If you use a green screen, the camera captures a brighter and cleaner signal, which makes the background easier to separate from your subject and helps produce more accurate chroma key results during editing.
2. Working with Limited Lighting or Small Shooting Spaces

Because green is brighter by nature, it doesn't demand as much light to look even on camera. If your lighting setup is simple or your space is limited, a green screen is usually more forgiving and easier to manage without ending up with dark patches or uneven areas.
3. Bright and Daylight Scenes

With green screens causing more color spill and slightly brighter edges, these effects are usually less noticeable in bright or daylight conditions. You don't need to focus as much on those details or spend an extra time cleaning up the edge during editing.
Part 3. When is a Blue Screen Better Than a Green Screen?
Now, what about the blue screen? The most obvious time to use a blue screen is when your scene includes green elements to avoid the accidental removal of important details during chroma key. But certain conditions are also better suited for working with a blue screen.
1. Featuring Subjects with Lighter Hair or Clothing

Working with light hair, especially blonde, can be challenging to key and usually benefits from a darker backdrop like a blue screen. If you film blonde hair against a green screen, it tends to catch and reflect green light, which often creates color spill and causes strands to blend into the background. Using blue helps maintain better contrast and keeps delicate edges more defined during chroma keys.
2. Working in Low Light Conditions or Night Scenes

Image: Behind the scene of Aladdin (2019)
If green screens perform better in daylight setups, blue screens often work better for night scenes since their darker tone blends more naturally with dim footage. Filmmakers also often use blue screens when they plan to replace the background with elements like the sky or the sea, because the color integrates more naturally with those environments.
3. Outdoor Filming
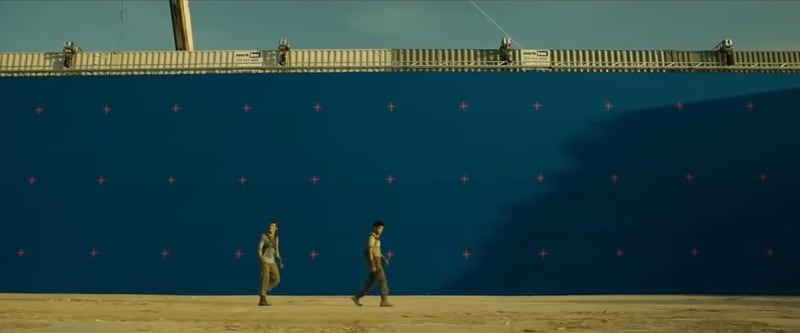
Image: Behind the scene of The Maze Runner (2014)
When shooting outdoors, most locations naturally include greenery like grass, trees, or bushes, which can easily blend with a chroma key green background. A blue screen helps avoid this color overlap, so it's easier to separate the subject from the background during editing.
Part 4. Blue Screen vs. Green Comparison Table
So, is a blue screen better than a green screen? As you see, the matter of blue screen vs green screen is not actually about which one is better. It's more about practicality and what works best in different situations, depending on your lighting, subject, and setup.
To compare them more easily, we've summarized the differences between blue screen and green screen in the table below.
| Green Screen | Blue Screen | |
| Brightness | Brighter and more reflective | Darker and less reflective |
| Luminance | Higher luminance, reflects more light | Lower luminance, reflects less light |
| Camera Sensitivity | Easier for digital cameras | Less sensitive for cameras, may need more exposure |
| Color Spill | More prone to color spill and edge halos | Produces less spill and cleaner edges |
| Best for | Daylight scenes | Night scenes |
| Lighting Requirement | Requires less lighting to appear even | Needs stronger lighting to maintain color consistency |
| Complexity | Easier to use and key in most situations | Slightly more complex due to lighting needs |
|
Show More
Show Less
|
||
Part 5. How to Choose the Best Background for Chroma Key in Your Studio
With those differences in mind, you can also consider several factors when choosing between a blue vs green chroma key background for your setup.
Color Matching
The easiest way to determine whether to use a blue screen or green screen is to check the colors in your subject and scene. You should choose a background color that doesn't appear in your subject's clothing, props, or surroundings.
If your subject is wearing green or standing near green objects, choose blue instead. The same applies in reverse.

But what if both colors show up in your scene? In that case, it's usually best to adjust the wardrobe, props, or set design so they don't match the background. If that's not possible, you may need to use a different solid color that contrasts with your subject or use another method to remove the background.
The reason both blue and green screens are ideal for monochromatic backgrounds in production is that these colors don't naturally appear in human skin tones. But actually, any solid color can work for chroma keying as long as it stands out from your subject and stays evenly lit.
Camera: Film or Digital
The next thing to consider is the type of camera you are using, as it can affect which screen color performs better.
- If you are using digital cameras: a green screen is better, since digital sensors are more sensitive to the green channel.
- If you are using traditional film cameras: a blue screen is better, as it can sometimes produce a cleaner matte. The blue channel tends to show less visible grain on film, which can help reduce edge fringing and create smoother outlines around your subject.

Analyze the Environment
Now, take a moment to analyze and consider your surroundings. Are you shooting in a small studio or a large space? Do you have a full lighting setup, or are you working with limited equipment?
Your space and lighting conditions can also affect which screen color works best:
- Green screens are usually easier to light because green is naturally brighter and requires less illumination to look even on camera. It's good for smaller spaces or setups with limited lighting.
- Blue screens often need more careful and even lighting, but they produce less color spill and can be useful when you want cleaner edges or are working with reflective subjects.

Analyze the Subject
Besides the environment, you also need to consider what you are shooting. Your subject plays a big role in the decision. Light-colored hair, fine strands, reflective fabrics, or detailed edges can sometimes key more cleanly against a blue screen because of reduced color spill.
The more detailed your subject is, the more careful you need to be about contrast and edge clarity. Always choose the background that creates the strongest separation between your subject and the screen.

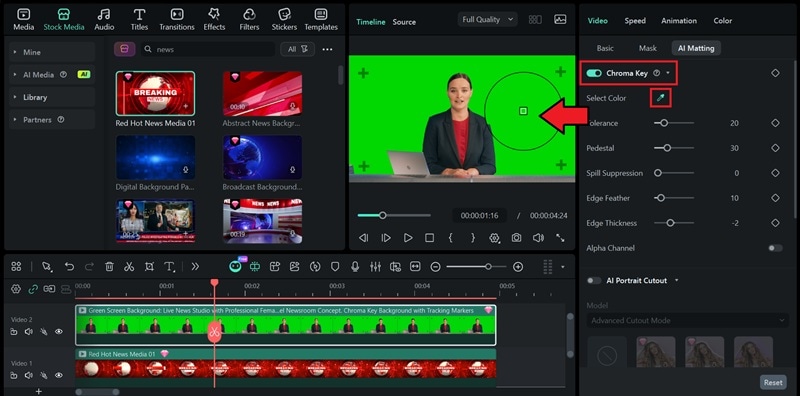
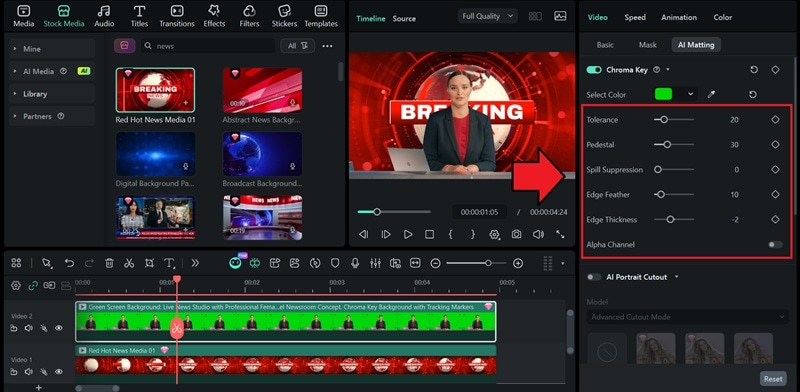
Part 6. How to Master Chroma Key in Filmora (Actionable Steps)
After understanding and deciding whether to use blue screen or green screen, you can start the editing process. No matter which background you choose, the chroma key process in post-production is generally the same.
To achieve a professional look, we'll use Wondershare Filmora, a powerful green screen software that simplifies the chroma key process. Whether you are using a blue or green backdrop, Filmora's AI-powered tools ensure a clean cutout with just a few clicks.
For this guide, we'll use the video editor Wondershare Filmora, since it's designed to be easy for beginners to learn while still being powerful enough for professional editing. It offers simple chroma key controls along with advanced adjustments to help you quickly remove the background and fine tune the edges for a clean result.
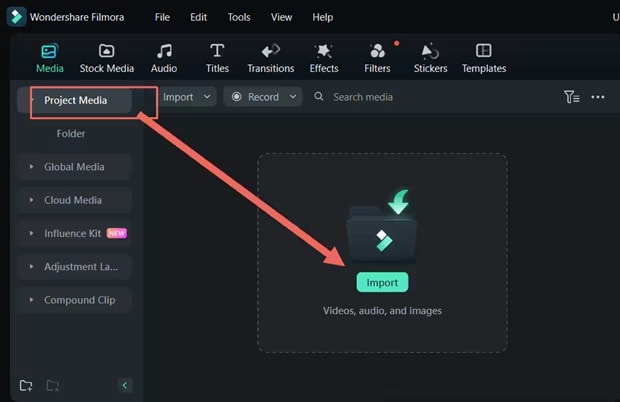
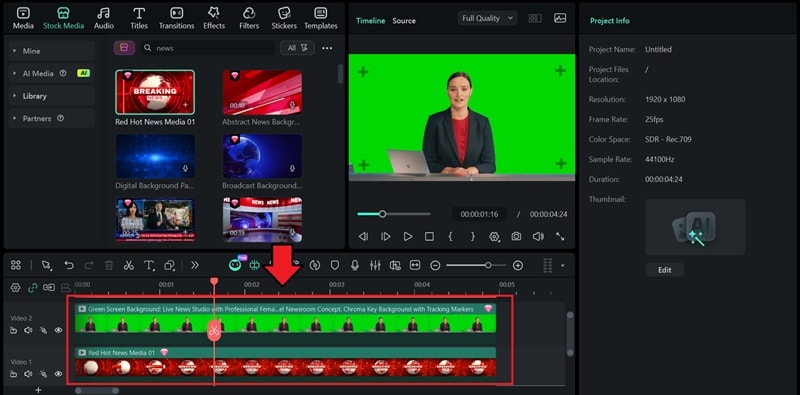
How to Remove a Green or Blue Screen in Filmora
Conclusion
In this blue screen vs green screen discussion, the better choice always depends on several factors that shape your setup. Green screen may be more common because it's easier for digital cameras to capture and usually requires less lighting, but blue screen is equally useful in certain situations, especially when working with lighter hair, reflective surfaces, or scenes that include green elements.
After filming, try removing the blue or green screen using Filmora. It offers simple chroma key controls and edge adjustment tools that help you refine the cutout, improve blending, and create a cleaner final result.
FAQs
-
Is it easier to light a blue screen or green screen?
Green screens are generally easier to light. The color is naturally brighter and has higher luminance, so it requires less lighting to appear evenly lit on camera. Meanwhile, blue screens are darker. They usually need stronger and more balanced lighting to avoid shadows and noise during keying. -
Can I use any color for chroma key?
Yes. Although green and blue are the most popular choices because they don't naturally match human skin tones, you can also use any color to work with the chroma key. As long as the color doesn't appear in your subject's clothing, props, or scene, and it's lit evenly, it can be keyed out. -
Why did movies switch from blue to green?
Movies switched from blue to green screens mainly because of the transition from film to digital cameras. And digital sensors are more sensitive to green. However, it's more nuanced than that, and not always about blue screen vs green screen. Many productions use both depending on the scene and filming conditions.
