
Making movies, or any kind of video content for that matter, is a very complex field today. You have to understand a lot about composition, lighting, directing choices, sound recording, and scene design, which are all complicated fields that require time and experience to master.
One essential part of the filmmaking toolkit is knowing how to pick the right transition effect between two scenes. Today, we will discuss these cinematic effects and how they are used.
In this article
Top 5 Cinematic Transition Effects
If we were to list all possible types of transitions in film, we would need a book, not an easy article. Since this is, in fact, an easy read, we decided to talk about the five most popular types of cinematic transitions. Without further ado, let’s jump in.
Zoom

The zoom transition is a standard in the industry. The camera zooms in, the scene changes, and then the camera zooms out. It is an excellent way to show the audience that the two scenes share a more intricate connection.
Fade

The fade transition is yet another industry staple. The camera fades to black, and the new scene fades in. You can experiment with the duration of the effect to add a sense of drama. This one is a calm transition that eases into the new scene.
Wipe

The wipe transition gives off an effect where the first scene is wiped into the second one, like scrolling on a mobile phone, but with a blur effect. It is an interesting transition that, depending on its duration, can serve many functions.
Film Burn

The film burn transition gives off an effect where an old film tape burns, practically destroying the first scene, but the effect resolves, revealing the next one. It is a very cool effect that can be used in several scenarios.
Dissolve

The dissolve transition is a creative use of the fade transition. The first scene fades out, while the second scene fades in, and it all happens at once. It is so common and so versatile that you will certainly find a use for it in your work.
So, we have covered the top five cinematic transition effects. Let’s take a look at how to use them on our own.
How to Add Cinematic Transitions Easily

At this point in the text, we would like to introduce you to Wondershare Filmora. This is one of the best, if not the best, video editing tools for beginners and professionals alike. Filmora comes with all the transition effects you need.
Instead of showing you how to apply the effects mentioned above, we will showcase a particular set of cinematic transitions and how to apply them to your video footage.
Start by downloading Filmora and proceed with the installation. Then, open the program, and start a new project. Then, import the two video files where you want to apply the cinematic transition effect.
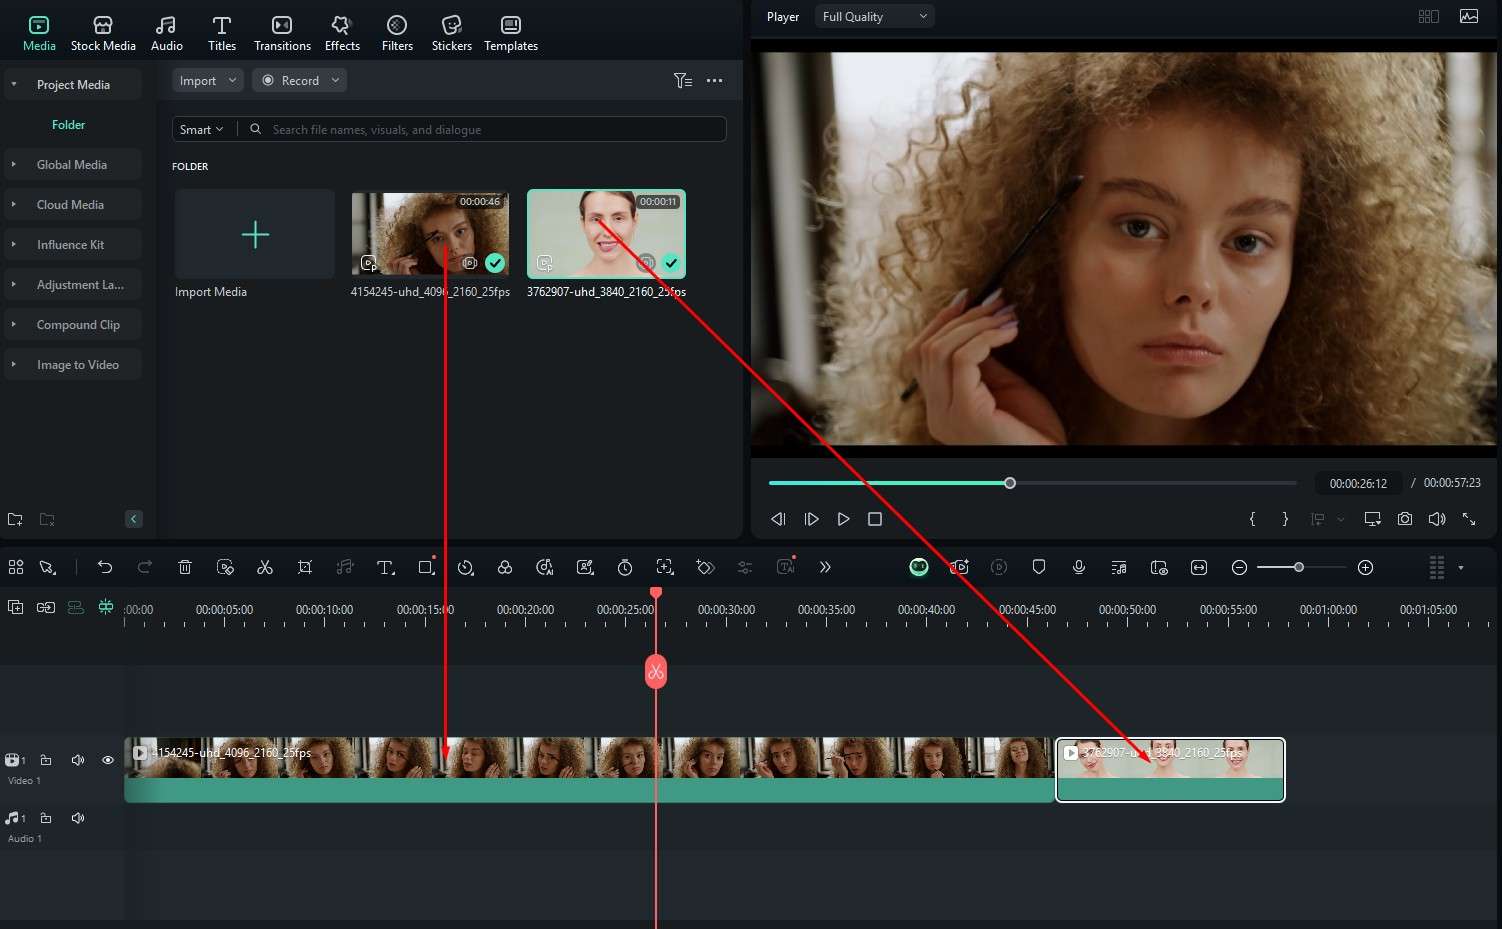
Step 1: Drag the two files to the timeline and place them so that one comes after the other.
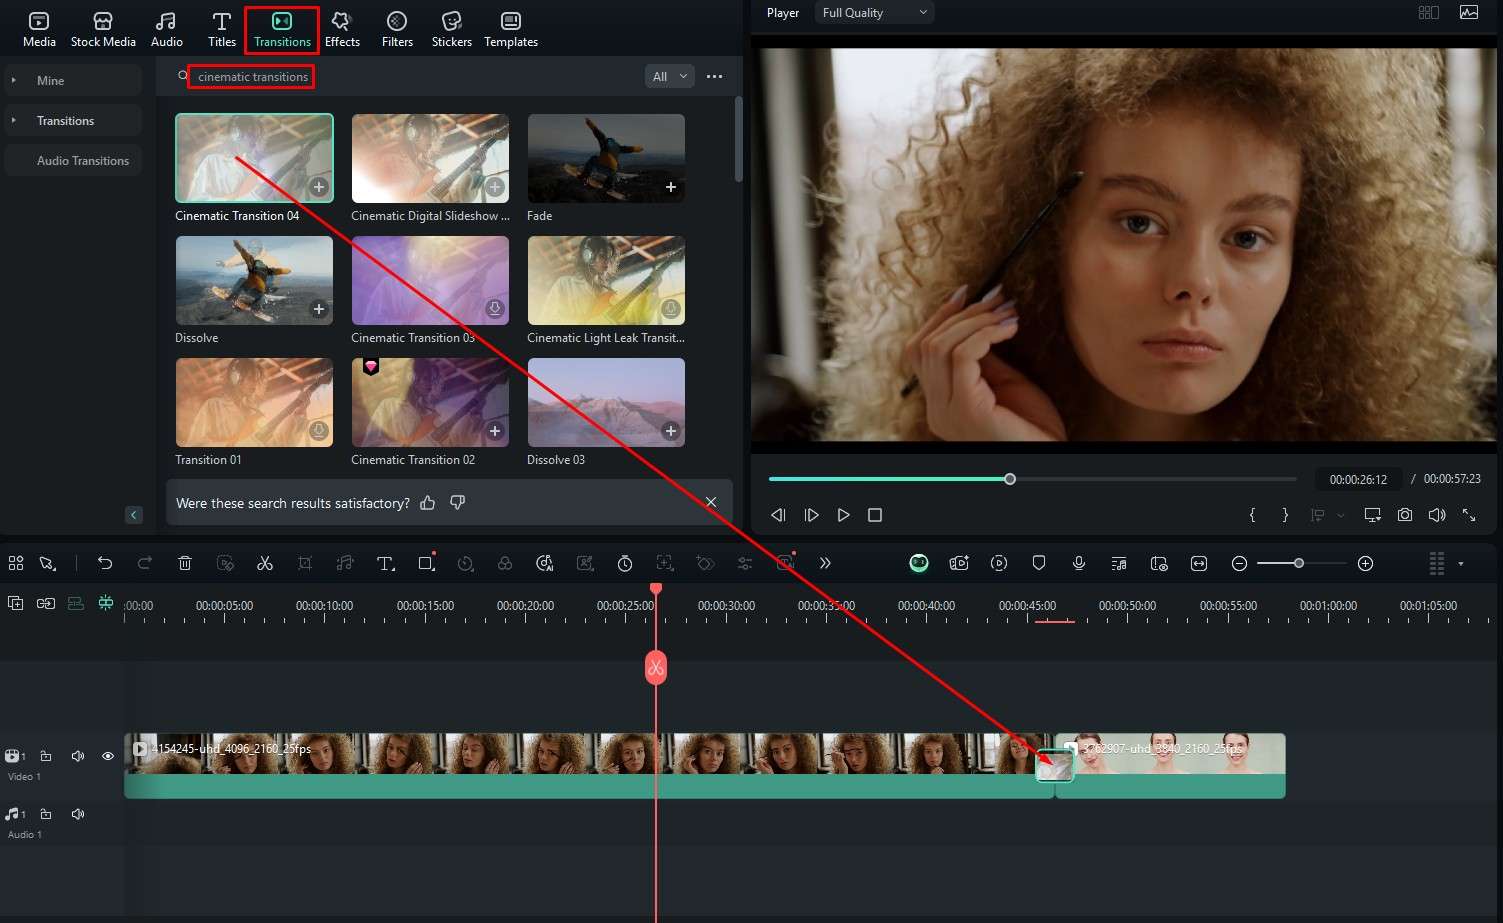
Step 2: Under Transitions search for “cinematic transitions” and select something from the provided options. Drag the selected transition to the timeline between the two clips.
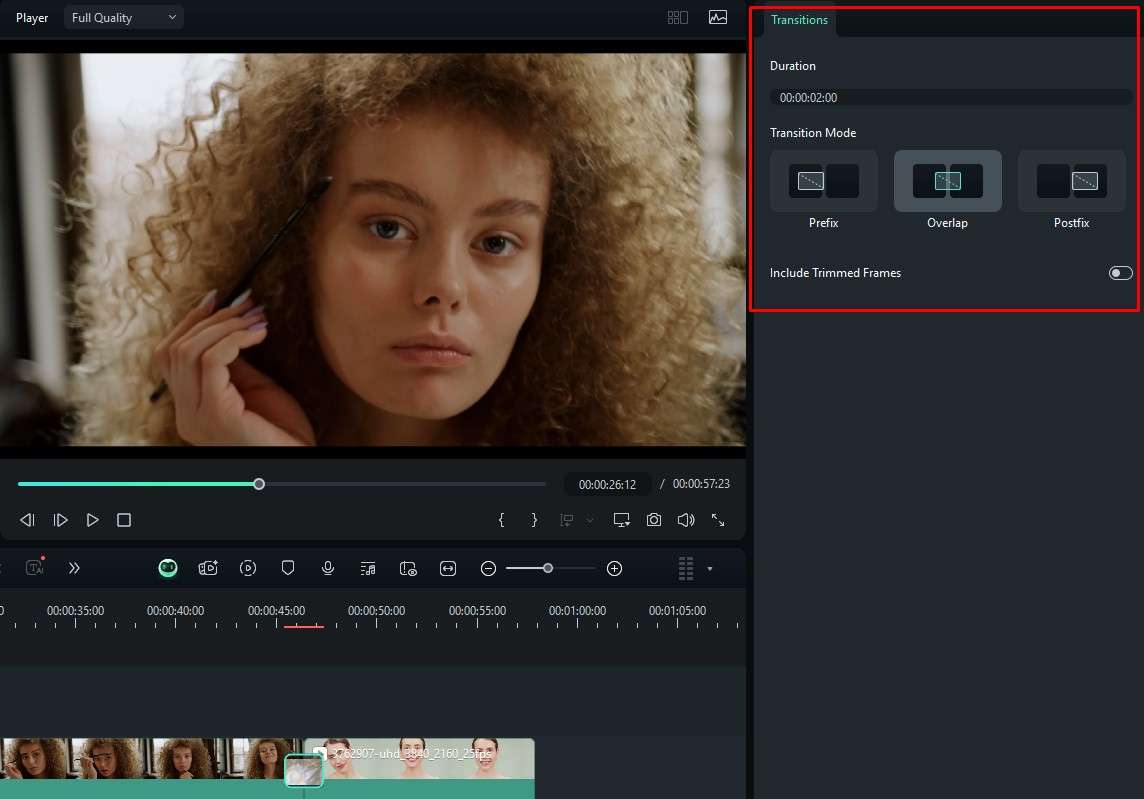
Step 3: Adjust the parameters of the transition effect on the right.
As you can see, adding transitions in Filmora is an easy, three-step process. There are many other features that are worth exploring in Filmora, so let’s see at least some of them.
Use Filmora for Basic Video Editing
Filmora is advertised as a video editing tool, so it’s no wonder that it is packed with video editing features. To showcase the intuitive interface, we will present some of those features below.
Trim videos easily
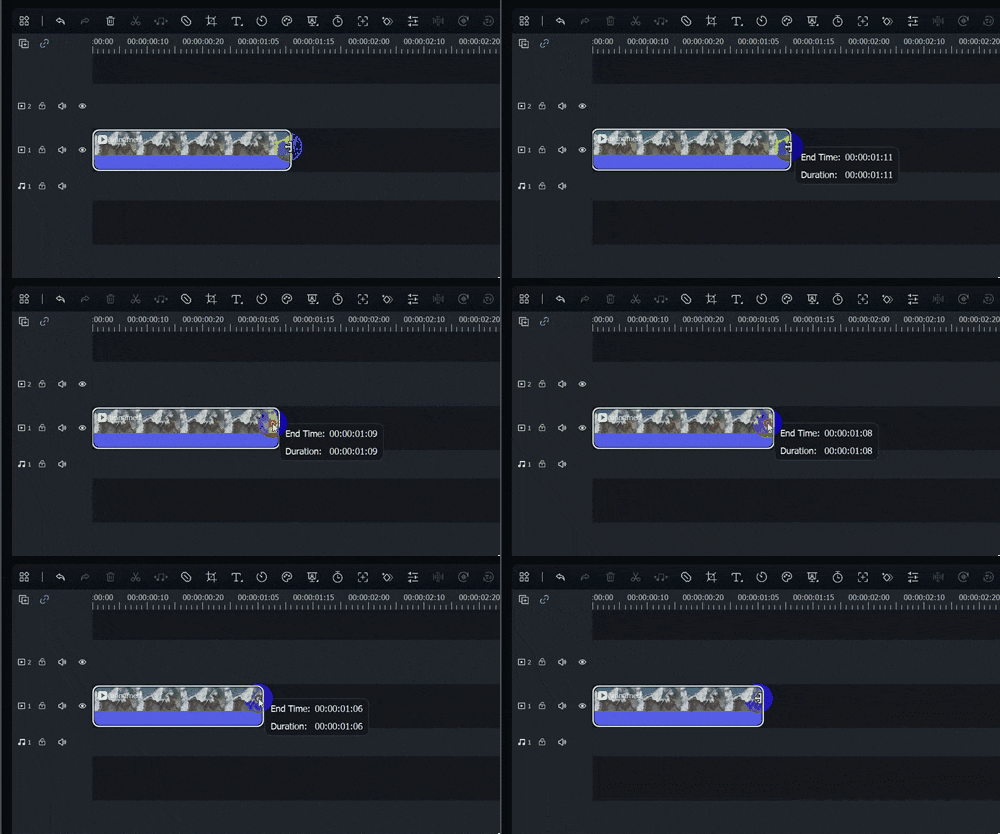
Trim ming videos in Filmora is done by hovering over the beginning or end point of the media in the timeline until the Trim icon appears. Then simply click and drag to a desired point.
Split videos in one click

Locate the moment in the clip when you want to make the cut and simply click on the Red Scissors to make an instant split. You can then proceed to further trim the cut footage.
Crop and zoom videos to perfection
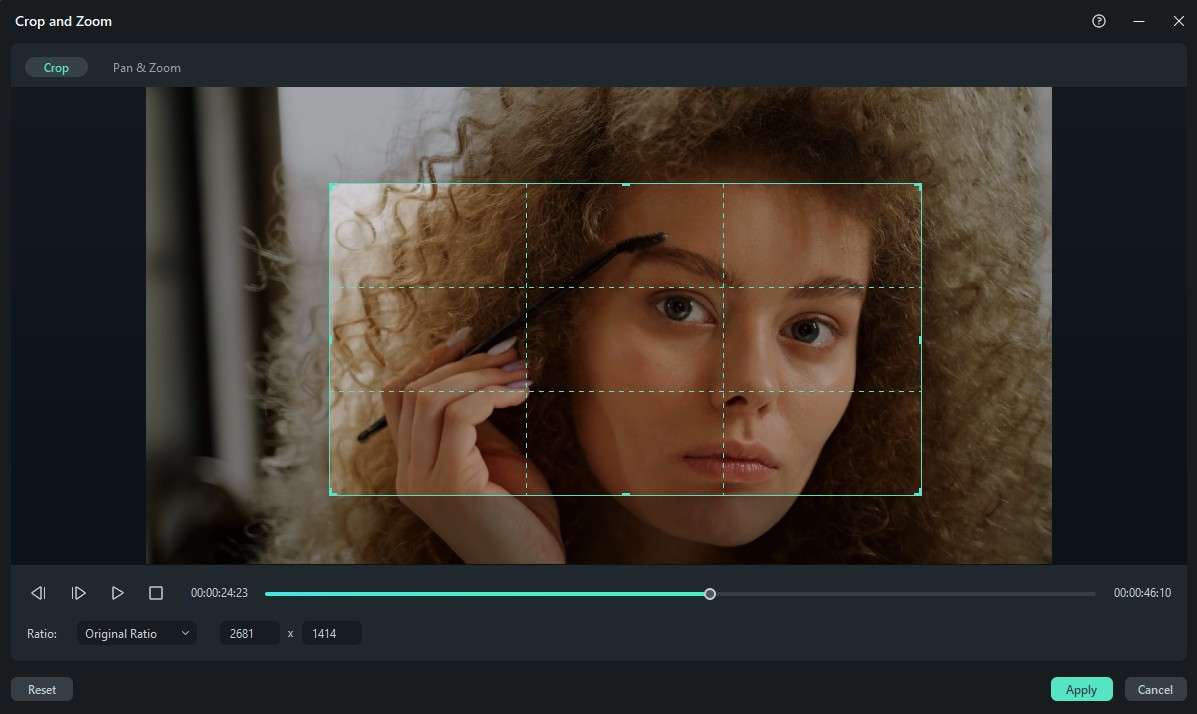
Step 1: Click on the video in the timeline and go Alt + C on the keyboard. This will open a new window. Here you can crop the video to your liking and adjust the aspect ratio.
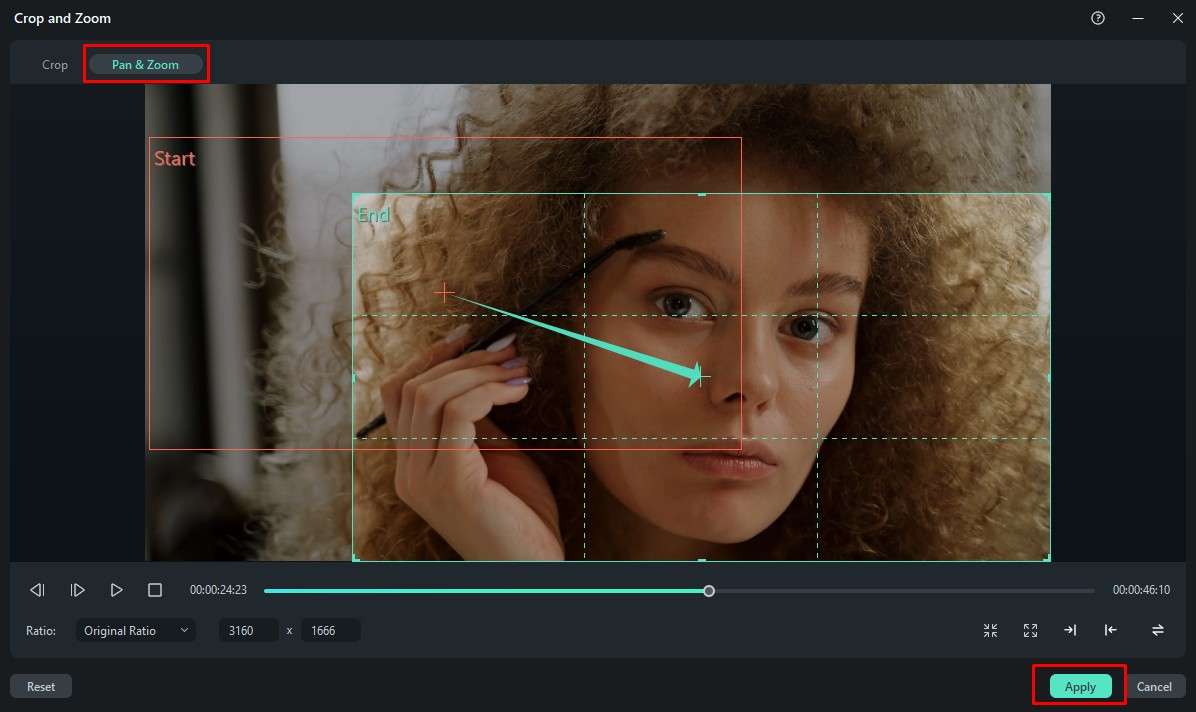
Step 2: If you want, you can move to the Pan & Zoom section, where you can select the start and end point of the footage and create a Ken Burns effect. When you are satisfied with the results, click Apply.
There are also some advanced features to explore, and we’ll do so in the following section.
Use Filmora’s Advanced Video Editing Features Along with Transitions
Mastering cinematic transitions is closely tied to using advanced video editing features. You need to prepare the clips and edit them to perfection before you decide which transition to use between them.
Edit multiple clips at once
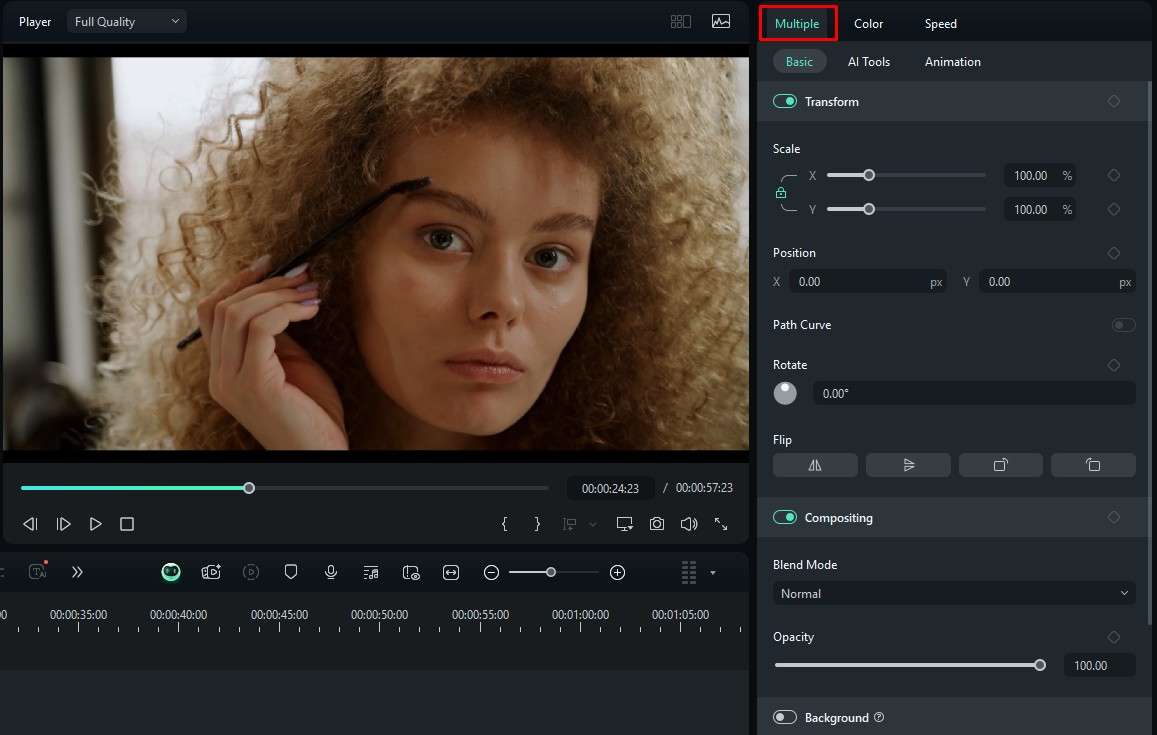
Step 1: Hold the Shift key to select two or more media files in the timeline.

Step 2: You will notice on the right that you can see the world Multiple. This means that whichever tweak you make, be it rotating or applying AI Tools, will be done to both files.
Create a Picture in Picture effect
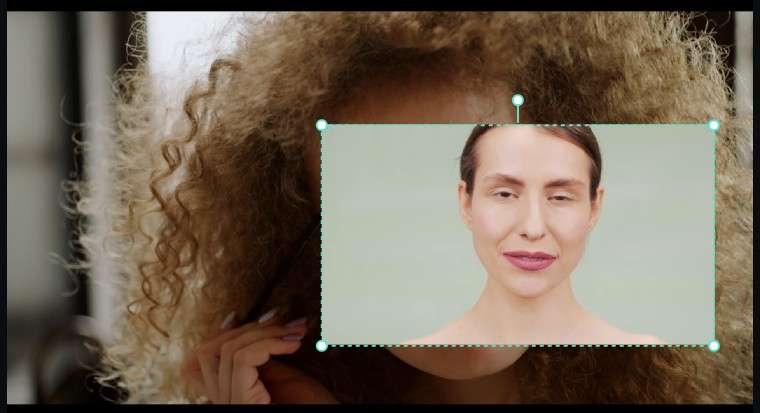
This advanced editing feature is easy in Filmora. For this, you will need background footage and the main clip you want to overlay above the background footage. For this tutorial, we will use the two media clips that are already in our project. Check it out.
Step 1: Add both media files to the timeline, but this time, put them one on top of the other. The clip below will serve as background footage, and the clip above will serve as overlay footage.
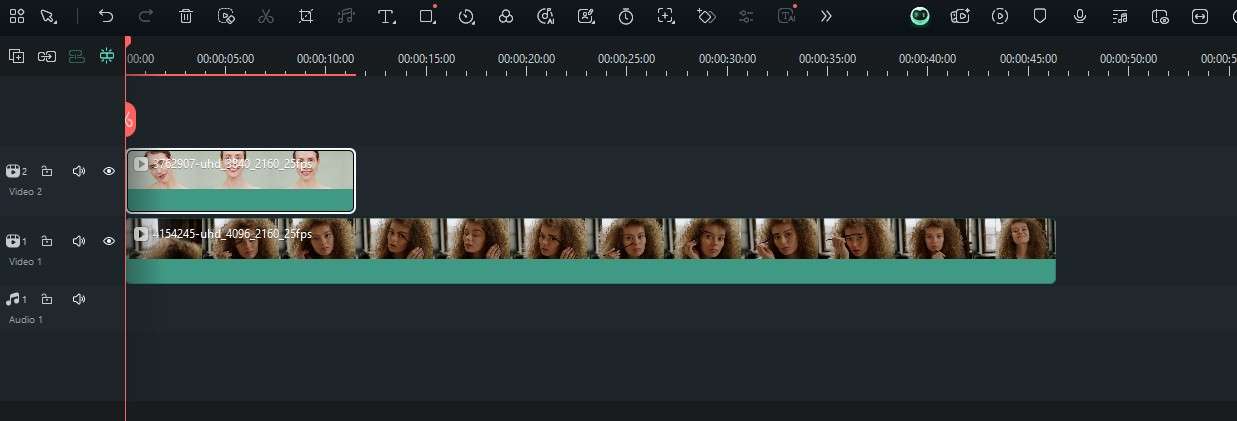
Step 2: Adjust the size of the overlay clip directly in the video player.
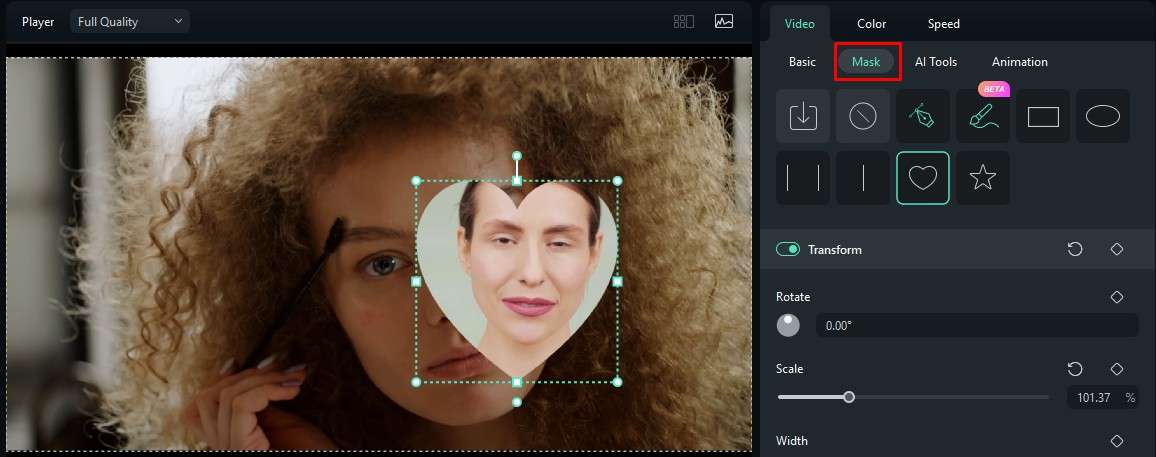
Step 3: On the right, you will see several features to manipulate both videos. A cool thing to do is to go to Masks and add the mast to the overlay footage.
And, finally, before we go, we have some cool AI features to share.
Explore the Vast Library of AI-Powered Features
The AI revolution is happening before our very eyes, and the team at Wondershare is ahead of the curb. They are constantly working on adding new AI features to Filmora and all their other products. Today, we will focus on two AI features, but you can explore the rest when you use the program.
AI Video Enhancer
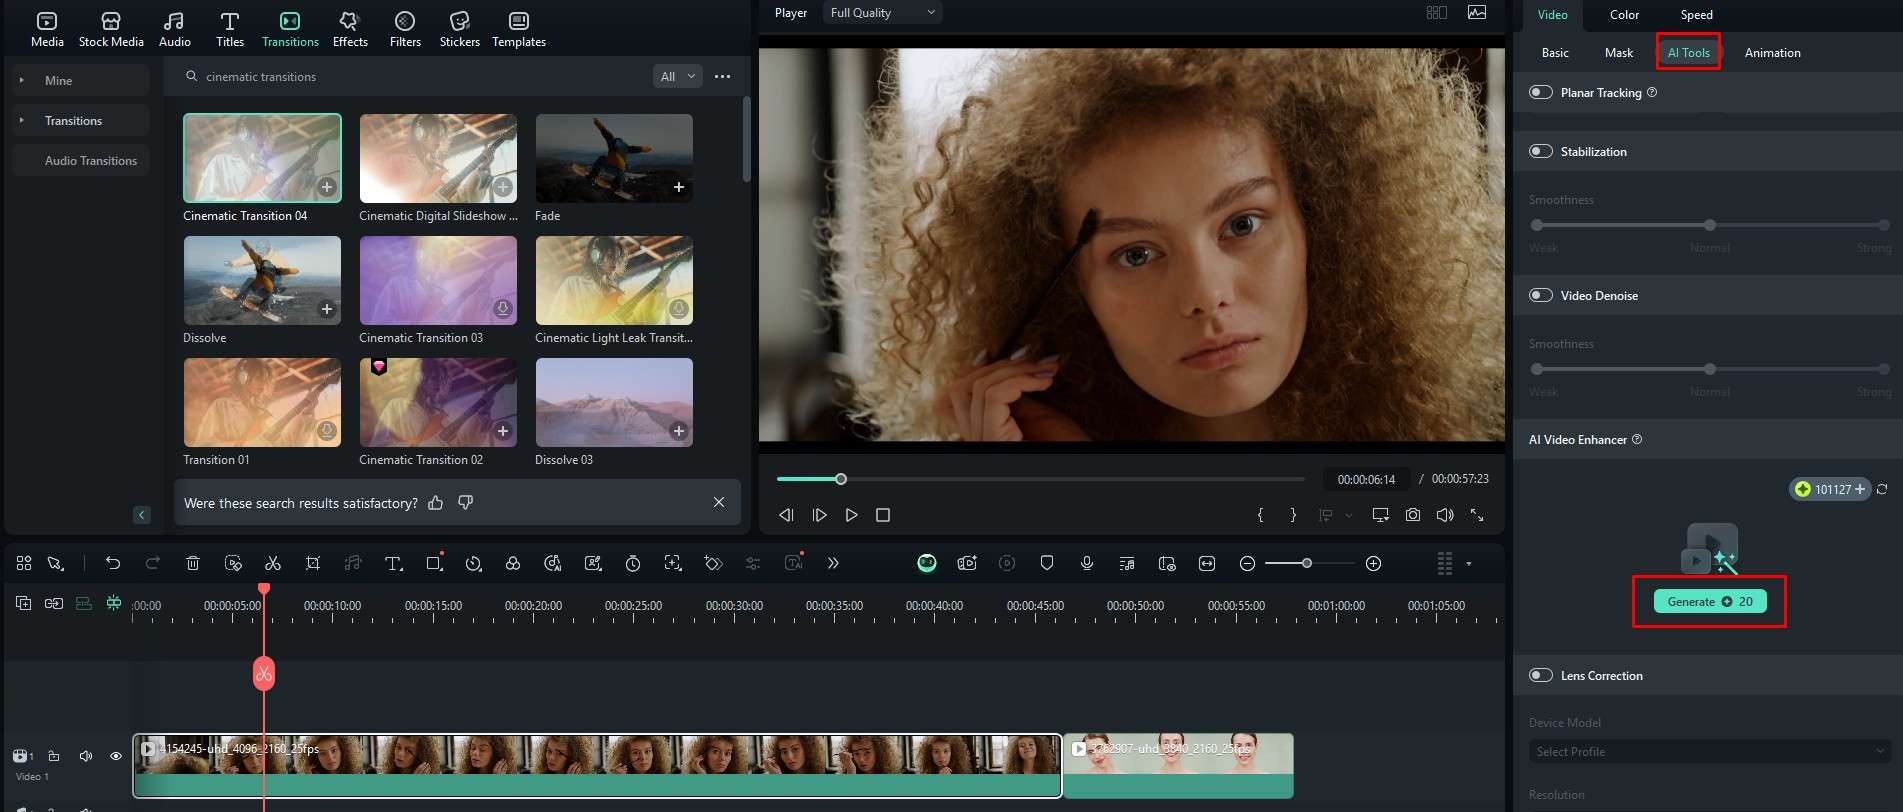
Improve the look of an old or badly recorded video with one click. Just select the video in the timeline, click on AI Tools on the right, and then scroll down until you find the AI Video Enhancer. You only need to click on Generate. Filmora will do everything else.
Smart Cutout
This is a cool feature that lets you select and manipulate a particular object throughout the video.
Step 1: Again, click on the video in the timeline and go to AI Tools, but this time, find the Smart Cutout feature, toggle it on, and then click to begin the process.
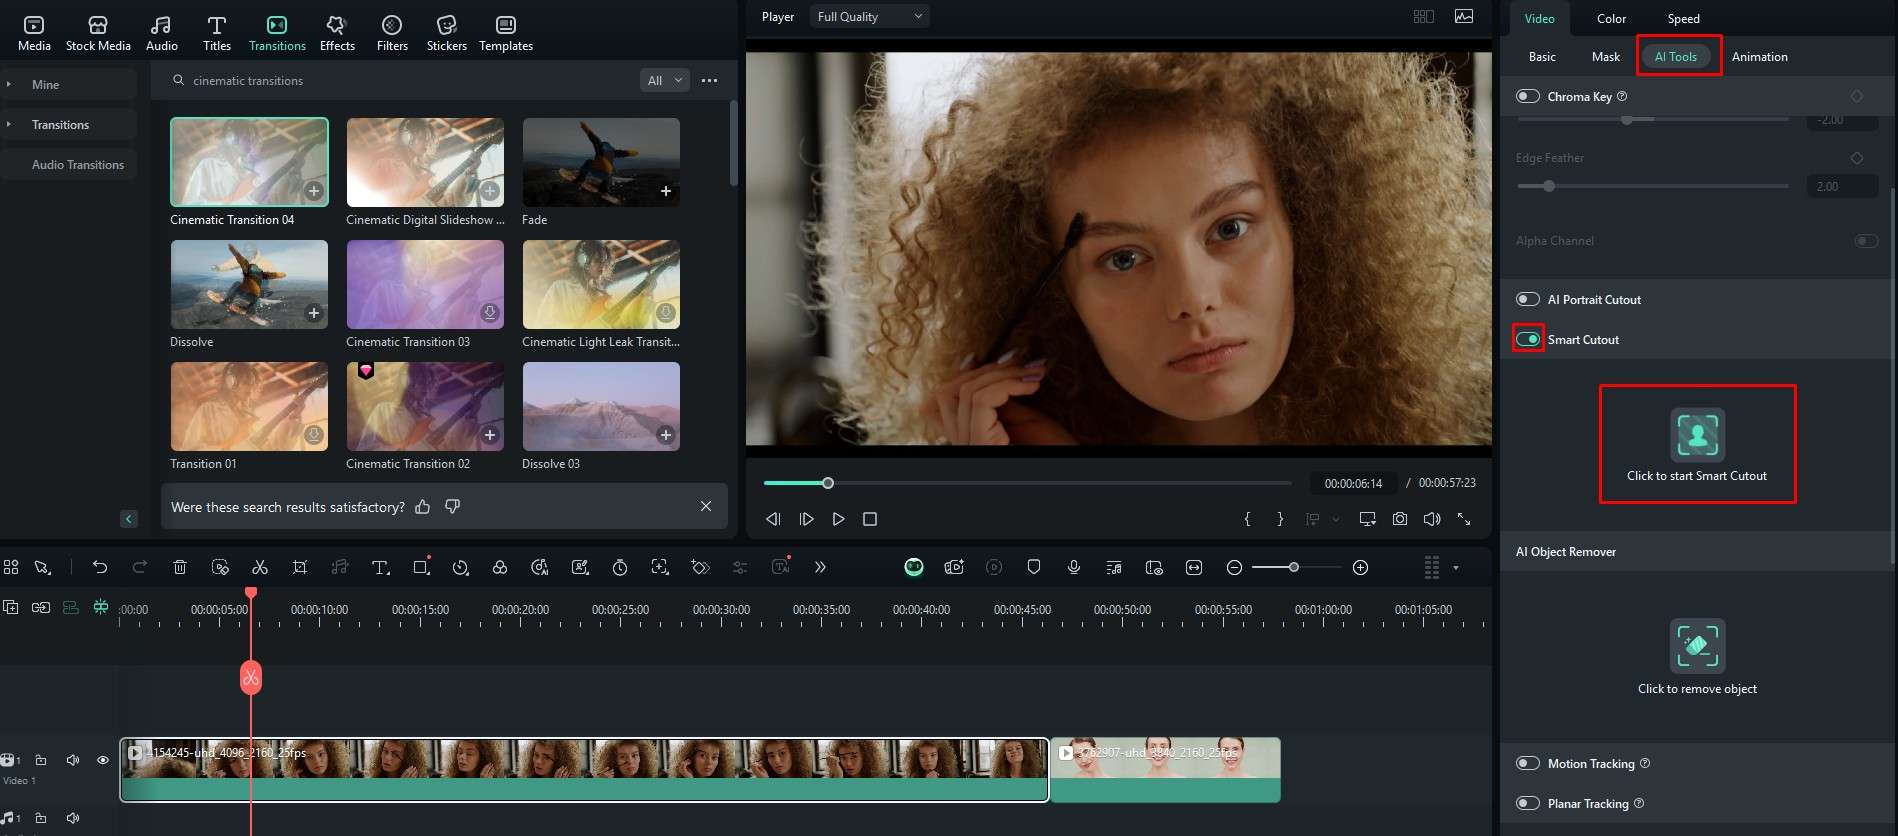
Step 2: Select the object that you want to cut out, and click again to start the Smart Cutout process. It will take some time.
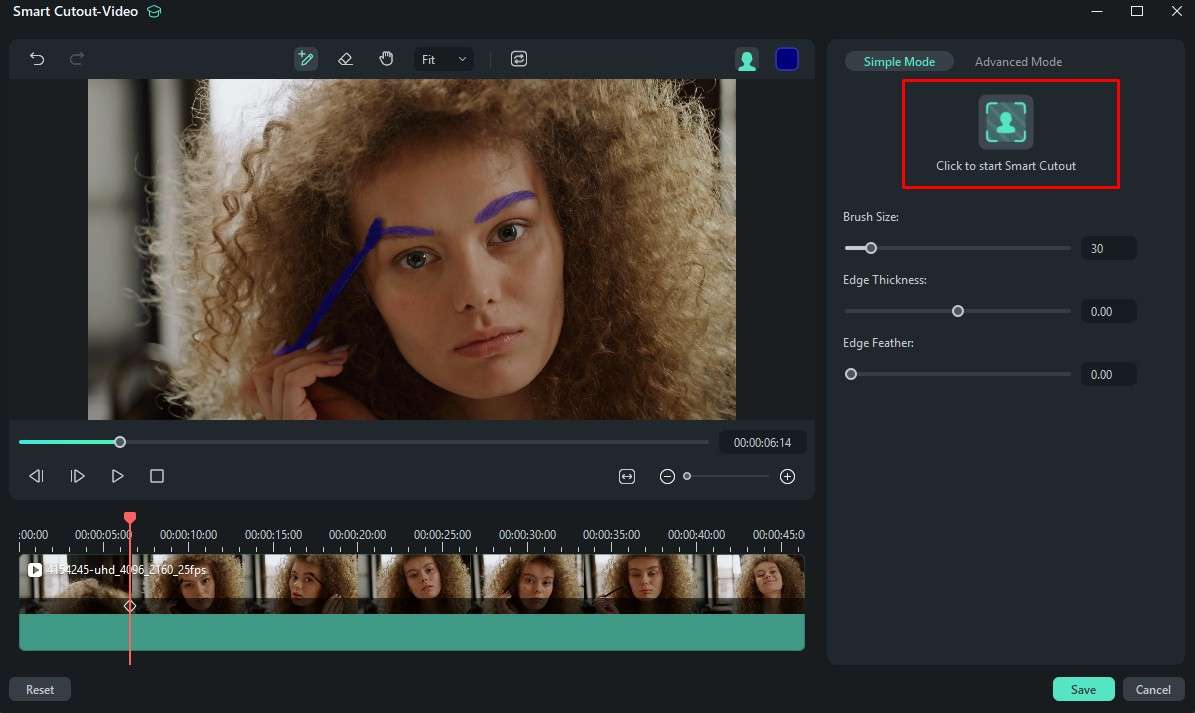
After the AI is finished, you can, of course, review the results and choose to save them or discard them.
Conclusion
So, if you want to master cinematic transitions and other filmmaking and video editing skills, you should give Filmora a chance. You can use it to kick off your video editing journey, and you can learn a lot of industry tricks. When you master Filmora, you can easily adjust to some more complicated solutions that are geared towards extremely professional Hollywood movie editors.


 100% Security Verified | No Subscription Required | No Malware


