
 100% Security Verified | No Subscription Required | No Malware


 ChatGPT
 Perplexity
 Gemini
 Claude
 Grok
Grok
Imagine presenting a vital project update through Zoom, only to have your colleagues express dissatisfaction because they couldn't hear your voice clearly or it sounded choppy and distorted. For remote workers and virtual teams, laggy audio during Zoom meetings is a common issue that many users face, presenting a significant challenge.
This platform is a crucial tool for many organizations and people worldwide that turn productive sessions into distressing experiences. Fortunately, this article will help you find quick fixes and alternative tools to restore your Zoom audio from choppy to clear and audible sound.
In this article
Part 1. Understanding Zoom and the Reasons Behind Zoom's Choppy Audio
Known as a cloud-based communication medium, Zoom enables global audiences to conduct virtual conferences and webinars through audio/video tools. Despite the platform being reliable for creating productive sessions, many users face Zoom audio quality issues that should be resolved and properly addressed. In this section, we'll highlight the common causes of audio problems in Zoom faced by many people:
Common Causes of Audio Problems in Zoom
- Weak Internet Connection: A weak and unstable internet is the major cause of choppy Zoom audio during high-end professional meetings. The smooth transmission of data can sound robotic and distorted due to the low bandwidth or network latency.
- Background Apps Consuming Bandwidth: Most of the time, unused apps or those playing in the background consume significant bandwidth, such as music streaming and file downloads. This is one of the leading reasons that causes Zoom's choppy audio during conferences.
- Incompatible or Malfunctioning Microphones: Poorly configured microphones can cause echo, crackling, and static audio during professional Zoom meetings. Users may also experience poor audio quality due to outdated and malfunctioning earpieces.
- Audio Settings within Zoom or Device: Sometimes, the issue is caused by incorrect audio settings in the Zoom platform. Low-input volume and microphone permissions are disabled from the sound controls or system settings, affecting the Zoom audio.
Part 2. Guide to Fixing Zoom Audio Quality Issues
It's quite embarrassing during a Zoom meeting when your communication is disrupted by poor sound quality, and the audio is choppy. This section provides a step-by-step guide to practical and quick fixes for restoring audio quality in Zoom meetings.
Way 1. Through Zoom Itself
When facing microphone issues during an important Zoom meeting, using the built-in options is the first solution you can think of. For your convenience, we've provided step-by-step instructions on how to resolve audio problems in 4 different ways using Zoom's pre-defined configuration:
Answer: To fix choppy Zoom audio within the platform, users should test microphone settings, enable background noise suppression, and use the 'Original Sound' feature.
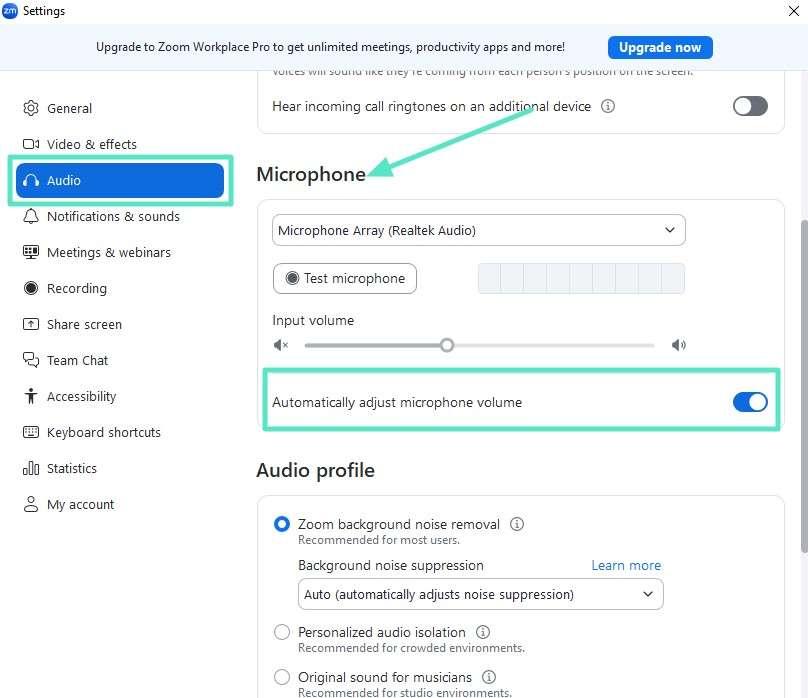
- Navigate to Settings > Audio and select 'Automatically Adjust Microphone Volume'.
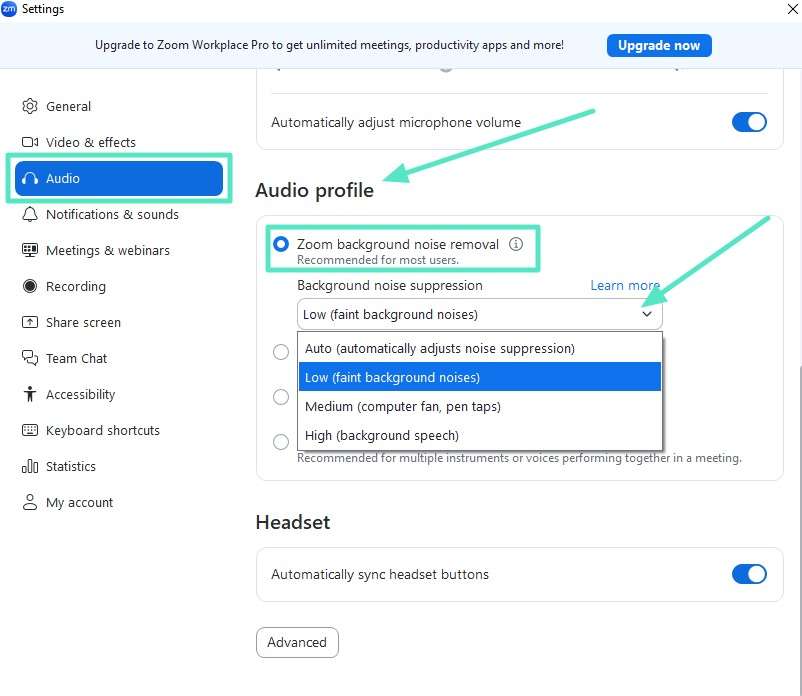
- Switch 'Background Noise Suppression' to Low for better vocal clarity.
- Enable 'Original Sound for Musicians' to bypass Zoom's compression filters.
Method 1. Check and Test Microphone Settings
The most common problem with discontinuous audio is either faulty device selection or the microphone access being turned off. During meetings and conference calls, Zoom offers users the ability to check the microphone natively. Follow the instructions below to resolve the Zoom microphone cutting out problem:
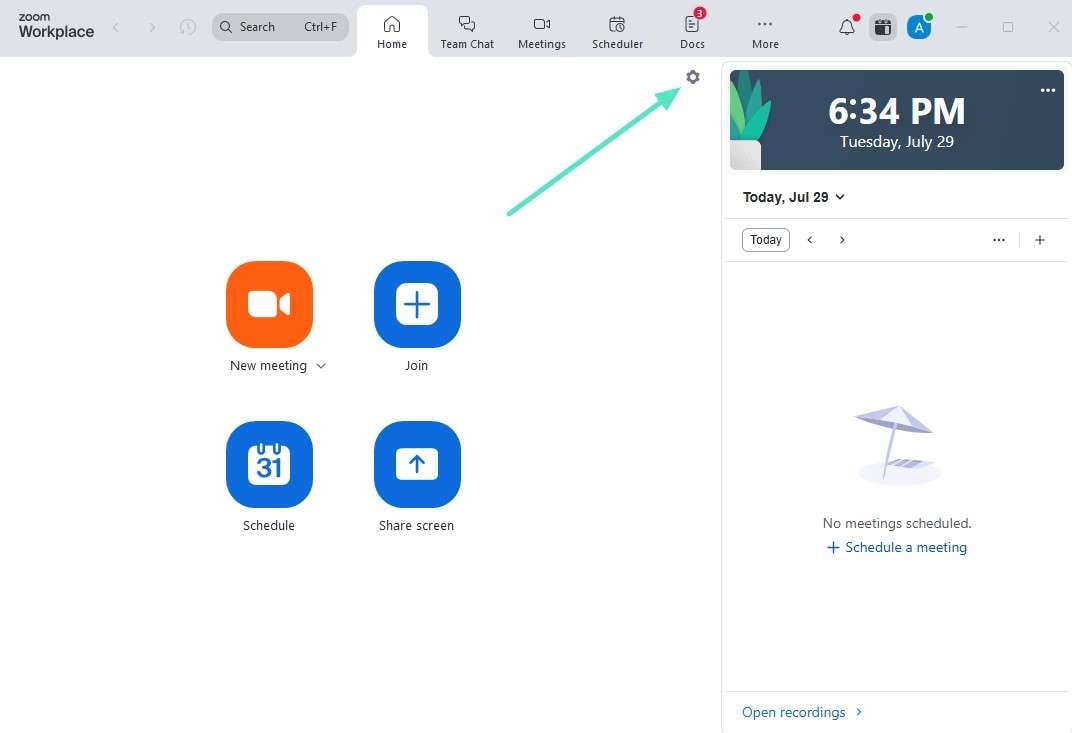
Step1Access the main interface of Zoom and click the "Gear" icon on the top right to opt for Zoom settings.
Step2Select the "Audio" tab, go to the "Microphone" section, and select the microphone array from the drop-down list to toggle the "Automatically Adjust Microphone volume" option.
Method 2. Use "Suppress Background Noise" Settings
In the Zoom platform, a particularly useful feature is "Suppress Background Noise," which eliminates any unwanted sound traffic from the background during important conference meetings. Voice cutout issues may be caused by the use of the wrong suppression levels, particularly in calm surroundings. To control the suppression level for resolving Zoom audio choppy, follow these steps given below:
- Instructions. After selecting the settings from the main interface of Zoom,select the "Audio" tab and scroll down to "Audio Profile." Activate "Zoom Background Noise Removal," and change the settings of "Background Noise Suppression" from auto to low.
Method 3. Enable the Original Sound
To preserve the natural quality of your microphone audio, Zoom offers the "Original Sound" feature. It is particularly used for content creators, musicians, and those requiring higher fidelity sound. This feature resolves Zoom audio quality issues, ensuring that audio is transmitted with minimal compression and filtering. Here's a detailed roadmap to use this feature in a guide given below:
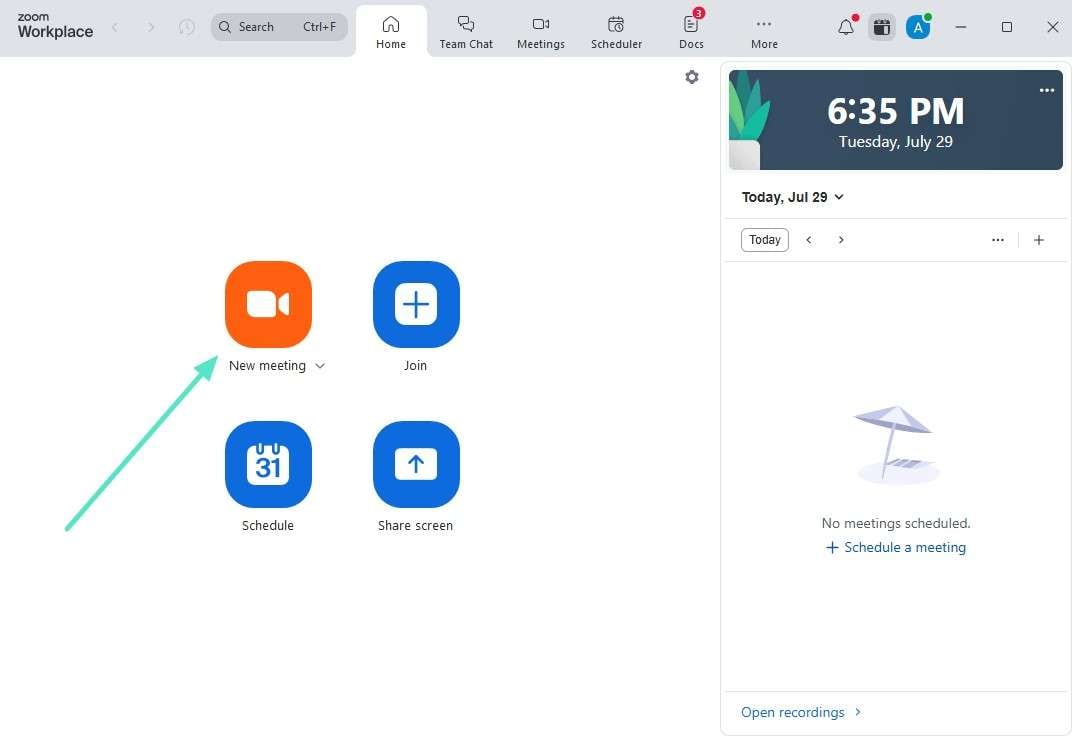
Step1Launch Zoom on your desktop and access its main interface. From the center, click "New Meeting" to start a new meeting.
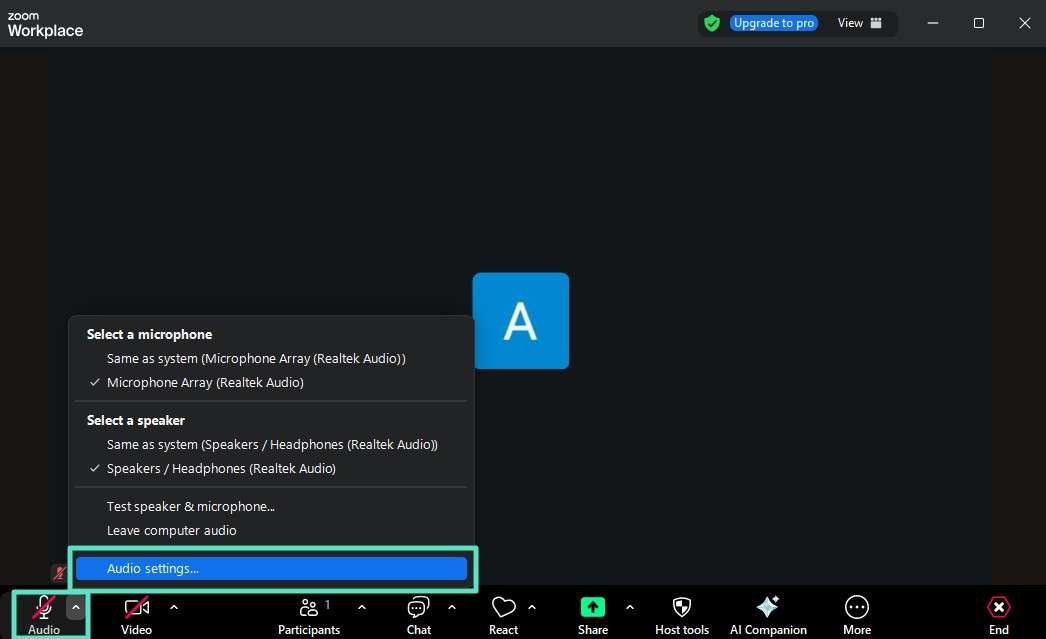
Step2From the meeting window, click on the left drop-down menu and select "Audio Settings."
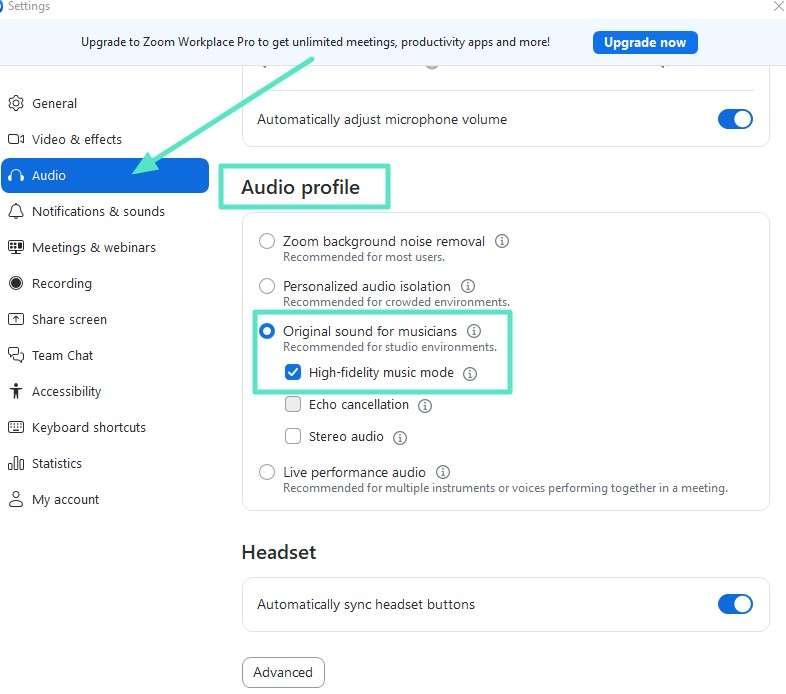
Step3Scroll down to the "Audio Profile" and select "Original Sound For Musicians" for studio environment sound modification. Further enable the "High-fidelity Music Mode" for best audio quality.
Method 4. Switch to Your Phone's Audio
If there is an issue with device compatibility, you can also install this app and take advantage of these facilities. You can easily join the Zoom meeting by switching the phone's audio during the Zoom meeting. It is helpful while experiencing bandwidth issues or when using your phone's speakers or microphones. This method provides precise sound and is used as a backup when device audio is not available.
Way 2. Manual Fixes on Windows Desktop Device
When using Zoom on a desktop, you may encounter technical issues, including connection problems, outdated software, and choppy Zoom audio. Luckily, this platform provides a range of manual troubleshooting options through its official resources and an intuitive interface. Users can manage window drivers, reinstall Zoom clients, and terminate conflicting applications. Here are a few manual fixes that are under discussion in detail in the following:
Method 1. Update Audio Drivers
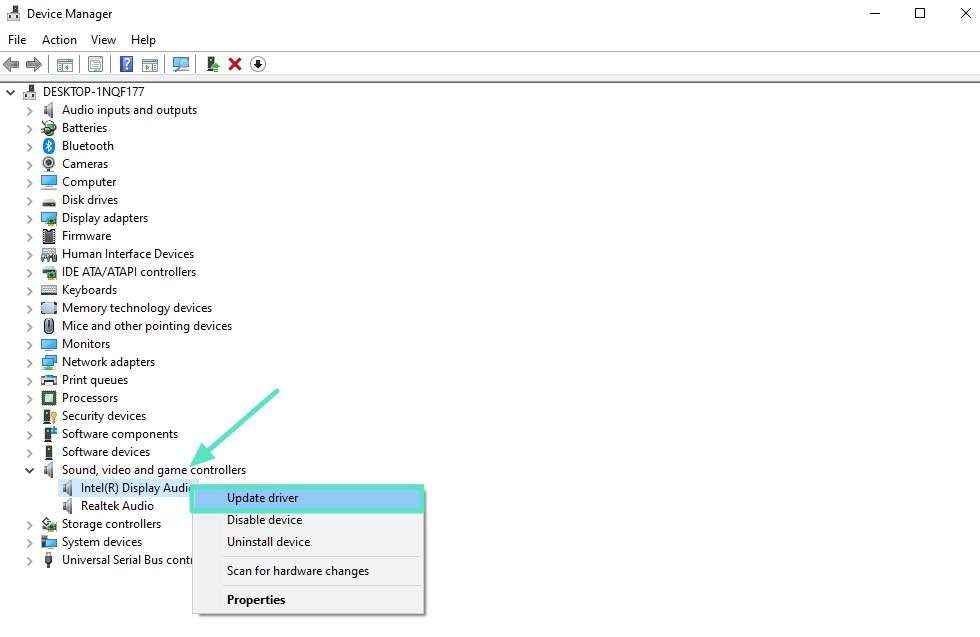
If you are encountering missing audio, microphone issues, or distorted sound during Zoom meetings, outdated audio drivers will be of no use. Keeping your drivers up-to-date is a vital task, as it serves as a communication bridge between the operating system and the device's hardware. Updating drivers can quickly resolve compatibility issues and other audio problems, making your meeting more straightforward. A guide to update these drivers for sorting out Zoom audio quality issues is mentioned below:
- Instructions. Open the device manager, scroll down to select the "Sound, Video, and Game Controllers" option, and right-click to update the drivers.
Method 2. Check the Default Microphone and Set the Correct Input/Output Device.
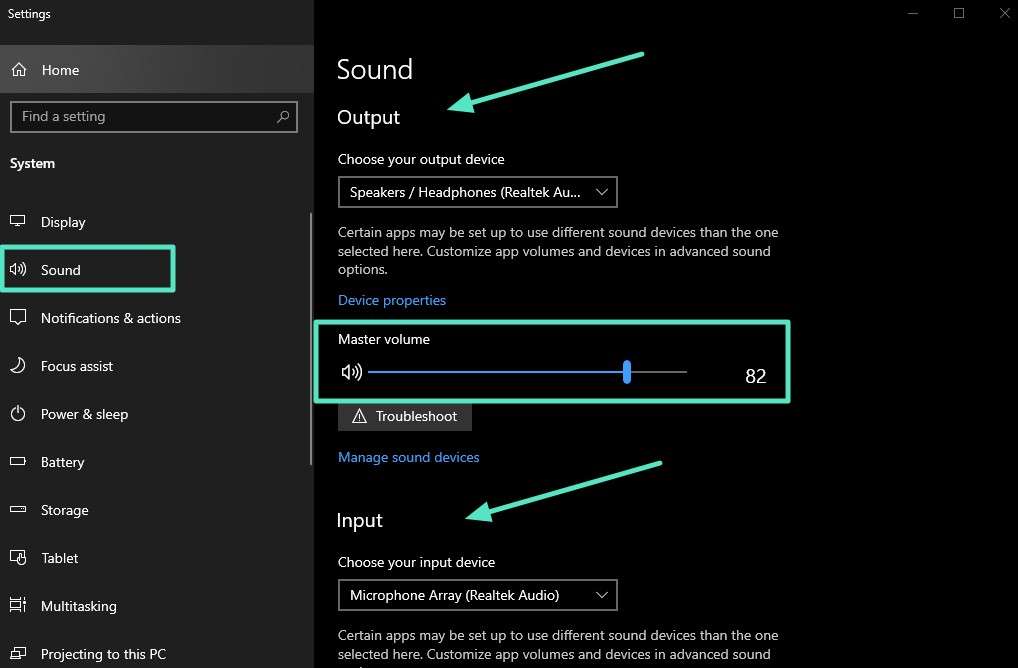
Setting the correct input and output audio devices is vital for seamless participation and clear communication. If default speakers are not configured properly, you may experience audio being routed to unintended devices, such as webcams and speakers. A comprehensive guide for checking the microphone and setting the speaker to sort out Zoom choppy audio is discussed in the following:
- Instructions. Access the main interface of your desktop and search for "System Settings" in the search bar below. From the left side panel, select the "Sound" option to access the sound window. Adjust the volume by dragging the slider to your desired level. Ensure that the "Input" and "Output" devices set to default are accurate.
Method 3. Adjust Microphone Sensitivity in Sound Settings.
Adjust the microphone's sensitivity to ensure your voice is clear without any background noise, which may help resolve the Zoom microphone cutting out issue. This interface offers sound controls that allow you to adjust the effects of the microphone's input, making it sound perfect and responsive. To make your communication effective and express your point effectively and assertively, do the following:
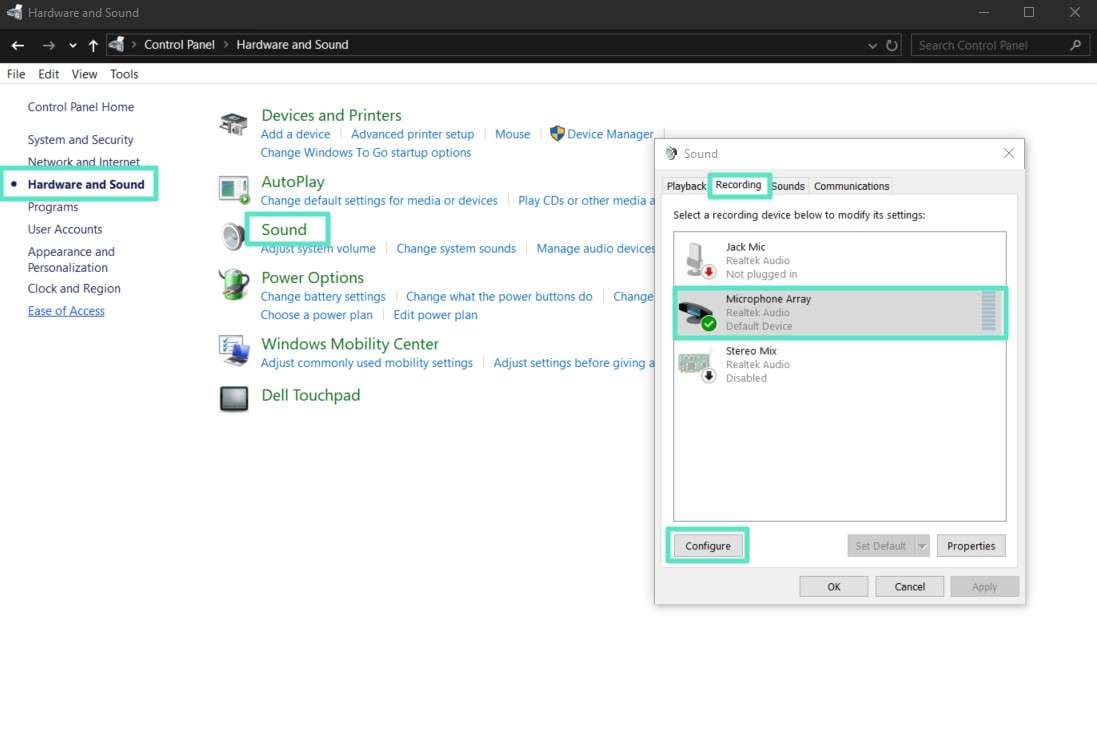
Step1Access the "Control Panel" of your device and expand the "Hardware and Sound" tab to access the "Sound" panel. Go to the "Recording" option, select "Microphone Array," then click the "Configure" button at the bottom left.
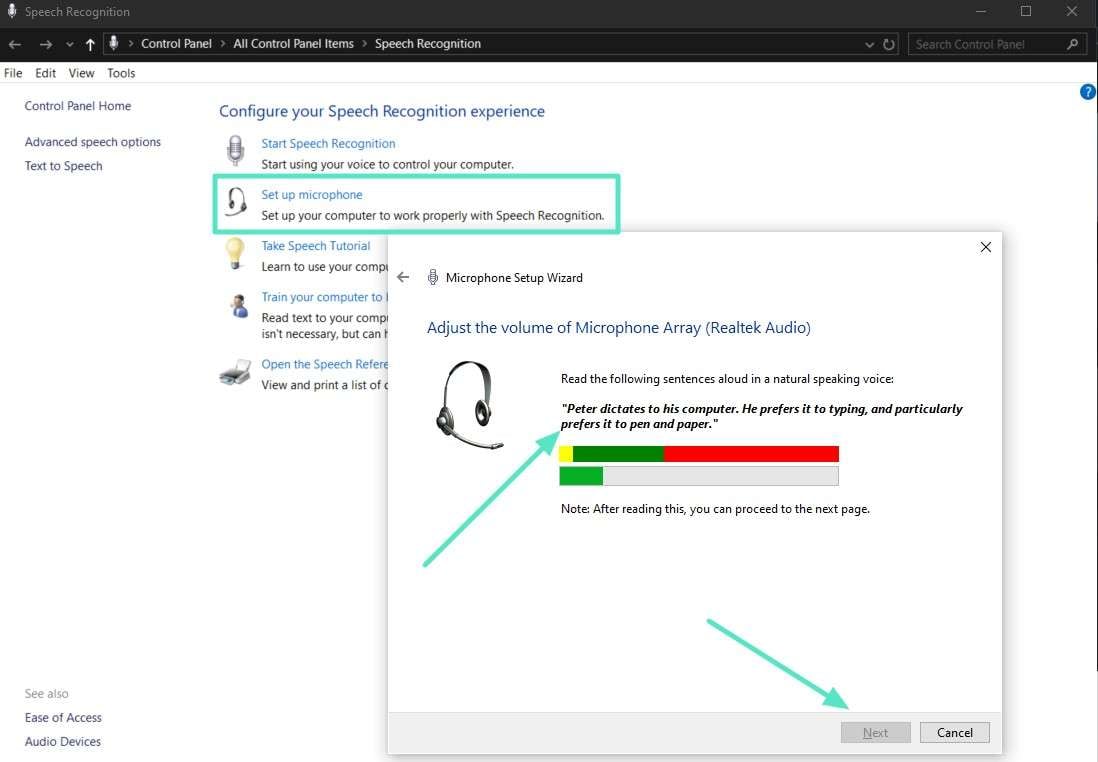
Step2Later, choose the "Set up Microphone" option, select the type of microphone, and click the "Next" button. In the microphone setup wizard, specific sentences are provided to read aloud, allowing you to adjust the volume of the microphone array. Proceed to the next page and select the "Finish" button below to complete the wizard, thereby resolving the issue of the microphone cutting out in Zoom.
Method 4. Disable Sound Enhancements that Interfere with Clarity
Some of the features that can reduce the sound quality in Zoom meetings during sound enhancement are echo cancellation, automatic noise suppression, and proprietary audio effects. Even though such additions aim at filtering out the background noises, they may distort voices and blunt a much-needed sound. Zoom provides a straightforward process to control and adjust choppy audio in the following way:
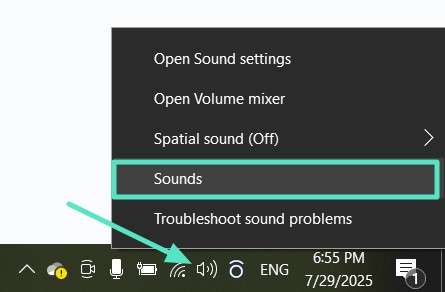
Step1In the right-bottom toolbar of the main display window of your device, right-click on the volume icon and select the "Sounds" tab.
Step2Open the "Playback" tab from the top of the sound display, select the "Speaker/HP" option, and click on "Properties."
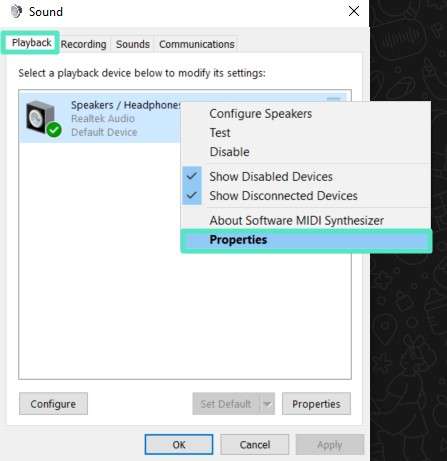
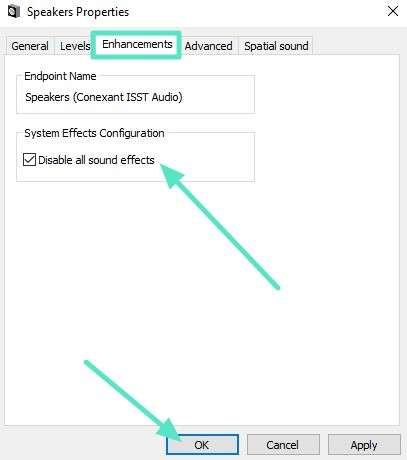
Step3From the properties display, select the "Enhancement" tab from the top taskbar and tick mark "Disable all sound effects." Click the "OK" button at the bottom to disable sound enhancements that interfere with clarity.
Part 3. Enhance Zoom Recorded Sessions Using Enhanced Tools - Wondershare Filmora
Imagine recording a business webinar video, and as you review the saved video, you notice that it contains uneven Zoom audio choppy.Filmora helps you enhance the audio in a recorded webinar by using its upgraded toolkit. It offers the transformation of raw Zoom recordings into masterfully edited content using the AI audio enhancer.
Filmora eliminates white noise in the video and cuts out the excess gaps. Using this platform, the quality of videos is enhanced, grain is minimized in low-light scenes, and the images are made sharper to provide a professional touch. All these innovative features are available to users on both desktops and mobile devices.
Using Wondershare Filmora on Desktop
This platform is a feature-rich editing environment that offers a drag-and-drop interface, allowing users to arrange both audio and video clips across an intuitive timeline. A comprehensive guide to enhancing Zoom videos and addressing audio quality issues with navigation is discussed below:
Answer: In Filmora, users can fix distorted Zoom recordings by using AI-powered tools like AI Denoise and Audio Sync to ensure vocal clarity.
- Import the recording into Filmora and use the 'AI Denoise' feature to remove steady background humming.
- Apply the 'Audio Sync' tool to automatically align external high-quality audio with the Zoom video.
- Adjust volume properties in the Audio Panel to remove robotic distortions.
Note: This workflow works on Windows 7 or later (64-bit) and macOS 10.14 or later.
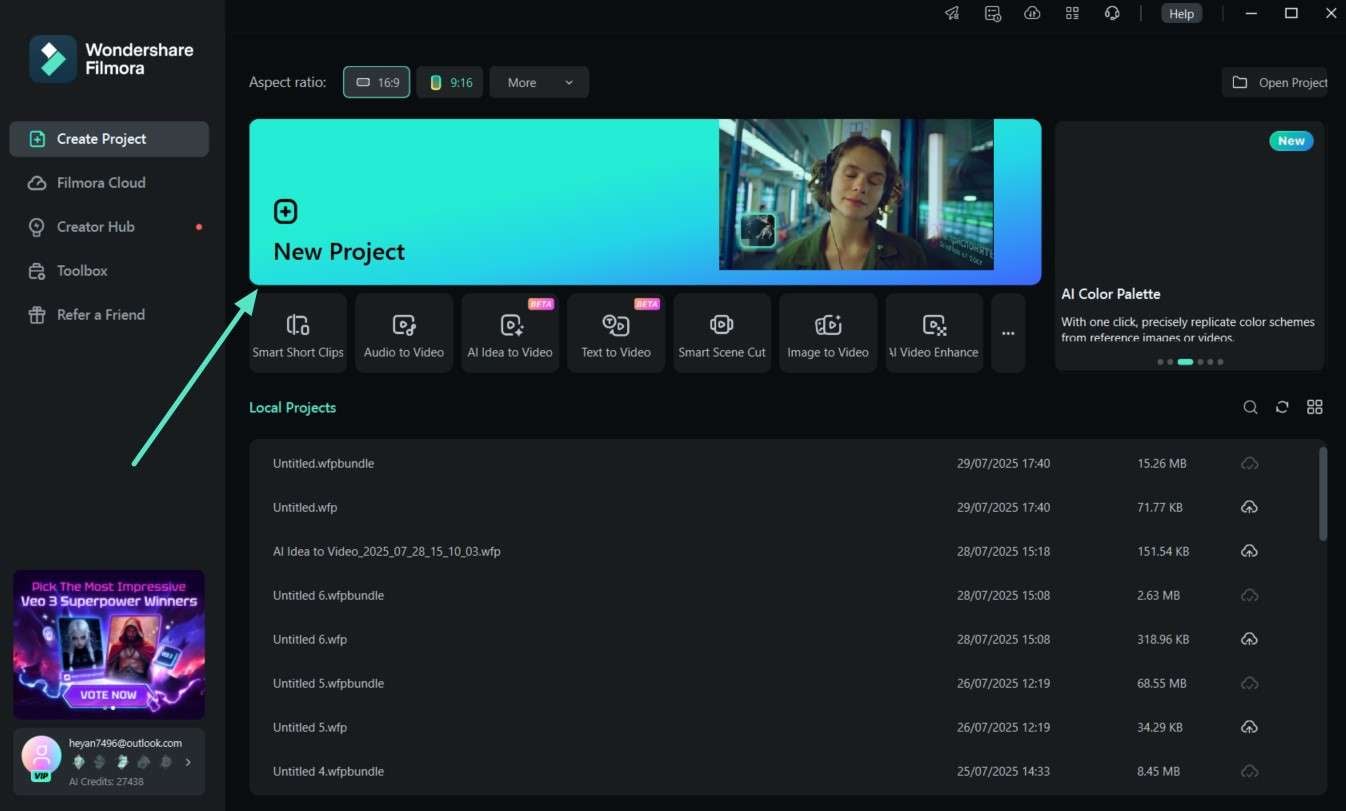
Step1Launch Filmora to Access Its Home Page.
Initially, launch this tool, access its main interface, click "New Project" to import your Zoom video, and drag it to the timeline.
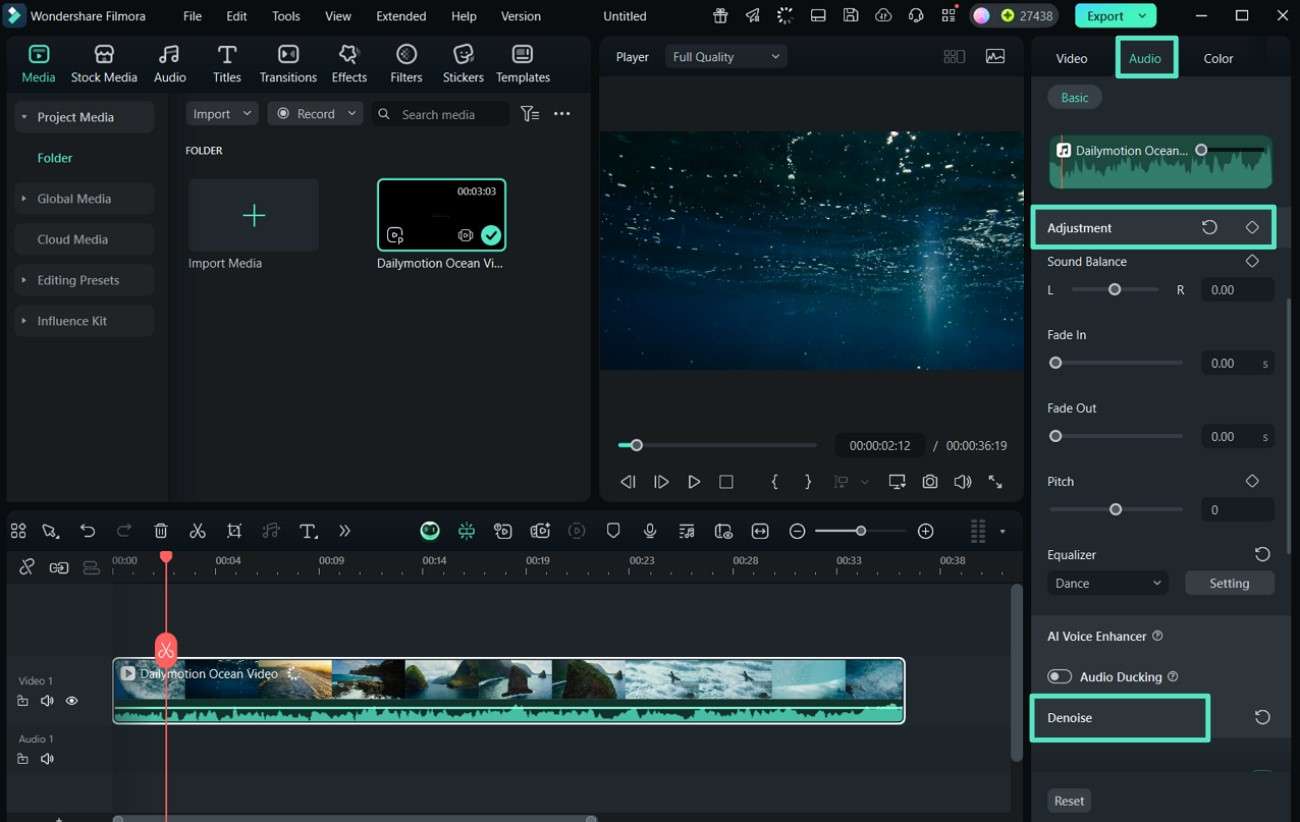
Step2Use AI Voice Enhancer to Modify Voices in the Video.
Click on the editing timeline and go to the "Audio" section on the right side panel. Under this section, choose the "Adjustment" tab to further adjust the volume properties of the video. Extend the "AI Denoise" to remove background noise from the video.
Step3Import Your Existing Audio File to Replace Voice.
To remove the background music or existing audio, you need to import the audio file by selecting "Import Audio." Drag it to the editing timeline and mute the original audio by clicking the "Audio" button on the right side.
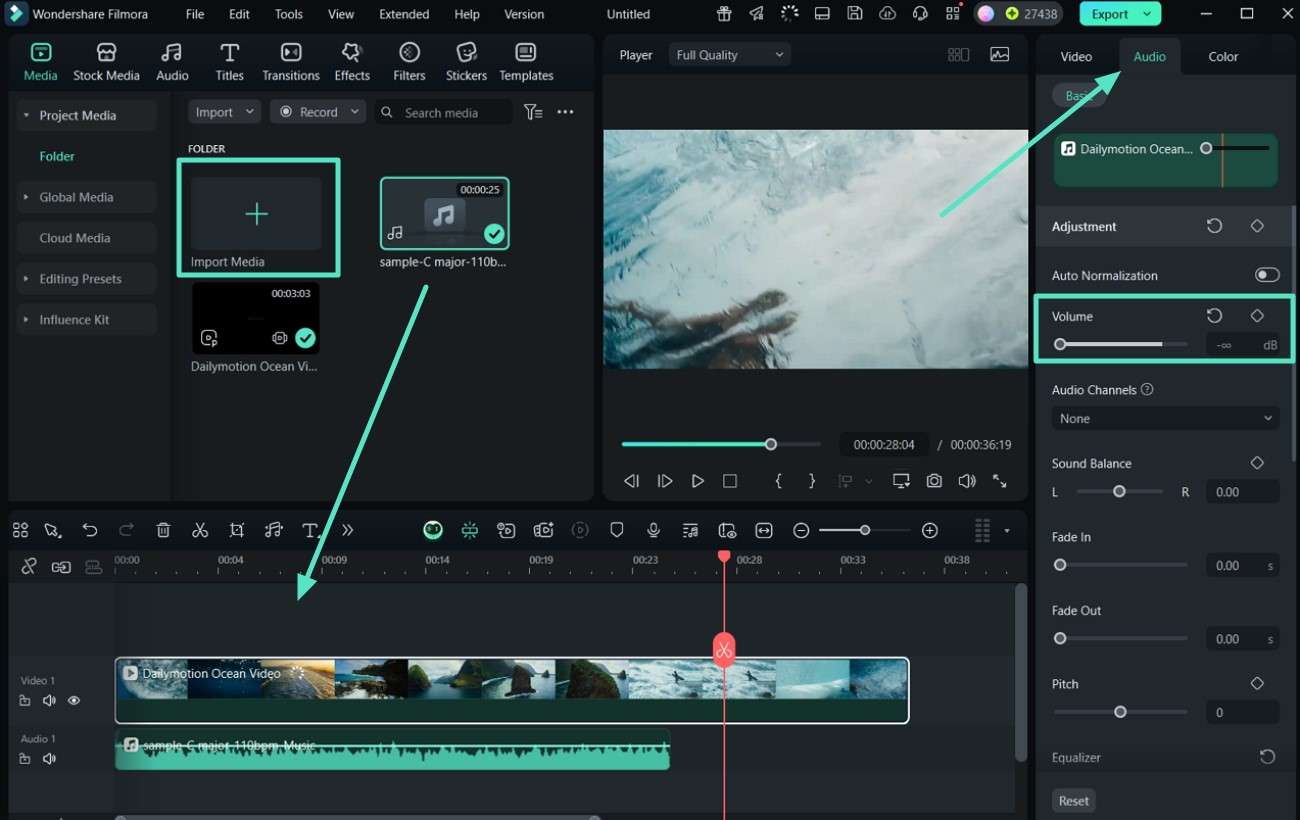
Step4Use Audio Sync to Match New Audio With Video.
Select both the editing timelines and left-click on them to access the "Auto-Synchronization" option from the menu bar. Align your imported audio with the video's length, preview the video in the preview window, and select the "Export" button located at the top right.

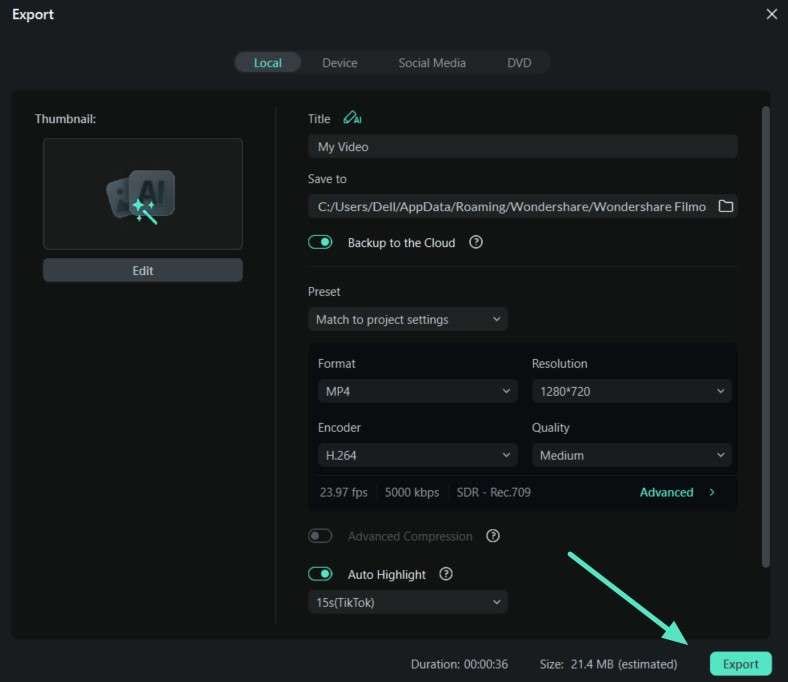
Step5Modify Settings in the Export Window.
Finally, once you are satisfied, change the advanced settings in the export window and click the "Export" button.
Using the Filmora App to Enhance Audio/Video for Zoom
In today's digital world, Zoom recordings play a vital role in e-learning. However, raw videos include Zoom audio quality issues, including background noise, unpolished visuals, and inconsistent sound quality. Filmora App (iOS/Android) helps to import Zoom recordings for instant improvements. It includes multifarious features, such as royalty-free music, smart trimming, audio enhancers, and video effects. A detailed roadmap to use the Filmora App with navigation is mentioned below:


Step1Access Filmora's Homepage and Create New Project.
Begin by accessing the main interface of Filmora App and pressing "New Project" to import your recording.

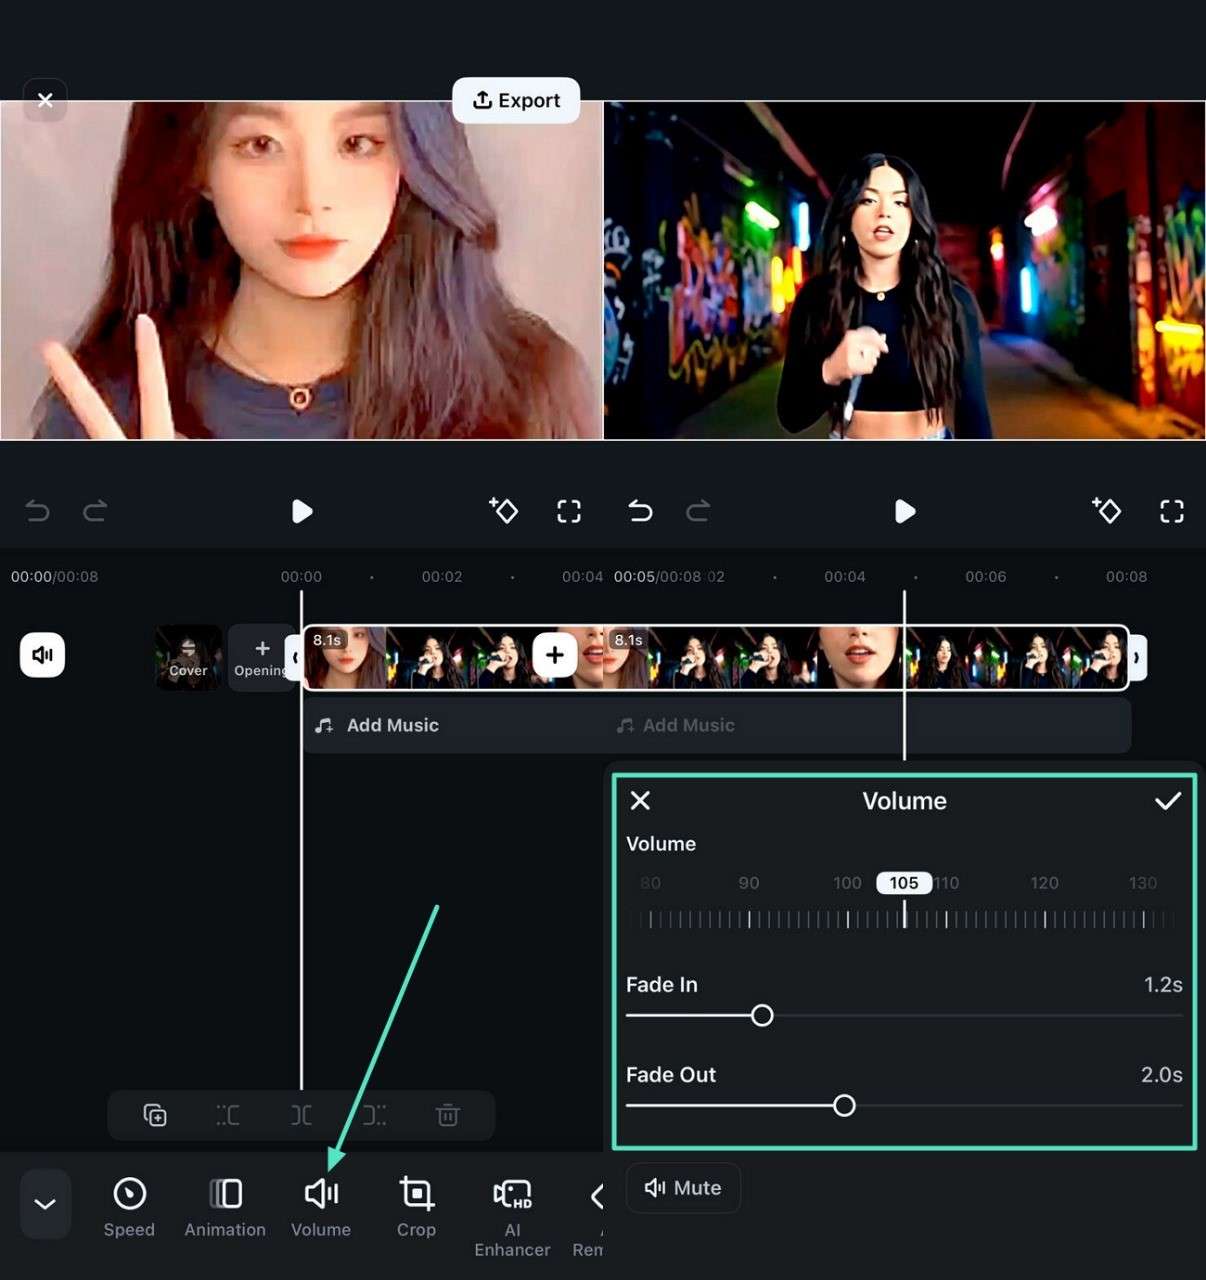
Step2Hit Timeline to Modify Settings.
Select "Volume" to adjust the volume of the video from the slider. Additionally, change the settings by sliding the "Fade In" and "Fade Out" sliders, and then select the "Tick" option on the right.
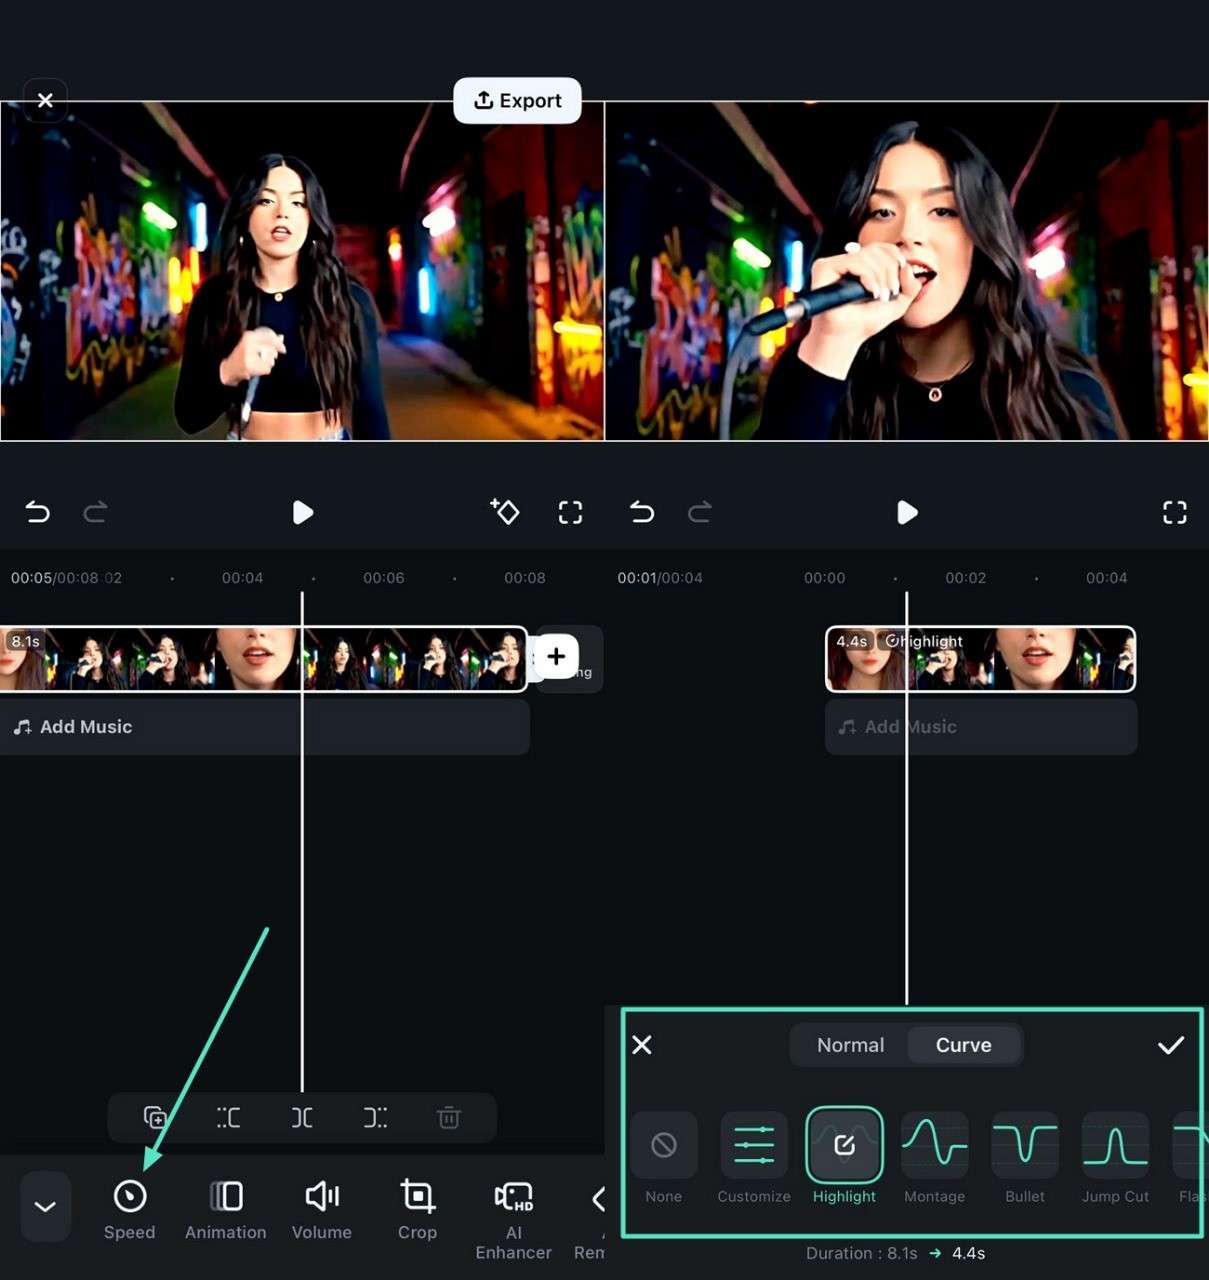
Step3Fix Speed Adjustment of Video.
Tap on the audio timeline and scroll to the right on the toolbar below to select the "Speed" option. Adjust the playback speed using the slider. Choose the "Curve" tab to select any curve model.
Step4Preview and Export the Video.
Next, select the "Noise Reduction" option to remove the background noise, and press the "Tick" option on the right. Press the "Play" button to preview the video in the preview window and hit "Export" in the top right corner. Finally, adjust the settings in the export display and tap the "Export" button.

Conclusion
It is quite frustrating to have Zoom choppy audio meeting or presentation, but those problems can be addressed in an orderly manner. In the given article, we have described how to optimize Zoom conference experience by verifying standards, adjusting the microphone sensitivity, and ensuring audio drivers are up to date. In contrast, Filmora is the best choice, as it offers advanced features to enhance the visuals and audio of recordings.
 secure download
