Whether you want to create a voice memo, capture your college lecture, record an interview, or make video voiceovers, you can use an array of built-in and third-party audio recording tools on your Apple device.
The only question is – what is the best way to record audio on iPhone/iPad? Of all the tools available, which one produces the best sound quality? Let's have a look and find out.
In this article
Best Ways to Record Audio on iPhone and iPad at a Glance
You can record a voice memo on an iPhone or iPad using several different methods. Here's a brief overview of the most popular options.
| iPhone/iPad Audio Recording | Voice Memos | Filmora Mobile | Voice Record Pro | Online Voice Recorder |
| Ease of use | ⭐⭐⭐⭐⭐ | ⭐⭐⭐⭐⭐ | ⭐⭐⭐ | ⭐⭐⭐ |
| Audio quality | ⭐⭐⭐⭐ | ⭐⭐⭐⭐⭐ | ⭐⭐⭐⭐ | ⭐⭐⭐ |
| Audio editing capabilities | Basic editing | Advanced editing | Advanced editing | Basic editing |
| Additional features | N/A | Comprehensive video/audio recording and editing, sound effects, audio enhancement, denoise, silence detection, etc. | Voice effects, playback speed change, audio splitting, etc. | N/A |
Check the best voice recording apps for more options.
Best Options for Recording Audio on iPhone/iPad
Depending on your needs and preferences, some tools for iPhone/iPad audio recording will be better for you than others. Let's see some of the best ways to record audio on iPhone and iPad.
Record Audio on iPhone and iPad With Voice Memos
Voice Memos comes pre-installed on all iPhone and iPad devices and is easily accessible.
It's a somewhat simple app that doesn't come with many bells and whistles but can be convenient on the go. It allows you to capture high-quality recordings using the built-in or external microphone, as well as your device-compatible headset. It even comes with some editing tools, such as skipping silence, enhancing recording, and adjusting the playback speed.
Whether you want to use the voice recorder on an iPhone or iPad, the process is straightforward:
- Swipe left on your Home Screen and open the Voice Memos app (or go to Utilities > Voice Memos);
- Tap the red Record button to start recording;

- If needed, swipe up from the Waveform and tap Pause to pause your recording;
- When you want to finish the recording, tap Pause then Done.

Record Audio on iPhone and iPad With Filmora Mobile
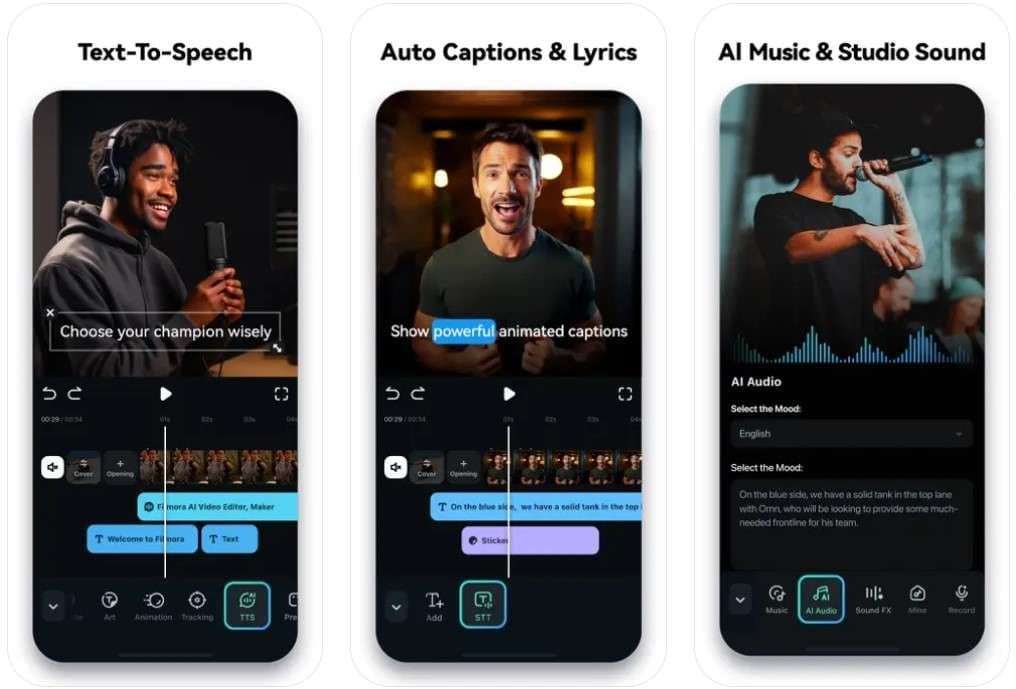
If you need more than just a basic iOS voice recorder, Filmora for mobile is the way to go. It's a powerful app suitable for professionals and novice users alike, making it easy to create stunning video and audio content without much fuss.
While it's primarily a video editor, it offers a full-featured audio recorder and editor that allows you to capture crisp and clear recordings for any purpose necessary. You can use it to create simple voice reminders and audio clips but also to record professional-sounding video voiceovers.
What's more, you can use it to completely change the sound of your recordings. Transform or completely change the sound of your voice, add special sound effects, remove background noise, enhance voice clarity, and so much more.
If you don't feel like recording yourself at all, you can even use Filmora's text-to-speech technology and create AI voiceovers based solely on textual input.
To record a memo on iPhone/iPad with Wondershare Filmora for mobile, you have to follow just a few steps:
- Download the Filmora app from the Apple App Store;
Filmora for Mobile Filmora for Mobile Filmora for Mobile Filmora for Mobile Filmora for Mobile
Edit Videos on Your Mobile Phone with 1-Click!

- • Powerful Brand New AI Features.
- • User-friendly video editing for beginners.
- • Full-featured video editing for professionals.
4,085,556 people have downloaded it - Go to New Project and import media as needed;

- If you're working on a video with sound, you can select the video in the timeline and go to Volume > Mute to mute it;
- To record a voiceover, go to Audio > Record;

- Give the app the necessary permissions, then tap the red Record button;
- Tap the Record button again to stop the recording;

- To change the sound of your voice, select the audio track in the timeline, go to Voice Effect, select the effect you like, and tap the Checkmark;
- When you're done, select Export and save your audio recording on your device.

Record Audio on iPhone and iPad Using Voice Record Pro
Look into the Voice Record Pro app if you're a podcaster or frequently need to create professional-sounding audio recordings on your iPhone/iPad. It's a great recorder that provides high-quality sound with excellent editing capabilities.
You can modify your recordings however you see fit, adding unique effects, splitting your audio, creating reverb and distortion, and more. You can even convert between different file formats – M4A, MP3, and WAV.
While all of its features are available for free, you'll be bombarded with constant ads while using the app.
Here's how to use Voice Record Pro to create audio recordings on your iPhone or iPad:
- Download the app from the Apple App Store;
- If needed, open the app and go to Settings first to calibrate the audio engine and make other necessary modifications;

- When you're ready, tap the red REC button to start recording;
- Tap the Pause or Stop icon when you're done recording.

Once you're done recording, you can make any necessary adjustments to your audio clips. You can save the recording to your device or share it via email, SMS, and more.
Record Audio on iPhone and iPad With 123APPS Online Voice Recorder

Finally, if you just need a quick voice recording, you could opt for an online audio recorder like 123Apps. It is free to use and doesn't require you to sign up. All you need is a consistent and reliable internet connection, and you'll be good to go.
To use 123Apps Online Voice Recorder, you'll need to follow a few steps:
- Use your internet browser to access the 123Apps Online Voice Recorder website;
- On the homepage, tap the Record button to start recording;

- When you're done, tap the Record button again to stop recording and save your audio file.
Online Voice Recorder only allows you to save your audio file as an MP3. You'll be able to find it in your Downloads folder.
Bonus: How to Record and Enhance Audio on Mac?
Recording audio on an iPhone or iPad is a relatively straightforward process, regardless of the tool you're using. Recording on a Mac, on the other hand, can be problematic. While you can create a quick voice memo on a Mac with built-in tools, if you want to create an Apple screen recording with sound or further enhance the recorded audio, you'd need a dedicated third-party option. Let's check Wondershare Filmora.
Its desktop version is more powerful and feature-packed, and yet it remains as easy to use as its mobile version. It gives you full flexibility to record and edit video and audio content in a few easy steps:
- Download Wondershare Filmora for Mac, select My Media in the Editor, and import a media file;
- In the timeline, place the Playhead where you want your audio to begin, then click the Microphone icon;
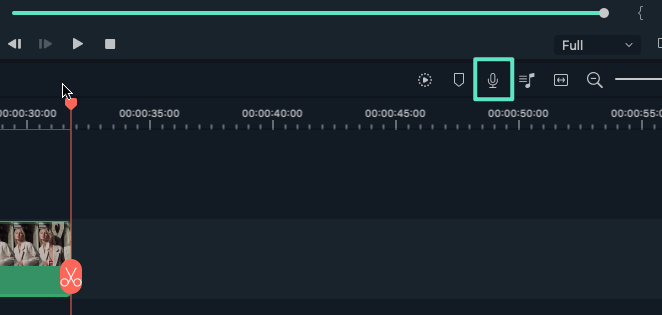
- Select your recording device and uncheck Mute Project;
- Click the red Record button and start your audio recording;
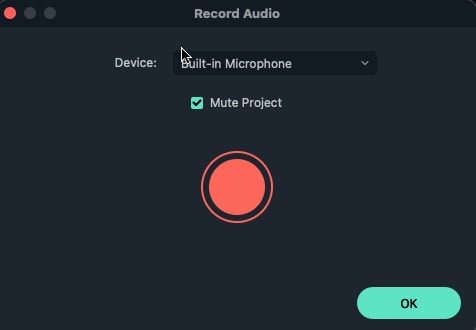
- When you're done, click the Record button again to stop recording, then click OK;
Depending on your needs, you can always add background music or sound effects to your recorded audio, or you can overwrite the whole or just a part of the recording. You can save your recording in all the common audio file formats you'd like.
Filmora also offers a lot of audio editing features that let you enhance your audio quality, let's see some of its powerful AI features in this video.
Tips for Recording High-Quality Audio on iPhone/iPad
Whether you're trying to record an iPhone screen with sound, making a voice memo on your iPad, or capturing audio on your Mac, there are a few tips that can ensure your audio quality is pristine.
Properly Set up Audio Settings
You'll always want to adjust your audio settings before recording. On an iPhone or iPad, for instance, you can create lossless audio recordings to avoid file compression that could impact audio quality. You can also set up stereo recording that separates audio into the left and right channels.
Use a Quality Format
You'll want to use formats that retain as much data as possible to ensure the best sound clarity. The best formats include WAV, FLAC, and ALAC.
Use a Good Microphone
The quality of your microphone has a massive impact on the ultimate audio recording quality. iPhones and iPads generally have fine-quality built-in microphones, but if possible, you'll want to use an external device that doesn't pick up a lot of background noise.
Record in a Quiet Environment
Although tools like Wondershare Filmora can easily reduce background noise, it's always best to record audio in a quiet environment.
Use a Pop Filter
A simple thing such as a pop filter is an excellent noise protection. It minimizes the sound of heavy airblasts during speech and can even keep some background noise under check.
Test Your Recording Environment
Finally, you should always do a test run in your recording environment. Create a quick recording to make sure everything works as it should.
Conclusion
Recording audio on iPhone and iPad is not difficult. You can choose to use iPhone voice memos, try a powerful audio editor like Filmora, or use an online audio recorder. Select your way and start recording audio today!
FAQs
-
Where is the sound recorder on an iPhone?
You can record audio with your iPhone using the Voice Memos app. You'll be able to find it by swiping left on your home screen and going to Utilities > Voice Memos. -
How do I record a live conversation on my iPhone?
You can record a live conversation on your iPhone by going to Ulities > Voice Memos and tapping the Record button to start recording. -
How can I record internal audio on my iPhone?
You can record internal audio from an app or similar by using the built-in Screen recorder app. Swipe down on your screen, tap the Record button, and open the app with the internal audio you want to capture. -
How long can an iPhone record audio?
There's no time limit on how long your iPhone audio recording can be. It all depends on your available storage. Your audio recording will stop when there's no more space left in your storage.


