
- Advanced lens correction with minimal distortion.
- Vast video/audio effects and creative assets.
- Powerful AI for effortless content creation.
- Intuitive, professional yet beginner-friendly.
- Works on Mac, Windows.


As a photographer or videographer, you’re likely already aware of the term barrel distortion photography, whether you came across it while learning or experienced it during shooting.
This distorting effect can be especially problematic, and understanding how to fix it can drastically improve your photography or videography skills.
In today’s guide, you’ll learn what barrel distortion is and what it’s caused by. We’ll also explore the different types of lenses that cause barrel and pincushion distortion and teach you how to perform barrel distortion correction with Filmora’s powerful post-production techniques, so let’s dig in.
Before discussing barrel distortion, we must first understand that it’s only one-half of a broader term that’s most often mentioned together: barrel and pincushion distortion. Understanding these two opposite phenomena together and as separate occurrences is pivotal to learning how to correct them.
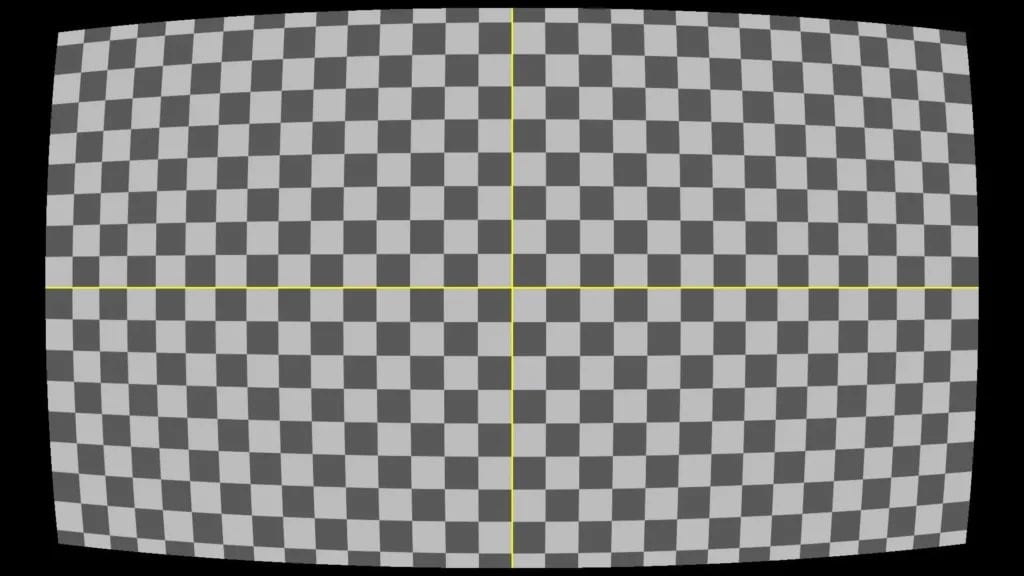
On the one hand, you have barrel distortion, which is also often called negative distortion. This optical defect causes a digital image’s straight lines to curve outward from the center, making the picture appear more rounded and creating a barrel-like look, hence the name.
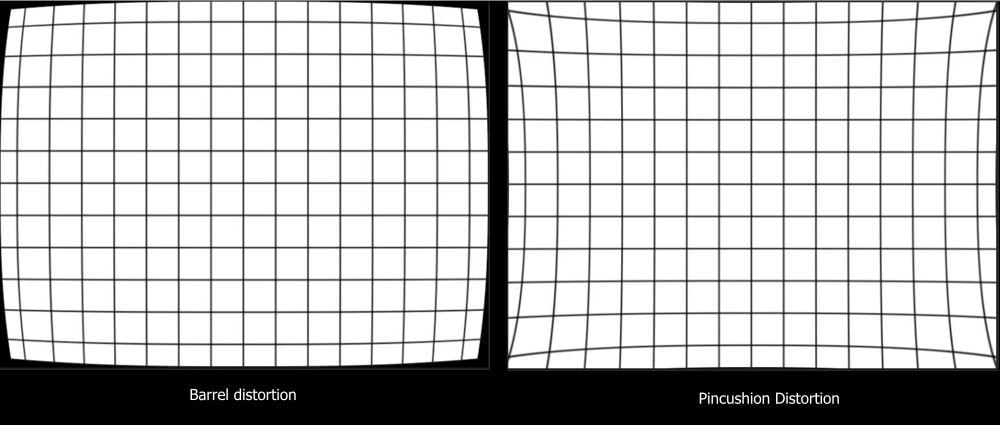
On the other hand, pincushion distortion, often called positive distortion, is the direct opposite of barrel distortion, as it curves an image’s edges inward, making them resemble a pin cushion, hence its name. Of course, there are additional types of distortions, including mustache distortion, comatic aberration, chromatic aberration, and perspective distortion, but we won’t detail them in this guide.
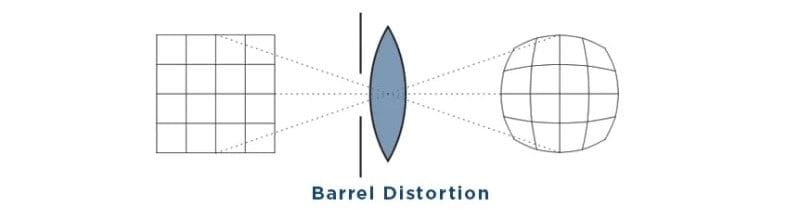
While it’s not the only cause of this phenomenon, barrel distortion primarily occurs due to the design of camera lenses, hence its secondary name: barrel lens distortion.
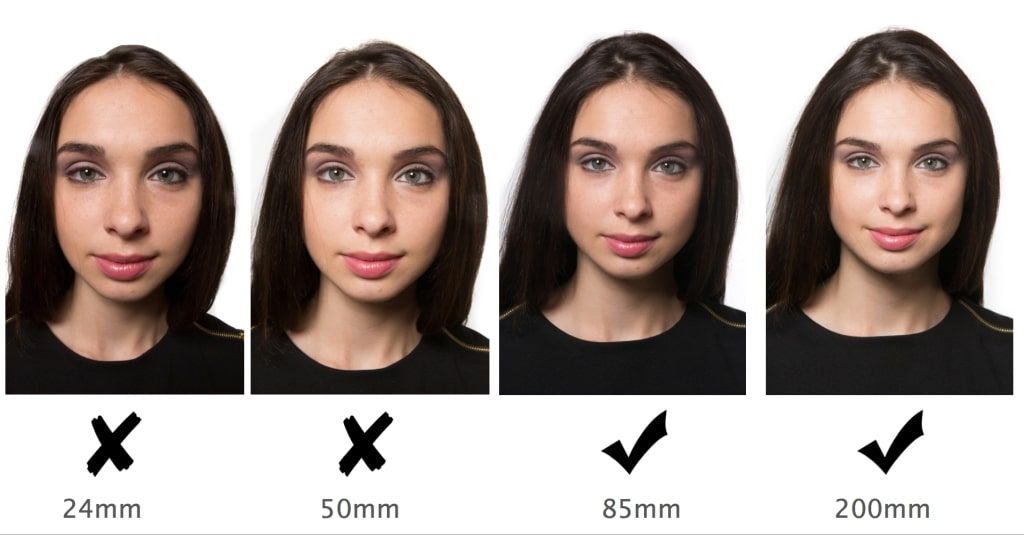
Wide-angle lenses are among the most common culprits behind this issue, as their broad field of view, especially that of lenses with a focal length of 35mm or less, often creates an uneven magnification between an image’s center and edges.
Other causes of barrel distortion in photography and videography include the distance between the camera and the subject, an imperfect alignment, and the device’s aperture setting. Still, these are much less common causes of the issue.
To mitigate such distortions and enhance your video quality, understanding how to use your phone camera settings effectively is crucial.Hopefully, the following video will be helpful.
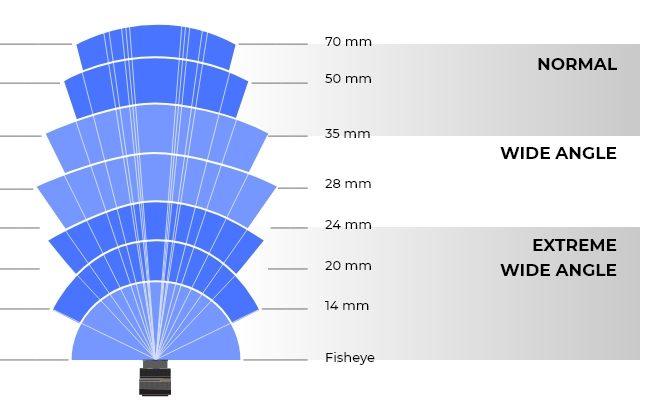
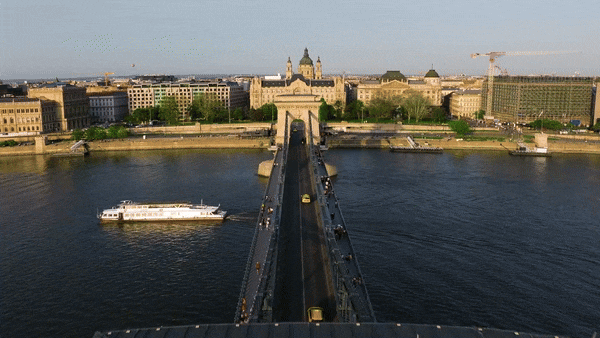
Barrel distortion occurs most often when you use wide-angle lenses, which include optics with a focal length of 35mm or less.
The optical defect known as barrel distortion will likely be stronger the wider your lens, primarily if you use extremely wide-angle optics with a focal length between 14 and 24mm. Moreover, the effect will be especially pronounced with a fisheye lens.
Many photographers and videographers actively choose a fisheye lens for certain shots, as it creates a unique effect. However, when accuracy is essential, barrel distortion, regardless of lens, can ruin the viewing experience and reduce the overall quality of your shots. In such cases, its adverse effects most commonly include the following:


In essence, barrel distortion can have noticeable adverse effects in multiple photo and video genres. It also makes consistency challenging, prompting many amateurs and professionals to correct these shots in post-production.

While barrel distortion has many adverse effects in multiple genres of photography and videography, the good news is that these optical defects can be reduced or removed with various methods.
Fixing such optical defects in post-production with barrel distortion correction software is one of these methods and, in most cases, the easiest way to remove unwanted optical defects from shots.
Software such as Wondershare Filmora offers various tools for barrel distortion correction. With it, photographers and videographers can fine-tune a shot’s settings to straighten the curved edges with a few taps. Such tools often have automated lens correction profiles that automatically apply fixes tailored explicitly to the lens you’re using.
Fortunately, editing software like Filmora makes barrel distortion correction remarkably simple and almost entirely automated, requiring only a few taps on the user’s end. With that said, let’s see how you can go about it:
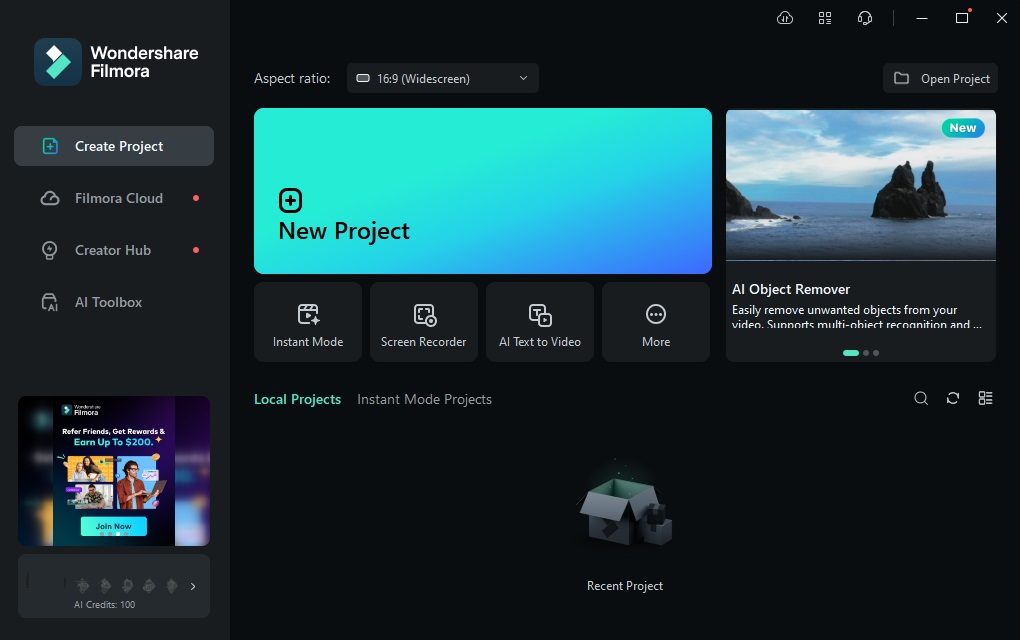
Step 1: Launch Wondershare Filmora and tap the New Project button on the app’s startup screen.
Step 2: Tap the Import button to add your image or video to Filmora.

Step 3: Drag and drop the media file into the Timeline below the Import section and click on it to select it.
Step 4: Navigate to the Editing panel on the right, click Video > AI Tools, and enable Lens Correction.
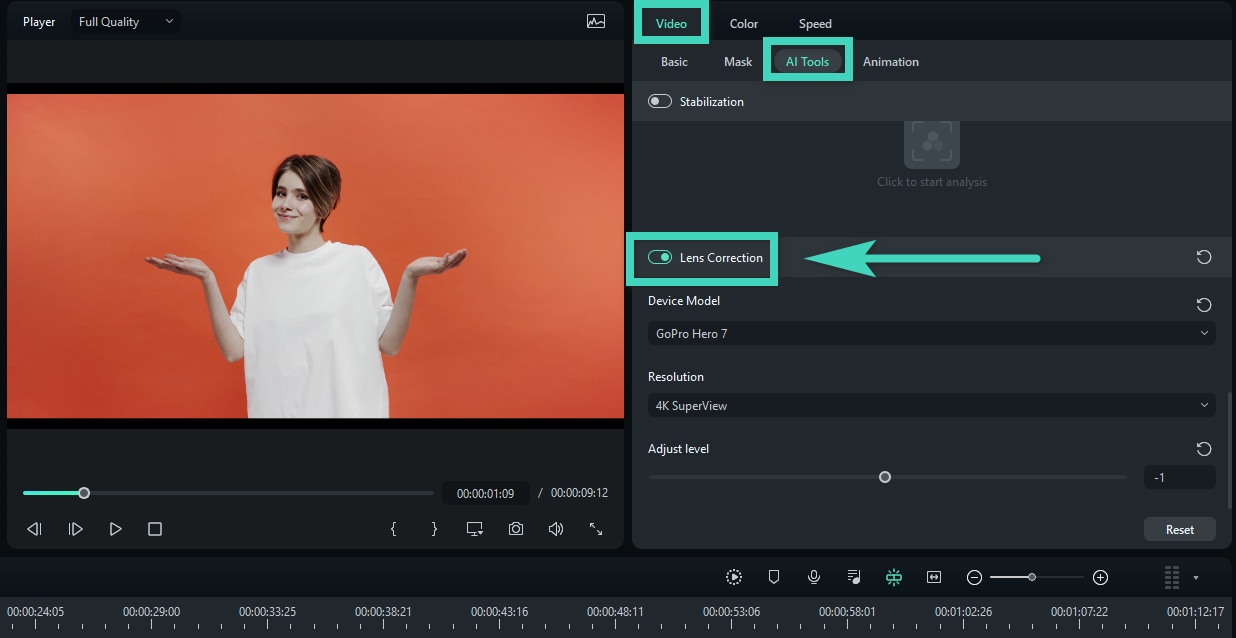
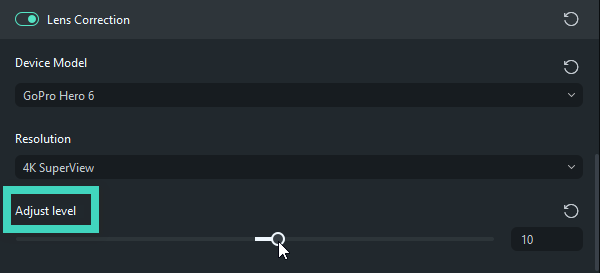
Step 5: Choose the camera model and your shooting resolution.
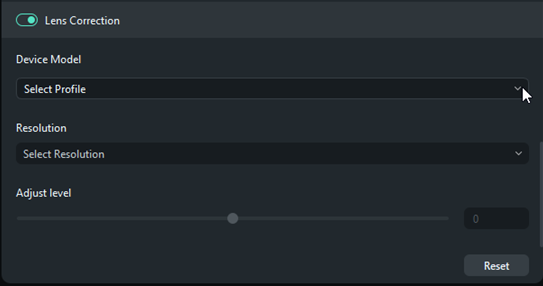
Step 6: Adjust the strength of the lens correction effect by moving the slider.
An extensive library of device models and unique shooting resolutions for each device make barrel distortion correction with Filmora seamless. Moreover, intelligent AI engines automate lens correction, simplifying the already short and straightforward process and making Filmora an obvious choice for all lens correction needs.
Aside from using Filmora’s built-in lens correction, you can also fix barrel distortion with the Mocha-powered tool. That's right, Filmora now supports Mocha lens distortion correction, which uses line detection and manual tweaks to straighten out those bulging edges.
With this feature, you can zero in on just the warped parts of your video instead of editing the whole frame. This method gives you more control and keeps the rest of your scene looking clean and untouched. It’s perfect for fixing barrel or fisheye distortion in specific spots.
 secure download

To learn how to do that, just check out this simple step-by-step guide below:
Step 1. Drag your video to the timeline
First, double-check that you’re using the latest version of Filmora since the Mocha Filmora feature is only available in the newer updates. Once that’s done, go to the “Media” tab and hit “Import” to bring in the video you want to edit. Then just drag it down to the timeline so you can start working on it.

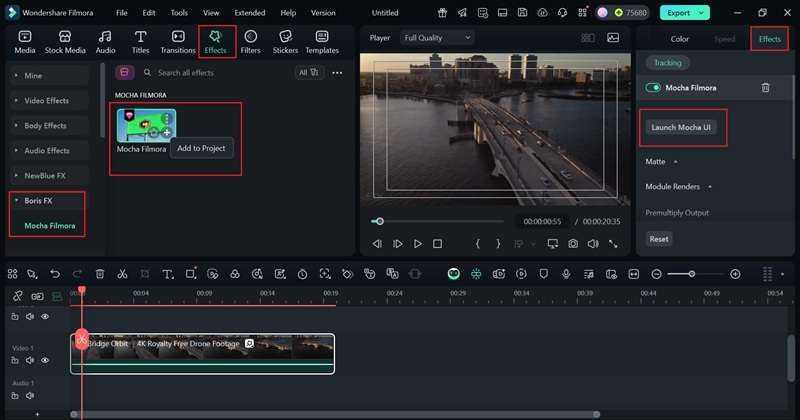
Step 2. Activate the Mocha Filmora feature
Next, head over to the “Effects” tab and look for the “Boris FX” folder on the left side. Find the Mocha Filmora effect and click the plus icon to apply it to your clip. After that, open the “Effects” panel again and click “Launch Mocha UI” to jump into the Mocha workspace.
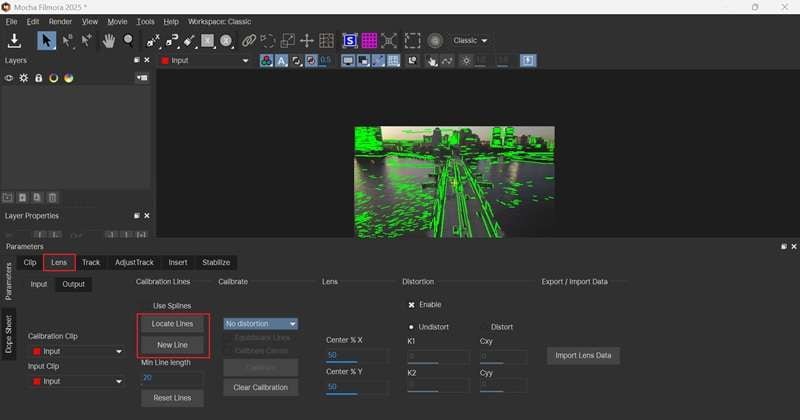
Step 3. Find and adjust the calibration lines
After you’re inside the Mocha workspace, scroll down and turn on the "Lens" section. Then click “Locate Lines” so Mocha can automatically find any curved or warped lines in your video. If you need to add your own, just hit “New Lines” and draw straight lines where things look off to help fix the distortion.
Step 4. Choose lens distortion models
If you click on "No distortion", you’ll see a list of different lens distortion models you can choose from. Each one fixes the image in its own way, depending on how the lens originally bent the picture.
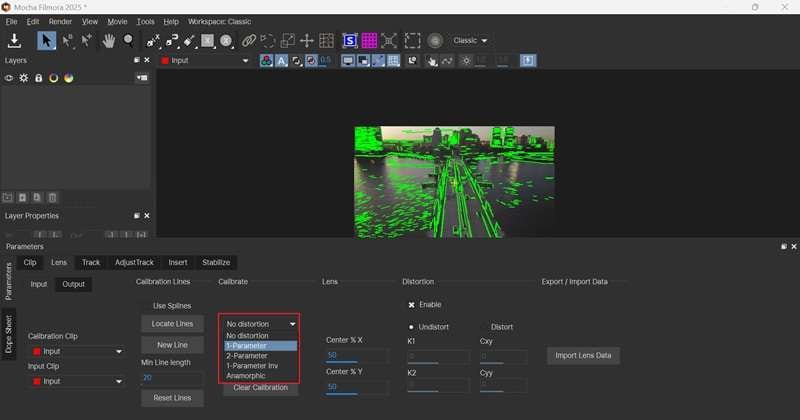
To make it easier to understand what each one does, here’s a quick summary table:
Model | What It Does | Best For |
|---|---|---|
No Distortion | Leaves footage unchanged | Already corrected footage |
1-Parameter | Basic radial fix | Mild barrel or pincushion distortion |
2-Parameter | More precise correction | Strong or complex distortion |
1-Parameter Inv | Simulates distortion | Matching lens effects or looks |
Anamorphic | Fixes horizontal squeeze | Footage from anamorphic lenses |
Based on the table, since you’re just trying to fix simple barrel distortion, go ahead and switch it to “1-Parameter".
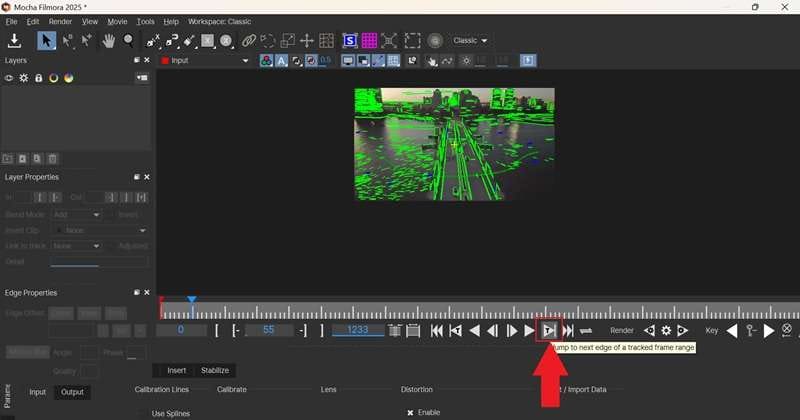
Step 5. Fine-tune the line and play it forward
Next up, click the "Calibrate" button to apply the line adjustments.

Then hit the "Track Forward" icon to let the video play through with the distortion fix in place, so you can see how it looks in motion.
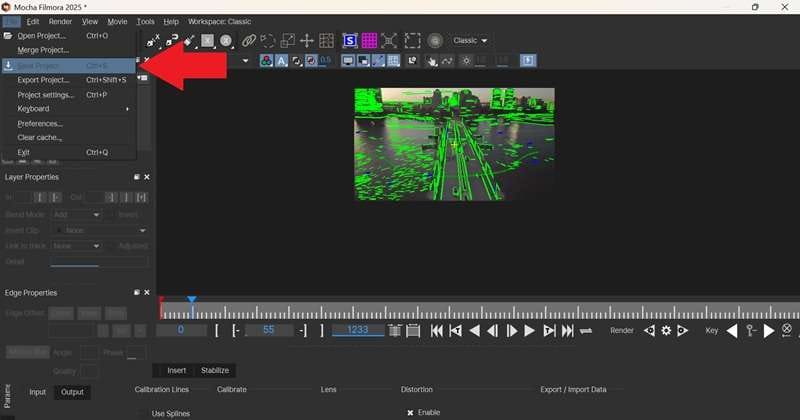
Step 6. Save your progress
Before jumping back to Filmora, make sure to save what you’ve done. Click on “File” and select “Save Project” so all your edits stay in place.
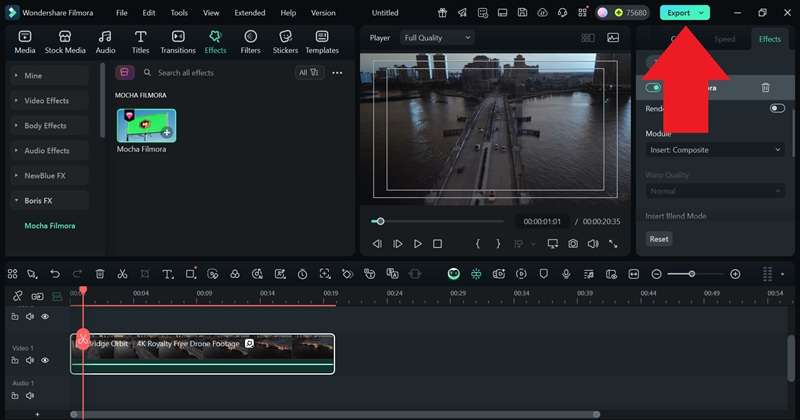
Step 7. Save your edited video
Once you're back in Filmora, you’ll see the changes applied to your video. You can still make more edits if needed. When everything looks good, go ahead and export the video to save it to your device.
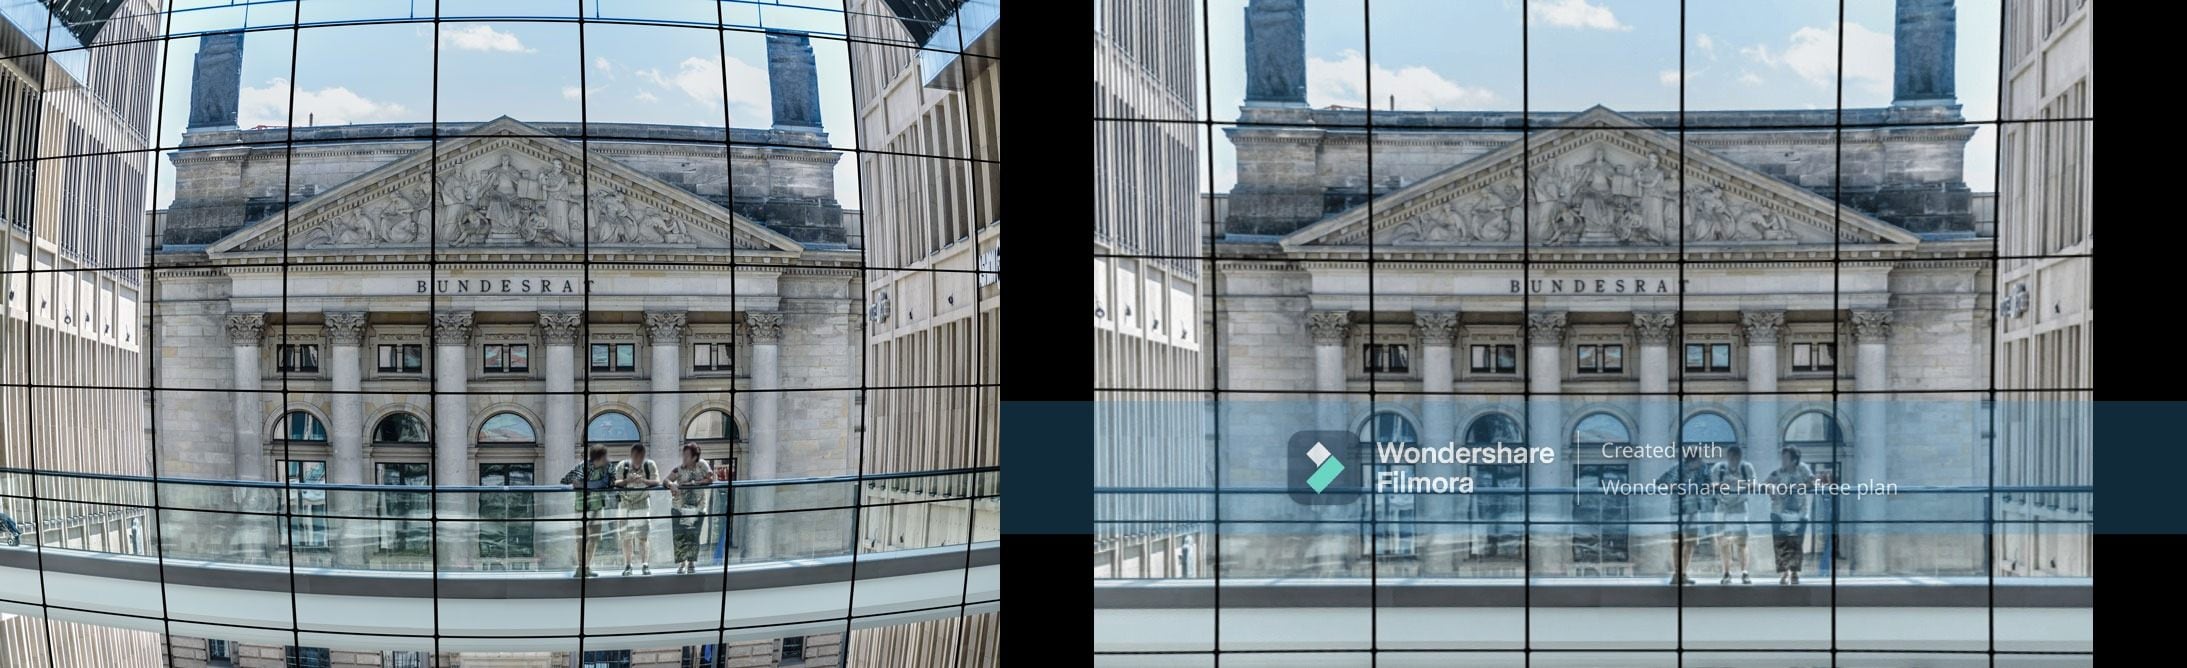
And just like that, the distortion is fixed. As you can see, the process is pretty simple, and you don’t have to adjust the entire video to correct just one part. Check out the final result below.
Here’s what the final barrel distortion correction looks like in Wondershare Filmora:
Besides barrel distortion correction software, there are a few other ways to eliminate barrel distortion from your images or videos. These methods include the following:
As you can see from the various distortion removal methods mentioned above, some have side effects, while others require additional work. For example, cropping causes massive detail loss, while distortion grids only tell you how much the shot is curved and still require post-production removal. Finally, screw-on lens correction filters can be expensive.
Barrel distortion makes straight lines in your video or photo look curved outward. It often happens with wide-angle lenses. You can fix it by cropping the edges, using a grid in the background, or adding a special lens filter.
That said, the easiest way to fix barrel distortion is by using software like Wondershare Filmora. It has tons of lens correction presets and super simple sliders that let you fix the issue in just a few clicks. Plus, with the latest Mocha-powered tools, you can fine-tune lens distortion even better by targeting only the parts that need fixing.
It's an all-in-one solution that makes the whole process quick and stress-free, even if you’re not a pro editor.

