Have you shot a beautiful image of the sky and want to place it in other photos? Changing images of skies is a very popular image editing trick to make them more appealing. If you are a Photoshop user and don't know how to change the sky in Photoshop, keep reading, and we will guide you step by step.
In this article
How To Perform Sky Replacement in Photoshop: EZ Guide?
Before you begin following our tutorial, which will teach you how to replace the sky in Photoshop, make sure that the software is properly installed and updated on your desktop or laptop. Then, load up the program and import an image where you can clearly see the sky. After all that is taken care of, you can begin following the steps below.
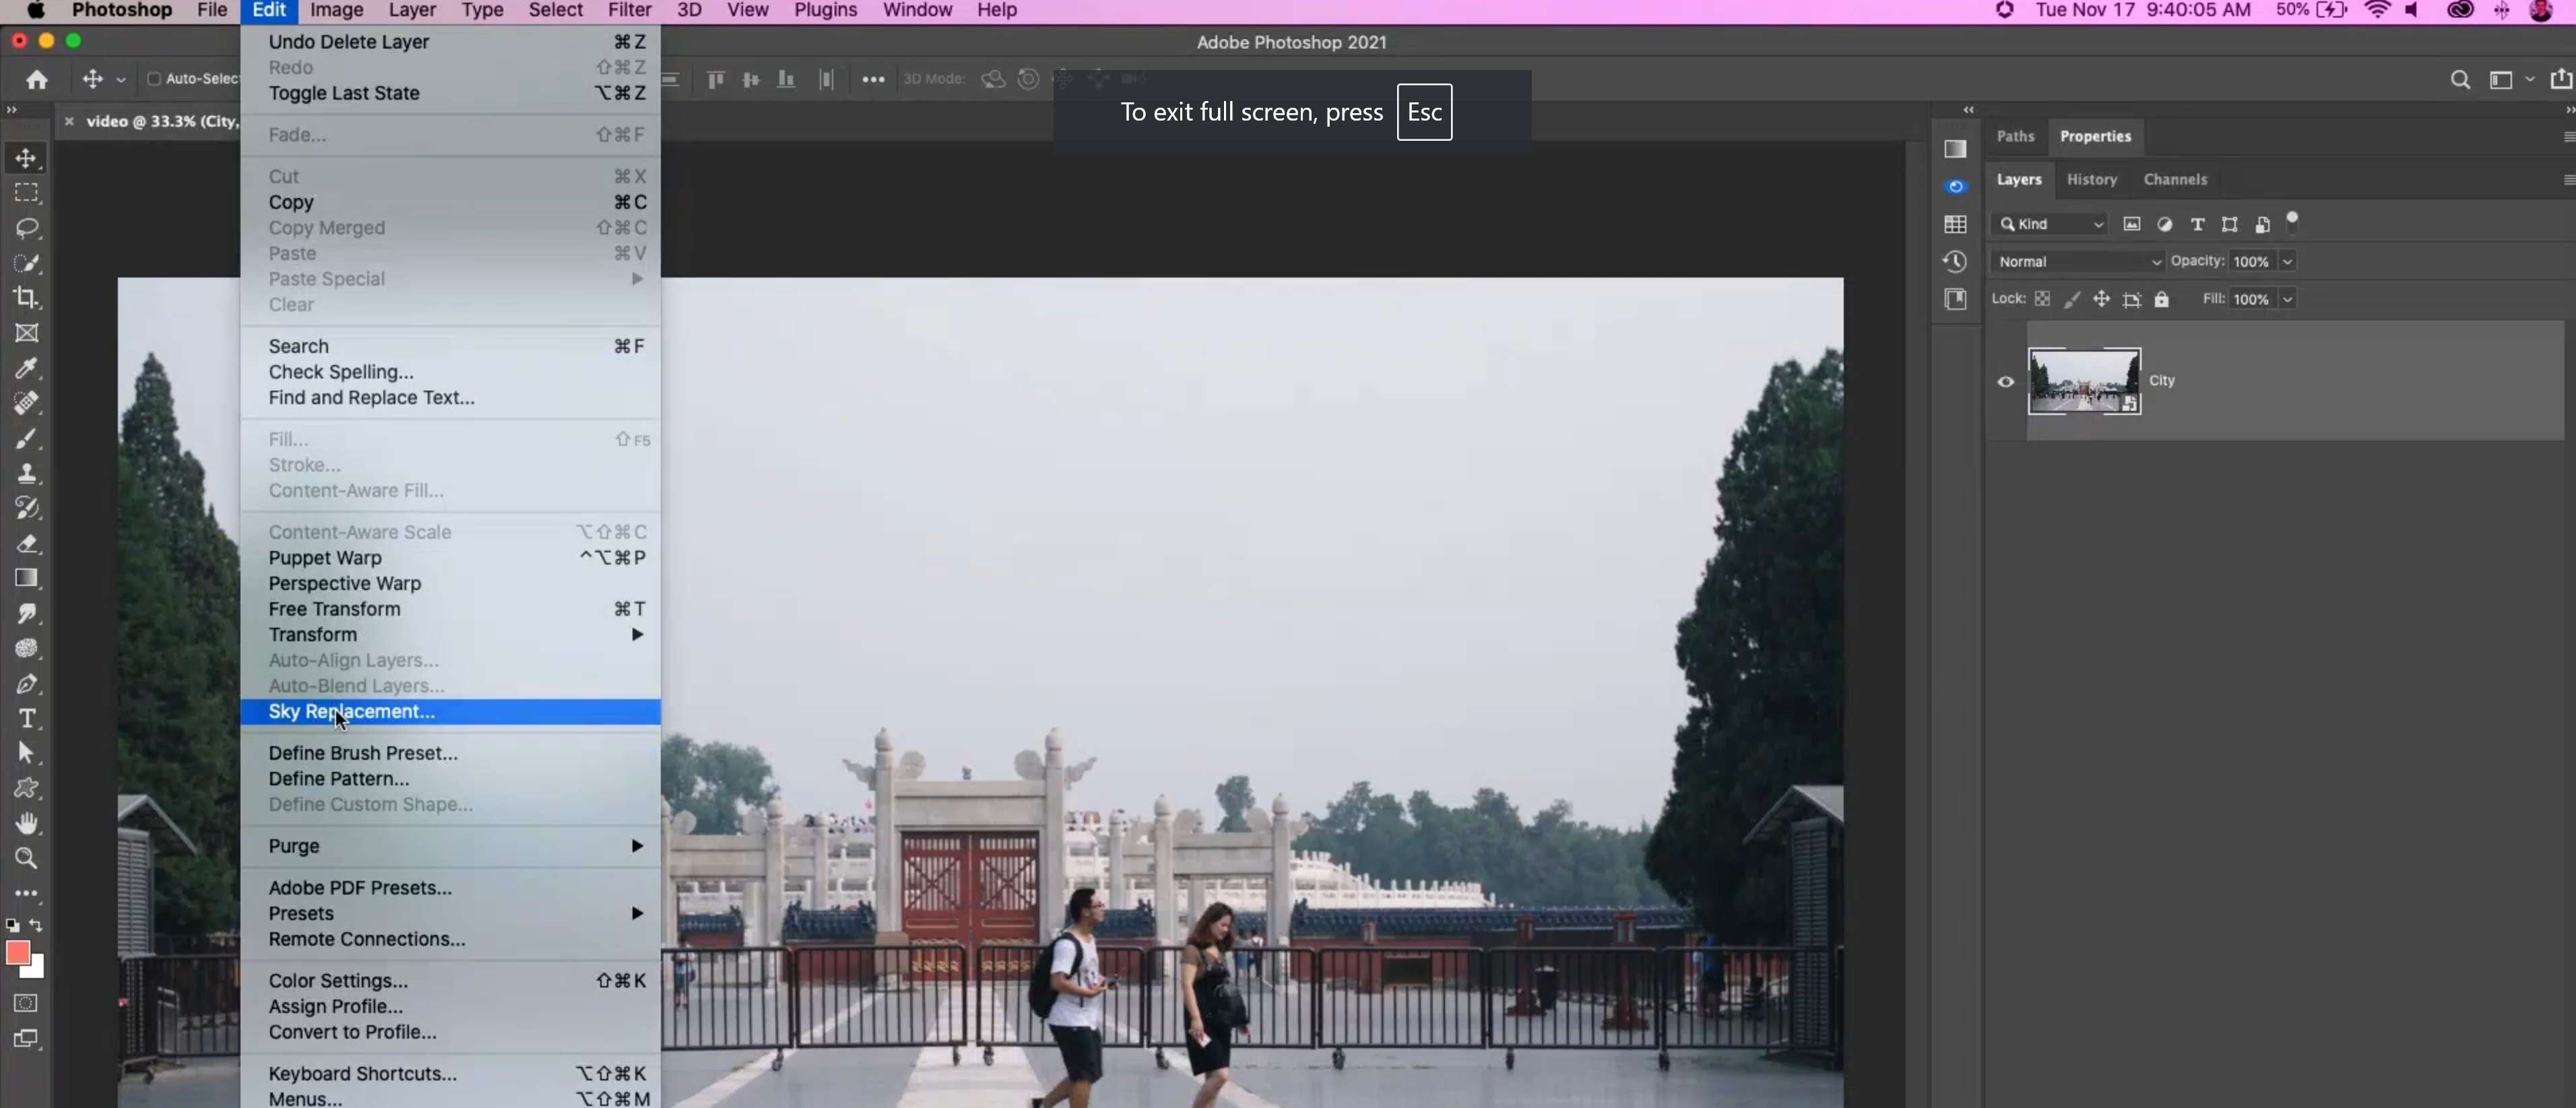
- Photoshop offers a Sky Replacement feature. Access it by going to Edit > Sky Replacement… and you're already halfway there.
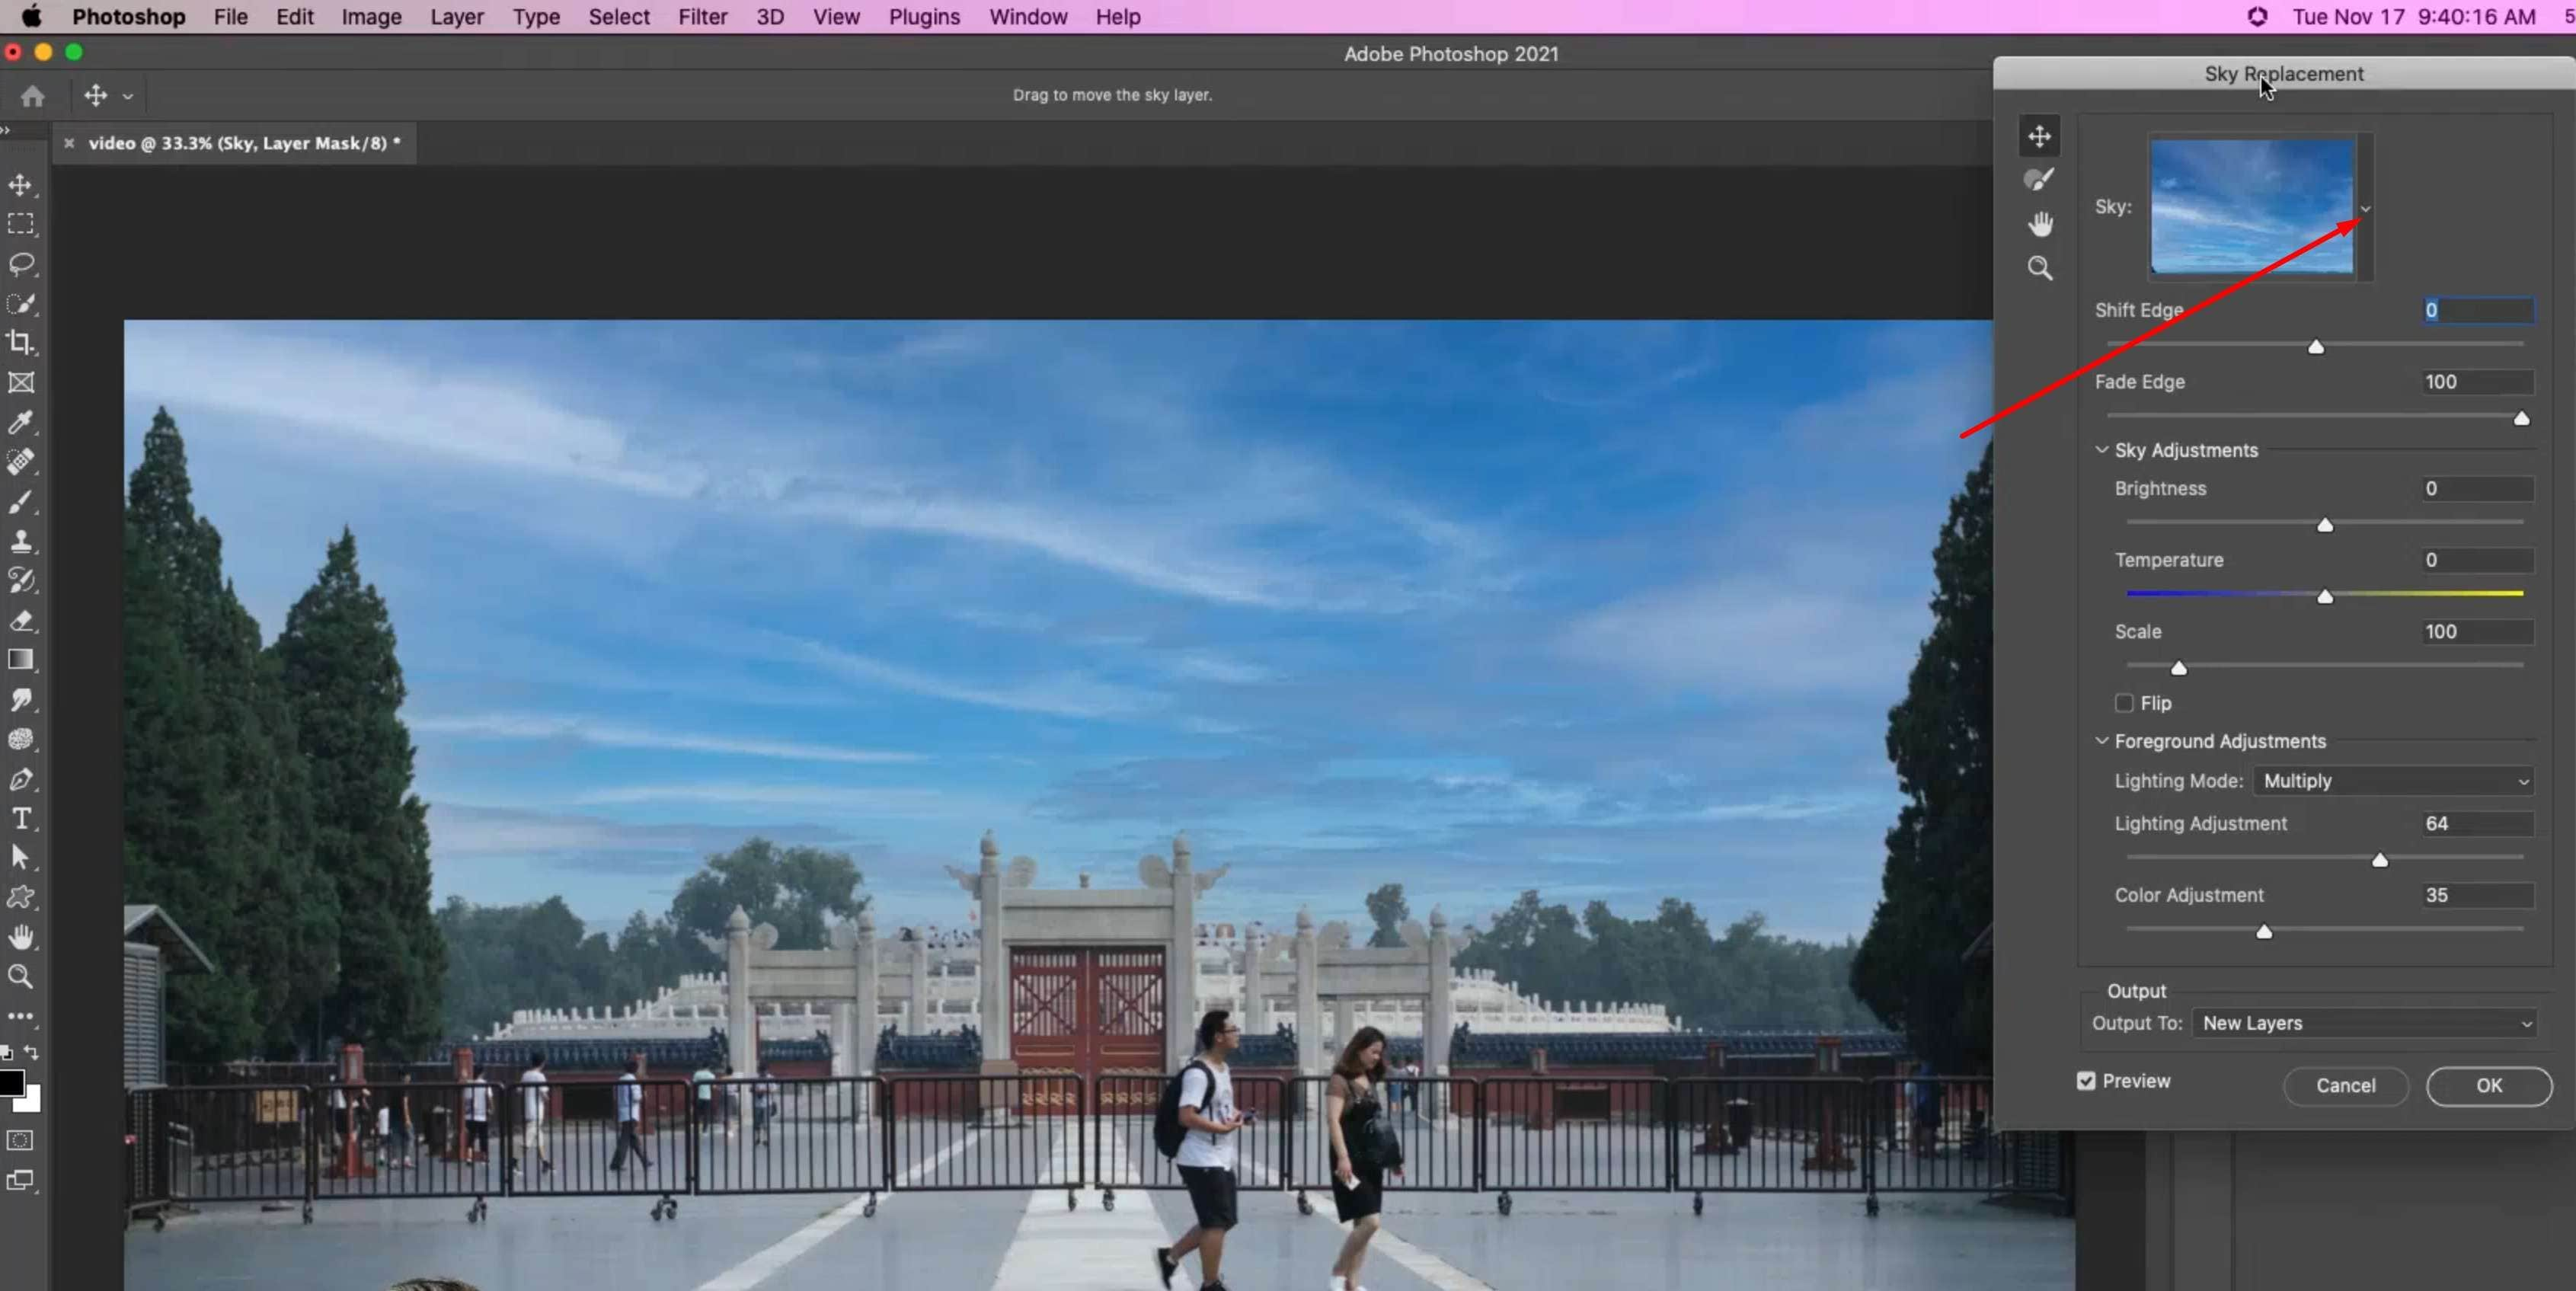
- Click on the small arrow pointing down to open various sky replacement options.
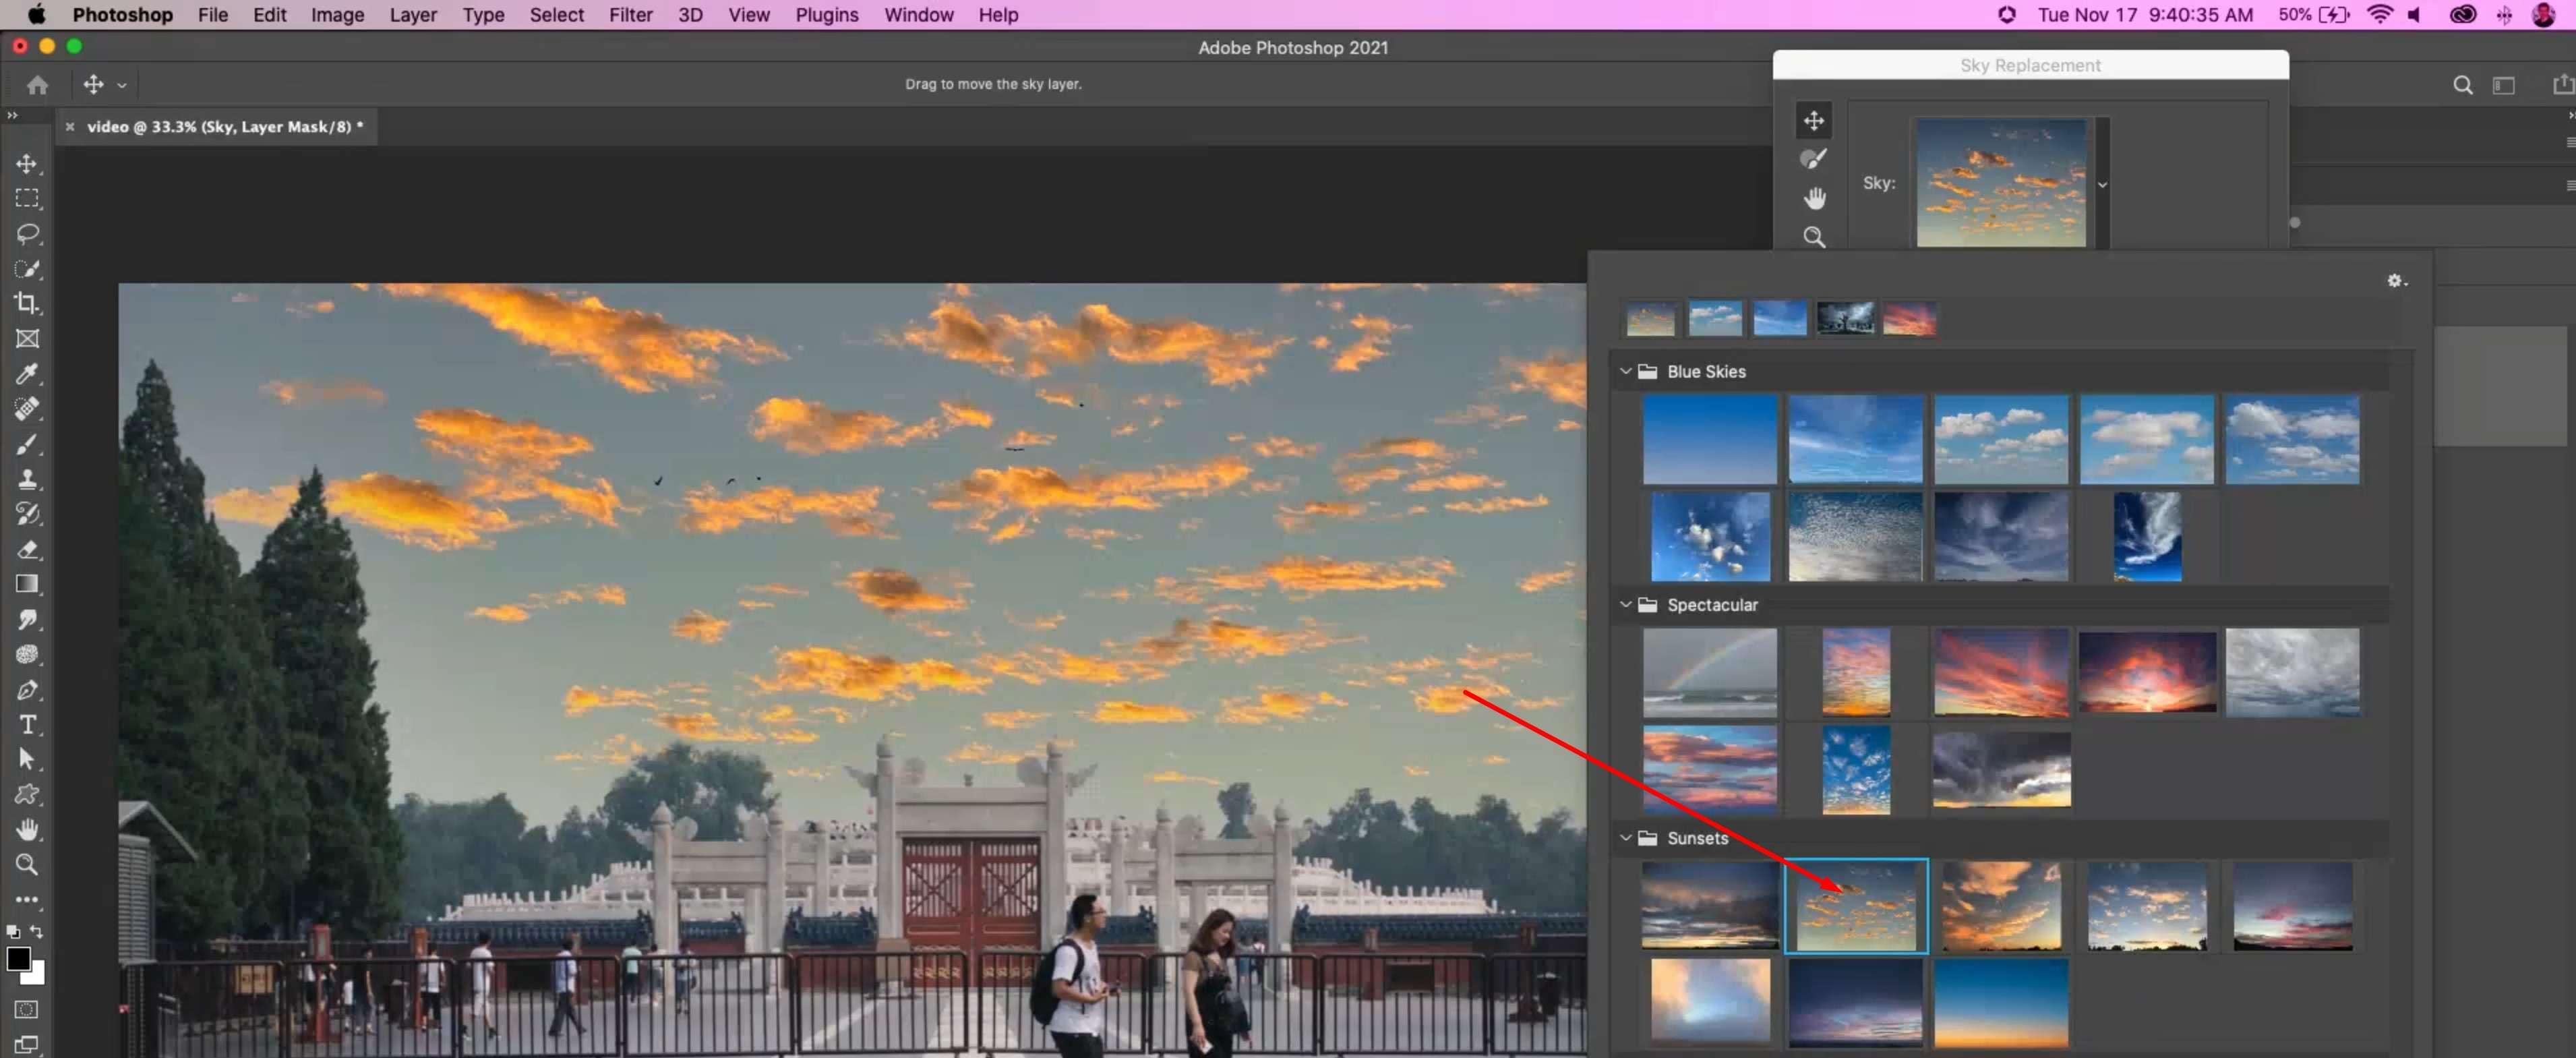
- Pick one of the options, and Photoshop will automatically add it to the photo.
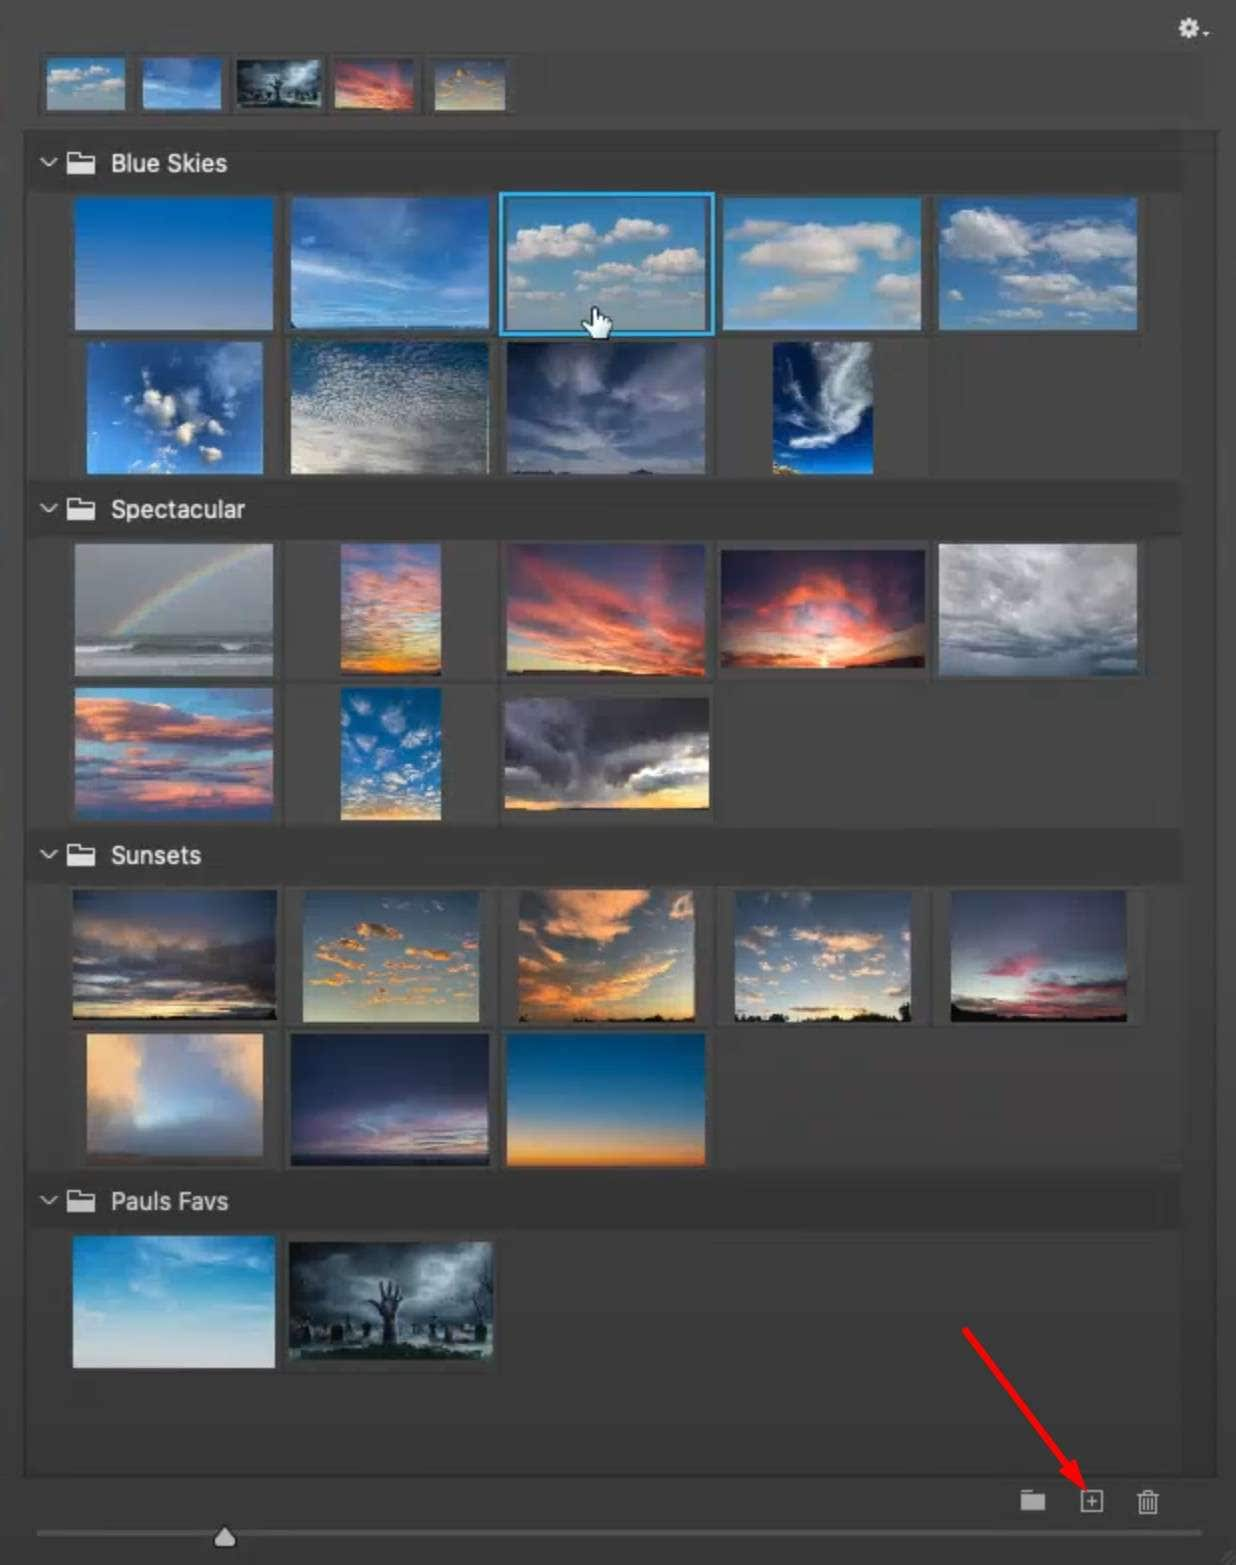
- You can also add your own images or something generated by AI by clicking on the + button in the lower-right corner of the sky selection window.
At this point, you are familiar with the procedure of adding a different sky to an image in Photoshop. However, other alternative methods exist to change the sky in photos or videos. Let's look at one of the alternatives: Wondershare Filmora.
- 100+ advanced video and image editing features.
- Vast video/image effects and creative assets.
- Powerful AI for effortless content creation.
- Intuitive, professional yet beginner-friendly.
- Works on Mac, Windows, iOS, and Android.

A Best Alternative to Change Sky in Photoshop
You might already be familiar with Wondershare's Filmora, although you may have heard of it for video editing tasks. Actually, you can use all the video editing features for images as well.
Unlike changing the sky in Photoshop, which requires manual edits for a more precise and high-quality result. In Filmora, you can use the smart cutout or masking feature to cut out the objects first automatically with AI, then add a new sky image to it.
In addition to that, Filmora allows you to make image masks for different shapes, which can meet your pro editing requirements. What's more, as an AI-powered tool, Filmora offers various AI features that can change image styles and facial expressions, animate static photos, or turn images into videos instantly with AI.
Let's see how to change the sky on desktops with Filmora.
How to Change the Sky on a PC with Filmora?
Filmora is available on Windows and Mac devices. You can download and install it on your device and then follow our detailed sky replacement guide.
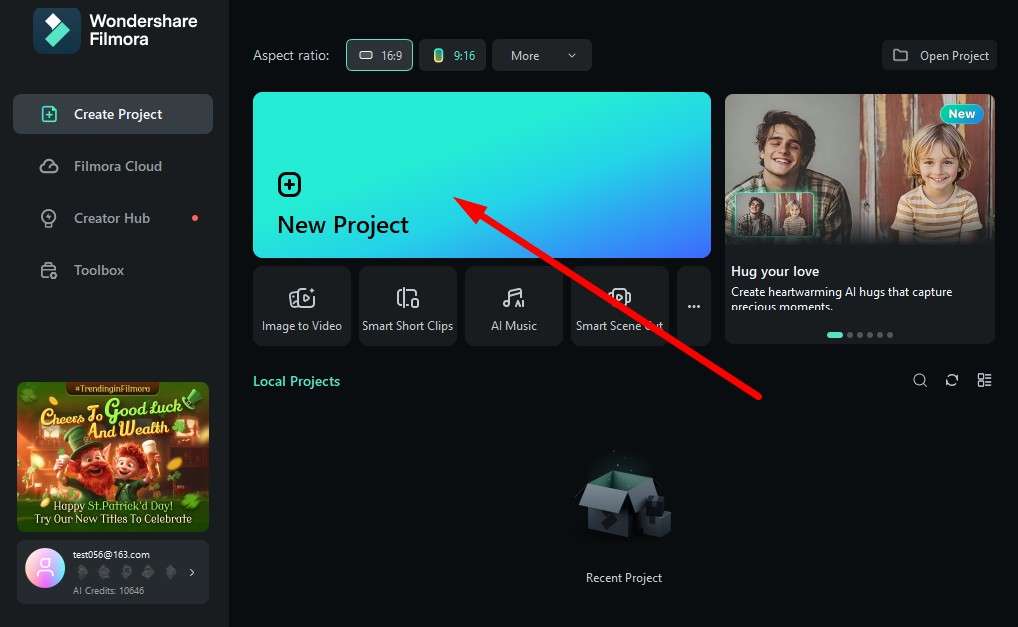
- Open Filmora on your desktop or laptop and click on New Project.
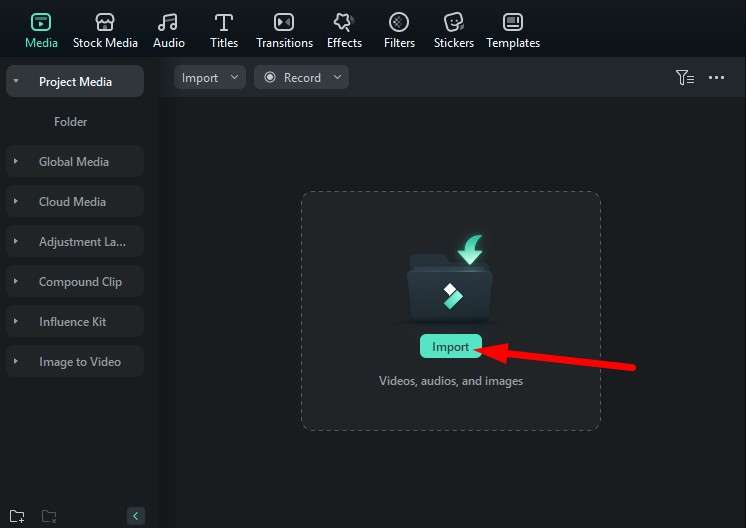
- Click to Import an image file. Make sure that you pick an image where you can see the sky.
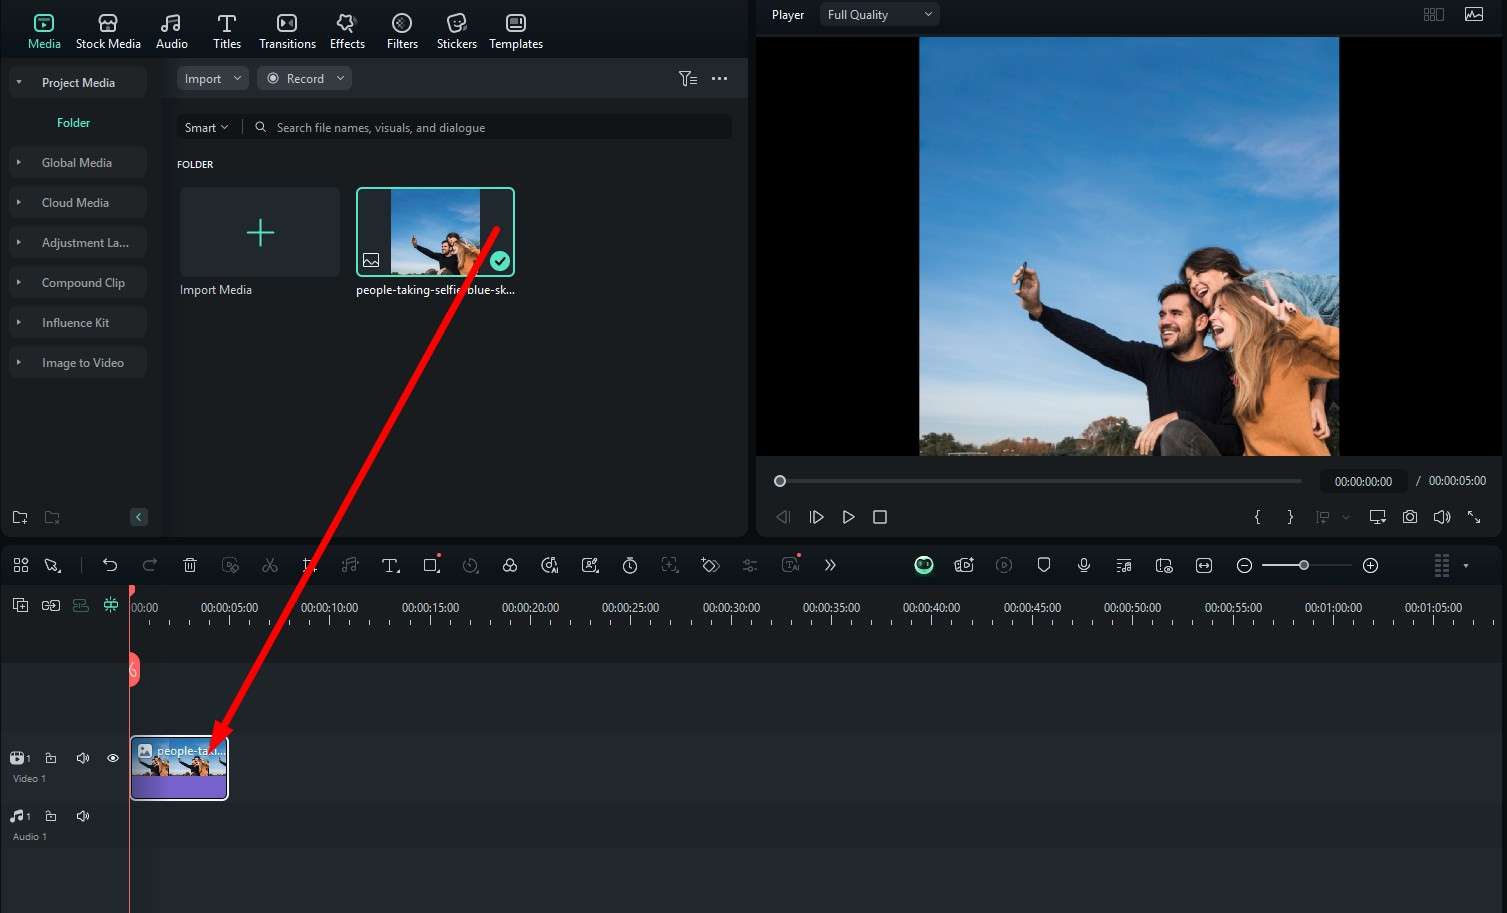
- Drag the image to the editing timeline, like in the screenshot below.
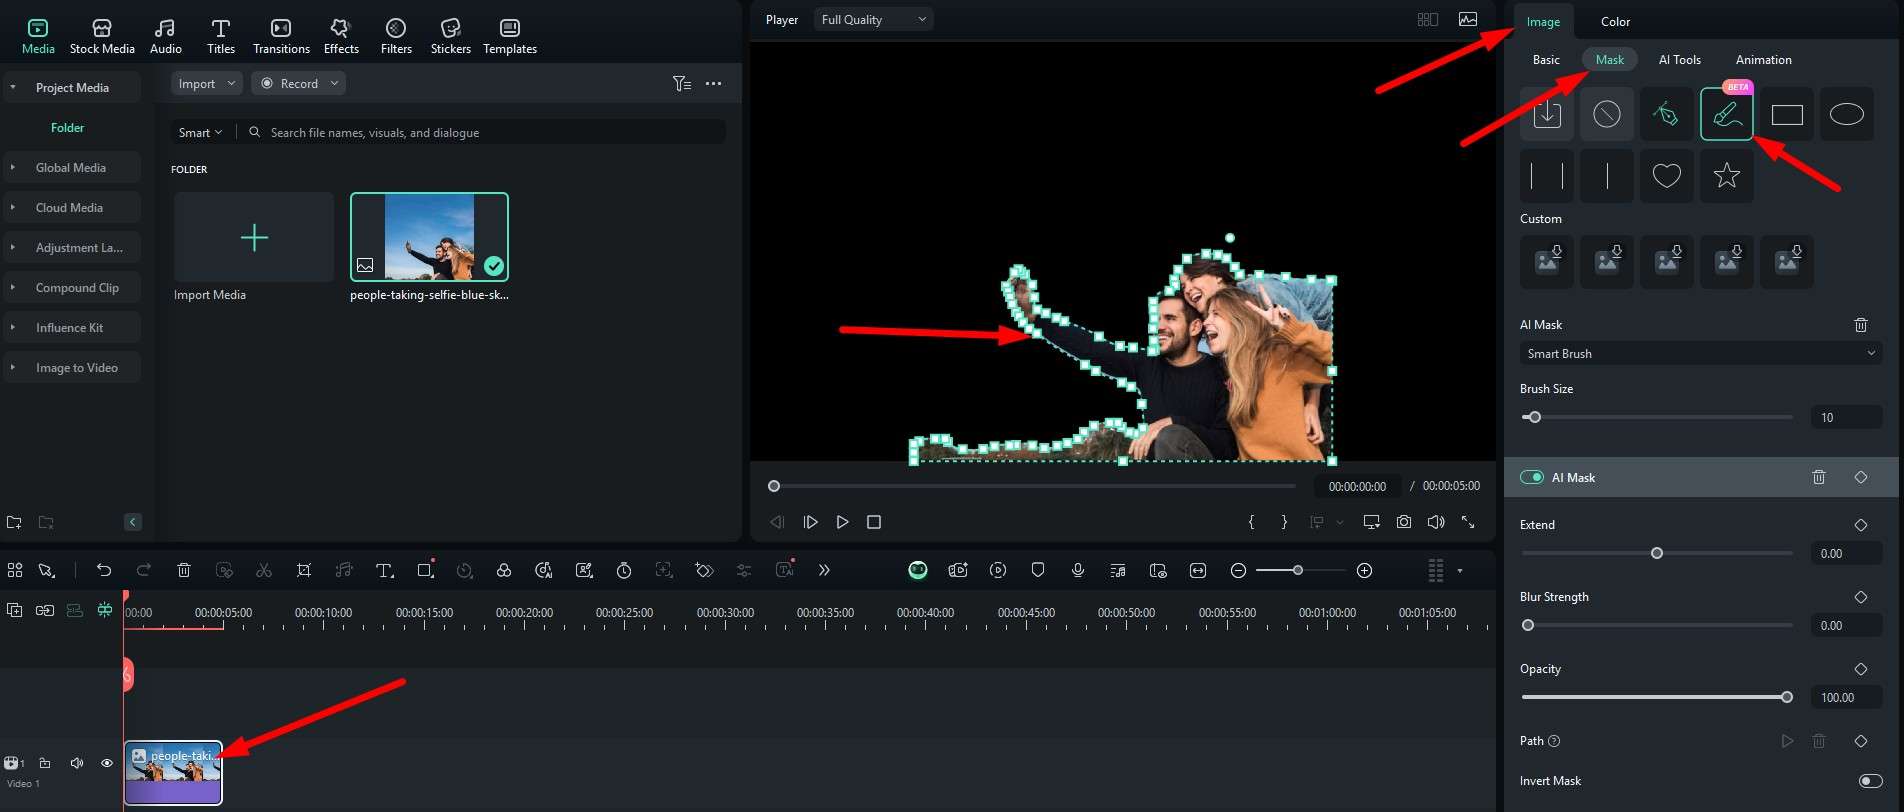
- Click on the image in the timeline to select it. Then, in the top-right, find Image > Mask. Here, you have two options: you can draw a custom mask or try the AI Mask feature. Then, in the player, draw casually around the area you want to isolate. The masking tool will do the rest for you.
- Now, click on Import Media to add another image. We will use an imaginative AI-generated image.
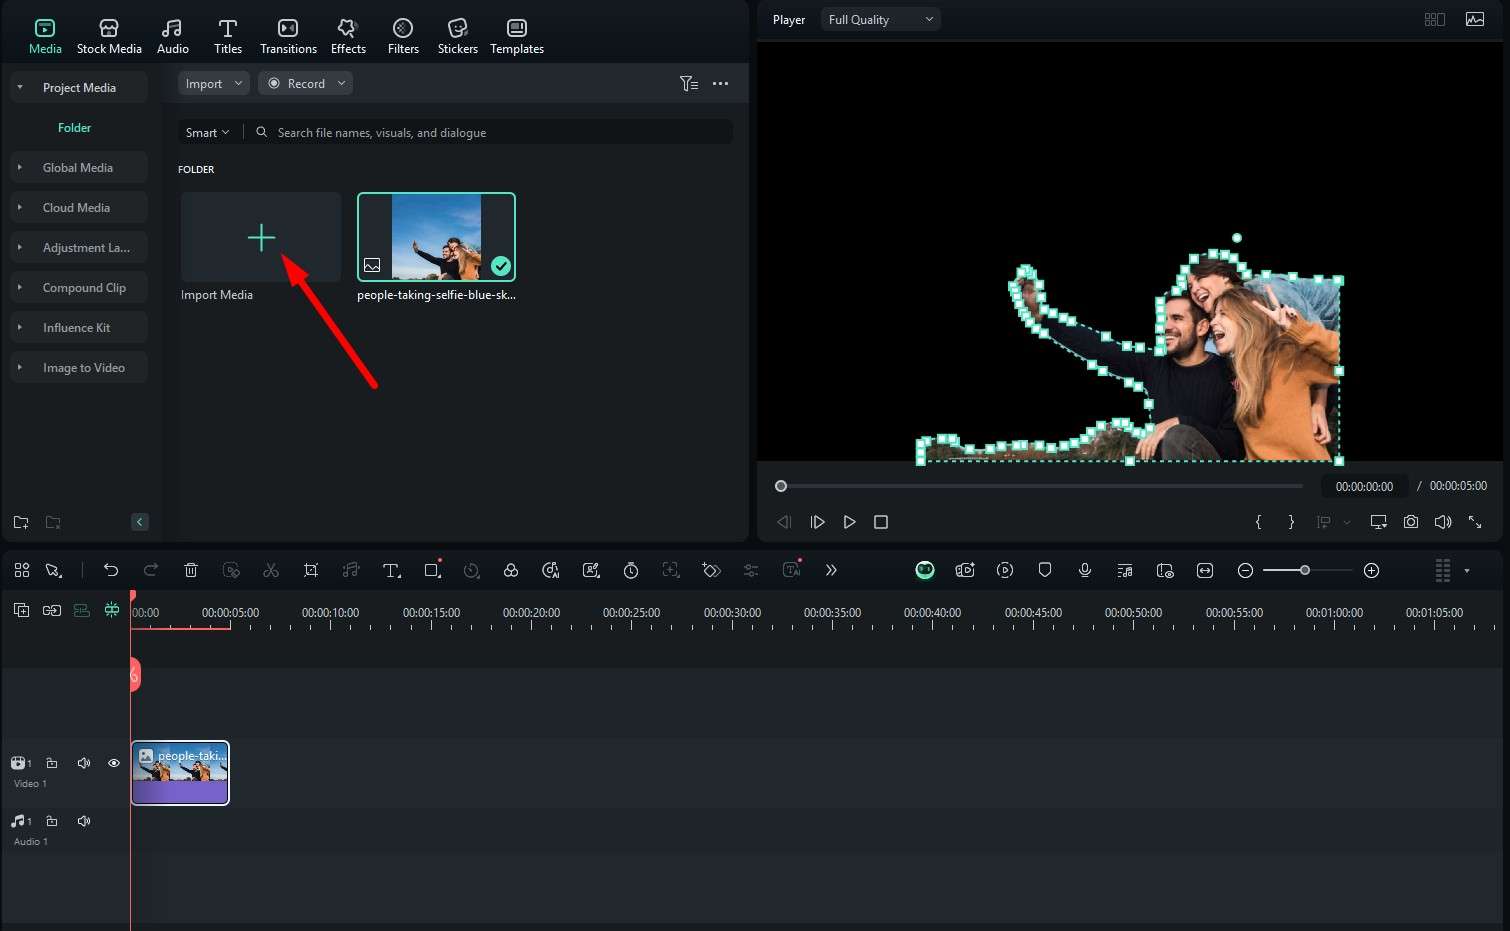
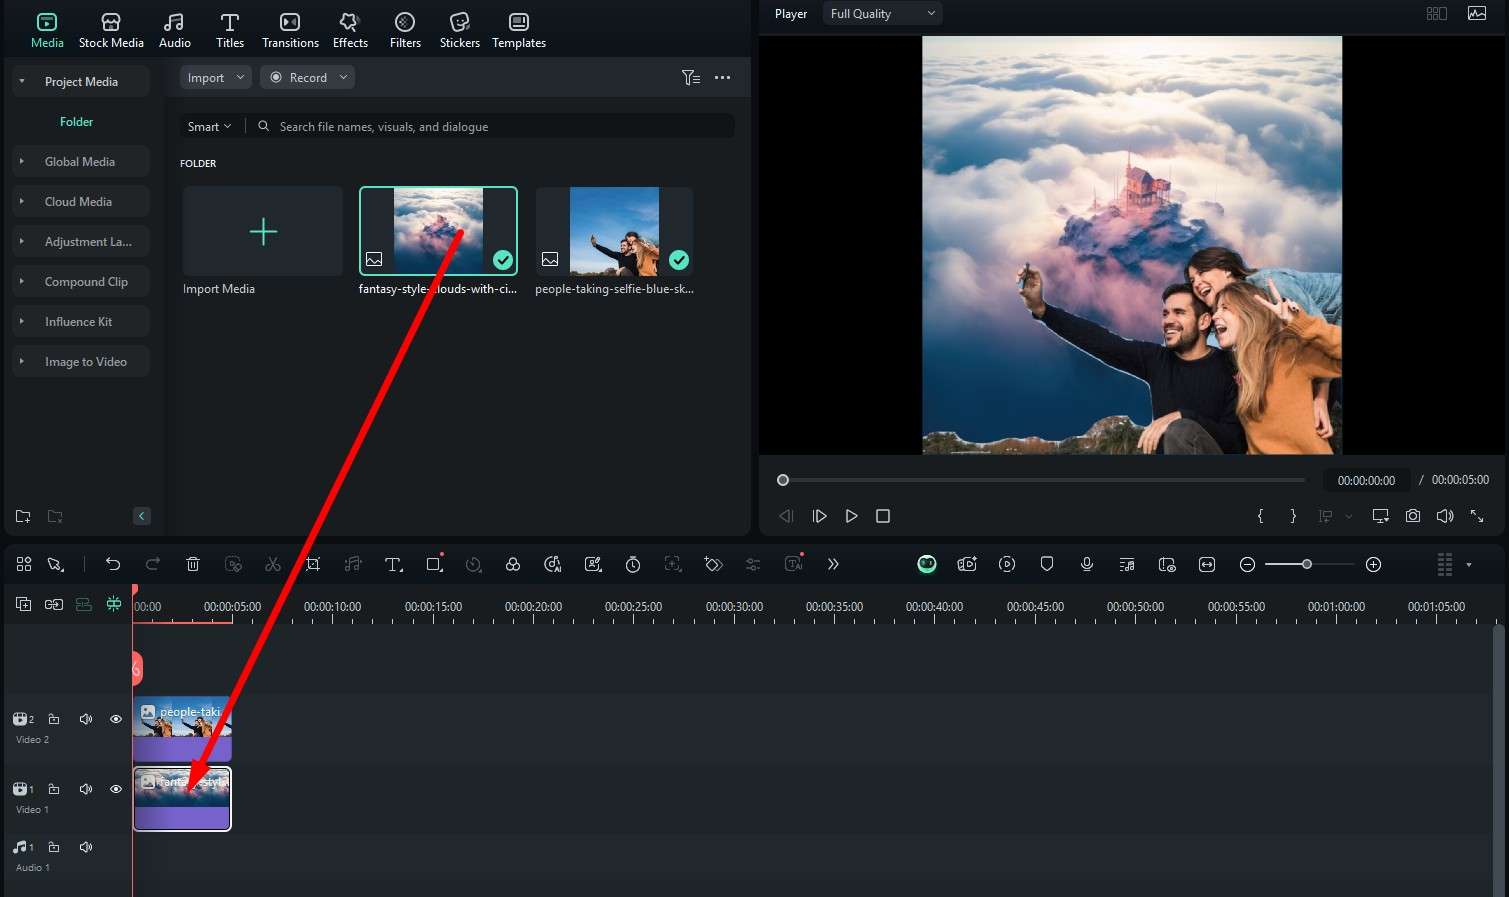
- Drag the new sky image to the timeline, and then make sure that, in the timeline, the new sky image is below the image where you removed the sky.
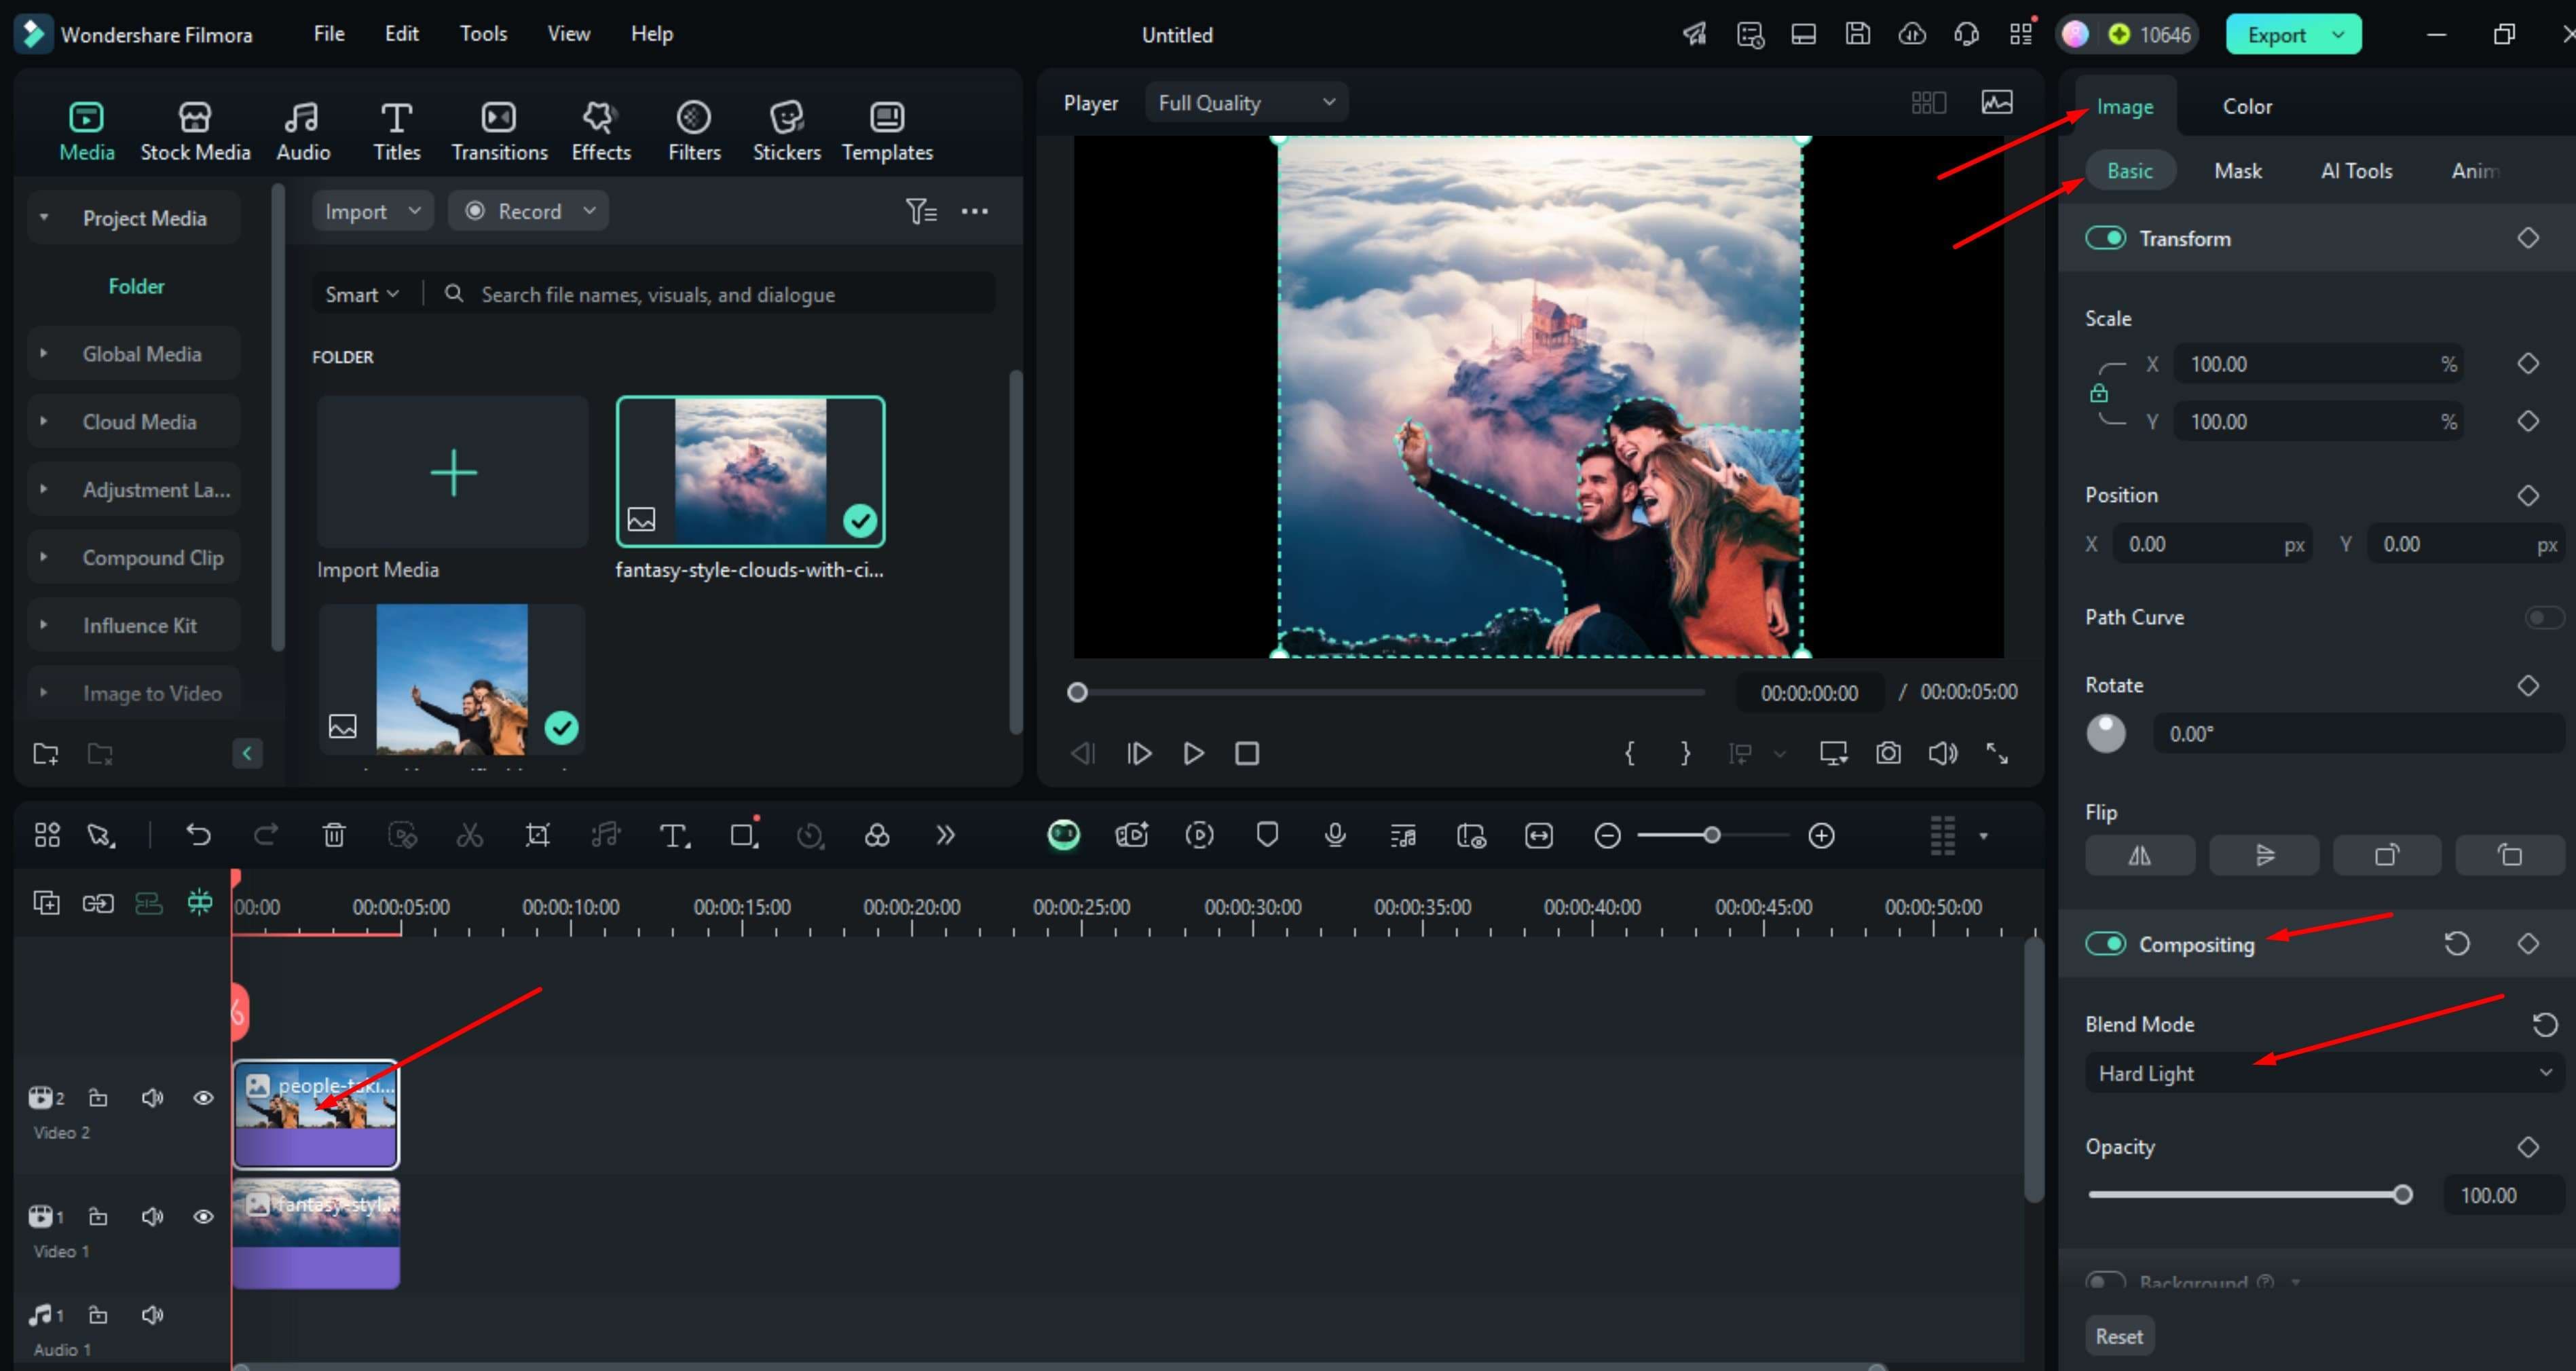
- Finally, to adjust the colors, select the top image in the timeline, and on the right, go to Image > Basic. Then, activate Compositing, and under Blend Mode, select Hard Light.
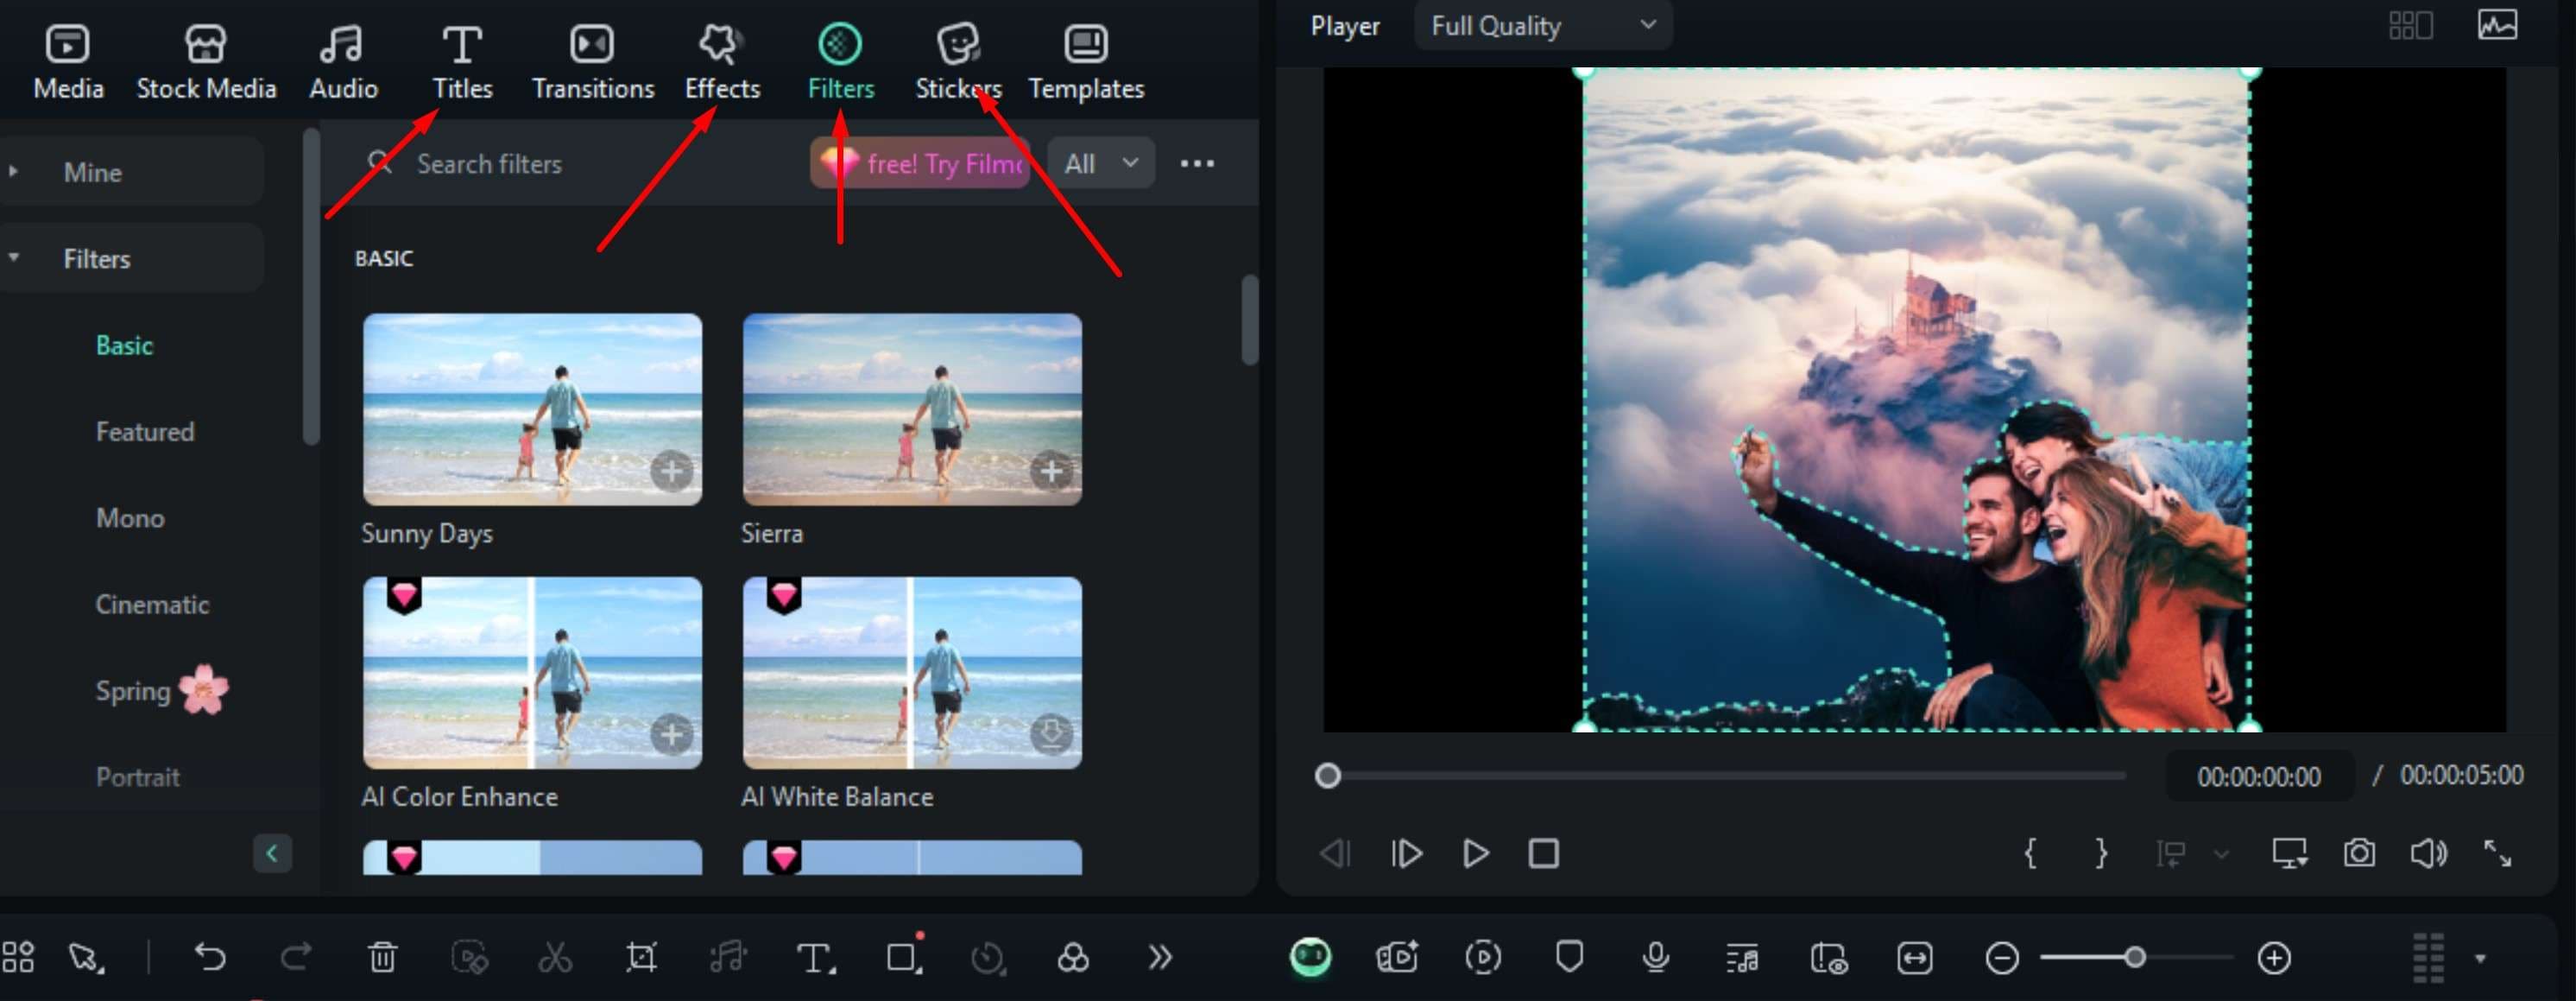
- You can easily customize the image further by adding Titles, Effects, Filters, and Stickers.
- CREATIVE SUGGESTION: A cool editing trick that you can try right away is to go to the Effects panel and search for "Mirror." You will get several results. Drag them over the image of the sky to add the effect. We used the Mirror Flip effect to achieve our desired result.
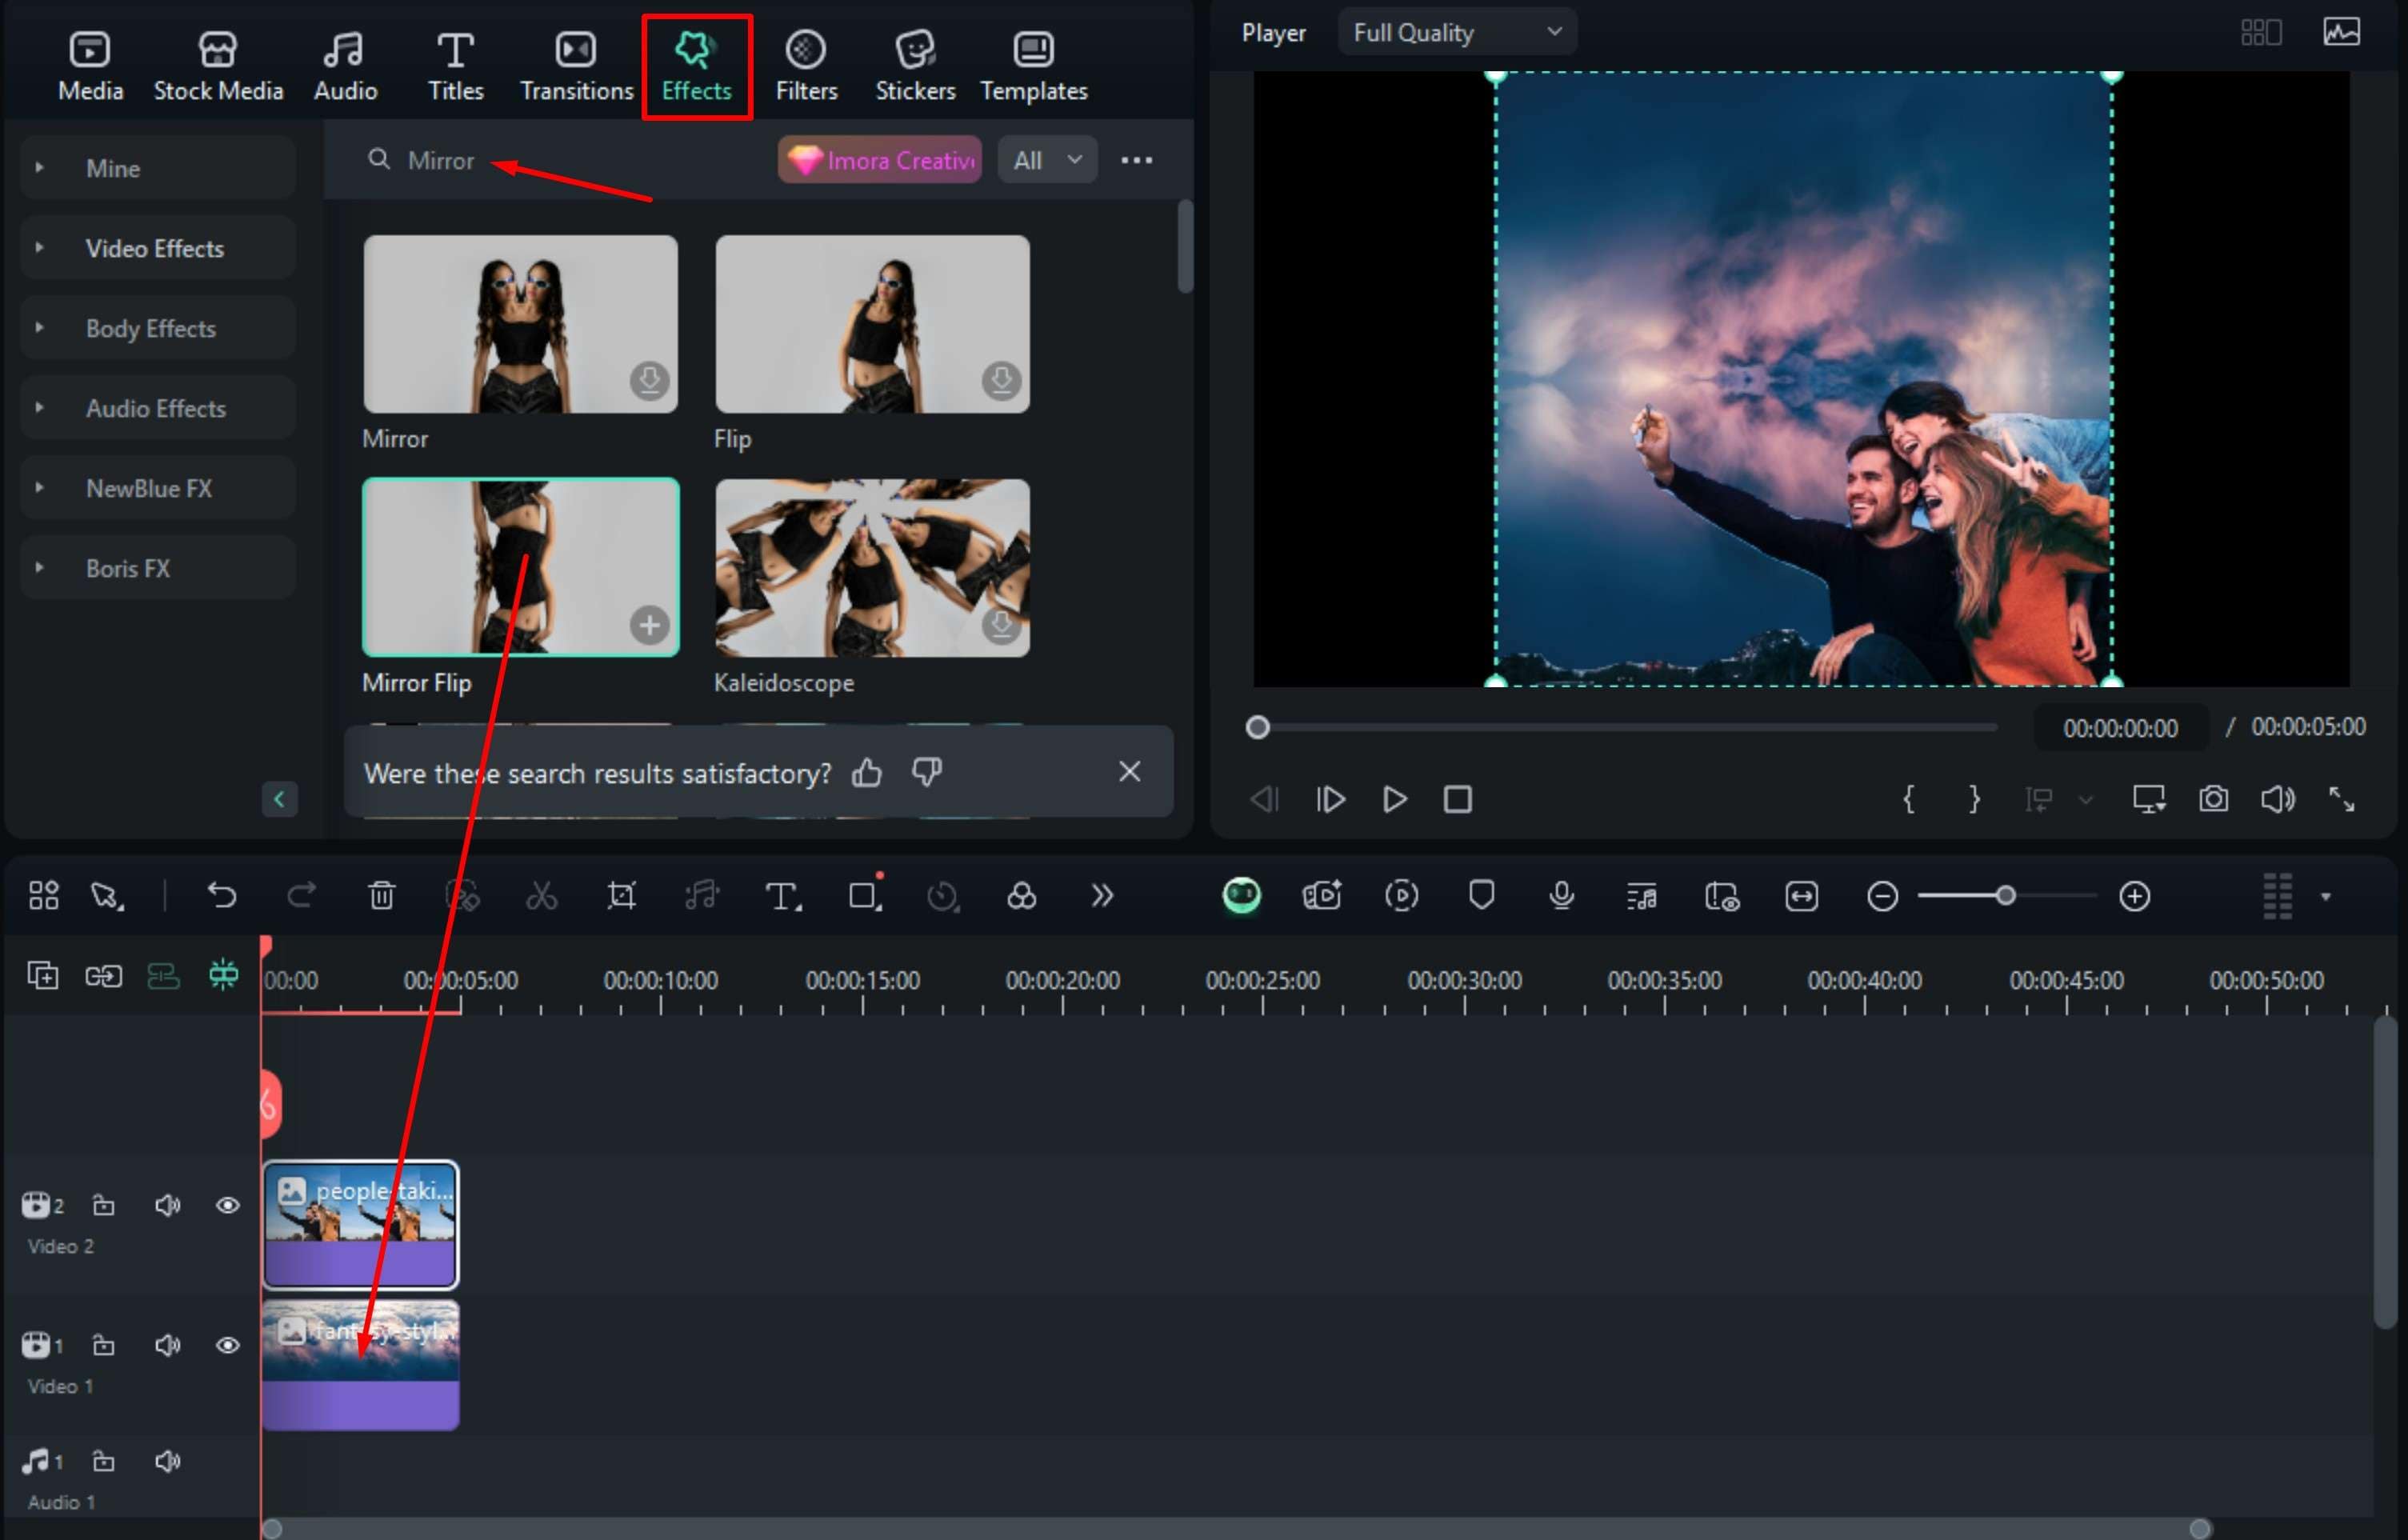
As you can see, changing the sky in Filmora is not that different from changing the sky in Photoshop, although it is clear that further editing tasks will be much more intuitive in Filmora.
All those features that we mentioned, like filters, titles, and stickers, have a search function. If you are looking for a glitch effect, for instance, you can search for it, and Filmora will offer at least a dozen options. If you want a Hot Summer filter, you can bet that you will find several options.
If you are looking for an app to replace the sky in photos, the following section is for you.
Bonus: How to Replace the Sky on Mobile Devices?
Filmora for Mobile Filmora for Mobile Filmora for Mobile Filmora for Mobile Filmora for Mobile
Edit Videos on Your Mobile Phone with 1-Click!
- • Powerful Brand New AI Features.
- • User-friendly video editing for beginners.
- • Full-featured video editing for professionals.
Like its software, the Filmora app also offers various image and video editing features. It supports a direct sky replacement feature under the Smart Cutout function. Here are the steps:
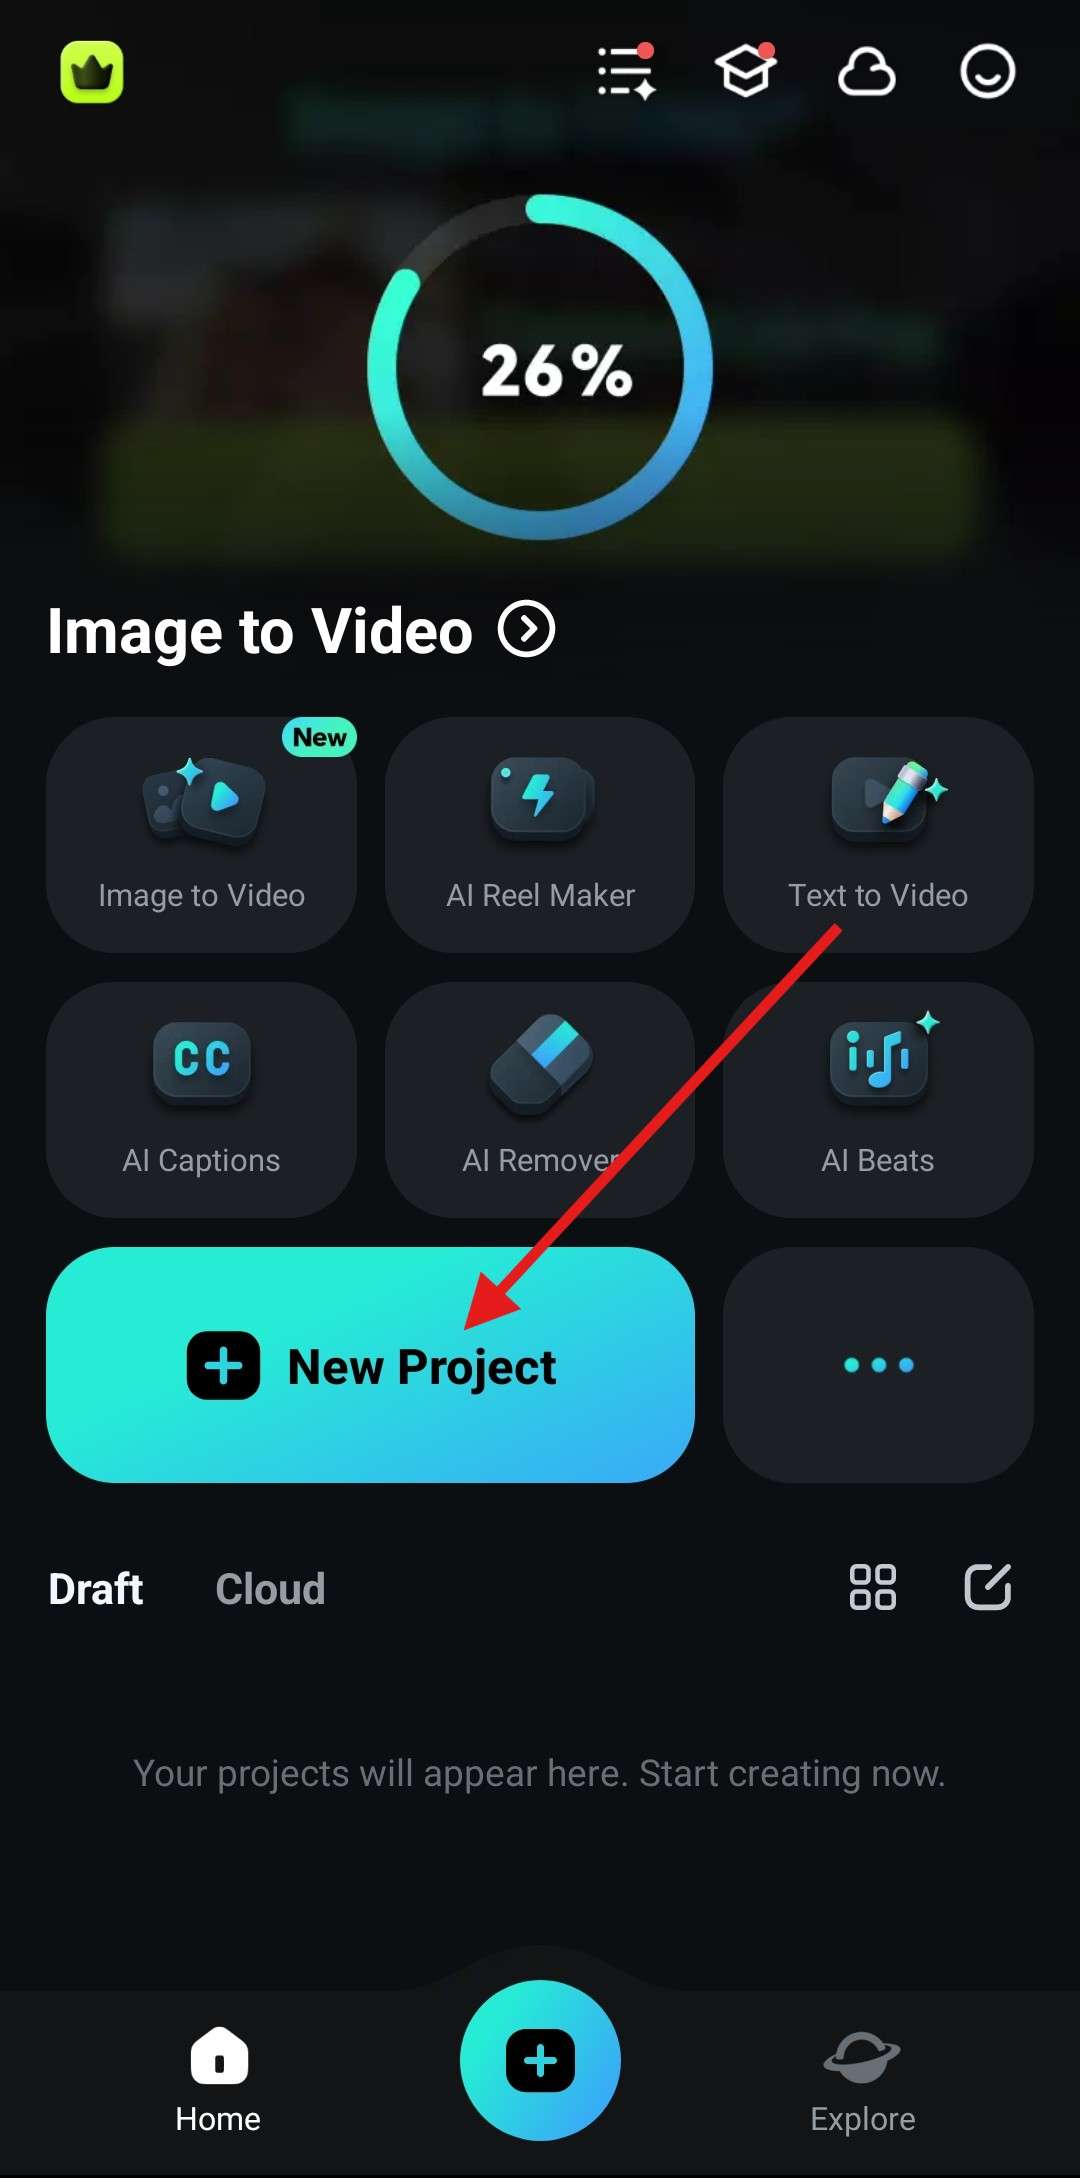
- Open the app and tap on New Project. Then, add an image where you want to utilize the sky replacement feature.
- Tap on the image in the timeline to select it, and find and tap on Smart Cutout in the menu at the bottom of the screen.

- Now, tap on Replace Sky.

The app will need a few moments to process the request. After that, the sky in the photo will be replaced. This is a very neat trick for fast image editing, especially if you need to take care of something quickly while you're commuting.
Conclusion
In this article, we have learned how to change the sky in Photoshop in a few simple steps. After that, we learned how to replace the sky on both the desktop and mobile versions of Filmora, showcasing the app's overall intuitiveness and sheer power. We didn't even mention Filmora's very helpful and fun AI features, but we'll leave that for another time.
FAQs
-
How do you make sky blue in Photoshop?
Activate the Sky Replacement feature and pick one of the images provided that features clear, blue skies. -
How to change the color of the sky in Photoshop?
You can upload a custom image with any sky color and use it in combination with the built-in sky replacement feature. -
Why is Sky Replacement unavailable in Photoshop?
Check to see if the sky replacement feature is activated by going to Edit > Sky Replacement and making sure that the feature is turned on. -
Which version of Photoshop has sky replacement?
Sky replacement was introduced to Photoshop in 2021. All versions released after that year have this feature.


 100% Security Verified | No Subscription Required | No Malware


