Most people use FFmpeg for its quick and efficient ability to handle a wide range of multimedia tasks. One of the video editing tasks you can do with FFmpeg is resizing videos. But unlike traditional video editing software, FFmpeg operates through a command-line interface.
This setup makes FFmpeg super lightweight and flexible, which is perfect if you like having total control over your video files. However, the command-line interface might be confusing for beginners who are not used to it. It’s hard to figure out the right commands for the tasks you want to perform.
No worries, though. It's normal to feel a little lost at first. That's why we're here to guide you on how to resize videos using FFmpeg.

In this article
Part 1. How to Resize Video with FFmpeg
Before you start using FFmpeg to resize videos, you'll need to download and install the software. You can download it from FFmpeg website. Choose the version that's compatible with your operating system, and follow the installation instructions.
After that, you'll be ready to explore the various ways to resize videos using FFmpeg. There are two main methods: scaling down the video with FFmpeg to reduce its dimensions and cropping the video to change its frame size.
1. Scaling down the video
In FFmpeg, you can downscale a video by specifying the exact dimensions you want your video to have. For example, to change a video’s resolution to 320×240 pixels, you can copy this command:
ffmpeg -i input.mp4 -vf scale=320:240 output.mp4
Here’s the breakdown of the command:
- -i input.mp4 indicates the video file you are resizing.
- -vf scale=320:240 tells FFmpeg to apply a scaling filter to change the video’s dimensions to 320 pixels in width and 240 pixels in height.
- output.mp4 designates the Image name for the resized video.

2. Crop a video
Cropping a video is another way to resize in FFmpeg by removing unwanted areas from the frame, thus altering the visual focus and dimensions of the video. Cropping can be particularly useful for removing black bars or focusing more on a subject in the video.
To crop a video in FFmpeg, you specify the crop filter along with the dimensions you want to keep. Here's how you might crop a video to a 1080x720 area starting with 100 pixels from the top and 50 pixels from the left:
ffmpeg -i input.mp4 -vf "crop=1080:720:50:100" output.mp4
Here’s the breakdown of the command:
- -i input.mp4 is the video file you are cropping.
- -vf "crop=1080:720:50:100" tells FFmpeg to apply the crop filter. The format for the crop values is crop=width:height:x_offset:y_offset.
- output.mp4 is the name of the output file that will contain the cropped video.
Resizing video in FFmpeg through cropping requires a specific understanding of the frame's layout. You must know the precise measurements of the areas you want to remove or the new focus area you wish to highlight.
Part 2. How to Maintain Aspect Ratio When Resizing Video in FFmpeg
Does your video look distorted after resizing it with FFmpeg? To avoid unnatural stretching and maintain the proper aspect ratio of your video, you can adjust one dimension and allow FFmpeg to automatically calculate the other. This method ensures that the video maintains its proportional dimensions without distortion.
For example, if you want to resize the width of your video to 1280 pixels and maintain the aspect ratio, you can use the following FFmpeg command:
ffmpeg -i input.mp4 -vf scale=-1:480 output.mp4
Here, setting the height parameter to -1 instructs FFmpeg to automatically calculate the appropriate width based on the new height, preserving the video’s original aspect ratio.

Part 3. Best Video Editing Alternative for Resizing Video Without Command Line
If the command-line approach turns out to be too daunting or time-consuming to resize video in FFmpeg, that’s okay. Not everyone is comfortable using command-line interfaces like FFmpeg. If you're looking for an alternative that doesn't require deep technical knowledge or command-line skills, Wondershare Filmora is your solution.
Filmora is a video editing software that uses a graphical interface, unlike FFmpeg. Despite this difference, Filmora still packs a punch in terms of functionality and performance. This software is designed to cater to users who prefer a visual interface, making the process of resizing and editing videos easier to navigate. Here are some differences between resizing video in FFmpeg and Filmora:
| FFmpeg | Filmora | |
| User Interface | No graphical interface, operated via text commands. | Graphical user interface with visual aids |
| Ease of Use | Requires knowledge of command line syntax and parameters. | Easier for beginners and those not familiar with coding, thanks to clickable menus and settings. |
| Previews | No real-time feedback on changes. | Immediate visual feedback through previews and real-time editing. |
| Error Handling | Errors must be managed through logs or console messages. | Include error dialogs and help resources for troubleshooting. |
Transitioning from a command-line tool like FFmpeg to a GUI-based application like Filmora is highly recommended for those who prefer a more streamlined video editing workflow. With Filmora, resizing a video is as simple as dragging a slider or selecting from preset output sizes.
There are a few methods you can use to resize video in Filmora:
- Using Auto Reframe
Filmora’s Auto Reframe feature automatically adjusts the aspect ratio of your video to fit different social media platforms or display formats. This tool analyzes the content and ensures that key subjects remain centered and visible as the frame size changes without manual adjustments.
- Using Crop Tool
Filmora’s Crop Tool allows for more manual control. You can specify exactly which parts of the video frame you want to keep. This tool is perfect for removing unnecessary borders or focusing on a specific part of the video.
- Changing the Video Aspect Ratio
You can also resize the video in Filmora by changing the aspect ratio. Filmora offers several presets, including 16:9, 1:1, 9:16, and more. However, if you change the video size with this method, you may need to make some adjustments as it can result in black bars appearing around the video. Refer to this guide to learn how to change the video aspect ratio with Filmora.
How to Resize Video Using Auto Rerame in Filmora
Step1Install and Import Your Video
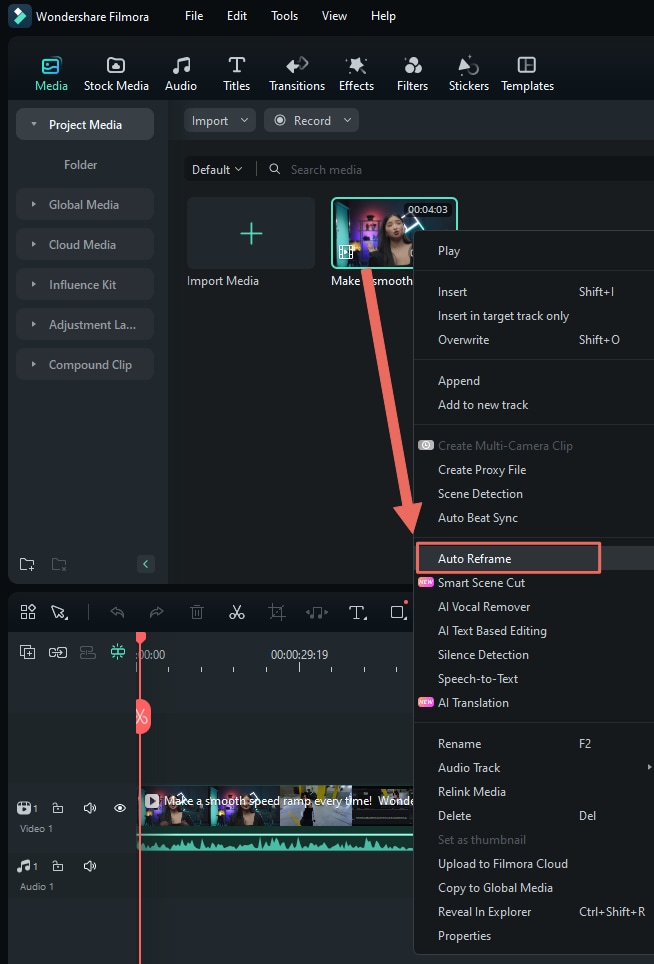
First, ensure you have the latest version of Filmora installed. To start, import your video by clicking import in the Media tab, and then choose the video you want to edit. Once the video is in the timeline, right-click on it and select the Auto Reframe option.
Step2Adjust the Aspect Ratio and Motion Speed
After selecting Auto Reframe, a new dialogue box will appear with different aspect ratio templates. You can choose from formats like square (1:1), vertical (9:16 or 4:5), standard (4:3), widescreen (16:9), or cinema (21:9). Pick the one that suits your needs and the platform where you plan to upload the video.
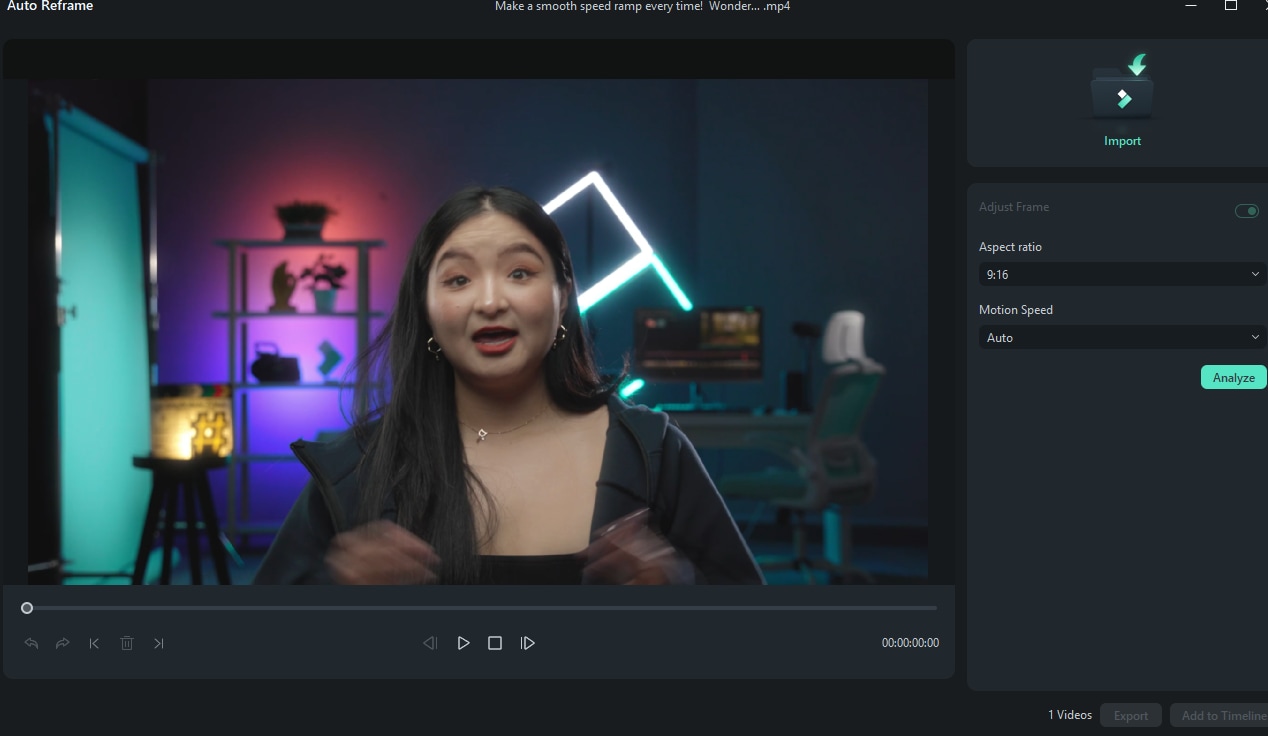
Additionally, you can adjust the motion speed of the video. Options include Auto, Fast, or Slow, depending on the desired pacing for your content.
Step3Analyze and Auto Reframe the Video
Once you've selected your aspect ratio and motion settings, click the Analyze button. Filmora will take a few moments to process and reframe the video according to your chosen aspect ratio.
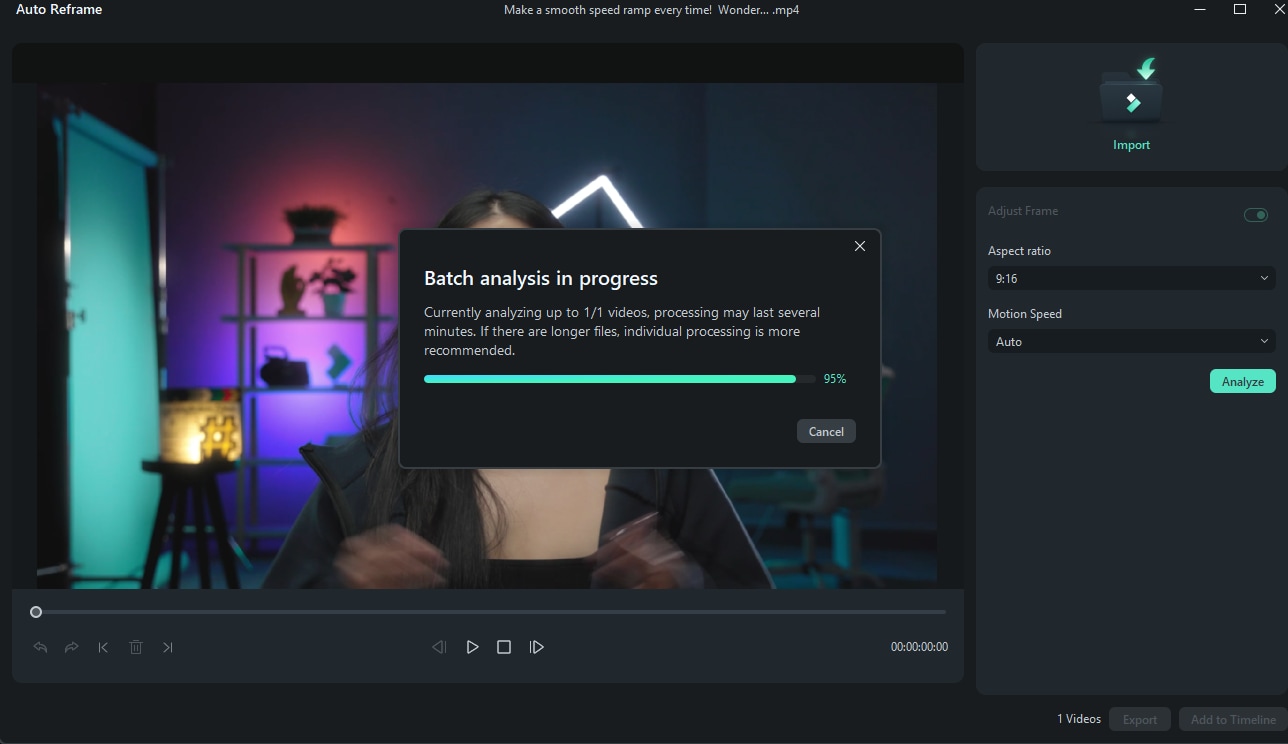
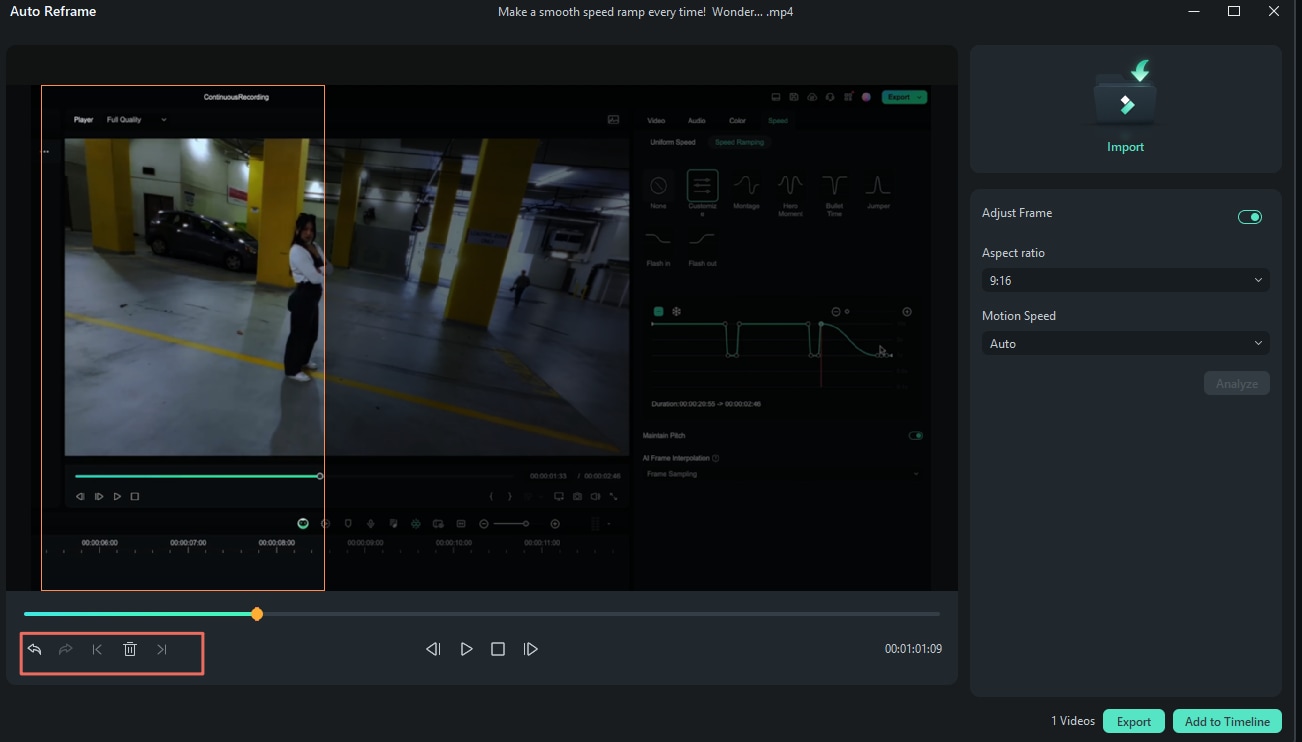
Once the analysis is complete, the video will automatically adjust to fit the aspect ratio and speed settings. Preview the reframed video. If you want to make additional adjustments, you can pause the video, manually move the framing box, and fine-tune the placement for any part of the clip that needs further alignment.
How to Resize Video by Cropping in Filmora
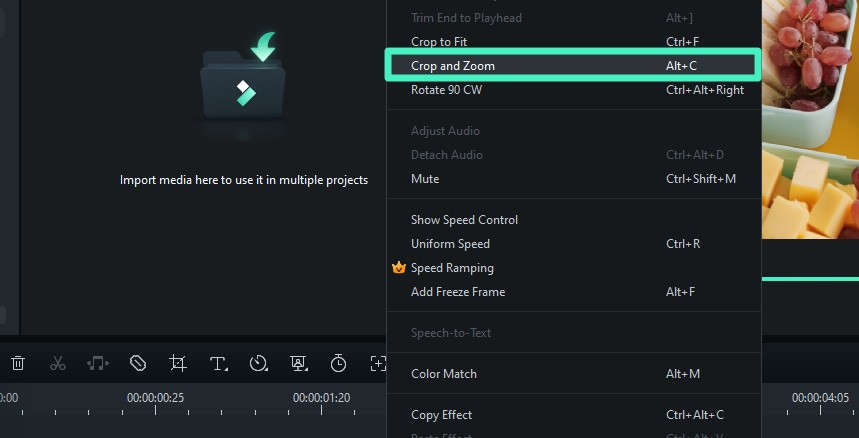
Step1Open the Crop and Zoom Panel
First, right-click on the clip in the timeline and select the Crop and Zoom option to access the panel.
Step2Choose Your Aspect Ratio
In the Crop and Zoom panel, you can select a preset aspect ratio for the crop area. The available options include 16:9, 4:3, 9:16, and more. If you prefer, you can also choose a custom aspect ratio to manually adjust your desired dimensions.

Step3Adjust the Crop Area
To customize the crop area, drag the corner handles of the rectangle to resize and reposition it as needed.
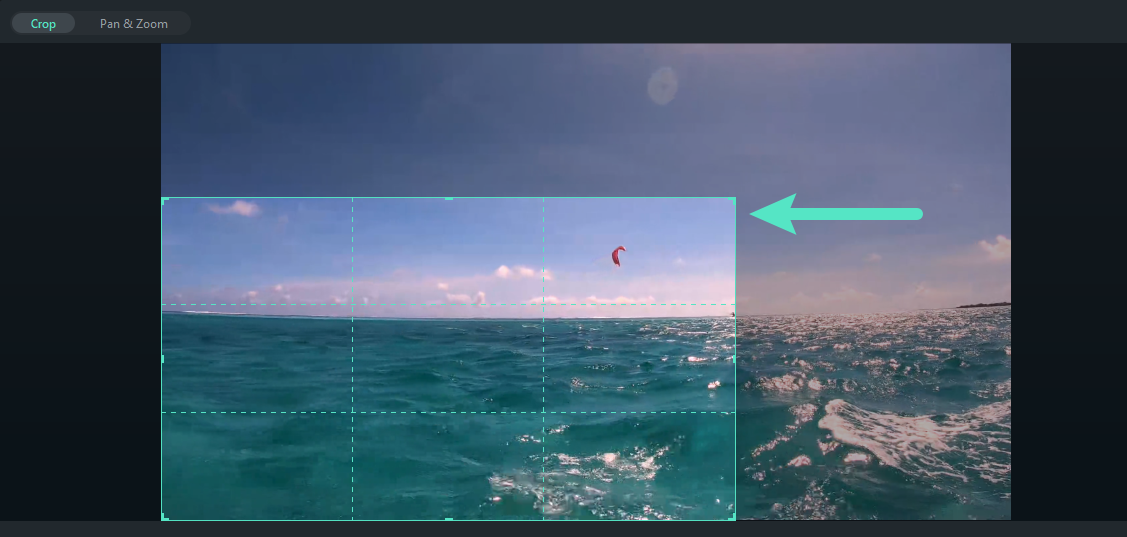
Once you're satisfied with the crop, click Apply to save the changes and finalize the crop on your video.
How to Resize the Video File
Once you've resized the video and made the necessary adjustments, you can further optimize its file size using Filmora’s Video Compressor feature. This allows you to reduce the file size without compromising on quality, making your videos easier to store, share, and upload online.
To do it, click the "Export" button at the top right corner. You will then have the option to choose how you want to compress your video: By Quality or YouTube Upload.
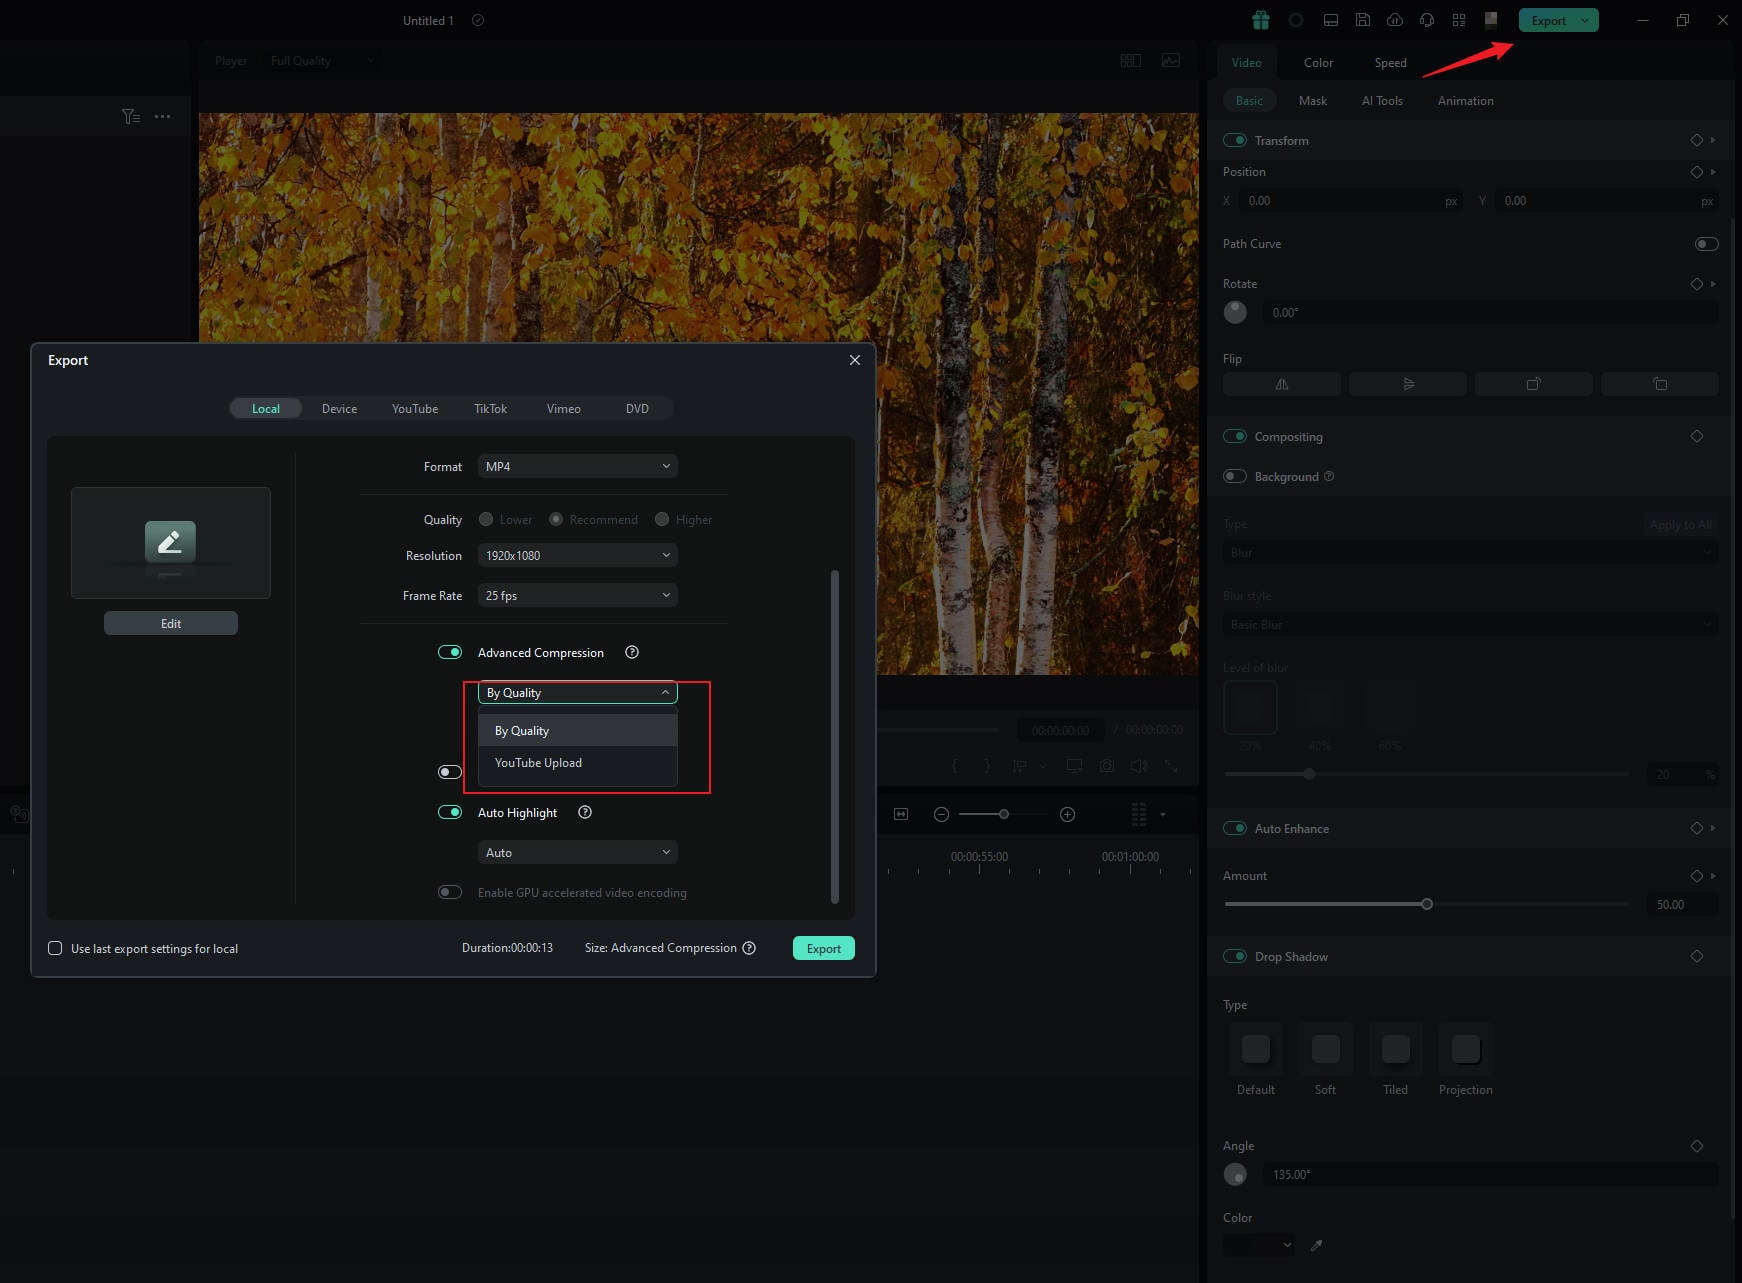
- By Quality: You can adjust the quality level of the compressed video from 10% to 90%. It gives you control over the balance between file size and video quality.
- YouTube Upload: If you're preparing the video for YouTube, this option will automatically compress the video to the platform’s recommended bitrate. You can maintain your video quality without suffering from additional blurriness due to YouTube's secondary compression.
Finally, click Export to save or share the compressed video to your device.
Conclusion
Resizing and scaling videos with FFmpeg may seem confusing at first since you need to use command-line inputs and understand the syntax for different tasks. But once you get the hang of it, you can scale, crop, and maintain the aspect ratio with precision.
However, if the command line isn't your thing, Filmora might be a better fit for you. With helpful features like Auto Reframe and crop tools, you can resize videos without needing to remember any commands. On top of that, Filmora’s Video Compressor feature allows you to further optimize your video, reducing the file size without compromising on quality.


 100% Security Verified | No Subscription Required | No Malware

